PC Powers On but No Display? What to Check
When a PC powers on but shows no display, the system is receiving power but failing POST or failing to send a video signal to the monitor.
Last updated: October 2026
Table of Contents
- Quick Answer: Why Is My PC’s Power Light On But Nothing Shows on Screen?
- What “Power Light On, No Display” Actually Means
- Step 1: Diagnose the Power Light and Motherboard LEDs
- What the Power Button Light Tells You
- What Motherboard Debug LEDs Mean (ASUS, MSI, Gigabyte, ASRock)
- POST Beep Codes as a Diagnostic Tool
- Step 2: Eliminate the Display and Cable as the Source
- Test the Monitor First (Before Touching the PC)
- Check Every Cable and Port
- Step 3: Reseat and Test RAM
- Step 4: Check the GPU
- Reseat the Graphics Card
- Test With Integrated Graphics (If Available)
- Step 5: Check Power Supply Output
- Step 6: Advanced Checks (If the Above Steps Failed)
- Clear the CMOS
- Check for Short Circuits
- CPU Seating and Cooler Pressure
- Quick-Reference Diagnostic Flowchart
- Symptoms Cheat Sheet: What Your PC Is Telling You
- FAQ
- How do I fix a computer that won’t turn on but has power?
- Why does my PC have power but won’t turn on or show anything on screen?
- What does it mean when the motherboard light is on but the PC won’t boot?
- How do I force restart a PC that won’t display anything?
- Can a bad PSU cause a PC to power on but show no display?
- When to Suspect Hardware Failure
- Final Thoughts
Quick Answer: Why Is My PC’s Power Light On But Nothing Shows on Screen?
Your PC’s power light being on only confirms the motherboard has switched on. It tells you nothing about whether the GPU, RAM, or CPU have initialized. In most cases, the culprit is improperly seated RAM, a monitor cable plugged into the wrong port (motherboard instead of GPU), or a missing 8-pin CPU power connector. Work through the steps below in order and you’ll isolate the fault without swapping parts at random.
What “Power Light On, No Display” Actually Means
There are three distinct failure states that all look the same from the outside:
- PC won’t boot: fans spin, LEDs glow, but the screen stays black. POST is failing.
- Monitor won’t turn on but PC is on: the system may have booted fine, but no video signal is reaching the display. A cable, port, or GPU output issue.
- PC turns on for 1 to 3 seconds then shuts off: a different problem entirely, often CPU power or thermal protection. See the step-by-step PC won’t turn on fix checklist for that scenario.
POST stands for Power-On Self-Test. Every time your PC starts, the BIOS runs a hardware check before handing off to the operating system. If POST fails at any stage, the graphics card never receives the instruction to output an image. Black screen. No signal. The power light sits there mocking you.
Knowing which failure state you’re in determines where to start. If you hear the system running but see nothing, work through this guide from Step 1. If the screen says “No Signal” in orange text, jump directly to Step 2.
- 🟢 Power LED on, fans spinning, monitor shows “No Signal” in text: video cable or wrong output port
- 🟡 Power LED on, fans spinning, monitor completely off/amber: no video signal reaching display
- 🟡 Motherboard DRAM LED lit: RAM not seating or incompatible
- 🟡 Motherboard VGA LED lit: GPU not seated or PCIe power missing
- 🔴 Fans spin 2 to 3 seconds then stop: 8-pin CPU power not connected, or CPU fault
- 🔴 Only power LED, no fan movement at all: PSU partial failure
Step 1: Diagnose the Power Light and Motherboard LEDs
What the Power Button Light Tells You
The case power LED plugs into the motherboard’s front-panel header, and the board decides when it’s lit. Gigabyte’s B650M AORUS ELITE AX manual, for example, spells it out: the LED is on when the system is operating (S0) and off in S3/S4 sleep or when it’s powered off (S5). So when your PC won’t turn on properly but the power light is on, all that confirms is the board has switched on. It doesn’t tell you the CPU initialized, the RAM passed its checks, or the GPU got a picture out. On its own, a glowing power LED tells you very little.
Don’t let it fool you into thinking the build is healthy.
What Motherboard Debug LEDs Mean (ASUS, MSI, Gigabyte, ASRock)
This is where diagnosis gets fast. Most modern motherboards include POST debug LEDs that light up sequentially during boot and stop at whatever component failed. When your PC won’t turn on but the motherboard light is on, write down which LED is lit before touching anything. That single LED narrows your diagnosis to one component.
| Motherboard Brand | LED Label | What It Indicates When Lit |
|---|---|---|
| ASUS (Q-LED) | CPU / DRAM / VGA / BOOT | Component failing POST at that stage |
| MSI (EZ Debug LED) | CPU / DRAM / VGA / BOOT | Last lit LED = problem component |
| Gigabyte | CPU / DRAM / VGA / BOOT | Sequential, stops at fault point |
| ASRock | Dr. Debug (numeric display) | Two-digit POST code, refer to your board’s manual |
For a full breakdown of what each LED combination means on MSI boards specifically, the EZ Debug LED guide covers every code and what to do next.
POST Beep Codes as a Diagnostic Tool
If your board has a speaker header and you’ve connected a PC speaker (or a dedicated buzzer), you get audio diagnostics on top of the LEDs. Most builders skip this. Worth doing.
- AMI BIOS, 1 long + 2 short beeps: GPU failure or no display adapter detected
- AMI BIOS, 3 short beeps: RAM error (base 64K memory failure)
- Award BIOS, continuous long beeping: RAM not detected or not seated
- Award BIOS, 1 long + 2 short: GPU issue
- Phoenix BIOS, 3-3-4 pattern: Video card or video memory failure
No beeps at all with a speaker installed often means a dead PSU or a CPU that isn’t initializing. Beep codes vary by BIOS revision, so cross-reference with your motherboard manual’s specific table.
Step 2: Eliminate the Display and Cable as the Source
Test the Monitor First (Before Touching the PC)
This one gets skipped constantly. Before you pull a single component, spend 90 seconds on the monitor itself. Connect it to a different device, a laptop, a phone via HDMI adapter, a game console. If the monitor works with another source, the monitor is fine and the problem is upstream.
While you’re there, check these:
- Input source selection: most monitors have an OSD button to cycle inputs. If it’s set to DisplayPort and you’re plugged into HDMI, you’ll see nothing. Extremely common after a cable swap.
- Power cycle properly: unplug the monitor’s power cable from the wall, not just standby. Wait 10 seconds. Some panels get stuck in low-power states that standby doesn’t clear.
- LED color: white or blue LED = powered and receiving signal; amber or orange = powered but no signal; no LED = monitor has no power at all
Check Every Cable and Port
Reseat both ends of your video cable. HDMI connectors in particular can seat 90% of the way and feel solid while making intermittent contact. Pull it out completely and push it back in firmly.
The single most common mistake in new builds: the video cable is plugged into the motherboard’s I/O panel instead of the GPU. If you have a dedicated graphics card installed, the motherboard’s HDMI and DisplayPort outputs are almost always disabled. Nothing comes out of them. Plug into the GPU. Always. If you’re unsure which ports belong to the GPU versus the motherboard, the GPU ports are located on the card itself, usually in the lower portion of the rear I/O area, while the motherboard video outputs sit in the main I/O cluster near USB and audio jacks. There’s a dedicated guide on motherboard HDMI not working that explains exactly why this happens and how BIOS iGPU settings play into it.
Also try switching from HDMI to DisplayPort on the GPU if you have both available. Cable failures are more common than you’d think, and swapping the cable itself takes 10 seconds.

Step 3: Reseat and Test RAM
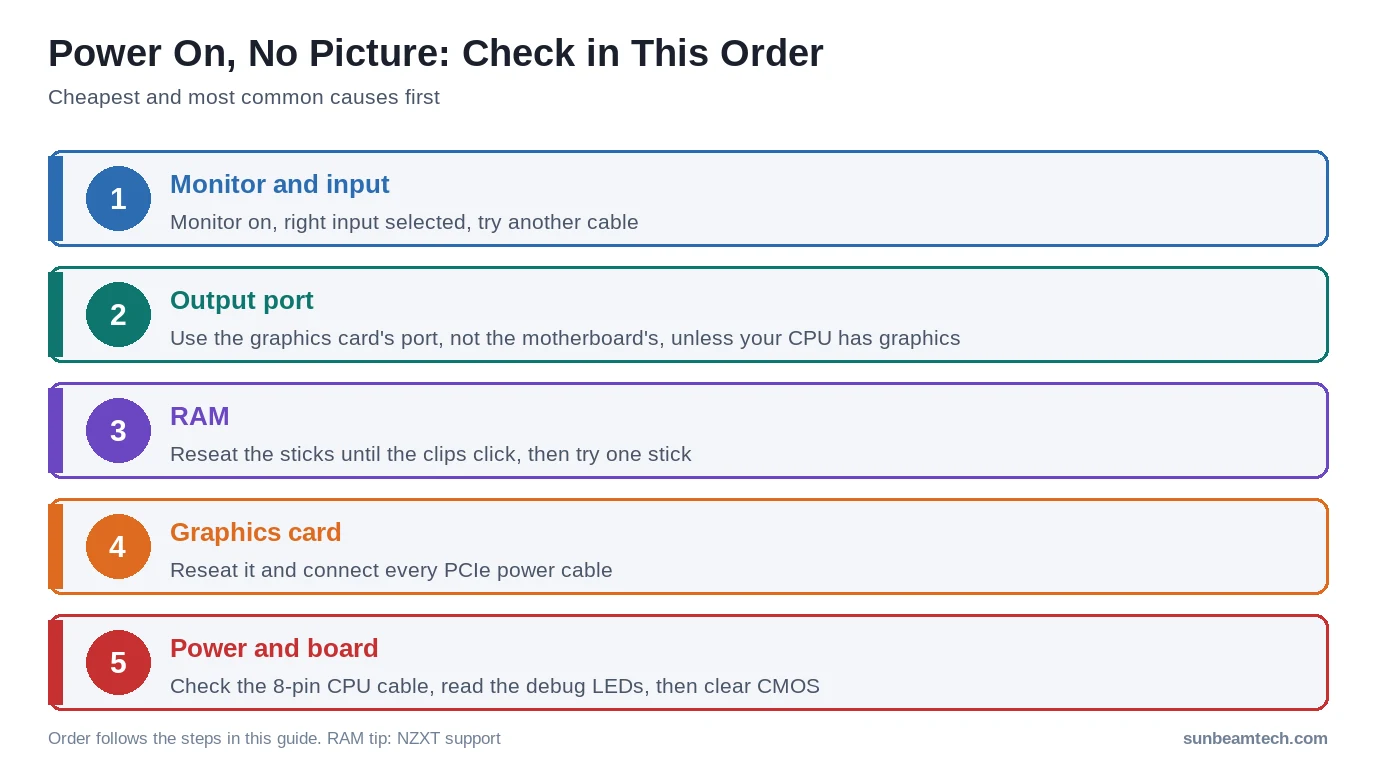
Start with RAM when the power light is on and nothing POSTs. Not the GPU. Not the PSU. RAM. NZXT’s own troubleshooting guide calls it “the single most common cause of a system that will not complete POST,” and a stick can work loose just from the case being moved.
Seating a stick takes more force than you’d expect. People are often afraid of breaking the stick and under-seat it. Press firmly until the clips click closed on both ends. If they haven’t closed, it’s not fully in.
How to reseat properly:
- Step 1: release both retention clips fully before insertion
- Step 2: align the notch in the stick with the key in the slot
- Step 3: press down firmly and evenly on both ends simultaneously until both clips snap shut
- Step 4: visually confirm the gold contacts are not visible above the slot
| Sticks Installed | Recommended Slots (Most Boards) | Notes |
|---|---|---|
| 1 stick | Slot 2 (A2) | Check manual, varies by board |
| 2 sticks | Slots 2 and 4 (A2/B2) | Enables dual-channel, most performance |
| 4 sticks | All slots | Fill from CPU-farthest first on most boards |
If reseating doesn’t help, boot with a single stick in slot A2. Try each stick individually. One bad stick in a 2-kit configuration will prevent the entire system from posting.
No POST speaker installed? Remove all RAM entirely and power on. A board that’s working except for missing RAM should trigger the DRAM debug LED or an error beep. If nothing changes when you yank all the RAM, the fault is elsewhere. For a detailed look at what the DRAM LED specifically indicates across different scenarios, the DRAM light on motherboard guide is worth reading.
Step 4: Check the GPU
Reseat the Graphics Card
Even if the GPU looks seated, it may not be. The PCIe x16 slot requires meaningful downward force and the retention clip at the end of the slot must audibly click into place. If you’re not sure what proper seating looks like, our GPU installation guide walks through it. Before reseating, remove the card entirely and blow out the PCIe slot with compressed air. Dust and debris in the contacts cause intermittent connection failures.
Power connectors are critical. Check every one:
- 6-pin connector: older budget cards (a GTX 1650 SUPER, for example)
- 8-pin connector: RTX 30 series, RX 6000/7000 series mid-range and up
- Dual 8-pin connectors: RTX 3080/3090, RX 6800 XT and above
- 16-pin (600W) connector: RTX 4080, 4090, RTX 5080, RTX 5090. Partial seating on this connector is a documented cause of no-POST on high-end Ada and Blackwell cards.
A GPU that’s 95% seated will still power the fans and LEDs. It won’t POST. Not great.
Test With Integrated Graphics (If Available)
Remove the GPU entirely and plug the monitor directly into the motherboard’s video output. This works only if your CPU has integrated graphics. Not all of them do.
| CPU Type | Has iGPU? | Examples |
|---|---|---|
| Intel Core (no suffix or K) | Yes | Core i5-13600K, Core Ultra 5 245K, Core Ultra 9 285K |
| Intel Core “F” suffix | No | i5-13600KF, i7-14700KF, Core Ultra 5 245KF |
| AMD Ryzen 7000/9000 (AM5, no “G” or “F”) | Yes, basic (2-core Radeon Graphics) | Ryzen 5 7600, Ryzen 7 9700X, Ryzen 9 9950X3D |
| AMD Ryzen “F” suffix (AM5) | No | Ryzen 5 7500F |
| AMD Ryzen 5000 (AM4, no “G”) | No | Ryzen 7 5800X3D, Ryzen 9 5950X |
| AMD Ryzen “G” series | Yes | Ryzen 5 8600G, Ryzen 7 8700G |
If you’re running an AM4 Ryzen without a G (a Ryzen 7 5800X3D, say), a Ryzen F model, or an Intel F chip without a graphics card, nothing will output. Ever. You need a dedicated card or a CPU with graphics. A Ryzen 5 7600 is a different story: AMD lists “AMD Radeon Graphics” with 2 graphics cores on its spec page, so it can drive the motherboard’s video outputs for this test, as long as your board has them.
Step 5: Check Power Supply Output
A PSU can deliver enough current to illuminate LEDs, spin fans, and light up the motherboard while completely failing to deliver stable voltage on the 12V rail the GPU and CPU actually need. This is called a partial voltage rail failure, and it’s why “lights are on” doesn’t always mean the PSU is fine.
Check these two connectors before anything else (see our PSU cables guide for full pinouts):
- 24-pin ATX connector: this is the main board power. All 24 pins must be fully seated. A half-inserted 24-pin is a common assembly mistake and will prevent POST completely.
- 8-pin CPU EPS connector: this sits near the top-left corner of the motherboard. Missing or unseated CPU power means the CPU gets no power from the 12V rail. Some boards will attempt to POST and fail silently. Others won’t even try.
Minimum PSU wattage by GPU tier (for a complete gaming build, not the GPU alone):
| GPU | Minimum PSU (Full Build) | Recommended PSU |
|---|---|---|
| GTX 1660 Super / RX 6600 | 450W | 550W |
| RTX 3070 / RX 6800 | 650W | 750W |
| RTX 4080 / RX 7900 XTX | 750W | 850W |
| RTX 5080 / RX 9070 XT | 850W | 1000W |
| RTX 5090 | 1000W | 1200W |
The paperclip test: disconnect the PSU from everything, short pin 16 (green wire) to any black wire on the 24-pin connector using a bent paperclip, then switch it on. If the PSU fan spins, the primary rail is functional. This test doesn’t confirm 12V rail stability under load but rules out a completely dead unit. Use caution and keep hands clear of moving parts.

Step 6: Advanced Checks (If the Above Steps Failed)
Clear the CMOS
A corrupted BIOS configuration, a failed overclock, or a post-hardware-upgrade configuration mismatch can all prevent POST. Clearing the CMOS resets every BIOS setting to factory defaults.
Two methods:
- Battery removal: locate the CR2032 coin cell on the motherboard, remove it, wait 30 seconds, replace it. About $3 at any hardware store.
- CLRTC / CLR_CMOS jumper: most boards have a dedicated jumper or button labeled CLRTC, CLR_CMOS, or similar. Short the pins for 5 to 10 seconds with the PSU unplugged, then remove the jumper and boot normally.
This is worth doing if you recently changed RAM, installed a new CPU, or updated the BIOS. ASUS’s official documentation on CMOS clearing procedures for Z790 and X870 boards is available directly at asus.com/support.
Check for Short Circuits
A standoff screw in the wrong position, touching motherboard traces that it shouldn’t, causes a short that prevents POST and can look identical to a component failure. Breadboarding, mounting the motherboard on a non-conductive surface like cardboard, outside the case, isolates this variable completely.
- Breadboard test: remove the motherboard from the case, place it on a cardboard box, connect only PSU, CPU, one RAM stick, and GPU, then try to boot
- Strip down: remove all non-essential components including extra drives, PCIe cards, and front panel USB headers
- Check standoffs: every standoff location under the board should match a mounting hole in the motherboard. No extras.
CPU Seating and Cooler Pressure
Bent pins on AMD AM4 and AM5 sockets (pins are on the motherboard, not the CPU) or a misaligned CPU in an Intel LGA socket will cause a no-POST situation. Inspect the socket with a flashlight before assuming something else is wrong. Our CPU installation guide covers correct socket alignment in detail.
One thing that doesn’t cause this: insufficient thermal paste. Running without thermal paste on first boot won’t prevent POST, though the CPU will throttle and overheat within seconds. Sort your thermal paste application after you confirm the system posts.
Quick-Reference Diagnostic Flowchart
Power light on? Yes
↓
Test monitor with another device
↓ Monitor works on other device
Check video cable + correct port (GPU, not motherboard)
↓ Still no display
Reseat RAM, try one stick in A2 slot
↓ Still no display
Check motherboard debug LEDs, write down which is lit
↓ DRAM LED? Check RAM. VGA LED? Check GPU.
Reseat GPU, confirm all PCIe power connectors clicked
↓ Still no display
Verify 24-pin ATX + 8-pin CPU EPS connectors are fully seated
↓ Still no display
Clear CMOS (battery removal or jumper)
↓ Still no display
Breadboard test, remove from case, strip to minimum components
↓ Still no display
Component failure suspected, test/replace RAM, then PSU, then GPU
Symptoms Cheat Sheet: What Your PC Is Telling You
| Symptom | Most Likely Cause |
|---|---|
| Power light on, fans spin, no display | RAM not seated, GPU output issue, or display cable |
| Power light blinks repeatedly | PSU issue or failed POST loop |
| Motherboard DRAM LED lit | RAM not seated or incompatible with board |
| Motherboard VGA LED lit | GPU not seated or PCIe power connectors missing |
| Fans spin 2 to 3 seconds then stop | 8-pin CPU power not connected, or CPU fault |
| No fan movement, only power LED | PSU partial failure |
| Monitor amber/yellow light | No signal from PC, start at Step 2 |
| Monitor “No Signal” text on screen | Wrong input port selected or cable failure |
FAQ
How do I fix a computer that won’t turn on but has power?
Start by reseating your RAM in slots A2 and B2 (the recommended dual-channel slots on most boards). Then confirm your monitor cable is plugged into the GPU’s output ports, not the motherboard’s I/O panel. After that, verify both the 24-pin ATX and 8-pin CPU EPS connectors are fully seated. Those three checks resolve the majority of cases.
Why does my PC have power but won’t turn on or show anything on screen?
Your system is switching on but failing POST, or it posts and the video signal never reaches the monitor. The power LED only shows that the board is switched on, not that POST passed, which is why lights can glow while the system does nothing useful. The most common failure points are improperly seated RAM, a disconnected 8-pin CPU power connector, or a monitor plugged into the motherboard’s video output when a dedicated GPU is installed.
What does it mean when the motherboard light is on but the PC won’t boot?
A lit motherboard LED that stays on without progressing to POST indicates a component failed initialization. Identify which debug LED is lit: DRAM LED points to RAM issues, VGA LED points to GPU issues, CPU LED points to processor or power issues, and BOOT LED indicates the system can’t find or initialize the storage drive. MSI’s EZ Debug LED documentation is available at msi.com/support, and Gigabyte’s equivalent guide is at gigabyte.com/support. Write down which LED is lit before touching anything, that single piece of information tells you exactly where to focus.
How do I force restart a PC that won’t display anything?
Hold the power button for 5 to 10 seconds until the system shuts down completely. Unplug the power cable from the PSU or the wall, then wait 30 seconds. This drains residual charge from the capacitors and clears any stuck power state. Reconnect the cable and press the power button normally. Some boards also have a dedicated reset button on the rear I/O panel on high-end models.
Can a bad PSU cause a PC to power on but show no display?
Yes. A PSU can supply enough current to illuminate LEDs and spin fans while delivering unstable or insufficient voltage on the 12V rail that the GPU and CPU depend on for full operation. Voltage rail failure under load is common in aging or low-quality units. If you’ve completed all the steps above without a resolution, borrowing a known-good PSU of sufficient wattage and swapping it in is the fastest way to rule the PSU out. It’s a free test if a friend has a spare.
When to Suspect Hardware Failure
If you’ve reseated RAM in every slot combination, tested with integrated graphics, cleared CMOS, breadboarded the system, and confirmed every power connector is seated, you’re past configuration errors. Something failed. The priority order for replacement testing makes financial sense: RAM is $30 to $80 and easy to borrow or buy. A replacement PSU runs $50 to $100. A GPU can often be borrowed from a friend for a 15-minute test. Motherboard replacement is last because it’s the most expensive and least commonly the culprit when everything else checks out. Document every step you’ve taken before contacting manufacturer support or filing a warranty claim. They will ask.
Final Thoughts
Start with the three usual suspects: RAM not properly seated, the video cable plugged into the wrong port, or a missing CPU power connector. Run through the steps in order and watch your motherboard’s debug LEDs. If you’re still stuck after completing every step here, drop your specific LED pattern or symptom in the comments below, the more detail you give, the faster this gets solved.

Alex has been building and tweaking custom PCs for over 12 years. From budget builds to full custom water loops, he’s assembled more than 50 systems and helped hundreds of builders troubleshoot their rigs. When he’s not benchmarking the latest hardware, you’ll find him optimizing airflow setups or stress-testing overclocks.