PC Won’t Turn On? Step-by-Step Fix Checklist
A PC that won’t turn on is typically caused by a failed or disconnected power supply, a loose internal cable, a faulty power button header, or a hardware component preventing POST (Power-On Self-Test) from completing. In most cases, the issue can be diagnosed and resolved at home using a systematic checklist.
Last updated: June 2026
Table of Contents
- Quick Answer: Why Won’t My PC Turn On?
- Before You Begin: What You’ll Need (and What to Check First)
- Tools That Will Make This Easier
- Safety First: Ground Yourself Before You Touch Anything
- Diagnose Your Symptoms First: Which Scenario Matches You?
- Step 1: Check Your External Power Source
- The Power Strip Problem (More Common Than You Think)
- Inspect the Power Cable
- Check the PSU’s Rear Power Switch
- Step 2: Drain Residual Power (The Flea Power Fix)
- Step 3: Check Internal Power Cables and Connections
- The 24-Pin ATX Motherboard Connector
- The CPU Power Connector: The One Everyone Forgets
- GPU Power Connectors
- Front Panel Headers: The Trickiest Step
- Step 4: Test and Isolate Hardware Components
- The PSU Paperclip Test
- Perform a Bare-Bones Boot Test
- RAM: Reseat and Test Single Sticks
- Check for Short Circuits
- Step 5: Decode POST Beep Codes and Motherboard Debug LEDs
- What Are POST Beep Codes?
- POST Beep Code Reference
- Motherboard Debug LED Indicators
- Step 6: Gaming PC-Specific Issues to Check
- Is Your PSU Powerful Enough for Your GPU?
- RGB and Fan Hubs Drawing Too Much Power
- New GPU Install Caused the Problem?
- When to Suspect a Dead Motherboard or CPU
- Quick-Reference Troubleshooting Checklist
- FAQ: PC Won’t Turn On
- How do I start an unresponsive computer?
- Why won’t my PC turn on even though it’s plugged in?
- My PC won’t turn on but the motherboard light is on, what does that mean?
- Why did my PC suddenly stop turning on? It was working fine yesterday.
- My PC turns on for a second then shuts off immediately, is it broken?
- The Short Version
Quick Answer: Why Won’t My PC Turn On?
The most common reasons a PC won’t turn on are a dead or disconnected power supply, a loose 24-pin ATX or 8-pin CPU power connector, a faulty front panel header connection, or residual charge (flea power) preventing the system from starting. Start by draining flea power, checking all internal power cables, and confirming the PSU rear switch is set to ON. Most cases are resolved within these first few steps.
Few things are more frustrating than sitting down to game or work, pressing the power button, and getting absolutely nothing. No fans. No lights. No sound. Just silence. Before you assume the worst, know this: most “dead PC” situations are caused by something embarrassingly simple. This guide covers three scenarios: PCs with zero response at all, PCs that spin up for a second then shut off, and PCs where lights or fans run but nothing displays on screen. If your PC turns on but Windows won’t load, that’s a different problem entirely.
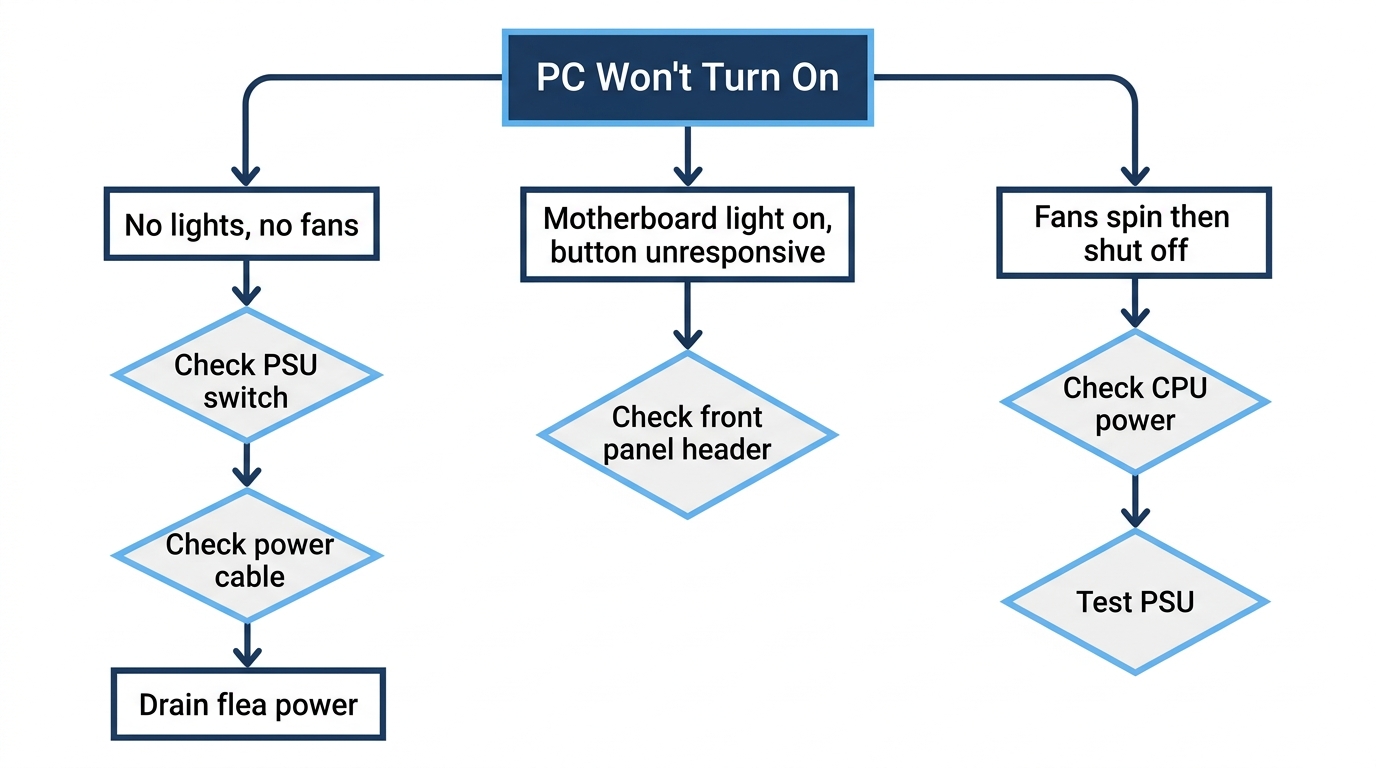
- 🔴 No lights, no fans, nothing: Start at Step 1 (external power) and Step 2 (flea power)
- 🟡 Motherboard light on, power button does nothing: Go to Step 3 (front panel headers)
- 🟡 Fans spin 1–3 seconds then shut off: Go to Step 3 and Step 4 (hardware isolation)
- 🟢 Power light on but no display: POST failure, go to Step 5 (POST codes/debug LEDs)
- 🔴 Gaming PC won’t turn on after GPU install: Go to Step 3 (GPU power) and Step 6 (gaming-specific)
- 🟡 Worked fine yesterday, now nothing: Start with Step 2 (flea power) and Step 4 (PSU test)
Before You Begin: What You’ll Need (and What to Check First)
Tools That Will Make This Easier
Most fixes on this list require no tools at all. That said, having a few things nearby will save you time if the easy fixes don’t pan out.
- Phillips head screwdriver: for removing side panels and reseating components
- Multimeter: for testing PSU voltage rails and CMOS battery (more useful than most guides admit)
- Anti-static wrist strap: or just touch a metal surface regularly to discharge static
- Spare IEC C13 power cable: the three-prong “kettle lead”, your monitor cable is often the same type and works as a swap
- Flathead screwdriver: for the front panel power pin bypass test
- Flashlight or headlamp: to see inside the case clearly
- Paperclip: straightened, for the PSU paperclip test
Safety First: Ground Yourself Before You Touch Anything
Electrostatic discharge (ESD) can kill components without any visible sign of damage. Before opening your case, power off the PC and unplug it from the wall. Touch a metal part of the case frame to discharge static. A wrist strap clipped to the case is better. One exception: when checking whether standby power is present on the motherboard, you can leave the PSU plugged in but switched off at the rear rocker. That 5VSB rail is what keeps the motherboard LED lit even when the PC is “off.”
Diagnose Your Symptoms First: Which Scenario Matches You?
Skipping straight to random cable-checking wastes time. Match your symptom below, then jump to the relevant section. If something activates (a motherboard LED, a fan twitch), the problem is more likely a CPU, RAM, or motherboard issue.
| Symptom | Most Likely Cause | Jump To |
|---|---|---|
| No lights, no fans, no sound at all | Power source, PSU, or power button header | Steps 1 & 2 |
| Motherboard light is on, pressing power does nothing | Front panel header, faulty PSU, short circuit | Step 3 |
| Fans spin 1–3 seconds then shut off | PSU overload, RAM/GPU seating, CPU power connector | Steps 3 & 4 |
| Power light on or blinking, but no display | POST failure, GPU, RAM, or display issue | Step 5 |
| PC won’t turn on all of a sudden (was working fine) | PSU failure, CMOS battery, flea power | Steps 2 & 4 |
| Gaming PC won’t turn on after GPU install | PCIe power connector, PSU wattage, short circuit | Steps 3 & 6 |
Step 1: Check Your External Power Source
The Power Strip Problem (More Common Than You Think)
Test the wall outlet first. Plug a lamp or phone charger into the same outlet and confirm it works. If you’re using a power strip, check that it’s switched on and hasn’t tripped its internal breaker. Surge protectors can fail silently after absorbing a spike, the strip looks fine, but it’s delivering nothing. If you have a UPS (uninterruptible power supply), check its status display. A depleted UPS battery or a tripped UPS won’t pass power through reliably.
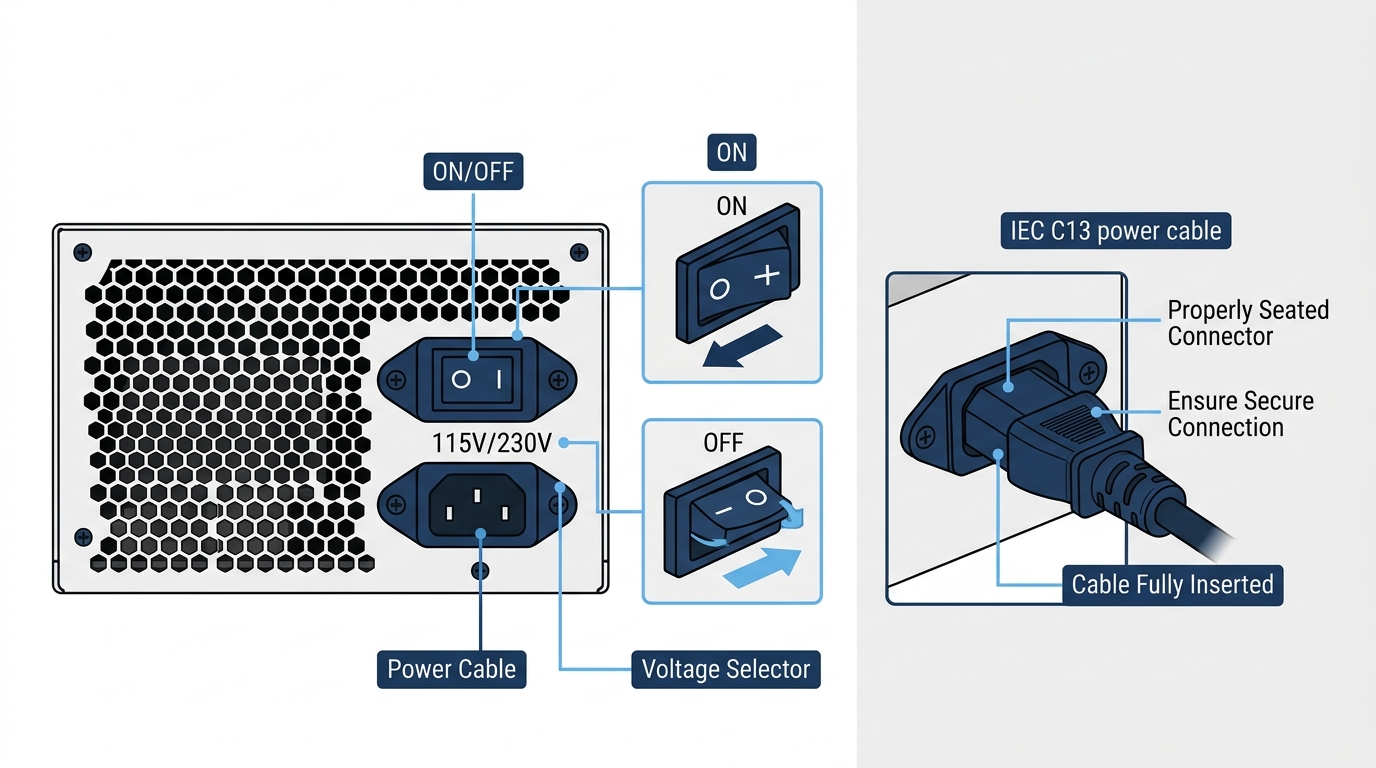
One more thing: if your PSU has a physical voltage selector switch on the back (some older units do), verify it’s set correctly. US outlets run at 120V AC. EU outlets run at 220–240V AC. Setting that switch wrong can prevent the PSU from starting or damage it entirely. Most modern PSUs are auto-switching and don’t have this switch, but it’s worth a look.
Inspect the Power Cable
The IEC C13 cable (the thick three-prong “kettle lead”) is easy to overlook. Check both ends, the wall plug and the socket on the PSU. A partially seated cable at the PSU end is a real thing. If your monitor uses the same cable type, swap them temporarily to rule out a faulty cable. Check for visible damage, bent pins, or debris inside the socket on the PSU.
Check the PSU’s Rear Power Switch
There’s a rocker switch on the back of every desktop PSU. It has two positions: “I” (on) and “O” (off). It sounds obvious, but this switch gets bumped more often than you’d think, especially when moving a PC or reaching behind a desk. Make sure it’s firmly set to “I.” Not halfway. Fully on.
Step 2: Drain Residual Power (The Flea Power Fix)
This is the fix that gets the most surprised reactions. Flea power (sometimes called residual or standby power) refers to the small electrical charge that capacitors inside the PSU retain even after the system is shut down and unplugged. In some situations, this charge interferes with the PSU’s ability to initialize properly on the next startup. It causes the PC to appear completely dead even though nothing is actually broken.
This scenario shows up most often after a power outage, after the PC has been left unused for days, or after a system wakes from a hibernation state that didn’t complete cleanly.
How to drain flea power:
- Shut down the PC and flip the PSU rear switch to OFF (the “O” position).
- Unplug the power cable from the wall outlet.
- Press and hold the case power button for 15–30 seconds. This drains the capacitors through the motherboard.
- Wait an additional 60 seconds. Don’t rush this.
- Reconnect the power cable and attempt to start the PC normally.
Works surprisingly often. If it doesn’t, the next step is reseating the CMOS battery. This is a CR2032 coin cell on the motherboard. Removing it for 30 seconds resets BIOS/UEFI to factory defaults and clears any corrupted settings that could be blocking startup. Measure the battery voltage with a multimeter if you have one: it should read between 2.7V and 3.3V. Anything below 2.5V means the battery needs replacing. Replacements cost under $5 at any electronics or hardware store.
Step 3: Check Internal Power Cables and Connections
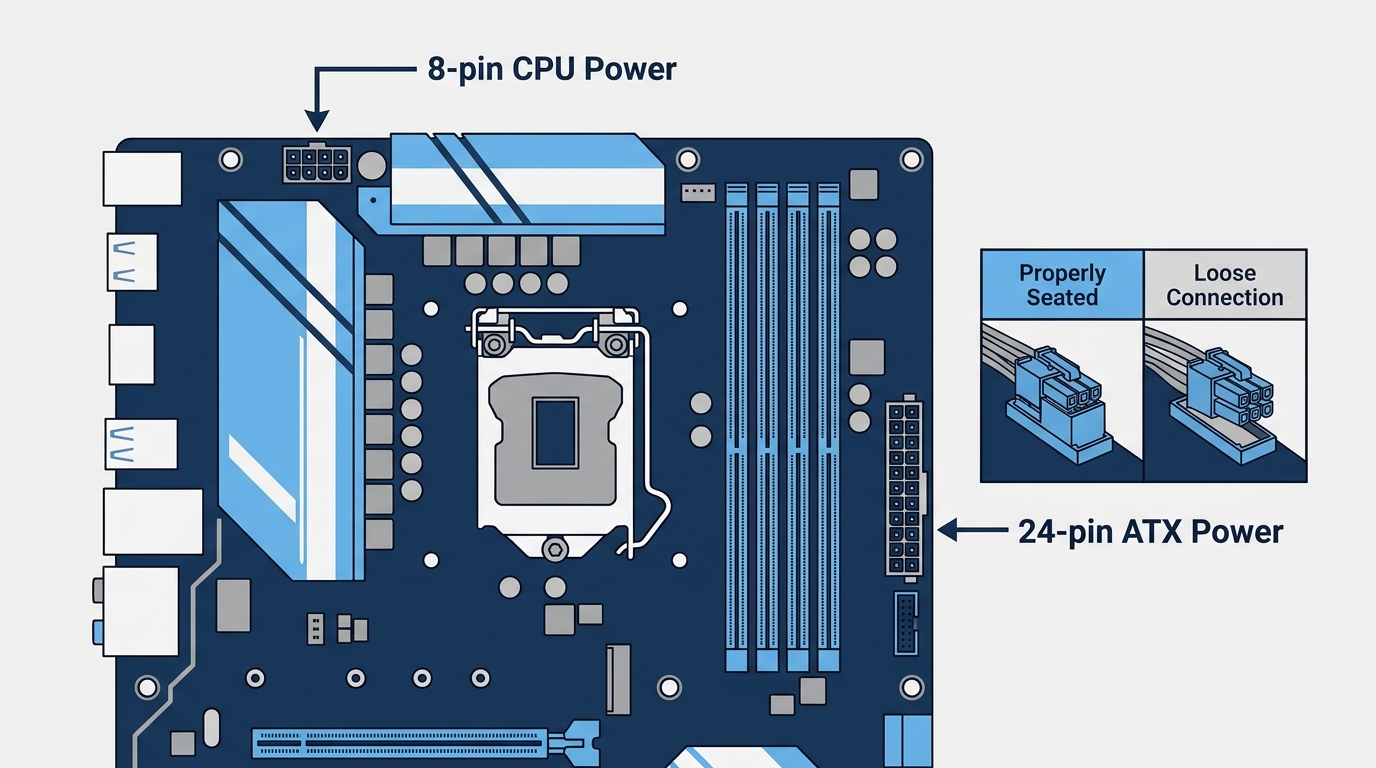
The 24-Pin ATX Motherboard Connector
This is the big wide connector running from your PSU to the right side of the motherboard. It’s the most common loose connection, especially after a build or any time the PC has been moved. It needs to be seated with firm, deliberate pressure until you hear and feel the latch click. New builders often underestimate how much force it takes. Wiggle it gently side to side while pressing down.
While you’re at it, inspect both the cable and the motherboard socket for bent or damaged pins. A single bent pin on this connector can prevent the system from starting entirely.
The CPU Power Connector: The One Everyone Forgets
This is responsible for a disproportionately large share of “my PC won’t turn on” posts online. Seriously. It’s a 4+4 pin (8-pin EPS) connector located at the top-left corner of the motherboard, near the CPU socket. On high-end HEDT boards like X299 or TRX50, you may need two 8-pin connectors. Most mainstream Z790, B650, and X670 builds need the full single 8-pin.
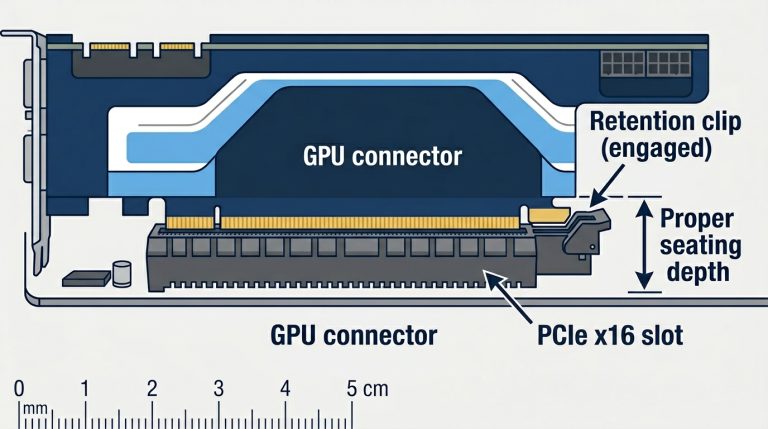
GPU Power Connectors
Any GPU from the RTX 3070 tier and above typically requires two 8-pin connectors, or a single 16-pin 12VHPWR connector on RTX 4000-series cards. A missing GPU power cable will prevent POST on most systems. The GPU either doesn’t initialize or the PSU’s overcurrent protection trips within seconds of startup.
If you’re using a 12VHPWR (16-pin) connector, it must be fully seated. Partial insertion has been documented as a cause of connector overheating and cable melting events, specifically with early RTX 4090 adapters. NVIDIA’s RTX 4090 product page addresses proper connector installation. Don’t assume it’s seated because it looks close. Push until the latch engages.
If you’re troubleshooting front panel header connections, the JFP1 front panel cable guide has a detailed breakdown of every pin on the header block including which ones control the power switch signal.
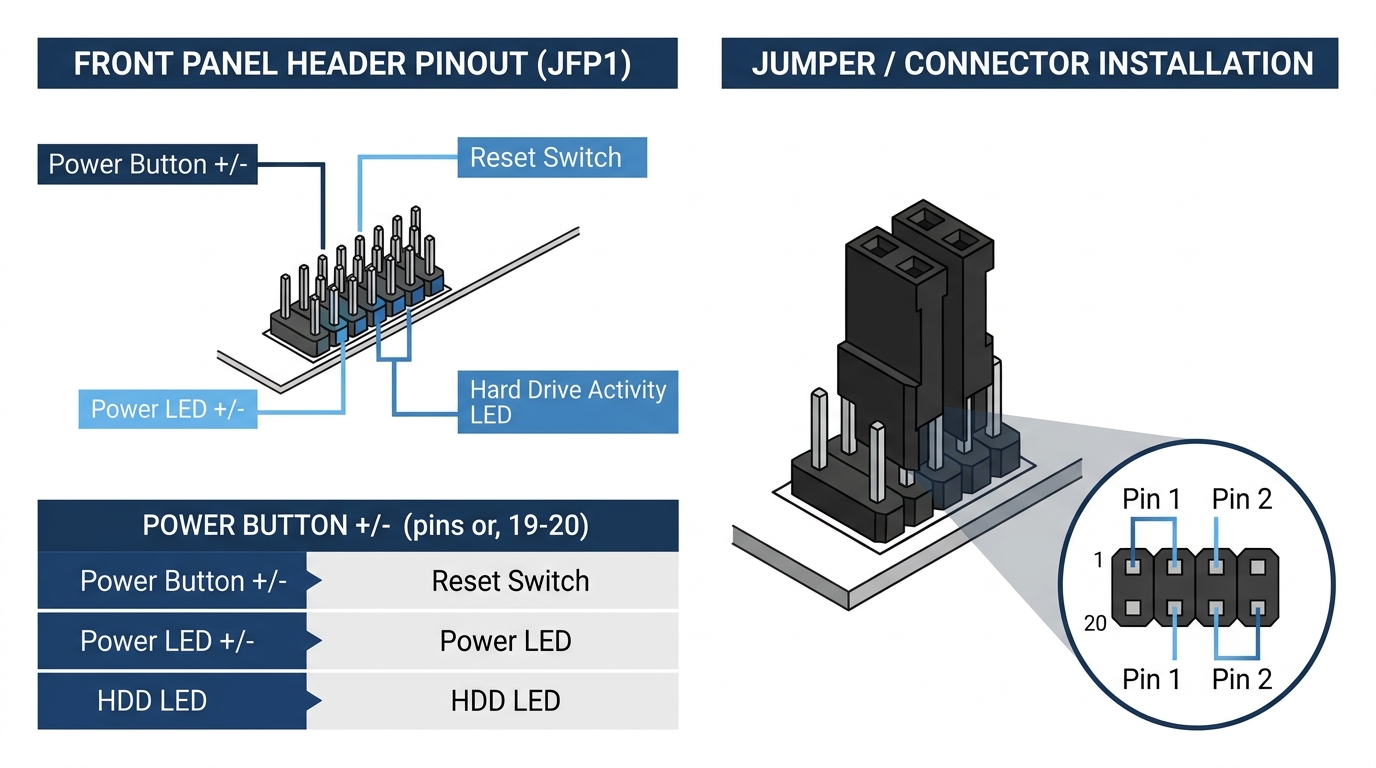
Front Panel Headers: The Trickiest Step
Front panel headers are the small cluster of 5–10 pins on the lower-right area of most motherboards. They receive the tiny cables from your case for the power button, reset button, power LED, and HDD activity LED. If the power switch (PWRSW) pins aren’t connected correctly, pressing the case button does absolutely nothing, even if every other component is fine.
Pinout varies by manufacturer. Check your motherboard manual. The header is usually labeled on the PCB but the text is tiny.
The screwdriver bypass test: Locate the two PWRSW (power switch) pins on your front panel header. Touch both pins simultaneously with the tip of a flathead screwdriver for about one second. If the PC powers on, the problem is your case’s power button or its cable, not your motherboard. This test is recommended across Reddit and forums for good reason, it’s fast, it’s safe, and it definitively isolates the power button as the cause.
Step 4: Test and Isolate Hardware Components
The PSU Paperclip Test
This lets you verify whether the PSU works independently of the motherboard. Disconnect everything from the PSU. Take a straightened paperclip and bridge the green wire (PS_ON, pin 16) to any black wire (ground) on the 24-pin ATX connector. Plug the PSU back in and switch it on. If the PSU fan spins, the unit is alive. If nothing happens at all, the PSU is dead or in protection mode.
If you have a multimeter, measure the voltage rails with the PSU running in paperclip mode:
| Voltage Rail | Expected Voltage | Acceptable Range |
|---|---|---|
| +12V | 12.0V | 11.4V – 12.6V |
| +5V | 5.0V | 4.75V – 5.25V |
| +3.3V | 3.3V | 3.135V – 3.465V |
| -12V | -12.0V | -10.8V – -13.2V |
These tolerances come from the Intel PC troubleshooting documentation. Readings outside these ranges indicate a failing PSU that should be replaced. For a deeper look at PSU failure symptoms, see the signs of a failing power supply before buying a replacement.
Perform a Bare-Bones Boot Test
If the PSU checks out, strip the system down. Remove everything except:
- CPU and cooler: never run a system without a cooler attached
- One stick of RAM: in slot A2 (the second slot from the CPU socket)
- PSU: connected to the motherboard and CPU power
- GPU or integrated graphics: use iGPU if your CPU has one
Remove all storage drives, extra RAM sticks, USB devices, and additional PCIe cards. If the system posts in bare-bones configuration, add components back one at a time. The one that causes failure on reinsertion is your culprit.
RAM: Reseat and Test Single Sticks
Remove both RAM sticks, blow out the slots gently, and reseat them firmly. The latches should click on both ends. Test each stick individually in the A2 slot. Oxidized contacts on RAM are more common than people expect, especially in older systems or humid environments.
Don’t make this mistake: dual-channel configurations require specific slots. On most boards it’s A2 + B2, not A1 + B1. Check your motherboard manual. Using the wrong slots can result in instability or failure to POST.
Check for Short Circuits
A loose or misaligned standoff (the brass spacers that hold the motherboard off the case) can cause the board to short against the case metal. Check that all standoffs are in the correct positions for your form factor (ATX, mATX, or ITX). Wrong standoff positions are a classic mistake in first builds.
To rule out a case short entirely, remove the motherboard and lay it on a non-conductive surface like a cardboard box. Connect only the PSU, one RAM stick, and CPU, then try powering it on using the screwdriver bypass on the PWRSW pins. If it boots outside the case, something inside the case is causing a short.
Step 5: Decode POST Beep Codes and Motherboard Debug LEDs
What Are POST Beep Codes?
POST stands for Power-On Self-Test. Every time a PC starts, the BIOS runs a quick diagnostic check of connected hardware before handing control to the OS. If something fails that test, the BIOS reports it through beep codes (if a speaker is connected) or through onboard LEDs. Many cases don’t include a motherboard speaker. If yours doesn’t, a cheap PC speaker can be plugged directly into the front panel header. Worth the $3.
POST Beep Code Reference
Note: beep codes vary depending on your BIOS manufacturer. AMI BIOS, Award BIOS, and Phoenix BIOS each have different patterns. The table below reflects the most common AMI codes:
| Beep Pattern | Meaning | Likely Culprit |
|---|---|---|
| 1 short beep | POST passed | Normal, check display output |
| 2 short beeps | POST error (general) | RAM or BIOS configuration |
| 3 long beeps | Memory error | RAM not seated or incompatible |
| 1 long + 2 short | Video card error | GPU not seated or no power |
| 1 long + 3 short | Video card error | GPU failure |
| Continuous beeping | Power issue or RAM | PSU or RAM failure |
| No beep, no boot | No POST at all | CPU, PSU, or motherboard |
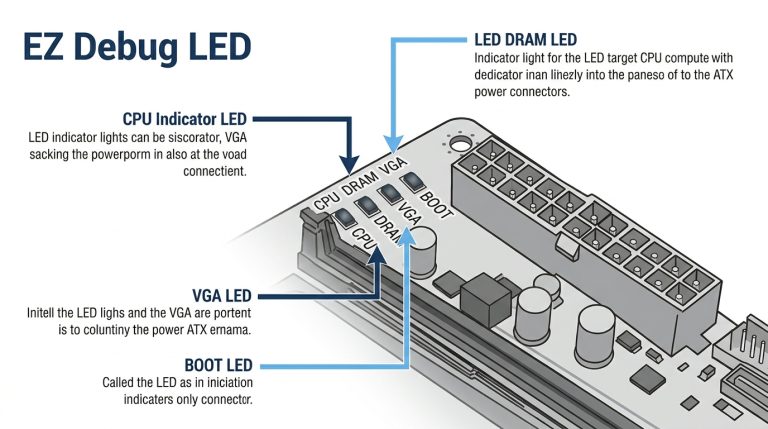
Motherboard Debug LED Indicators
Modern boards from ASUS ROG and MSI MEG include EZ Debug LEDs — four indicators labeled CPU, DRAM, VGA, and BOOT. Gigabyte Aorus boards have equivalent status LEDs using the same labels. The LED that stays lit when the system fails to start tells you exactly which component failed POST. Not blinking, solid on.
- CPU LED solid: CPU not seated, wrong socket, or dead CPU
- DRAM LED solid: RAM not seated correctly, wrong slots, or incompatible kit
- VGA LED solid: GPU issue, reseat or check power connectors
- BOOT LED solid: storage device not detected, check SATA/NVMe connections
High-end boards also include a Q-Code LCD display showing two-digit hexadecimal POST codes. Refer to your motherboard manufacturer’s Q-Code table for exact meanings. ASUS publishes these in their motherboard manuals, available on the ASUS support site.
If you’re seeing a white debug LED on startup specifically, that’s a VGA/GPU initialization failure. The white light on motherboard guide covers that exact scenario in more detail.
Step 6: Gaming PC-Specific Issues to Check
Is Your PSU Powerful Enough for Your GPU?
GPU TDP has increased significantly over the past two hardware generations. An RTX 4090 can draw 450–600W under gaming load. If your PSU can’t handle the full system draw, it trips its overcurrent protection and shuts everything down, usually within 1–3 seconds of startup. Not great.
| GPU Tier | Example GPU | Minimum PSU (Full System) |
|---|---|---|
| Budget | RX 6600, RTX 3060 | 550W |
| Mid-Range | RX 7700 XT, RTX 4070 | 650W |
| High-End | RX 7900 XTX, RTX 4080 | 800–850W |
| Flagship | RTX 4090 | 1000W+ |
These are realistic system totals, not just GPU TDP. Factor in your CPU, fans, and other components on top of the GPU draw. You can use be quiet!’s PSU wattage calculator to get a reliable estimate for your specific configuration.
RGB and Fan Hubs Drawing Too Much Power
Daisy-chained RGB hubs and fan controllers pulling from a single SATA power connector can trip PSU overcurrent protection on that rail. This is especially common in cases stuffed with LED strips, multiple RGB fans, and a powered hub all on one cable. Test by unplugging every RGB and fan hub connector and attempting to boot with bare cooling only. If it starts, add peripherals back one at a time.
New GPU Install Caused the Problem?
Check that the PCIe x16 slot latch clicked fully when you seated the GPU. It takes more force than expected on many boards. Verify all power connectors are attached and fully locked. If your board has multiple PCIe x16 slots, try the GPU in the secondary slot to rule out a failed primary slot. Also double-check the PSU wattage against the table above, a GPU upgrade without a PSU upgrade is a common cause of a gaming PC that suddenly won’t turn on.
When to Suspect a Dead Motherboard or CPU
If you’ve worked through every step above and still get nothing, the issue may be the motherboard or CPU itself. Dead. Not repairable at home.
Signs pointing to a dead motherboard: no POST, no beep codes, no debug LED activity of any kind, all cables confirmed good, bare-bones test still fails. Signs pointing to a dead CPU: debug LED stops at CPU, cooler spins but no POST, Q-Code halts at a CPU-stage code.
Before concluding the CPU is dead, inspect the socket with a flashlight and magnifying glass. On Intel LGA platforms, bent pins in the motherboard socket are common after cooler removal or accidental drops. Bent pins are fixable with a mechanical pencil barrel or thin needle, carefully, one at a time. Not fun, but doable.
Also look for physical damage on the board: bulging capacitor tops, burn marks, or a scorch smell. Any of those means the component is done. At this point, check warranty status. Most desktop CPUs and motherboards carry three-year manufacturer warranties. Both Intel and AMD have RMA processes that are straightforward if the damage isn’t user-caused.
Quick-Reference Troubleshooting Checklist
- Check the wall outlet with another device
- Verify the power strip or UPS is functioning
- Confirm PSU rear rocker switch is set to ON (“I”)
- Check voltage selector switch if present (115V vs 230V)
- Drain flea power: PSU off, unplugged, hold power button 30 seconds, wait 60 seconds
- Reseat the 24-pin ATX motherboard connector
- Reseat the CPU 8-pin (or 4+4 pin) power connector
- Reseat the GPU and verify all PCIe power cables are locked
- Reseat RAM, try a single stick in the A2 slot
- Check front panel header connections, run the screwdriver bypass test on PWRSW pins
- Run the PSU paperclip test to confirm PSU output
- Measure PSU voltage rails with a multimeter if available
- Perform a bare-bones boot test, CPU, one RAM stick, PSU only
- Check for short circuits or loose standoffs, test outside the case
- Read POST beep codes and/or motherboard debug LEDs
- Inspect CPU socket for bent pins and board for physical damage
FAQ: PC Won’t Turn On
How do I start an unresponsive computer?
Start with the two fastest fixes: drain flea power (unplug the PSU, hold the power button for 30 seconds, wait 60 more seconds, then reconnect), and run the screwdriver bypass test on the front panel PWRSW pins. If neither works, move to a bare-bones boot test with just the CPU, one RAM stick, and PSU connected. These three steps resolve the majority of unresponsive PC situations without replacing any components.
Why won’t my PC turn on even though it’s plugged in?
Being plugged in doesn’t mean power is reaching the components. Check the PSU rear rocker switch, the wall outlet, and the power strip. Inside the case, a loose 24-pin ATX connector, a missing CPU power cable, or a short circuit from a loose standoff can all prevent startup even with a working PSU. Use the symptom table at the top of this guide to narrow down the specific cause based on what you’re seeing (or not seeing).
My PC won’t turn on but the motherboard light is on, what does that mean?
Good news, actually. If the motherboard LED is on, the 5VSB (standby) rail from the PSU is delivering power. The PSU isn’t dead. The problem is somewhere else: the front panel header connection, the power button itself, or a component preventing POST from starting. Run the screwdriver bypass test on the PWRSW pins first. If the PC starts, the case power button is faulty. If it doesn’t, move to reseating RAM and checking the CPU power connector.
Why did my PC suddenly stop turning on? It was working fine yesterday.
Sudden failures after normal operation usually point to a few things: PSU failure (the most common sudden cause, especially in older units), a power surge that damaged a component, CMOS battery failure causing a BIOS corruption loop, or RAM or GPU that shifted slightly in its slot from vibration or temperature cycling over time. Start with the flea power drain, then reseat all internal connections. If those don’t fix it, run the PSU paperclip test to verify the supply unit itself.
My PC turns on for a second then shuts off immediately, is it broken?
Not necessarily. A startup-then-shutdown behavior is almost always the PSU’s protection circuit tripping to prevent damage. Common triggers include a PSU overloaded by a new high-TDP GPU, a CPU installed without a cooler (thermal protection kicks in within seconds), RAM seated in the wrong slots, or a short circuit somewhere in the case. Run a bare-bones boot test outside the case. If it stays on bare-bones, one of the components you removed was causing the protection shutdown. Add them back one at a time to find the culprit.
The Short Version
Work through this checklist in order before buying any replacement parts. The majority of cases resolve at Step 1 (PSU switch), Step 2 (flea power drain), or Step 3 (reseating the CPU power or front panel header). If you’ve gone through every step here and nothing has worked, it’s time to contact the component manufacturer about warranty service, most CPUs and motherboards are covered for three years. Don’t spend money on new parts until you’ve confirmed exactly which component is faulty using the isolation tests above.

Alex has been building and tweaking custom PCs for over 12 years. From budget builds to full custom water loops, he’s assembled more than 50 systems and helped hundreds of builders troubleshoot their rigs. When he’s not benchmarking the latest hardware, you’ll find him optimizing airflow setups or stress-testing overclocks.