Signs of a Failing Power Supply: 8 Warning Signals
Signs of a bad power supply include random shutdowns under load, BSODs, failure to turn on, burning smells, unusual noises, voltage instability, component throttling, and overheating despite adequate airflow.
Last updated: May 2026
Table of Contents
- What Does a Power Supply Actually Do? (Quick Primer)
- 8 Warning Signs of a Bad Power Supply
- 1. Random Shutdowns or Restarts (Especially Under Load)
- 2. Blue Screens of Death (BSODs) and System Freezes
- 3. PC Won’t Turn On, or Requires Multiple Attempts
- 4. Unusual Noises, Coil Whine, Buzzing, Clicking, or Grinding
- 5. Burning Smell or Visible Burn Marks
- 6. GPU or CPU Underperformance and Throttling
- 7. Overheating Components (Despite Good Airflow)
- 8. Electrical Shocks, Static Discharges, or Voltages on the Case
- Signs of a Bad Power Supply vs. Bad Motherboard, How to Tell the Difference
- How to Test a Failing Power Supply, 3 Methods (From Basic to Advanced)
- Method 1, The Paperclip Test (Free, 2 Minutes)
- Method 2, PSU Tester Tool ($10–$25)
- Method 3, Software Monitoring Under Stress (Most Accurate)
- When a Failing PSU Damages Other Components, The Hidden Risk
- How Long Should a PSU Last? (And When to Replace It Proactively)
- FAQ, Signs of a Bad Power Supply
- How would I know if my power supply is bad?
- How do I know if my PSU is fried?
- Can a bad PSU cause a PC to not turn on at all?
- How do I tell if the problem is my PSU or my motherboard?
- Is it worth repairing a failing PSU?
- Final Thoughts
253W. That’s the sustained load an Intel Core i9-14900K can draw on its own. Add a power-hungry GPU like an RTX 4090 pulling another 450W, and your PSU is working hard every second you’re gaming or rendering. Most builders stress over GPU specs and RAM speeds, then drop a generic PSU into their build and forget about it. That’s a mistake. A degrading power supply doesn’t just crash your system. It can silently kill your GPU, corrupt data on your SSD, and fry your motherboard before you ever see a warning sign. The tricky part is that most of these symptoms look identical to RAM failures, motherboard issues, or driver problems at first glance.
Below you’ll find all 8 warning signs, specific voltage thresholds, diagnostic tools, and a PSU-vs-motherboard comparison table that most guides skip entirely.
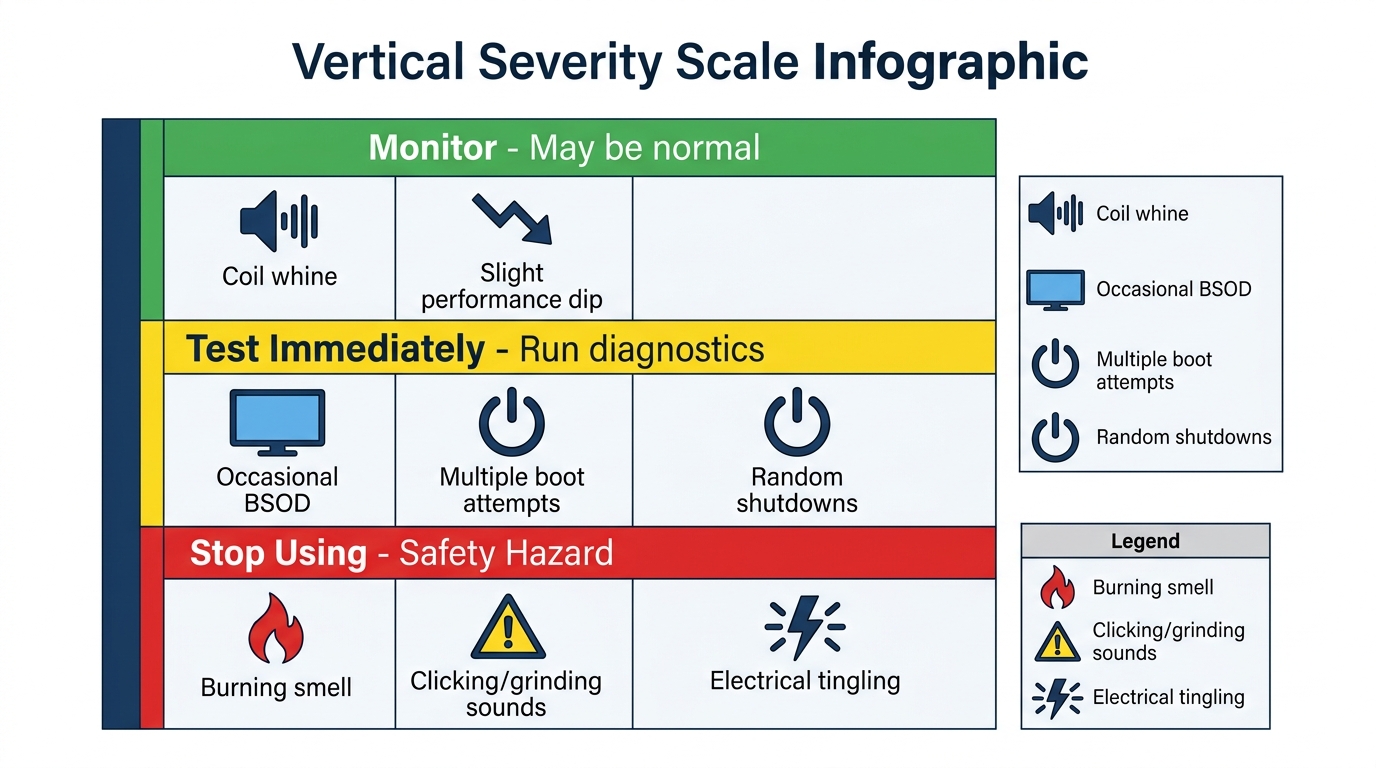
- 🟢 Coil whine (mild, consistent), Monitor. May be normal on budget units.
- 🟢 Slight performance dip under heavy load, Check wattage headroom first.
- 🟡 Occasional BSOD under GPU/CPU load, Test with HWiNFO64 immediately.
- 🟡 PC requires multiple power attempts to boot, Run paperclip test, check capacitors.
- 🟡 Random shutdowns during gaming, Stress test and monitor +12V rail.
- 🔴 Burning smell or visible scorch marks, Power down immediately. Do not restart.
- 🔴 Clicking or grinding from PSU, Stop using immediately. Fan bearing failure.
- 🔴 Electrical tingling from case or USB ports, Unplug from wall. Serious safety hazard.
What Does a Power Supply Actually Do? (Quick Primer)
Your PSU does one job: convert 120V or 240V AC power from your wall outlet into the low-voltage DC your components actually use. It outputs several different voltage rails simultaneously, each powering different parts of your system.
- +12V rail: Powers your CPU (via EPS connector) and GPU (via PCIe connectors). This is the one that matters most.
- +5V rail: Powers USB ports, storage controllers, and some motherboard logic.
- +3.3V rail: Powers RAM and certain chipset functions.
- +5VSB (standby): Keeps the motherboard in standby mode when your PC is “off.”
Modern high-end GPUs pull serious current. An RTX 4090 can hit 450–600W on the +12V rail alone during stress. Pair that with a 200W+ CPU and you’re looking at 700–800W of real system draw. A PSU rated at 850W with zero headroom is already working at its limit from day one.
80 PLUS efficiency ratings (Bronze, Gold, Platinum, Titanium) tell you how much input power converts to usable output vs. heat. An 80 PLUS Bronze unit at full load converts about 82% to usable power. A Platinum unit converts roughly 89% at full load (up to 92% at typical 50% operating load). That 7% gap at full load translates to real heat inside your PSU, and heat degrades components faster.
Typical PSU lifespan runs 5–10 years for quality units. Budget and no-name PSUs often fail in 3–5 years, sometimes less. If you want to know what PSU is currently installed in your system before diagnosing further, checking your power supply without opening your PC takes about 60 seconds using system tools.
8 Warning Signs of a Bad Power Supply
1. Random Shutdowns or Restarts (Especially Under Load)
Your system runs fine at the desktop, but the moment you launch a game or kick off a render, it cuts off completely. No BSOD, no warning. Just off.
This is the classic PSU failure pattern. When your system is idle, power draw might sit around 80–120W. Under full GPU and CPU load it can jump to 600W or more. A degraded PSU that can no longer sustain its rated wattage triggers Over Power Protection (OPP) or Over Temperature Protection (OTP) and shuts the system down to protect itself.
Here’s a detail most guides miss: shutdowns under load strongly point to PSU, while shutdowns at idle or during POST point more toward motherboard or RAM issues. Context matters.
A PSU rated at 650W that’s 5+ years old may only deliver around 550W reliably. That’s a 15–20% real-world degradation. If your system peaks at 580W, you’re in the shutdown zone.
Diagnostic step: Download OCCT (free) and run the PSU stress test. If your system crashes within 5 minutes, suspect the PSU first. Cross-reference your peak system draw on PCPartPicker’s wattage estimator against your PSU’s rated output.
2. Blue Screens of Death (BSODs) and System Freezes
Not all BSODs are equal. PSU-related BSODs tend to show up under GPU or CPU load and often carry specific error codes: WHEA_UNCORRECTABLE_ERROR, KERNEL_POWER, and MEMORY_MANAGEMENT are the most common. Random BSODs during light tasks like browsing lean more toward RAM or driver problems.
Why does a PSU cause a BSOD? Voltage sag on the +12V rail means your CPU or GPU receives corrupted power signals. The processor can’t execute instructions correctly and Windows throws a stop error.
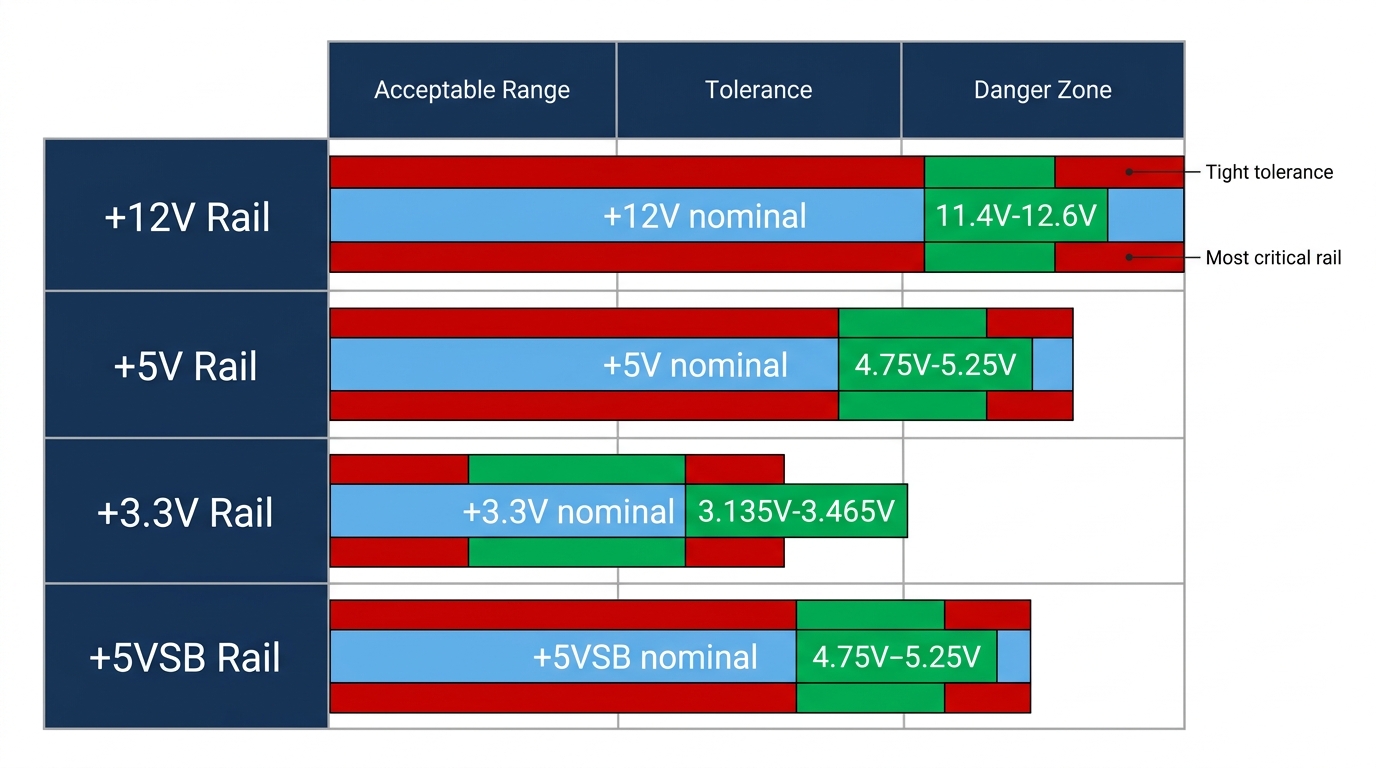
The ATX specification sets strict tolerances for voltage rails. Here’s what you need to know:
| Rail | Nominal | Minimum (ATX Spec) | Maximum (ATX Spec) |
|---|---|---|---|
| +12V | 12.0V | 11.4V (−5%) | 12.6V (+5%) |
| +5V | 5.0V | 4.75V (−5%) | 5.25V (+5%) |
| +3.3V | 3.3V | 3.135V (−5%) | 3.465V (+5%) |
Download HWiNFO64 (free) and open the Sensors panel. Watch those voltage values in real time while running a stress test. Any reading that drops below the minimums above during load is a confirmed failure signal.
3. PC Won’t Turn On, or Requires Multiple Attempts
There are two distinct flavors of this symptom, and they point to different failure modes.
Completely dead (no fan spin, no LEDs, nothing): The PSU likely isn’t delivering the +5VSB standby rail to the motherboard. Without standby power, the board can’t even signal the PSU to turn on. The system appears totally dead even if every other component is fine.
Fans spin briefly then stop, or requires 3–4 attempts before POST: This usually means degraded capacitors or a failing power-good signal. The PSU starts, can’t maintain stable output, and shuts down. On the next attempt, it might just barely hold on long enough to POST.
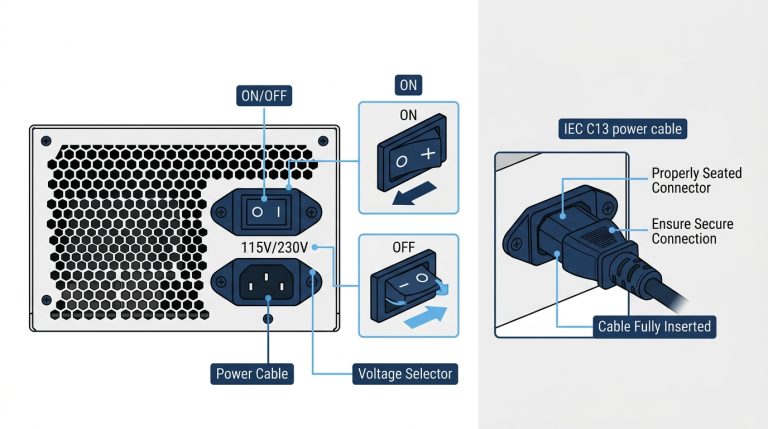
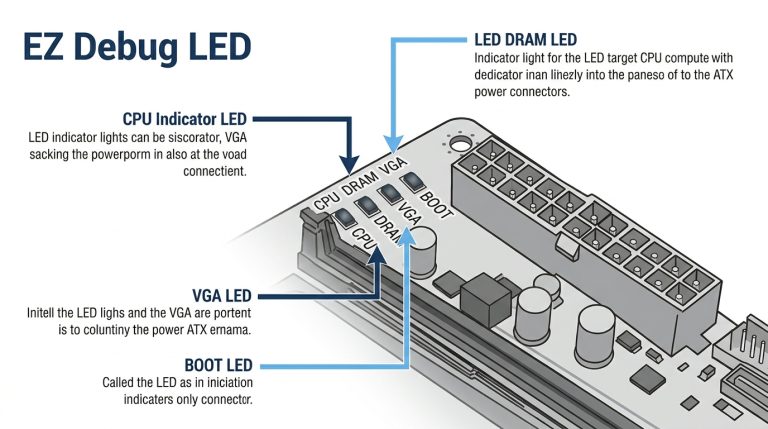
The fastest free diagnostic is the paperclip test. Unplug the PSU from all components. Take a standard paperclip and short the green wire (PS_ON, pin 16) to any black wire (ground) on the 24-pin ATX connector. If the PSU fan spins, the unit can at least power on. If nothing happens, the PSU is confirmed dead.
Important caveat: the paperclip test only confirms basic power-on capability. It doesn’t test voltage stability under real load. For that, you need a PSU tester tool (around $10–$20) or software monitoring under stress. Not a complete test. But a fast one.
4. Unusual Noises, Coil Whine, Buzzing, Clicking, or Grinding
Sound is one of the clearest early warning signals you’ll get from a failing PSU. The type of noise tells you a lot about what’s actually going wrong internally.
| Sound | Likely Cause | Urgency |
|---|---|---|
| Coil whine (high-pitched hiss) | Inductors vibrating under load | Low–Medium (can be normal) |
| Buzzing or humming | Failing capacitors or transformer | Medium–High |
| Clicking | Fan bearing failure or relay issue | High |
| Grinding | Fan bearing fully failing | Critical, replace immediately |
Mild coil whine on a budget PSU isn’t necessarily a death sentence, but coil whine that gets progressively worse over time is a sign of component degradation. Worth keeping an ear on.
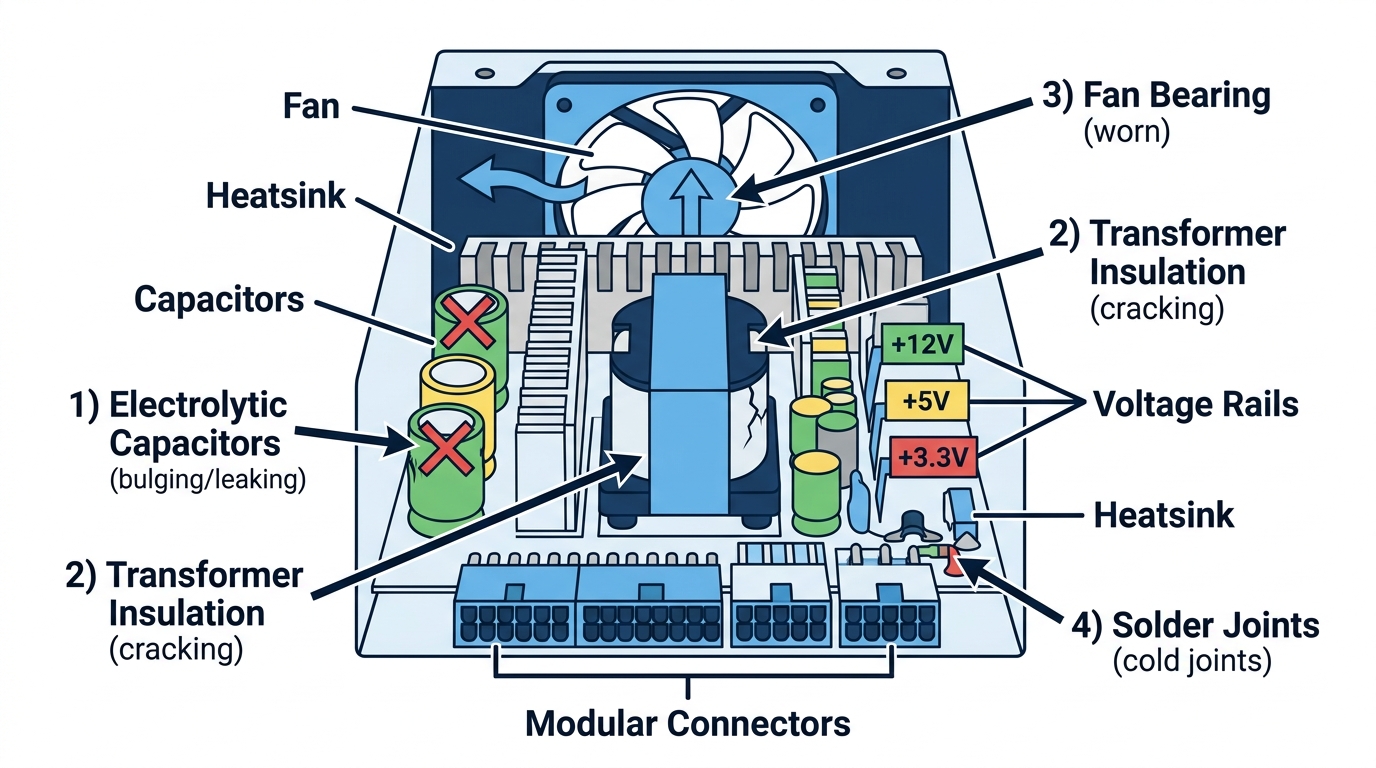
Fan failure is the most dangerous outcome. When the fan stops, thermal runaway follows. A PSU running without adequate cooling will overheat, and in the worst cases, can start a fire. Clicking or grinding means stop using it today.
5. Burning Smell or Visible Burn Marks
A burning plastic or electrical smell coming from the back of your case is a capacitor failing or an internal short circuit in progress. Power down immediately and unplug from the wall. Don’t restart it to “see if it happens again.”
Inspect the PSU vent grill with a flashlight. Look for scorch marks, black carbon deposits, melted cable insulation near the connectors, or bulging capacitor tops.
One important distinction: burning smell from the back of the case (where the PSU exhausts) points to the PSU itself. Burning smell near the GPU slot or motherboard area suggests a different failed component. Isolate before assuming.
Safety warning: never open a PSU, even when unplugged. The large filter capacitors inside can hold charges up to 400V for extended periods after power removal. Lethal voltage. Leave the enclosure closed.
6. GPU or CPU Underperformance and Throttling
You upgraded your GPU, expected a big performance boost, and got a frustrating 10–15% improvement instead. Your frame rates dip mid-game. GPU clocks drop unexpectedly. The CPU runs below its base clock despite sitting at low temperatures.
This is what a power-starved system looks like in practice. GPU boost clocks depend on the +12V rail staying stable. When the PSU voltage sags under load, the GPU’s power delivery circuitry detects it and reduces the boost clock to pull less current. Same mechanism applies to the CPU.
A concrete example: the RTX 4080 has a 320W TDP. In a 750W system with a degraded PSU delivering only 680W of effective output, that GPU might be capped at 270W, causing a 10–15% performance loss versus a properly powered system. You’d never know why without monitoring.
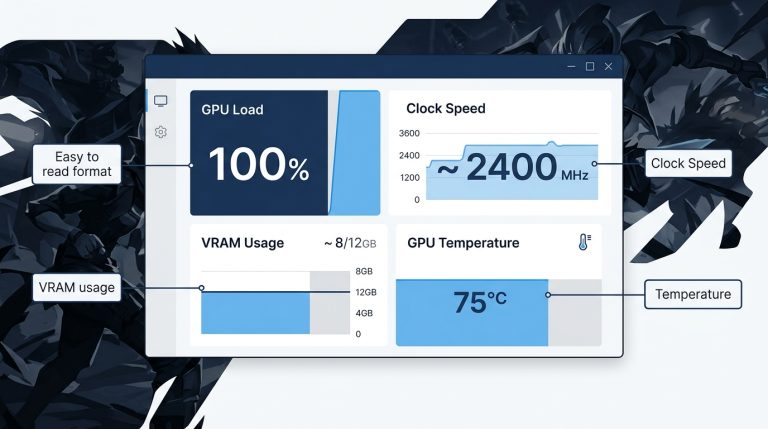
Open MSI Afterburner and watch the GPU Power % reading during a demanding game or benchmark. A healthy PSU at full load should show 98–100% GPU power utilization. If it never climbs past 85–90%, the PSU may be artificially limiting it. Also check CPU Package Power in HWiNFO64. If the CPU throttles below its rated frequency while temperatures are under 85–90°C, it’s likely power-starved rather than thermally limited. If you suspect heat is the actual culprit, reviewing normal GPU temperature safe ranges gives you a solid baseline to compare against.
7. Overheating Components (Despite Good Airflow)
Your CPU or GPU temps are running hot even though your case has good airflow, fans are spinning, and your thermal paste job is fresh. Nothing you do seems to bring temps down.
A failing PSU fan might be the cause. When the PSU’s internal fan stops working, the unit itself overheats and pushes excess heat out through its vents directly into your case. Case ambient temperature rises. Every component runs hotter as a result.
Efficiency also matters here. An 80 PLUS Bronze unit at 80% load generates roughly 20% of its input power as waste heat. A Platinum-rated unit generates only about 8%. On a 750W draw, that’s the difference between dumping 150W of heat into your case versus 60W. Budget PSUs add significantly more thermal load to your system.
| PSU Exhaust Temp vs. Ambient | Status |
|---|---|
| +5°C to +10°C | Normal |
| +11°C to +19°C | Monitor closely |
| +20°C or higher | Fan likely failing or PSU overloaded |
Use a cheap infrared temperature gun on the PSU exhaust vent while the system is under load. If it’s reading 20°C or more above your room temperature, your PSU fan is struggling or the unit is overloaded. For symptoms that look like CPU heat issues but don’t respond to better cooling, it’s worth checking whether your CPU is actually overheating and ruling out the PSU as a contributing factor.
8. Electrical Shocks, Static Discharges, or Voltages on the Case
You touch your case or a USB port and feel a tingle. Your keyboard or mouse disconnects randomly. Peripherals behave erratically for no apparent reason. These are serious electrical safety symptoms, not minor annoyances.
A PSU with failed ground isolation allows AC leakage current to reach the metal chassis. The low-level shock you feel is real current. Power down and unplug from the wall immediately.
USB peripherals disconnecting randomly can also indicate +5V rail degradation specifically, since USB runs on the +5V supply. Per ATX specification, the +5V rail should never vary more than ±5% from its nominal 5.0V under load. Readings below 4.75V (the -5% ATX tolerance limit) are outside spec and dangerous to connected devices. Parity check memory errors, which look like RAM failures, can also be caused by voltage noise on the rails corrupting data signals.
Don’t confuse this symptom with normal static discharge from carpet in dry environments. The test: if the tingling sensation occurs only when the PC is running and plugged in, and disappears when you shut it down, it’s AC leakage from the PSU. That’s a fire-and-electrocution risk scenario.
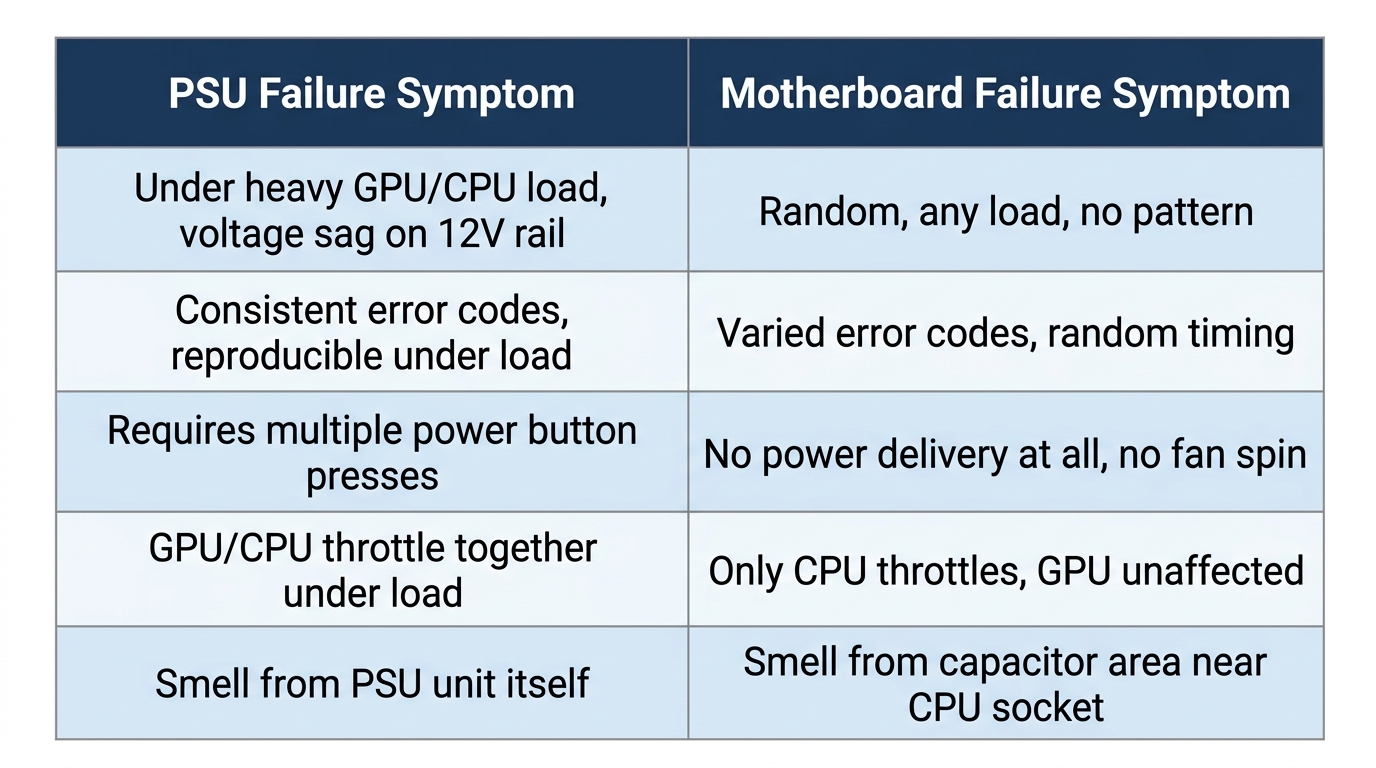
Signs of a Bad Power Supply vs. Bad Motherboard, How to Tell the Difference
PSU and motherboard failures share so many symptoms that misdiagnosis is extremely common. Community data from PC building forums suggests roughly 35% of suspected motherboard failures are actually PSU-related. Blaming the wrong component means buying a new motherboard and still having the same problem.
| Symptom | More Likely PSU | More Likely Motherboard |
|---|---|---|
| No power at all (no standby LED) | ✓ | , |
| Standby LED on, won’t POST | , | ✓ |
| Random shutdowns under load | ✓ | , |
| Random shutdowns at idle | , | ✓ |
| BSODs with WHEA/KERNEL_POWER | ✓ | ✓ |
| No display, fans spin fine | , | ✓ |
| Paperclip test fails | ✓ | , |
| Paperclip test passes, system still fails | , | ✓ |
| Burning smell from back of case | ✓ | , |
| Burning smell near PCIe slots | , | ✓ |
The fastest isolation method is swapping the suspected PSU into a known-good system. If the second system also develops problems, the PSU is confirmed bad. If the second system runs fine, focus on the original motherboard or other components. Alternatively, borrow or buy a replacement PSU before spending $150–$300 on a new board.
How to Test a Failing Power Supply, 3 Methods (From Basic to Advanced)
Method 1, The Paperclip Test (Free, 2 Minutes)
- Shut down your PC and unplug the PSU from the wall outlet.
- Disconnect the 24-pin ATX connector from the motherboard.
- Locate the green wire (PS_ON, pin 16) on the 24-pin connector.
- Bend a paperclip into a U-shape and insert one end into the green wire socket, and the other into any adjacent black wire (ground) socket.
- Plug the PSU back into the wall and flip the PSU power switch on.
- If the PSU fan spins, the unit can at least power on. If nothing happens, the PSU is confirmed failed at the basic level.
What it tells you: Basic power-on capability only. It does not test whether the rails are stable or within spec under real load. Passes this test don’t rule out a failing PSU.
Method 2, PSU Tester Tool ($10–$25)
A dedicated PSU tester plugs into the 24-pin connector and provides go/no-go status on individual rails with basic voltage readings. The Thermaltake Dr. Power III and CyberPower PSU tester are two commonly available options in this price range.
What you get: quick confirmation that each rail is outputting voltage in the right ballpark. What you don’t get: real-load testing. A PSU can pass a tester sitting on a bench and still sag badly under a 600W gaming load. Good for dead PSU confirmation. Not ideal for intermittent failures.
Method 3, Software Monitoring Under Stress (Most Accurate)
This is the proper way to catch a degrading PSU that still powers on but can’t hold stable voltage under load.
- Download and install HWiNFO64 and OCCT (both free).
- Open HWiNFO64 in Sensors mode. Locate the +12V, +5V, and +3.3V readings from your motherboard’s voltage sensors.
- Run the OCCT PSU stress test for 30 minutes. Keep HWiNFO64 visible and watch for voltage drops in real time.
- After the test, review the minimum and maximum voltage logged for each rail.
Pass: All rails stay within ±5% of nominal throughout the entire test.
Fail: Any rail dips below its ATX minimum spec (see table in Sign #2). PSU replacement is warranted.
One important note: motherboard voltage sensors have an inherent accuracy range of ±2–5%. A reading of 11.5V on the +12V rail might be 11.3V in reality. Treat software monitoring as a strong indicator, not a lab-grade measurement. For precision, a multimeter on the PSU’s molex connectors while under load gives more accurate readings.
When a Failing PSU Damages Other Components, The Hidden Risk
This is the part most PSU guides don’t cover, and it’s the most expensive lesson a builder can learn the hard way.
A PSU doesn’t just fail cleanly. Certain failure modes actively damage everything connected to it.
- Overvoltage failure: If the PSU’s Over Voltage Protection (OVP) circuit fails, the +12V rail can spike to 14–16V or higher. GPU VRMs, the CPU, and motherboard circuitry are not designed to survive that. Instantaneous damage. No warning.
- Excessive ripple noise: All DC rails have some AC ripple. Healthy PSUs keep ripple well within the ATX spec limit of 120mV on the +12V rail. A degrading PSU can push ripple into the 400–600mV range. Over time, high ripple degrades NAND flash on SSDs, causing data corruption and premature drive failure. Silent damage.
- Capacitor failure (short circuit): When capacitors fail by shorting internally, they can push incorrect voltages down PCIe lanes or SATA power lines. Connected drives and GPUs take the hit.
Industry-level repair data suggests that 20–30% of GPU “failures” sent for RMA are actually caused by PSU overvoltage or excessive ripple damaging the GPU’s VRM section. The GPU gets replaced and the root-cause PSU stays in the system, ready to kill the next card.
The rule: when a PSU fails, test every component it was powering before assuming they survived. Don’t drop $400 on a new GPU without confirming the PSU is healthy first.
How Long Should a PSU Last? (And When to Replace It Proactively)
| PSU Tier | Expected Lifespan | Example Brands |
|---|---|---|
| Budget / Unbranded | 2–4 years | Generic, Diablotek |
| Entry (80+ Bronze) | 4–6 years | EVGA BQ, Corsair CX |
| Mid-range (80+ Gold) | 6–8 years | Seasonic Focus, Corsair RMx |
| High-end (80+ Platinum/Titanium) | 8–12 years | Seasonic Prime, be quiet! Dark Power |
One key spec to look for when reading PSU reviews: Japanese capacitors. Manufacturers like Seasonic and Super Flower source higher-grade capacitors that measurably hold up better over time compared to budget units using cheaper alternatives. This shows up in long-term reliability data.
Warranty length is a signal too. A PSU with a 10-year warranty (Seasonic Prime) reflects manufacturer confidence in its internals. A 3-year warranty on a budget unit tells you the manufacturer doesn’t expect it to last much longer than that.
Proactive replacement rule: replace any PSU after 7 years regardless of symptoms, and any time you upgrade to a GPU with significantly higher TDP than your previous card. A PSU that handled a 150W GPU comfortably may not have the headroom or the remaining lifespan to reliably power a 320W replacement.
FAQ, Signs of a Bad Power Supply
How would I know if my power supply is bad?
The most common signs are random shutdowns during gaming or heavy workloads, blue screens with error codes like KERNEL_POWER or WHEA_UNCORRECTABLE_ERROR, a PC that won’t turn on or needs multiple attempts, burning smells, unusual noises (clicking, buzzing, grinding), and performance throttling that doesn’t match your hardware’s rated specs. Confirm with the paperclip test for basic power-on, then use HWiNFO64 and OCCT under load to check voltage rail stability against ATX spec tolerances.
How do I know if my PSU is fried?
A completely dead PSU with no fan spin, no standby LED on the motherboard, and a failed paperclip test is almost certainly fried. Burnt smell, visible scorch marks on the vent grill, or bulging capacitors visible through the enclosure openings confirm it. Don’t open the unit itself, stored capacitor charge can still be at lethal voltages even after the unit is unplugged from the wall.
Can a bad PSU cause a PC to not turn on at all?
Yes. If the PSU fails to deliver the +5VSB standby rail, the motherboard never receives the power it needs to monitor the power button. The system will appear completely dead, no LEDs, no fan movement, no response, even if the motherboard, CPU, and RAM are fully functional. This is one of the clearest signs pointing to the PSU rather than any other component.
How do I tell if the problem is my PSU or my motherboard?
Use the symptom comparison table earlier in this guide as your starting point. Then run the paperclip test. If the PSU fan doesn’t spin during the test, the PSU is the problem. If it does spin, swap the PSU into a known-good system or try a replacement PSU before assuming the motherboard is at fault. Remember: shutdowns under load almost always point to PSU, while a system that has standby power but won’t POST more often indicates a motherboard or RAM issue.
Is it worth repairing a failing PSU?
No. Not in almost any realistic scenario. PSU repair requires advanced electronics knowledge, proper equipment, and carries serious electrocution risk from capacitors that hold charge up to 400V even when unplugged. A quality replacement 650W Gold-rated PSU from a reputable brand starts at $60–$80. A 750W Gold unit runs $80–$110. Far cheaper than an ER visit or replacing the GPU and motherboard that a botched repair or continued use of a failing unit might destroy.
Final Thoughts
Here’s a quick recap of all 8 warning signs to check:
- Random shutdowns under load (especially gaming or rendering)
- BSODs with KERNEL_POWER, WHEA_UNCORRECTABLE_ERROR, or MEMORY_MANAGEMENT codes
- PC won’t turn on, or requires multiple attempts before POST
- Unusual noises: clicking, grinding, persistent buzzing
- Burning smell or visible burn marks near PSU vents
- GPU or CPU underperforming despite adequate specs
- High component temps despite clean airflow
- Electrical tingling from the case or erratic USB behavior
A replacement 650W Gold-rated PSU costs $60–$80. A GPU killed by a voltage spike from a failing unit costs $400 or more. The math isn’t complicated. If you’re seeing two or more of these signs, stop chasing software fixes and test the PSU first. It’s the component most builders check last when it should often be checked first.

Alex has been building and tweaking custom PCs for over 12 years. From budget builds to full custom water loops, he’s assembled more than 50 systems and helped hundreds of builders troubleshoot their rigs. When he’s not benchmarking the latest hardware, you’ll find him optimizing airflow setups or stress-testing overclocks.