How to Check What Power Supply You Have Without Opening Your PC
A power supply unit (PSU) is the component inside your PC that converts AC wall power into the regulated DC voltages your hardware needs to run.
Last updated: May 2026
Table of Contents
- Why Knowing Your PSU Wattage and Model Actually Matters
- Before a Hardware Upgrade
- For Troubleshooting Stability Issues
- When You Have a Prebuilt PC
- Method 1: Check Your Original Purchase Documentation
- Receipts, Amazon Orders, and Newegg Order History
- Manufacturer Spec Sheets for Prebuilt PCs
- Method 2: Use Windows Built-In Tools
- System Information Tool (msinfo32)
- Windows Management Instrumentation (WMIC) via Command Prompt
- Device Manager: What It Won’t Tell You
- Method 3: Third-Party Software to Estimate Power Draw
- HWMonitor (Free, Most Popular)
- Open Hardware Monitor (Free, Open Source)
- HWiNFO64 (Most Detailed Free Option)
- Method 4: Check Without Opening Using Physical Clues
- Reading the PSU Through the Case Vents
- Identify PSU Tier by Visible Connectors
- Form Factor Identification
- Method 5: Use a PSU Calculator to Reverse-Engineer Your Needs
- How Online PSU Calculators Work
- The Reverse-Engineering Approach
- Method 6: Physically Check the PSU Label
- Safety Steps Before You Open
- Where to Find the PSU in Your Case
- What to Read on the Label
- What to Do Once You Know Your PSU Specs
- Is Your PSU Enough for Your Upgrade?
- Should You Upgrade Your PSU?
- Frequently Asked Questions
- How do I check what PSU I have without opening the case?
- How do I check my power supply wattage on Windows 11?
- Can I check my PSU specs through Task Manager?
- How do I check what power supply I have on a laptop?
- What’s the minimum PSU wattage I need for a modern gaming PC?
- Wrapping Up
You’ve just picked out a new GPU. Then you realize you have no idea if your power supply can actually handle it. Unlike your CPU or GPU, Windows doesn’t expose PSU data natively, there’s no “Device Manager for power supplies.” Whether you want to know how to check what power supply you have on your PC without touching a screwdriver, or you need exact wattage figures before dropping money on an upgrade, this guide covers six methods that work on Windows 10, Windows 11, prebuilts, and custom builds alike.
Why Knowing Your PSU Wattage and Model Actually Matters
Before a Hardware Upgrade
This is the most common reason people go looking for PSU specs. GPU power demands have climbed sharply. The RTX 4070 pulls 200W TDP. The RTX 4090 pulls 450W. If you don’t know what’s in your case, you’re guessing, and a PSU that can’t keep up won’t just fail to run your new card, it can crash your entire system under load.
A practical rule: your PSU should have 25% headroom above your total system draw. A 12th Gen i5 paired with an RTX 4070 pulls roughly 450W under full load (200W GPU + ~150W CPU under boost + 100W rest of system). That means you need a 600W PSU at minimum, and a 650-750W unit is the smarter buy for headroom and efficiency reasons.
For Troubleshooting Stability Issues
Random shutdowns, BSODs, and coil whine are all classic PSU symptoms. Not just from underpowered units, aging PSUs lose efficiency too. Capacitor degradation typically starts showing up after 3-5 years, especially in budget units running near their rated load. Knowing your exact PSU model lets you pull up failure reports, check RMA history, and verify whether a known bad batch applies to your unit.
When You Have a Prebuilt PC
How to check what type of power supply you have matters especially in prebuilt systems. Dell, HP, and Lenovo routinely install non-standard, low-efficiency PSUs in their budget desktops. Sometimes the wattage is fine. The brand often isn’t. An OEM spec page might say “500W” but won’t tell you that it’s a generic unit with no 80 Plus certification and sketchy voltage regulation. Knowing the exact model changes what you do next.
A standard gaming PC with a mid-range GPU draws 300-500W under full load. An entry-level PSU rated at 500W operating at 80% efficiency delivers only 400W of usable power. That gap matters.
Method 1: Check Your Original Purchase Documentation
Receipts, Amazon Orders, and Newegg Order History
If you built your own PC, this is the fastest zero-effort method. Your order history has everything: exact model number, wattage, and efficiency rating. Zero guesswork.
- Amazon: Go to Returns & Orders, search for your build date
- Newegg: Account → Order History → search by date range
- Best Buy: Purchase History in your account shows receipts with full product names
You’ll get the exact model string (e.g., “Corsair RM750x 2021”) which you can then cross-reference against the manufacturer’s spec sheet for complete rail ratings and efficiency data.
Manufacturer Spec Sheets for Prebuilt PCs
If someone else built your PC or you bought it prebuilt, the OEM support page is your best friend. Every major manufacturer ties component specs to the serial number or service tag.
- Dell: support.dell.com → Enter your Service Tag → View full system specs
- HP: support.hp.com → Enter serial number
- Lenovo: pcsupport.lenovo.com → Enter serial or model number
One honest caveat: OEM spec pages almost always list PSU wattage but rarely identify the brand or model of the actual unit installed. You’ll know you have a 500W PSU. You won’t know if it’s a decent unit or a fire hazard. Still useful for upgrade planning.
Method 2: Use Windows Built-In Tools
System Information Tool (msinfo32)
This works on both Windows 10 and Windows 11, so if you’ve been searching for how to check what power supply you have on Windows 11, this is the built-in starting point.
- Press Win + R, type msinfo32, press Enter
- In the left panel, navigate to Components → Power
- Look for any populated fields under the Power section
Here’s the honest truth: on custom-built PCs, this section is almost always empty. PSUs don’t communicate with Windows at the OS level. On some OEM systems (Dell, HP, Lenovo), the BIOS populates basic PSU data that msinfo32 can surface. Worth checking. Don’t expect miracles on a custom rig.
Windows Management Instrumentation (WMIC) via Command Prompt
WMIC can pull system information that msinfo32 sometimes misses. Open Command Prompt as Administrator and run:
wmic path Win32_Battery get /all
For motherboard info that sometimes accompanies PSU data on branded systems:
wmic baseboard get product,Manufacturer,version,serialnumber
Rarely returns direct PSU data on desktop builds. Worth 30 seconds to try on an OEM system before moving to other methods.
Device Manager: What It Won’t Tell You
PSUs do not appear in Device Manager. At all. There’s no firmware, no driver, no communication channel between the PSU and Windows. If someone on a forum told you to check Device Manager for PSU info, that advice is simply wrong. This is why every software method either estimates wattage indirectly or comes up empty, the OS genuinely can’t query the PSU.
According to contributors at the Tom’s Hardware Forum, the PSU is not intelligent hardware and cannot be detected through software interrogation. The label on the unit itself is the only authoritative source for model and wattage data.
Method 3: Third-Party Software to Estimate Power Draw
HWMonitor (Free, Most Popular)
Download it from cpuid.com/softwares/hwmonitor.html. HWMonitor shows real-time voltage rails (+12V, +5V, +3.3V) and per-component power draw for your CPU and GPU.
What it will NOT tell you: PSU brand, model, or rated wattage. What it will tell you: whether your PSU is healthy right now.
A stable +12V rail reading between 11.8V and 12.2V under load indicates a healthy PSU. Readings below 11.7V under stress suggest the unit is struggling. To test properly:
- Download and install HWMonitor
- Run Prime95 (CPU stress) and FurMark (GPU stress) simultaneously
- Watch the +12V rail, it should stay above 11.8V
- Sum CPU wattage + GPU wattage + ~100W for the rest of the system to estimate total draw
Open Hardware Monitor (Free, Open Source)
Available at openhardwaremonitor.org. Similar to HWMonitor but shows per-component watt readings more clearly in a single view. Good for estimating total system load in watts so you can compare against a known or estimated PSU rating.
HWiNFO64 (Most Detailed Free Option)
The most granular free tool available. Download from hwinfo.com. HWiNFO64 breaks down individual power delivery per rail, which is genuinely useful when diagnosing whether a specific rail (like the +12V CPU line) is underpowered. If your system crashes during CPU-heavy tasks but not GPU tasks, per-rail data narrows that down fast.
| Software | Shows PSU Model? | Shows Voltage Rails? | Shows Watt Draw? | Best For | Free? |
|---|---|---|---|---|---|
| HWMonitor | No | Yes | Partial (CPU/GPU only) | Quick voltage check | Yes |
| Open Hardware Monitor | No | Yes | Yes (per component) | Open source users | Yes |
| HWiNFO64 | No | Yes | Yes (most detailed) | Deep diagnostics | Yes |
| GPU-Z | No | No | GPU only | GPU-specific load | Yes |
Method 4: Check Without Opening Using Physical Clues
Reading the PSU Through the Case Vents
This one’s underused. No screwdriver needed.
Most ATX PSUs have a label on the side that faces the interior of the case. On modern mid-towers built after 2018, the PSU sits at the bottom behind a shroud, but that shroud almost always has a mesh vent or open bottom. Grab a flashlight and your phone camera, aim through the vent, and photograph the label.
What you’re looking for:
- Brand name and model number (usually printed large)
- Total wattage (listed as “Max Output” or “Total Power” in watts)
- 80 Plus certification logo (Bronze, Gold, Platinum, etc.)
Works best on cases with bottom-mounted PSUs and open-mesh undersides. Doesn’t work well on fully sealed OEM desktops. Worth trying before you grab a screwdriver.
Identify PSU Tier by Visible Connectors
Flip the case around and look at the cable management area behind the motherboard tray. PSU cables tell a story:
- 1x EPS CPU connector: likely an entry-level unit (400-550W range)
- 2x EPS CPU connectors: almost certainly a high-end unit (750W+)
- 2x PCIe 8-pin cables: capable of powering mid-to-high-end GPUs
- 1x 16-pin 12VHPWR connector: modern high-wattage unit designed for RTX 40 series cards
Not a precise method. But it tells you capability and gives you a rough tier before you open anything.
Form Factor Identification
If you’re buying a replacement, knowing how to check what type of power supply you have means knowing its physical form factor, wattage alone isn’t enough.
- ATX PSU: 150mm × 86mm × 140-200mm, standard for most full and mid-tower builds
- SFX PSU: 125mm × 63.5mm × 100mm, small form factor cases
- TFX/Flex ATX: narrow rectangular units used in slim OEM desktops
An ATX PSU will not physically fit in an SFX case. Get this wrong and you’re returning parts.
Method 5: Use a PSU Calculator to Reverse-Engineer Your Needs
How Online PSU Calculators Work
Tools like the OuterVision PSU Calculator estimate your system’s total power draw based on your component list. If your PC runs stably, your PSU is at minimum meeting that calculated number. It’s not a perfect identification method, but it’s a useful triangulation step.
The Reverse-Engineering Approach
- Step 1: Go to OuterVision PSU Calculator
- Step 2: Enter your CPU, GPU, RAM, storage drives, and case fans (find your CPU and GPU names in Task Manager → Performance if you’re unsure)
- Step 3: The result shows your estimated minimum wattage requirement
- Step 4: If your system is stable under load, your PSU is at or above this number
Pair this with HWiNFO64 voltage data. If your +12V rail holds steady and the calculator says you need 500W, your PSU is likely a 550-650W unit running comfortably. Not a definitive ID, but it narrows things down considerably when no documentation exists.
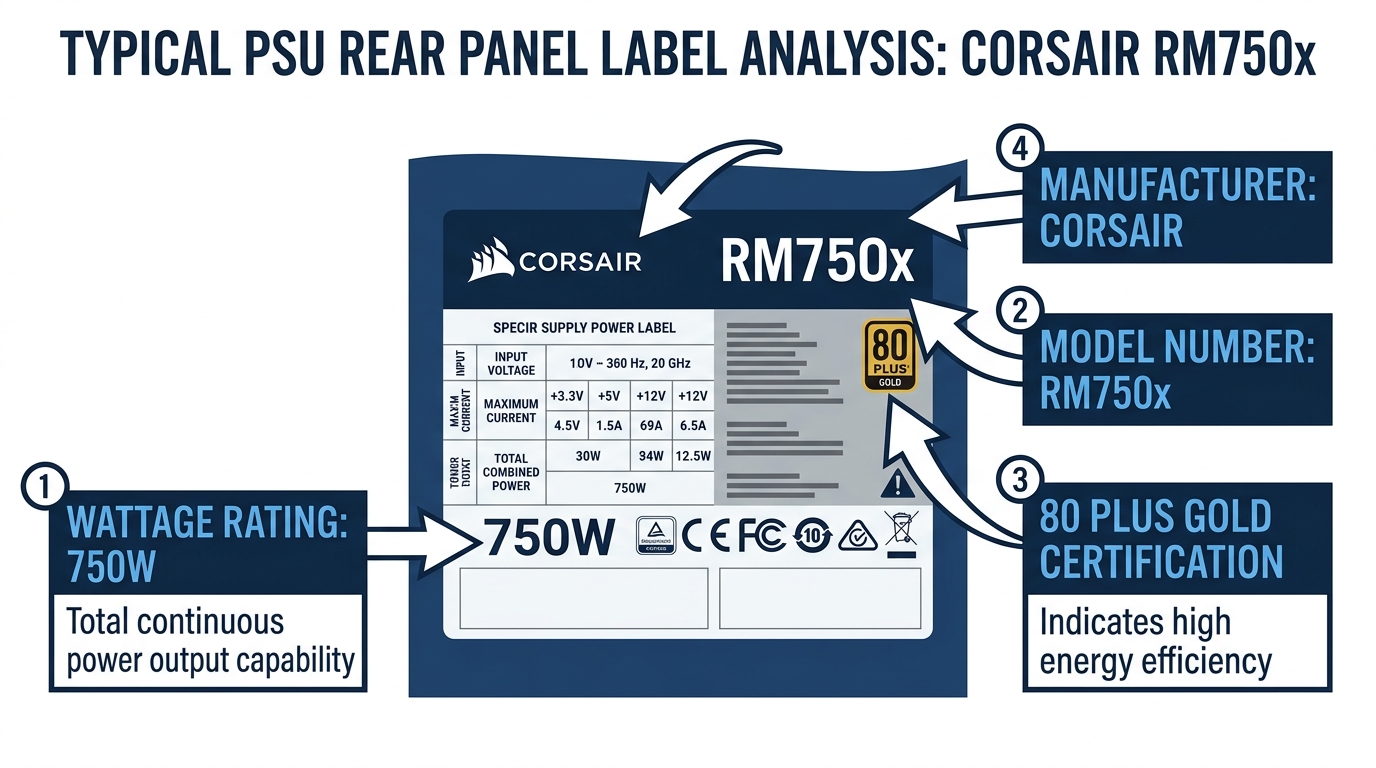
Method 6: Physically Check the PSU Label
The title says “without opening”, but this is the definitive fallback. Every other method approximates. This one gives you ground truth.
Safety Steps Before You Open
- Power off the PC completely
- Flip the PSU switch to O (off position)
- Unplug the power cable from the wall
- Touch an unpainted metal part of the chassis to discharge static before touching anything inside
- Do NOT open the PSU itself. Capacitors inside retain lethal charge even hours after unplugging. The exterior label is all you need.
Where to Find the PSU in Your Case
- Modern mid/full-towers: bottom-rear, usually behind a PSU shroud
- Older cases and some budget cases: top-rear mount
- Label orientation: typically faces the interior of the case in most installations
What to Read on the Label
- Brand and model number: e.g., “Corsair RM750x” or “EVGA SuperNOVA 650 G6”
- Total output wattage: listed as “Max Output” or “Total Power”
- +12V rail rating: the most important number, this is what powers your CPU and GPU
- +5V and +3.3V rails: power storage, USB, and motherboard logic
- Efficiency certification: 80 Plus Bronze / Gold / Platinum / Titanium
- Safety markings: UL, CE, FCC, absence of these on a budget unit is a red flag
| 80 Plus Rating | Efficiency at 20% Load | Efficiency at 50% Load | Efficiency at 100% Load |
|---|---|---|---|
| 80 Plus (White) | 80% | 80% | 80% |
| 80 Plus Bronze | 82% | 85% | 82% |
| 80 Plus Silver | 85% | 88% | 85% |
| 80 Plus Gold | 87% | 90% | 87% |
| 80 Plus Platinum | 90% | 92% | 89% |
| 80 Plus Titanium | 92% | 94% | 90% |
Gold is the sweet spot for most builds. Anything below Bronze on a gaming PC is worth replacing on principle.
What to Do Once You Know Your PSU Specs
Is Your PSU Enough for Your Upgrade?
Use this formula: (CPU TDP + GPU TDP + 100W for everything else) × 1.25 = recommended PSU wattage. The 1.25 multiplier gives you the 25% headroom that keeps your PSU running efficiently and extends its lifespan.
If you’re weighing options like the RTX 4070 vs 4080 for your next upgrade, the TDP difference between those two cards (200W vs 320W) translates directly into different PSU requirements for the same system.
| GPU | GPU TDP | Recommended PSU (i5/Ryzen 5 system) | Recommended PSU (i9/Ryzen 9 system) |
|---|---|---|---|
| RTX 4060 | 115W | 550W | 650W |
| RTX 4070 | 200W | 650W | 750W |
| RTX 4070 Ti Super | 285W | 750W | 850W |
| RTX 4090 | 450W | 850W | 1000W |
| RX 7900 XTX | 355W | 850W | 1000W |
Should You Upgrade Your PSU?
Replace it if any of these apply:
- It’s 5+ years old and running a high-load system
- Efficiency is below 80 Plus Bronze
- Your calculated system draw is within 25% of the rated wattage (no headroom left)
- You’re hearing coil whine under GPU load
- The system crashes or reboots during gaming but not during idle
You’re probably fine if your unit is Gold or Platinum rated, under 4 years old, and you have at least 25% headroom above your calculated draw. Keep it. Unstable GPU temperatures and system crashes that look GPU-related are sometimes PSU issues in disguise, so it’s always worth checking both.
Frequently Asked Questions
How do I check what PSU I have without opening the case?
Your best no-disassembly options are: check your purchase order history (fastest for custom builds), use the OEM support page with your serial number (fastest for prebuilts like Dell or HP), or shine a flashlight through the case vents and photograph the PSU label with your phone camera. Software tools like HWMonitor can show voltage rail data and approximate power draw, but they can’t identify the PSU brand, model, or rated wattage, the hardware simply doesn’t communicate that information to Windows.
How do I check my power supply wattage on Windows 11?
Windows 11 has no native PSU wattage display. Start with msinfo32, press Win + R, type msinfo32, go to Components, then Power. On OEM systems, this sometimes shows PSU data. On custom builds, it’s almost always blank. HWiNFO64 is the best software option for monitoring live power draw across your components. The definitive answer still comes from physically reading the PSU label, or checking your purchase documentation if you built the machine yourself.
Can I check my PSU specs through Task Manager?
No. Task Manager shows CPU, GPU, RAM, disk, and network utilization, nothing PSU-related. There’s no firmware or driver interface between the PSU and Windows that Task Manager (or any OS tool) can query. This is a common misconception circulating in older forum threads. The PSU is passive hardware from Windows’ perspective.
How do I check what power supply I have on a laptop?
For the external AC adapter (the brick), look at the label on the adapter itself, it lists input voltage, output voltage, amperage, and total wattage. For the internal power circuit of a laptop, the manufacturer’s support page using your laptop’s model number is the reliable source. Search your model number + “specifications” on the manufacturer’s site for full power details.
What’s the minimum PSU wattage I need for a modern gaming PC?
For a mid-range build (Ryzen 5 7600 or Core i5-13600K with an RTX 4070), 650W Gold-rated is the practical minimum, and it’s tight. Budget builds running integrated graphics can function on 300-400W. Anything with an RTX 4090 or RX 7900 XTX in a high-end system should use a 1000W Platinum unit. Don’t cheap out on PSU headroom, it’s the one component whose failure can take other parts with it.
Wrapping Up
Knowing your PSU specs isn’t optional before a hardware upgrade, it’s the prerequisite. The fastest methods are your order history (custom builds) or the OEM support page with your serial number (prebuilts). Software like HWiNFO64 tells you whether your current PSU is healthy and how hard it’s working, even if it can’t name the unit. And if all else fails, a flashlight through the case vents or a quick case opening gets you ground truth in under five minutes.
| Your Situation | Best Method | Time Required |
|---|---|---|
| Custom-built PC, know where you bought parts | Order history lookup | 2 min |
| Prebuilt (Dell/HP/Lenovo) | OEM support page + serial number | 3 min |
| Check if PSU is sufficient for upgrade | HWiNFO64 + PSU calculator | 10 min |
| Need exact model and brand | Physical label (open case) | 5 min |
| Can’t open case, no documentation | Flashlight through case vents | 2 min |
Once you’ve confirmed your PSU specs, run them through the wattage formula above against your target GPU’s TDP. If you’ve got 25% headroom and a Gold or better rating, you’re good to upgrade. If not, sort the PSU first, everything else follows from there.
Common Dell Optiplex SFF PSU wattages for reference:
- Optiplex 3050 SFF: 240W
- Optiplex 5070 SFF: 200W
- Optiplex 7070 SFF: 200W
- Optiplex 3070 SFF: 200W

Alex has been building and tweaking custom PCs for over 12 years. From budget builds to full custom water loops, he’s assembled more than 50 systems and helped hundreds of builders troubleshoot their rigs. When he’s not benchmarking the latest hardware, you’ll find him optimizing airflow setups or stress-testing overclocks.