Motherboard HDMI Not Working: Causes and Fixes
Motherboard HDMI not working is typically caused by a CPU without integrated graphics, a disabled iGPU in BIOS, a dedicated GPU overriding the onboard output, or a faulty HDMI cable or port.
Last updated: July 2026
Table of Contents
- Quick Answer: Why Is My Motherboard HDMI Not Working?
- Why Your Motherboard Even Has an HDMI Port (And When It Won’t Work at All)
- Motherboard HDMI Is Powered by Your CPU’s Integrated Graphics, Not Your GPU
- Which CPUs Have Integrated Graphics? (Quick Reference by Brand)
- HDMI Version on Motherboards: Does Your Cable or Monitor Support It?
- The 8 Most Common Causes of Motherboard HDMI Not Working
- How to Fix Motherboard HDMI Not Working: Step-by-Step
- Fix 1: Check Physical Connections First
- Fix 2: Enable Integrated Graphics in BIOS/UEFI
- Fix 3: Brand-Specific BIOS Steps (ASUS, Gigabyte, MSI)
- Fix 4: Resolve GPU vs. iGPU Conflict
- Fix 5: Update or Reinstall iGPU Drivers
- Fix 6: Clear CMOS and Reset BIOS to Defaults
- Fix 7: Update Motherboard BIOS/UEFI Firmware
- Motherboard HDMI Not Working for a Second Monitor
- When It’s Not a Settings Problem: Diagnosing Physical Port Damage
- Quick Troubleshooting Checklist
- FAQ: Motherboard HDMI Not Working
- How do I fix motherboard HDMI not working?
- How do I enable my motherboard’s HDMI port?
- Why is my PC not outputting through HDMI from the motherboard?
- Why is my HDMI not working even though it’s plugged in?
- Can I use both my GPU and motherboard HDMI at the same time for dual monitors?
- Final Thoughts
Quick Answer: Why Is My Motherboard HDMI Not Working?
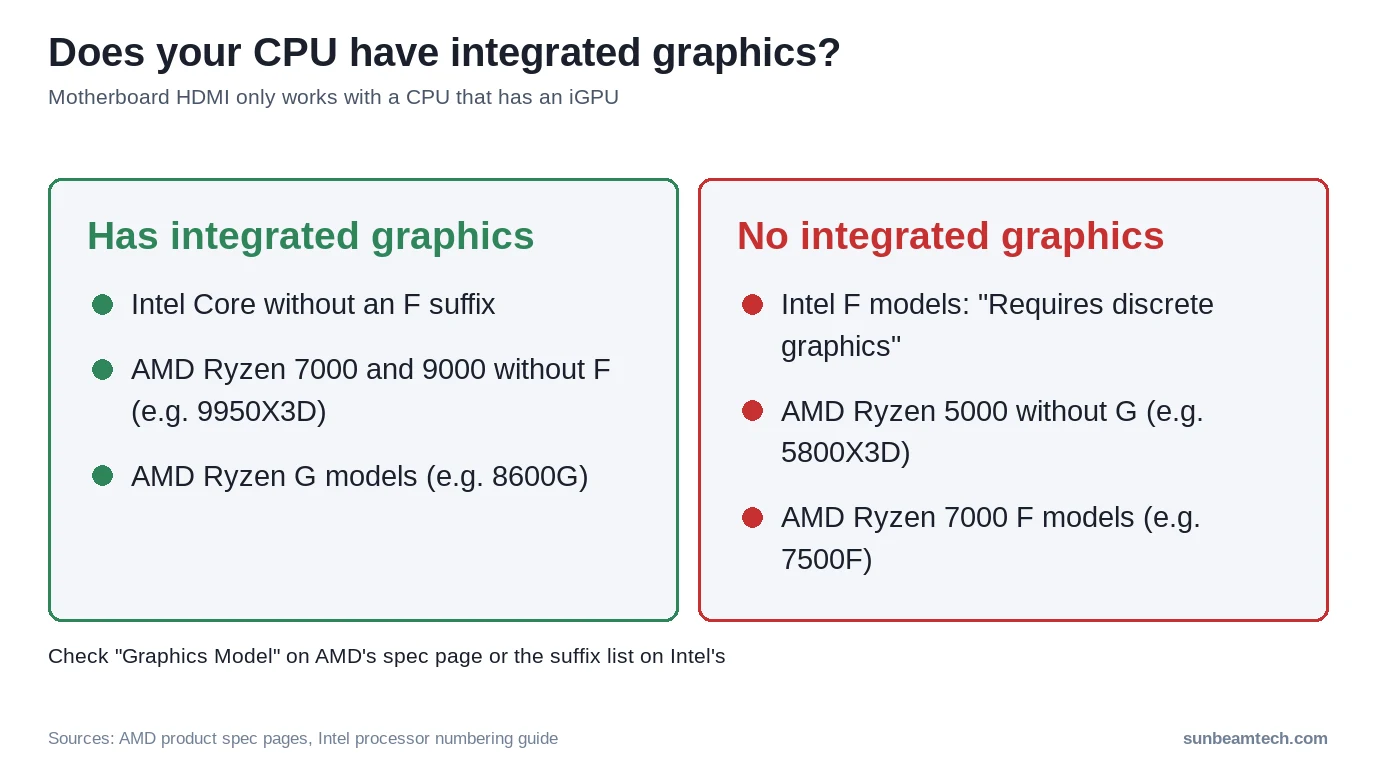
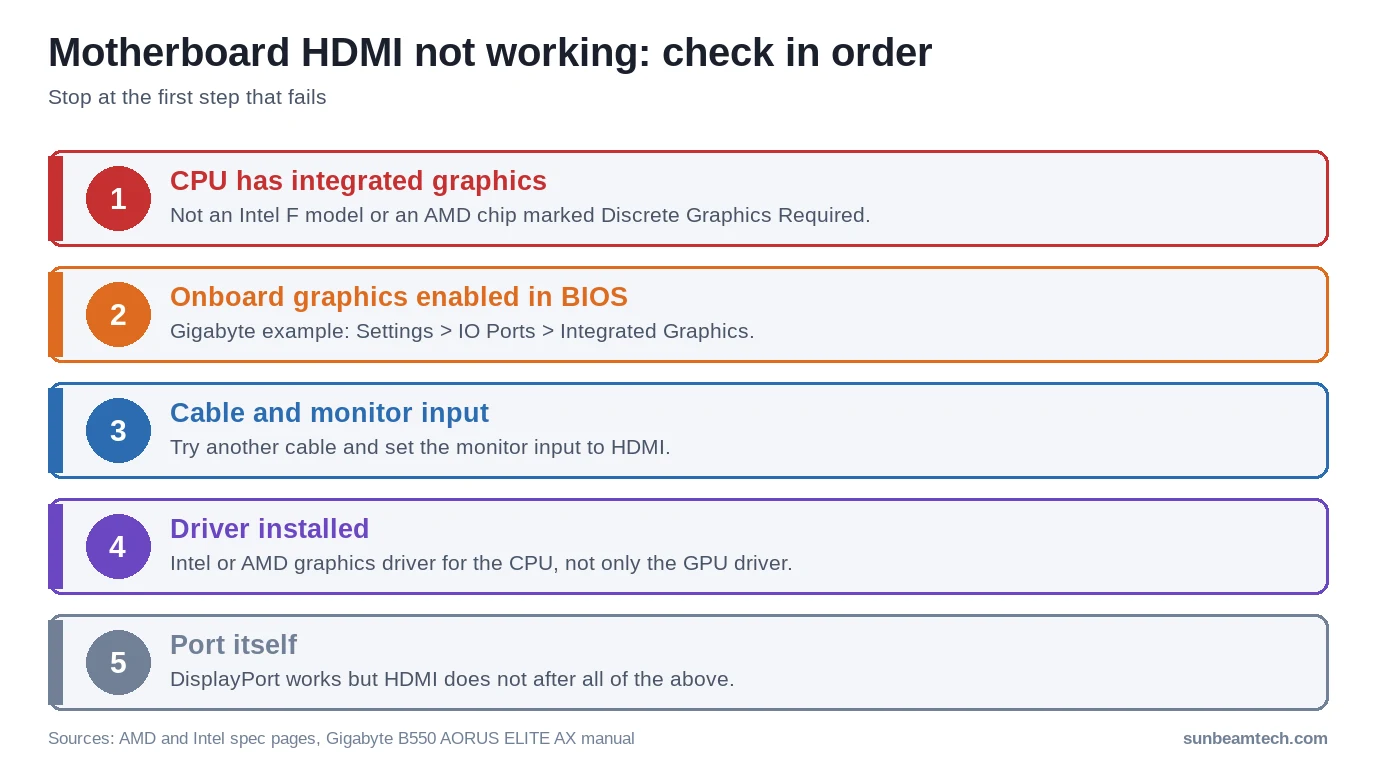
The single most common reason your motherboard’s HDMI port produces no signal is that either your CPU has no integrated graphics at all, or the iGPU is disabled in BIOS because a dedicated GPU is installed. Fix it by entering BIOS, navigating to Graphics Configuration, and setting Primary Display to IGFX or CPU Graphics. If your CPU has no integrated graphics at all (Intel “F” models, or AMD Ryzen chips that AMD lists as “Discrete Graphics Card Required”, such as the Ryzen 7 5800X3D and Ryzen 5 7500F), the port can’t output video whatever the settings.
The cause is rarely obvious from the blank screen alone. This guide covers every reason your onboard HDMI port might be dead, including the BIOS settings that fix it, brand-specific walkthroughs for ASUS, Gigabyte, and MSI boards, what to do when you’re running a dual monitor setup, and how to tell when the port itself is physically damaged beyond software fixes.
- 🔴 No iGPU (Intel “F” models, AMD chips marked “Discrete Graphics Card Required”): The port can’t output video with that CPU.
- 🟡 iGPU disabled in BIOS: Fixable. Set Primary Display to IGFX.
- 🟡 Dedicated GPU overriding onboard output: Enable IGD Multi-Monitor in BIOS.
- 🟡 Wrong monitor input selected: Switch monitor source to HDMI.
- 🟡 Outdated iGPU drivers: Update via Device Manager or Intel/AMD tool.
- 🟡 Corrupted BIOS settings: Clear CMOS and reload defaults.
- 🔴 Physical port damage (bent pins, desoldered joint): RMA or professional repair required.
Why Your Motherboard Even Has an HDMI Port (And When It Won’t Work at All)
Before running through fixes, it’s worth understanding what that HDMI port on your motherboard’s I/O panel actually does. Skipping this step is exactly why most people spend an hour troubleshooting a problem that has no software solution.
Motherboard HDMI Is Powered by Your CPU’s Integrated Graphics, Not Your GPU
Your motherboard doesn’t generate its own video signal. The HDMI port on the I/O panel outputs video from the CPU’s integrated graphics processor (iGPU). If your CPU doesn’t have an iGPU built in, that port is electrically dead. Not broken. Not misconfigured. Just completely non-functional by design.
This is why plugging into your motherboard HDMI and getting no signal on a brand-new build isn’t always a defect. It might simply mean you bought a CPU that was never designed to output video through that port.
Which CPUs Have Integrated Graphics? (Quick Reference by Brand)
| CPU Family | iGPU Included? | Onboard HDMI Functional? |
|---|---|---|
| Intel Core i3/i5/i7/i9 (10th–14th Gen, no “F” suffix) | Yes (Intel UHD 630/750/770) | Yes, if enabled in BIOS |
| Intel Core “F” series (e.g., i5-12600KF, i7-14700KF) | No | No, port is inactive |
| Intel Core Ultra 200 series (Arrow Lake, e.g., Core Ultra 9 285K) | Yes (Intel Graphics) | Yes, if enabled in BIOS |
| AMD Ryzen 7000 and 9000 desktop (non-F, e.g., Ryzen 7 7800X3D, Ryzen 9 9950X3D) | Yes (AMD Radeon Graphics, 2 cores) | Yes, if enabled in BIOS |
| AMD Ryzen 5000 without G (e.g., Ryzen 7 5800X3D) and Ryzen 7000 F models (e.g., Ryzen 5 7500F) | No (“Discrete Graphics Card Required”) | No, port is inactive |
| AMD Ryzen G-series (e.g., Ryzen 5 8600G with Radeon 760M) | Yes (AMD Radeon Graphics) | Yes, if enabled in BIOS |
The Intel “F” suffix trap catches a lot of builders. You buy an i5-12600KF because it’s slightly cheaper, drop it into a board with a perfectly functional HDMI port, and wonder why the screen stays dark. The answer: the “F” means no iGPU. That port will never output video with that CPU installed. No BIOS setting changes that.
Intel’s iGPU naming by generation matters too. The UHD 630 ships with 8th through 10th Gen CPUs, UHD 750 with 11th Gen, and UHD 770 with 12th and 13th Gen. Each generation has different driver requirements and slightly different HDMI output capabilities.
HDMI Version on Motherboards: Does Your Cable or Monitor Support It?
The HDMI version and maximum resolution of the onboard port differ from board to board, and from CPU to CPU, so check both spec pages before you assume the port is broken. MSI’s MAG B550 Tomahawk spec page, for example, lists “1x HDMI 2.1 port, supports a maximum resolution of 4096×2160 @60Hz”, and adds that the output is only “Available for the processor with integrated graphics.” On the CPU side, AMD lists HDMI 2.1 for the Radeon 760M graphics in the Ryzen 5 8600G. If your monitor needs more than the port supports, use the graphics card or a DisplayPort output instead.
Check your motherboard’s spec sheet (linked from the manufacturer’s product page) to confirm which HDMI version your I/O panel carries before assuming it’s broken.
The 8 Most Common Causes of Motherboard HDMI Not Working
Run through this list before touching anything. Knowing the cause cuts your fix time in half.
- No integrated graphics in the CPU: Intel “F” models and AMD chips listed as “Discrete Graphics Card Required” (for example the Ryzen 7 5800X3D) have no iGPU, so the port can’t work. Ryzen 7000 and 9000 chips without an F do have one.
- iGPU disabled in BIOS/UEFI: When a dedicated GPU is installed, most boards default to disabling the onboard graphics output.
- Dedicated GPU set as primary display adapter: BIOS routes all video output to the PCIe card, leaving the motherboard HDMI dark.
- Faulty or wrong-spec HDMI cable: Cheap cables fail more often than people expect. An HDMI 1.4 cable won’t carry an HDMI 2.0 signal correctly.
- Physically damaged HDMI port: Bent pins, a desoldered joint, or debris in the port can kill signal entirely.
- Wrong monitor input source selected: Your monitor may be looking at DisplayPort or DVI while the signal comes in on HDMI.
- Missing, outdated, or corrupt iGPU drivers: Windows won’t output video through a port whose driver isn’t functioning.
- Outdated BIOS firmware: On a new or upgraded system, the BIOS may not support the CPU yet.
How to Fix Motherboard HDMI Not Working: Step-by-Step
Work through these fixes in order. The earlier steps take two minutes. The later ones are only needed if the simple stuff doesn’t resolve it.
Fix 1: Check Physical Connections First
Start here. Always. You’d be surprised how often a cable that looks seated isn’t fully clicked in.
- Reseat the cable: Disconnect and firmly reconnect the HDMI cable at both the motherboard end and the monitor end. It should click or feel snug.
- Swap the cable: Try a completely different HDMI cable. A bad cable is a surprisingly common culprit, especially for intermittent signal.
- Inspect the port: Shine a flashlight into the HDMI port on your motherboard. Look for bent pins, debris, or any sign that the port has shifted on the board.
- Check your monitor’s input source: Press the input/source button on your monitor and confirm it’s set to HDMI, not DisplayPort, VGA, or DVI.
- Try a different monitor: If you have access to a second screen, plug in there to rule out a monitor-side issue.
Not exciting. But it eliminates the dumbest causes immediately.
Fix 2: Enable Integrated Graphics in BIOS/UEFI
This is the fix for the majority of people with a compatible CPU who still get no signal. When a dedicated GPU is installed, most boards default to routing all display output through the PCIe card. The onboard HDMI gets shut off.
- Power off your PC completely.
- Boot and press DEL or F2 immediately to enter BIOS (the key varies by board, but DEL works on most).
- Find the onboard graphics options. Intel’s guide to enabling integrated graphics notes that the method “is different for every motherboard manufacturer”, so use the brand steps below or your board manual.
- Set Primary Display to IGFX or CPU Graphics. Change it away from PEG, PCIe, or Auto if that’s what’s currently selected.
- If you want both your dedicated GPU and the motherboard HDMI active at the same time, enable IGD Multi-Monitor.
- Press F10 to save and exit. If your BIOS screen displays correctly during POST, the problem is typically a driver issue or a display frequency mismatch rather than a hardware failure, which means it’s solvable without replacing anything.
Fix 3: Brand-Specific BIOS Steps (ASUS, Gigabyte, MSI)
Generic BIOS instructions only get you so far. Each manufacturer labels these settings differently, and the menu paths don’t always match. Here’s exactly where to find the right settings on the three most common board brands.
ASUS Motherboard HDMI Not Working:
- Enter BIOS and press F7 to switch to Advanced Mode if you’re in EZ Mode.
- Navigate to: Advanced → System Agent (SA) Configuration → Graphics Configuration
- Set Primary Display to IGFX
- Enable iGPU Multi-Monitor if you want both outputs active
- Applies to ASUS ROG, TUF Gaming, Prime, and ProArt series boards
Gigabyte Motherboard HDMI Not Working:
- Enter BIOS and go to Settings → IO Ports (the location in Gigabyte’s B550 AORUS ELITE AX manual; check your own board’s manual)
- Set Initial Display Output to IGD Video to make the onboard graphics the first display. The default is PCIe 1 Slot.
- Set Integrated Graphics to Forces to keep the onboard graphics on with a graphics card installed. On the default, Auto, the BIOS enables or disables it depending on the graphics card installed.
MSI Motherboard HDMI Not Working:
- Enter BIOS and go to Settings → Advanced → Integrated Graphics Configuration
- Set IGD Multi-Monitor to Enabled
- Confirm that Primary Display is not locked to PCIe
Fix 4: Resolve GPU vs. iGPU Conflict
When a dedicated GPU is physically installed in your build, the BIOS almost always defaults to making the GPU the primary display adapter. The motherboard HDMI goes dark as a result.
The BIOS fix is covered in Fix 2 above.
If you want the motherboard HDMI to be the sole display output and not use the GPU at all, say, to troubleshoot the GPU or test onboard graphics, set Primary Display to IGFX and leave IGD Multi-Monitor off.

Fix 5: Update or Reinstall iGPU Drivers
Your BIOS settings can be perfect, but if Windows doesn’t have a working driver for the iGPU, the HDMI output won’t function at the OS level.
- Right-click the Start menu and open Device Manager
- Expand Display Adapters
- Look for Intel UHD Graphics or AMD Radeon Graphics (the iGPU entry, separate from your dedicated card)
- If it’s missing entirely, the iGPU may still be disabled at the BIOS level, go back to Fix 2
- If it’s present but shows a yellow warning, right-click and select Update Driver → Search automatically
For Intel iGPU drivers, use the Intel Driver and Support Assistant to automatically detect and install the correct version for your CPU generation.
For AMD Ryzen G-series processors, use the AMD Auto-Detect and Install tool.
Fix 6: Clear CMOS and Reset BIOS to Defaults
If your BIOS settings are corrupted, unknown (you bought the PC secondhand), or the result of an overclocking session gone wrong, clearing the CMOS resets everything to factory defaults. This is consistently the top community-recommended fix when nothing else works.
Three ways to do it:
- Method 1 (software): Inside BIOS, select Load Optimized Defaults (sometimes called “Load Setup Defaults”), then save and exit.
- Method 2 (jumper): With the power cord unplugged, short the two clear CMOS pins (labelled CLRTC, CLR_CMOS, JBAT1 or CLRCMOS1, depending on the brand) for 5 to 10 seconds with a screwdriver tip or a jumper cap, then remove it. Only older boards use a 3-pin jumper that you move from pins 1-2 to 2-3 and back.
- Method 3 (battery): Power off and unplug the PC. Remove the circular CMOS battery from the motherboard for 30 to 60 seconds. Reinstall and boot.
One important heads-up: clearing CMOS resets all BIOS settings, including your XMP or EXPO RAM profiles. You’ll need to re-enable those after the clear. Small price if it fixes your HDMI problem.
Fix 7: Update Motherboard BIOS/UEFI Firmware
An outdated BIOS can cause problems after a CPU upgrade. For new and upgraded systems, AMD’s boot troubleshooting guide says to “confirm that the BIOS version on the motherboard is compatible with the processor.” If you’re running a board with an older firmware version and a newer CPU, this is worth checking.
- Find your exact board model. Check the box, the physical board, or the BIOS screen itself.
- Go to the manufacturer’s support page (ASUS, Gigabyte, MSI, ASRock, etc.) and download the latest BIOS file for your specific board revision.
- Flash using the board’s built-in utility: EZ Flash (ASUS), Q-Flash (Gigabyte), M-Flash (MSI).
Do not interrupt a BIOS flash. Power failure mid-flash can brick the board. Plug into a UPS or at least make sure no one’s going to hit the power strip. Worth being careful here.
Motherboard HDMI Not Working for a Second Monitor
This is a specific scenario that deserves its own section. You’ve got a GPU driving your primary monitor, and you want to use the motherboard’s HDMI port for a second screen. Totally doable, but only with the right CPU and BIOS settings.
Requirements: your CPU must have an integrated GPU, and IGD Multi-Monitor must be enabled in BIOS. Without both of these, Windows won’t even see the second display.
Step-by-step for dual monitor setup using motherboard HDMI:
- Enable IGD Multi-Monitor in BIOS (see Fix 2 above for exact menu paths).
- Boot into Windows with both monitors connected.
- Right-click your desktop and open Display Settings.
- Click Detect if the second monitor doesn’t appear automatically.
- Set the display arrangement to Extend, Duplicate, or Second Screen Only depending on your preference.
Common failure point: Windows detects both displays but shows one as “Disconnected.” The usual fix is rolling back the Intel display driver one version, or doing a clean uninstall and reinstall via Device Manager.
If you want to understand the differences between monitor connection types before setting up your displays, the guide to DisplayPort vs HDMI covers bandwidth, adaptive sync, and which cable to use for each scenario.
When It’s Not a Settings Problem: Diagnosing Physical Port Damage
You’ve gone through every fix above. BIOS is set correctly. Drivers are current. A different cable and monitor both confirm the problem. DisplayPort on the same board works fine. But the HDMI port produces nothing.
That’s physical damage. And it’s more common than manufacturers like to admit.
Signs of a damaged HDMI port:
- Intermittent signal: Connection cuts in and out when you wiggle the cable
- No signal across all cables and monitors tested: Rules out a cable or monitor issue
- Visibly loose port: The port has physical play or wobble when you touch it
- Bent or missing pins: Visible when you shine a flashlight directly into the port
The flashlight inspection is the most useful quick diagnostic. Hold a small light at an angle and look straight into the HDMI port. Healthy pins are straight, evenly spaced, and all present. A damaged port will have one or more pins bent sideways, pushed back, or absent entirely.
Your options if the port is physically damaged:
- Under warranty: Submit an RMA claim. Don’t attempt to repair it yourself, that voids the warranty immediately.
- Out of warranty: A qualified micro-soldering repair shop can reflow or replace the HDMI port.
- Workaround: If the motherboard also has a DisplayPort output and your monitor supports it, use that instead. If your monitor only has HDMI inputs, an active DisplayPort-to-HDMI adapter (not a passive cable) will work.
If DisplayPort on the same board works and HDMI still gives nothing after a new cable, another monitor and a CMOS clear, the HDMI port itself is the most likely suspect.
Quick Troubleshooting Checklist
| # | Check | Done? |
|---|---|---|
| 1 | Cable firmly seated at both ends | ☐ |
| 2 | Tested a second known-good HDMI cable | ☐ |
| 3 | Monitor input source set to HDMI | ☐ |
| 4 | CPU has integrated graphics (not an Intel “F” model or an AMD chip marked “Discrete Graphics Card Required”) | ☐ |
| 5 | BIOS: Primary Display set to IGFX or CPU Graphics | ☐ |
| 6 | BIOS: IGD Multi-Monitor enabled (if dGPU is also installed) | ☐ |
| 7 | iGPU driver installed and up to date | ☐ |
| 8 | CMOS cleared and BIOS reset to defaults | ☐ |
| 9 | BIOS firmware updated to latest version | ☐ |
| 10 | Physical port inspected via flashlight, no visible damage or bent pins | ☐ |
FAQ: Motherboard HDMI Not Working
How do I fix motherboard HDMI not working?
Start by confirming your CPU has integrated graphics, check that it isn’t an Intel “F” model or an AMD chip that AMD lists as “Discrete Graphics Card Required”. If your CPU does have an iGPU, enter BIOS and set Primary Display to IGFX, then enable IGD Multi-Monitor if you also have a dedicated GPU installed. Try a different HDMI cable, update your iGPU drivers via Device Manager or the Intel/AMD driver tool, and clear CMOS if problems persist. If DisplayPort works on the same board but HDMI doesn’t after all that, suspect physical port damage.
How do I enable my motherboard’s HDMI port?
Enter BIOS by pressing DEL or F2 at boot and find the onboard graphics settings. The path differs by brand and board: on Gigabyte’s B550 AORUS ELITE AX, for example, it’s Settings → IO Ports → Initial Display Output, set to IGD Video, and the brand steps above cover the rest. On many boards the option is called Primary Display, set to IGFX or CPU Graphics. If you have a dedicated GPU installed and want both outputs running simultaneously, enable IGD Multi-Monitor. Save with F10 and reboot.
Why is my PC not outputting through HDMI from the motherboard?
A common reason is a CPU without integrated graphics: Intel “F” models and AMD chips such as the Ryzen 7 5800X3D and Ryzen 5 7500F have none, so the port can’t output video. Ryzen 7000 and 9000 chips without an F, including the Ryzen 9 9950X3D, do have integrated Radeon graphics. If your CPU does have an iGPU, the second most likely cause is that BIOS has disabled the onboard output because a dedicated GPU is installed. Third possibility: the HDMI cable is bad or the port is physically damaged.
Why is my HDMI not working even though it’s plugged in?
Several things can cause a blank screen despite a connected cable. The monitor input source may be set to the wrong input. The cable itself may be faulty or not rated for the resolution you’re trying to output. The iGPU may be disabled in BIOS. Drivers may be missing or outdated. Or the HDMI port on the board may be physically damaged. Work through the 10-step checklist above in sequence, it covers every case and tells you where the problem is.
Can I use both my GPU and motherboard HDMI at the same time for dual monitors?
Yes, but only if your CPU includes integrated graphics and you enable IGD Multi-Monitor in BIOS. Once that’s done and you’ve booted into Windows, open Display Settings (right-click the desktop), click Detect, and set up your preferred display arrangement.
Final Thoughts
The fix for most onboard HDMI problems takes under five minutes: confirm your CPU has an iGPU, enter BIOS, set Primary Display to IGFX, and enable IGD Multi-Monitor if you’re running a dedicated GPU alongside it. Drivers and CMOS clears solve the cases that BIOS alone doesn’t. Physical port damage is the outlier, and even then, a DisplayPort workaround or a repair shop visit gets you back up. If you’ve run through every step here and the port still won’t cooperate, the EZ Debug LED indicators on your motherboard can point you toward other hardware initialization failures that might be contributing to the problem. Almost every case of hdmi not working on a motherboard has a software or settings cause, and software causes are always fixable. Start methodical, stay in order, and you’ll have a working display before you know it.

Alex has been building and tweaking custom PCs for over 12 years. From budget builds to full custom water loops, he’s assembled more than 50 systems and helped hundreds of builders troubleshoot their rigs. When he’s not benchmarking the latest hardware, you’ll find him optimizing airflow setups or stress-testing overclocks.