How to Enable XMP in BIOS (Step by Step)
XMP (Extreme Memory Profile) is an Intel specification that lets compatible DDR4 and DDR5 RAM run above JEDEC default speeds using pre-validated overclock settings stored on the stick.
Last updated: June 2026
Table of Contents
- Quick Answer: How Do You Enable XMP in BIOS?
- What Is XMP (and Why Should You Enable It)?
- XMP Definition and History
- XMP vs. EXPO vs. DOCP vs. A-XMP: What’s the Difference?
- XMP Disabled vs. Enabled: Real Performance Difference
- Before You Enable XMP: What to Check First
- Is Your RAM XMP-Compatible?
- Is Your CPU and Motherboard Compatible?
- How to Enter BIOS on Any Motherboard Brand
- How to Enable XMP in ASUS BIOS
- How to Enable XMP in MSI BIOS
- How to Enable XMP in ASRock BIOS
- How to Enable XMP in Gigabyte BIOS
- How to Enable XMP in Intel BIOS (Z-Series and Extreme Boards)
- XMP Profile 1 vs. Profile 2: Which Should You Choose?
- Can You Enable XMP on a Laptop?
- How to Verify XMP Is Working After Enabling
- Method 1: CPU-Z
- Method 2: Task Manager
- Method 3: BIOS Confirmation
- XMP Troubleshooting: What to Do If It Won’t Work
- PC Won’t Boot or Boots to a Black Screen After Enabling XMP
- XMP Enabled but RAM Still Running at Default Speed
- System Is Unstable, Crashing, or Blue Screening After XMP
- Frequently Asked Questions About XMP
- Does enabling XMP damage my RAM or CPU?
- Is XMP the same as overclocking?
- Why is my 3600 MHz RAM running at 2133 MHz?
- Can I enable XMP on Windows 10 or Windows 11 without going into BIOS?
- Does XMP work on AMD motherboards?
- Quick Reference: Enable XMP in 3 Steps
Quick Answer: How Do You Enable XMP in BIOS?
To enable XMP, restart your PC and press DEL (or F2) to enter BIOS. Switch to Advanced Mode if needed, then navigate to your board’s overclocking tab (labeled Extreme Tweaker on ASUS, OC on MSI, OC Tweaker on ASRock, or Tweaker on Gigabyte). Set the XMP or EXPO option to Profile 1, then press F10 to save and exit. Your RAM will now run at its rated speed instead of the slower JEDEC default.
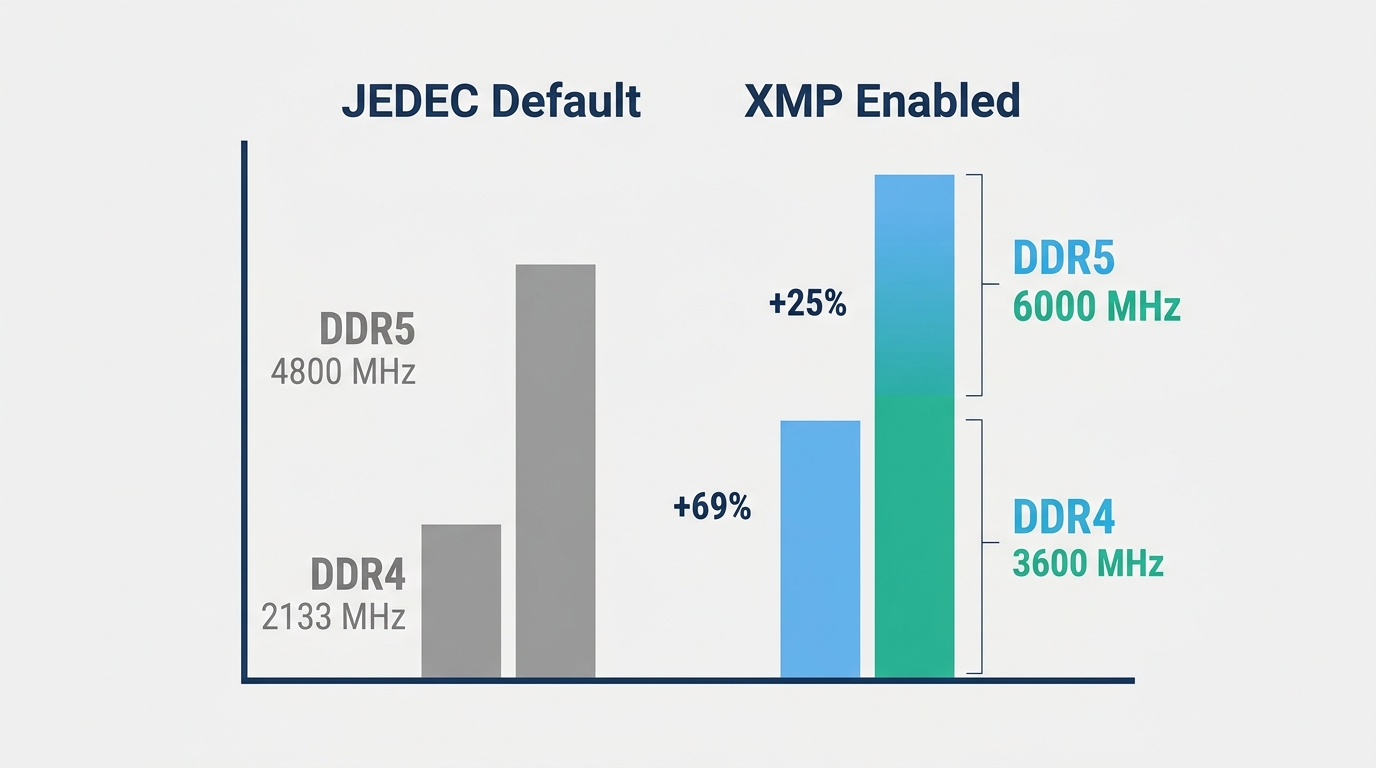
Most systems ship with RAM running at 2133 MHz for DDR4 or 4800 MHz for DDR5, regardless of what speed is printed on the stick. That’s JEDEC default, the lowest common denominator that every CPU and board agrees to run without any configuration. If your DDR4-3600 kit is reporting 2133 MHz in Task Manager, it hasn’t broken. It’s just waiting for you to flip one switch. This guide covers exactly how to do that on every major motherboard brand, plus what to do if it doesn’t stick.
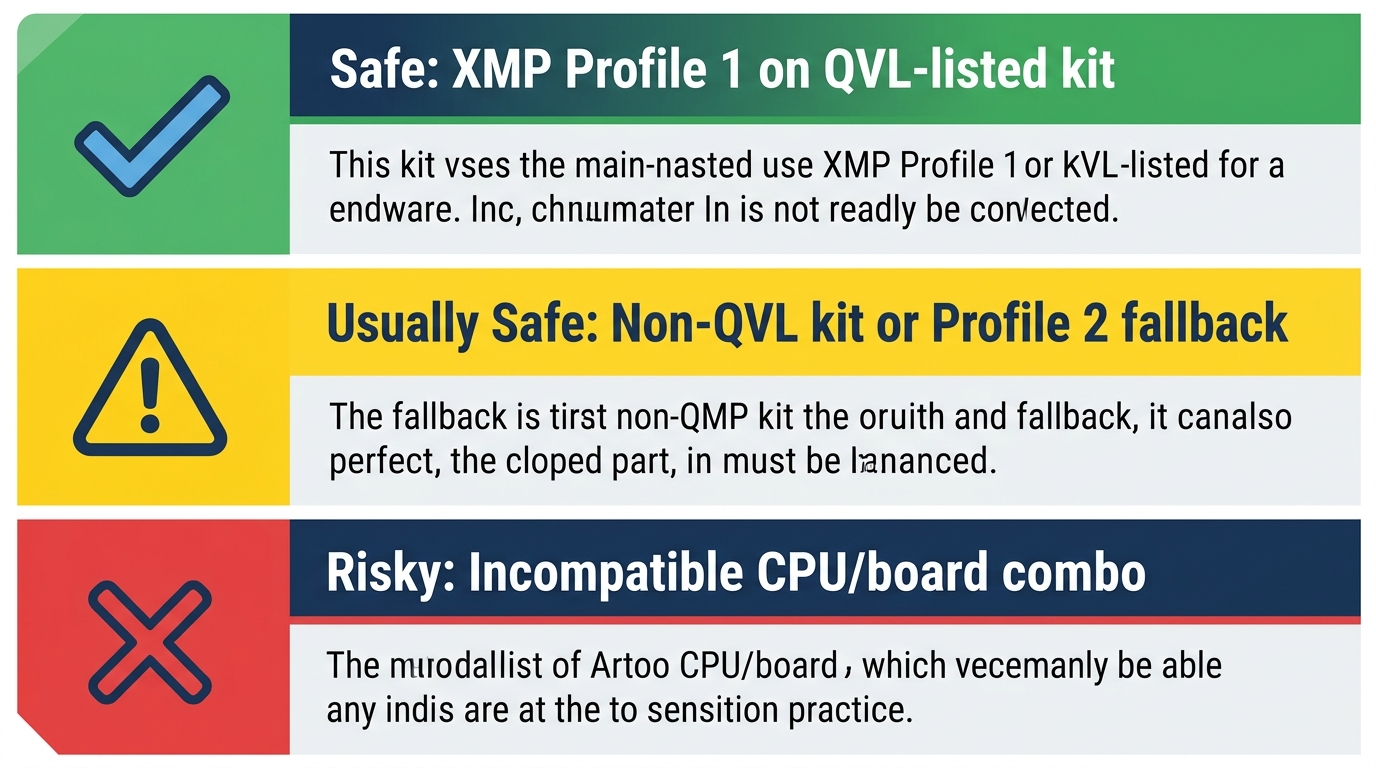
- 🟢 XMP Profile 1 on a QVL-listed kit: Safe. This is what the RAM was designed and validated for.
- 🟢 EXPO or DOCP on AMD platforms: Safe. Functionally identical to XMP.
- 🟡 XMP on a kit not on your board’s QVL: Usually fine, but test with MemTest86 after enabling.
- 🟡 XMP Profile 2 as a fallback: Lower speed, but more conservative. Use if Profile 1 is unstable.
- 🔴 XMP on incompatible CPU/board combo: May not POST. Check your motherboard’s supported memory list first.
What Is XMP (and Why Should You Enable It)?
XMP Definition and History
Intel introduced XMP in 2007 as a way to store validated overclock settings directly on a RAM stick’s SPD (Serial Presence Detect) chip. The idea was simple: instead of manually dialing in frequencies and timings, the board reads the profile and applies it automatically. No guesswork.
The spec has gone through three versions:
- XMP 1.0: DDR3 support only
- XMP 2.0: DDR4 support, up to two pre-configured profiles per kit
- XMP 3.0: Launched with Intel 12th Gen (Alder Lake) in 2021, supports DDR5 and adds up to five profiles per kit (three vendor-programmed, two user-writable)
When you buy a DDR4-3600 CL18 kit, those specs are what the manufacturer programmed into the XMP 2.0 profile on the stick. Enabling XMP tells your board to read and apply those settings at POST. That’s the entire mechanism.
For a deeper look at how the spec works under the hood, the XMP explainer covering the full BIOS standard is worth reading before you start tweaking.
XMP vs. EXPO vs. DOCP vs. A-XMP: What’s the Difference?
AMD doesn’t license the XMP name, so they ship their own equivalent specs. The names differ, but the mechanism is identical: a profile stored on the RAM’s SPD chip that the board applies automatically.
| Name | Full Name | Platform | Introduced |
|---|---|---|---|
| XMP | Extreme Memory Profile | Intel | 2007 |
| EXPO | EXtended Profiles for Overclocking | AMD (AM5) | 2022 |
| DOCP | Direct Overclock Profile | AMD (AM4, older) | ~2017 |
| A-XMP | AMD XMP | AMD (AM4, some AM5) | ~2019 |
DOCP and A-XMP are functionally AMD’s rebranded XMP implementations. If your AM4 board lists “DOCP” instead of “XMP,” it’s the same thing. If you’re on AM5 with an EXPO kit, look for the EXPO toggle. The detailed breakdown of DOCP and EXPO settings on AMD platforms covers the AM4 and AM5 differences in full.
XMP Disabled vs. Enabled: Real Performance Difference
Here’s why this matters in practice. A DDR4-3600 kit running at default JEDEC 2133 MHz shows roughly 10 to 15 percent lower memory bandwidth in AIDA64 compared to the same kit at 3600 MHz with XMP enabled. In gaming, the gap depends on the platform.
AMD Ryzen is particularly sensitive to memory speed because the memory controller sits on-die and connects directly to the CPU’s Infinity Fabric. Titles like Cyberpunk 2077 and Starfield can show 8 to 12 FPS gains at 1080p on Ryzen when you go from 2133 MHz JEDEC to 3600 MHz XMP. Intel platforms benefit less, but still measurably so in latency-bound scenarios.
For reference, here are the default vs. typical XMP speeds:
- JEDEC DDR4 default: 2133 MHz / CL15
- Typical XMP DDR4 kit: 3200 to 3600 MHz / CL16 to CL18
- JEDEC DDR5 default: 4800 MHz / CL40
- Typical XMP DDR5 kit: 6000 to 7200 MHz / CL36 to CL40
Worth the 60 seconds it takes to enable.
Before You Enable XMP: What to Check First
Is Your RAM XMP-Compatible?
Check the product page or packaging for an “XMP” or “EXPO” badge. If you’re already installed and running, open Task Manager (CTRL+SHIFT+ESC), go to Performance, then Memory. The speed shown there is what your RAM is actually running at. If it reports 2133 MHz on a kit rated for 3600 MHz, XMP is off.
For more detail, download CPU-Z (free from CPUID) and check the SPD tab. It lists the XMP profiles stored on each stick, including the rated frequency and timings for each profile.
Is Your CPU and Motherboard Compatible?
Not every CPU officially endorses every XMP speed. The general limits:
- Intel 12th Gen: officially supports DDR5 up to 4800 MHz XMP, DDR4 up to 3200 MHz XMP
- Intel 13th Gen: officially supports DDR5 up to 5600 MHz XMP, DDR4 up to 3200 MHz XMP
- Intel 14th Gen: officially supports DDR5 up to 5600 MHz XMP; faster kits run via XMP but outside official spec
- AMD Ryzen 5000 (AM4): DOCP/A-XMP; sweet spot is 3600 MHz CL16 to CL18 for 1:1 Infinity Fabric ratio
- AMD Ryzen 7000 (AM5): EXPO and XMP 3.0; sweet spot is 6000 MHz CL30 for optimal FCLK ratio
B-series boards (B660, B760, B550, B650) do support XMP. Some early B660 boards had frequency caps, so check your motherboard’s QVL (Qualified Vendor List) to confirm your specific RAM kit is listed. You can find the QVL on your motherboard manufacturer’s product support page.
How to Enter BIOS on Any Motherboard Brand
Spam the key repeatedly the moment you press power. Don’t wait for a logo. If Windows loads, you missed it.
| Brand | BIOS Key | Notes |
|---|---|---|
| ASUS | DEL or F2 | DEL most common |
| MSI | DEL | |
| ASRock | DEL or F2 | F2 on some models |
| Gigabyte | DEL or F2 | |
| EVGA | DEL | |
| HP (pre-built) | F10 | |
| Dell (pre-built) | F2 | |
| Lenovo (pre-built) | F1 or F2 |
If Windows already loaded and you don’t want to restart blindly, you can reach UEFI from inside Windows: Settings, then System, then Recovery, then Advanced Startup, then Restart Now. From there, choose Troubleshoot, Advanced Options, then UEFI Firmware Settings. The navigation differs by brand, but the setting itself is always in the OC or memory-related tab.
How to Enable XMP in ASUS BIOS
- Enter BIOS by pressing DEL on boot.
- Check the top of the screen. If it says “EZ Mode,” press F7 to switch to Advanced Mode.
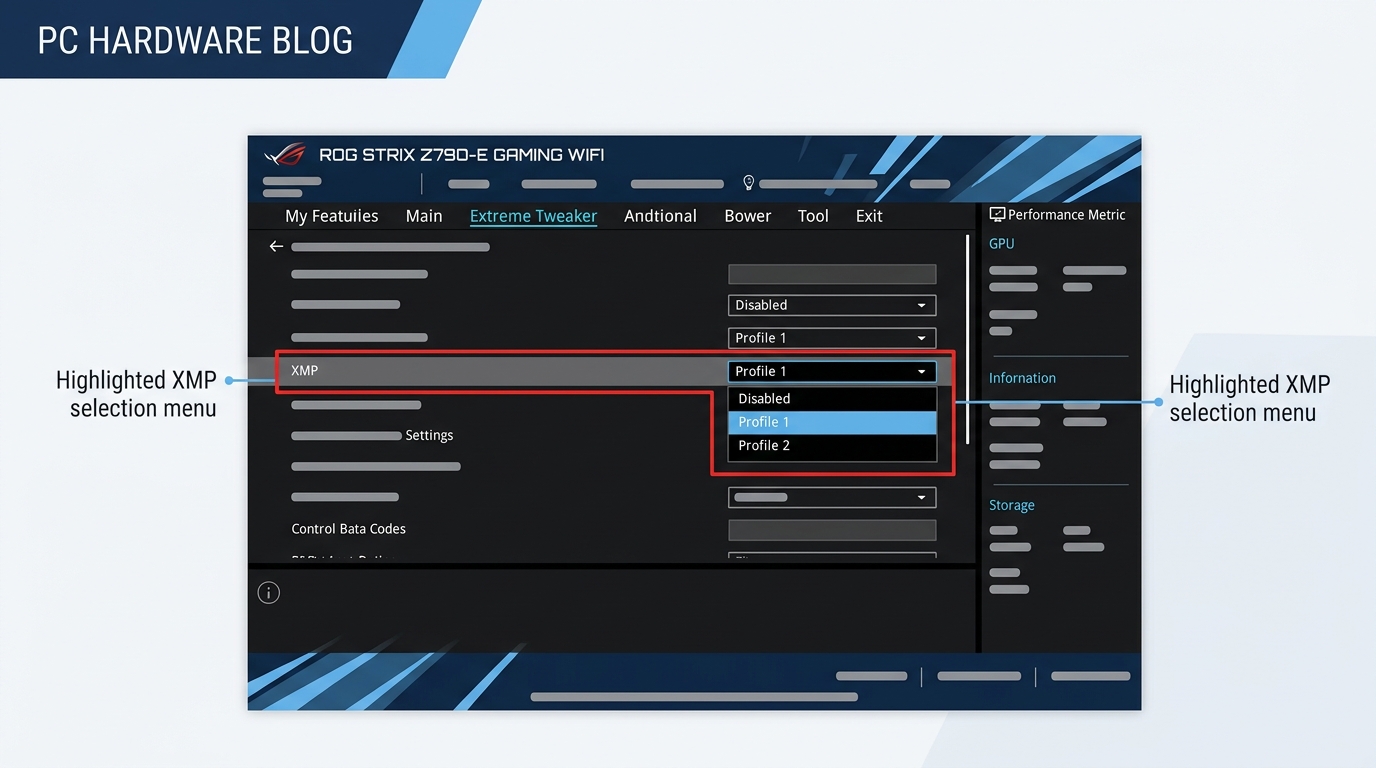
- Click the Extreme Tweaker tab at the top of the screen.
- Locate the Ai Overclock Tuner dropdown.
- Select XMP I (Intel platforms) or EXPO I (AMD platforms) to enable Profile 1.
- Confirm the DRAM frequency shown matches your RAM’s rated speed.
- Press F10 to save and exit.
On ASUS EZ Mode, the XMP toggle sometimes appears as a simple button directly on the main screen. If you see it there, you can enable it without switching to Advanced Mode at all.
How to Enable XMP in MSI BIOS
- Enter BIOS by pressing DEL on boot.
- If in EZ Mode, press F7 to switch to Advanced Mode.
- Click OC in the left sidebar.
- Scroll down to the DRAM Setting section.
- Set Extreme Memory Profile (XMP) to Profile 1 (Intel) or set EXPO to Enabled (AMD).
- Confirm the displayed memory frequency matches your kit’s rating.
- Press F10 to save and exit.
How to Enable XMP in ASRock BIOS
- Enter BIOS by pressing DEL or F2 on boot.
- If in EZ Mode, press F6 to switch to Advanced Mode.
- Click the OC Tweaker tab.
- Find XMP Profile (Intel) or EXPO Profile (AMD) in the left panel.
- Set XMP Profile to Profile 1 on Intel builds, or EXPO Profile to Profile 1 on AMD builds.
- Press F10 to save and exit.
How to Enable XMP in Gigabyte BIOS
- Enter BIOS by pressing DEL or F2 on boot.
- If in Easy Mode, press F2 to toggle to Advanced Mode.
- Select the Tweaker tab.
- Locate Extreme Memory Profile (X.M.P.) in the dropdown. Gigabyte spells it with periods in the UI.
- Select Profile 1.
- Press F10 to save and exit.
How to Enable XMP in Intel BIOS (Z-Series and Extreme Boards)
On Intel’s own boards, navigate to the Memory tab, then find the XMP setting and select Profile 1. The label is usually straightforward. Most consumer builders on Intel platforms will be using one of the four brands above, so this path is less common.
XMP Profile 1 vs. Profile 2: Which Should You Choose?
Start with Profile 1. That’s the rated spec the RAM was validated and sold at. Not a debate.
Profile 2 exists as a fallback, typically offering a slightly lower frequency or different timing configuration for systems where Profile 1 causes instability. On XMP 2.0 DDR4 kits, Profile 2 often runs at a more conservative speed. On XMP 3.0 DDR5 kits, there can be up to five profiles, with three set by the manufacturer and two user-writable slots.
| Profile | Typical Frequency | Typical Timings | Use Case |
|---|---|---|---|
| XMP Profile 1 | Rated speed (e.g., 3600 MHz) | Manufacturer’s primary spec (e.g., CL18) | Default choice. Use this first. |
| XMP Profile 2 | Slightly lower (e.g., 3200 MHz) | Often tighter (e.g., CL16) | Fallback if Profile 1 is unstable |
Profile 2 can actually have tighter secondary timings that partially compensate for the lower clock. But in most real-world gaming and productivity scenarios, Profile 1 at the rated speed wins. Only switch to Profile 2 if you’re seeing crashes or failed boots with Profile 1 and you’ve already confirmed your RAM is properly seated.
Can You Enable XMP on a Laptop?
Mostly no. Most laptops run RAM at fixed system speeds, either because it’s soldered to the board or because the BIOS exposes no memory configuration options. There’s no toggle to find because the option genuinely isn’t there.
Exceptions do exist. Certain high-performance gaming laptops from ASUS ROG, MSI GT/GS series, and Lenovo Legion expose XMP or memory overclocking settings in their BIOS. On Lenovo Legion models that support it, the path is BIOS, then More Settings, then Configuration, then Memory Profile. On ASUS ROG laptops, check the OC or Advanced tab.
How to check your specific laptop: enter BIOS on boot (usually F2 or F1) and look for anything labeled Memory Profile, XMP, or OC under an Advanced section. If it’s not there, the platform doesn’t support it. Some SO-DIMM kits do ship with XMP profiles programmed on them, but those profiles are useless without board-level BIOS support to read and apply them.
Don’t force it. A laptop BIOS that doesn’t show XMP isn’t a bug or an oversight you can work around in software.
How to Verify XMP Is Working After Enabling
Three ways to confirm. Pick any one.
Method 1: CPU-Z
Download CPU-Z from CPUID’s official site, open it, and click the Memory tab. Look at DRAM Frequency. Important: CPU-Z shows half the actual speed because DDR means Double Data Rate. A 3600 MHz kit will show 1800 MHz here. That’s correct, not a problem. A DDR5-6000 kit shows 3000 MHz. If the number matches half your rated speed, XMP is working.
Method 2: Task Manager
Press CTRL+SHIFT+ESC, click Performance, then Memory. The Speed shown here displays the full DDR speed, so a 3600 MHz kit should read 3600 MHz. This is the fastest verification on Windows 10 and Windows 11. No downloads needed.
Method 3: BIOS Confirmation
Re-enter BIOS after saving. The DRAM frequency displayed on the main or OC screen should reflect your XMP profile speed. This is the most definitive check because it happens before Windows is involved.
XMP Troubleshooting: What to Do If It Won’t Work
PC Won’t Boot or Boots to a Black Screen After Enabling XMP
Common. Don’t panic. Most boards automatically reset to JEDEC defaults after a failed POST, so your system is likely already safe when it boots back into Windows. The fixes to try:
- Reseat the RAM: Power off completely, press the retention clips, remove and firmly re-seat both sticks. This solves it more often than you’d expect.
- Check the QVL: If your specific kit isn’t on the motherboard’s Qualified Vendor List, XMP compatibility isn’t guaranteed. Try Profile 2 or manual sub-timings.
- Test one stick at a time: If one DIMM is marginal, isolating it narrows down the issue fast.
- Update BIOS: Older BIOS versions sometimes have broken XMP parsing for newer kits. Check the manufacturer’s support page for updates.
XMP Enabled but RAM Still Running at Default Speed
Three likely causes:
- You didn’t save: Pressing F10 and confirming the save dialog is required. Just changing the setting and closing BIOS doesn’t apply it.
- Restart vs. cold boot: Some boards only apply memory changes after a full power-off cycle, not a warm restart. Shut down completely, wait 10 seconds, then power on.
- BIOS needs updating: Newer RAM kits sometimes need a BIOS version that added SPD parsing support for that specific kit’s XMP profile data.
System Is Unstable, Crashing, or Blue Screening After XMP
Run MemTest86 (free, bootable) for at least two full passes. Any errors point to a RAM issue, either a faulty stick or an XMP speed the kit can’t sustain on your platform.
If MemTest passes clean:
- Drop to Profile 2 and test stability over a few days.
- Check CPU temperatures under load. Higher memory clocks slightly increase demand on the CPU’s memory controller, which sits inside the CPU on AMD Ryzen. Verify temps are under 90°C during stress. If you’re seeing CPU temperatures pushing into unsafe territory, address cooling before assuming XMP is the culprit.
- On AMD Ryzen AM4: ensure FCLK (Infinity Fabric clock) is set to half the memory speed. For 3600 MHz RAM, FCLK should be 1800 MHz. A mismatch here causes instability even if the memory itself is fine.
Frequently Asked Questions About XMP
Does enabling XMP damage my RAM or CPU?
No. XMP profiles are pre-validated by the RAM manufacturer at those specific speeds and voltages before the kit ships. Enabling XMP is not the same as manually overclocking. The voltages are within spec for the RAM. Technically it operates outside JEDEC’s baseline standard, so some warranties have fine print about it, but actual hardware damage from enabling XMP on a compatible system is not a realistic concern.
Is XMP the same as overclocking?
Technically yes, RAM is running above JEDEC baseline speeds. Practically, it’s in a completely different category from manual overclocking. You’re not tuning anything. You’re applying a validated profile the manufacturer already tested and certified. The risk profile is orders of magnitude lower than manually pushing a CPU or GPU beyond spec.
Why is my 3600 MHz RAM running at 2133 MHz?
Because XMP is disabled. Every DDR4 system defaults to JEDEC standard 2133 MHz at boot regardless of what the RAM is rated for. The stick’s rated speed (3600 MHz, in this case) only activates when XMP is enabled in BIOS. This is by design, not a defect. Your RAM isn’t underperforming because it’s broken. It’s underperforming because it hasn’t been configured yet.
Can I enable XMP on Windows 10 or Windows 11 without going into BIOS?
No. XMP is a BIOS-level configuration. Windows has no control over memory frequency whatsoever. The operating system works with whatever speed the firmware has already configured at POST. You can reach UEFI from within Windows (Settings, System, Recovery, Advanced Startup, Restart Now), but you still have to go through BIOS to make the actual change. There’s no Windows software that enables XMP.
Does XMP work on AMD motherboards?
Yes, but the label varies. On AM4 boards, it’s called DOCP or A-XMP. On AM5 boards with EXPO-certified RAM, look for EXPO. XMP-branded kits can also be enabled on AMD boards using the DOCP or A-XMP option; they read the same SPD profile data. The naming is a branding distinction, not a functional one.
Quick Reference: Enable XMP in 3 Steps
If you want the stripped-down version:
- Enter BIOS: Spam DEL (or F2) immediately on power-on before the logo appears.
- Find and enable XMP/EXPO: Navigate to your board’s OC tab (Extreme Tweaker on ASUS, OC on MSI, OC Tweaker on ASRock, Tweaker on Gigabyte). Set XMP or EXPO to Profile 1.
- Save and exit: Press F10, confirm the save dialog, let the system reboot. Verify speed in Task Manager or CPU-Z.
That’s the whole process. Two to three minutes from start to finish, and your RAM finally runs at the speed you paid for. If it boots cleanly and Task Manager confirms the rated speed, you’re done. If something goes wrong, the troubleshooting steps above will get you sorted. Don’t leave performance sitting unused in your BIOS because of a setting you haven’t flipped yet.

Alex has been building and tweaking custom PCs for over 12 years. From budget builds to full custom water loops, he’s assembled more than 50 systems and helped hundreds of builders troubleshoot their rigs. When he’s not benchmarking the latest hardware, you’ll find him optimizing airflow setups or stress-testing overclocks.


