Thermal Paste for CPUs: What to Know Before Buying
Thermal paste is a thermally conductive compound applied between a CPU and its cooler to eliminate microscopic air gaps and maximize heat transfer efficiency.
Last updated: June 2026
Table of Contents
- Quick Answer: What Is Thermal Paste for a CPU?
- What Is Thermal Paste and Why Does Your CPU Need It?
- The Physics Behind the Problem
- When Do You Actually Need to Apply It?
- Types of Thermal Paste: Picking the Right Formula for Your Build
- Polymer/Silicone-Based (Beginner-Friendly, Non-Conductive)
- Ceramic/Carbon-Based (Mid-Tier Performance)
- Phase-Change Pads (Emerging Category)
- Liquid Metal (Expert Only)
- Best Thermal Paste for CPUs: Top Picks by Category
- Best Overall: Arctic MX-7
- Best High-Performance: Thermalright TF8
- Best for SFF/ITX Builds: Thermal Grizzly PhaseSheet PTM7950
- Best Budget Pick: Arctic MX-4
- Best for Laptop Re-Paste: Noctua NT-H2 or Thermal Grizzly Kryonaut
- How to Apply Thermal Paste to Your CPU: Step-by-Step
- What You’ll Need Before You Start
- Step 1: Clean the Surfaces
- Step 2: Choose Your Application Method
- Step 3: Mount the Cooler
- Step 4: The Break-In Period
- How Much Thermal Paste Does Your CPU Actually Need and What Does It Cost?
- Quantity Guide by CPU Size
- When to Buy More Than You Need
- When to Replace Your CPU Thermal Paste
- FAQ: Thermal Paste for CPUs
- How long should I wait after applying thermal paste to my CPU?
- Does thermal paste brand matter?
- Can you use too much thermal paste?
- Is pre-applied thermal paste on stock coolers good enough?
- Can I use thermal paste on my GPU?
- The Short Version
Quick Answer: What Is Thermal Paste for a CPU?
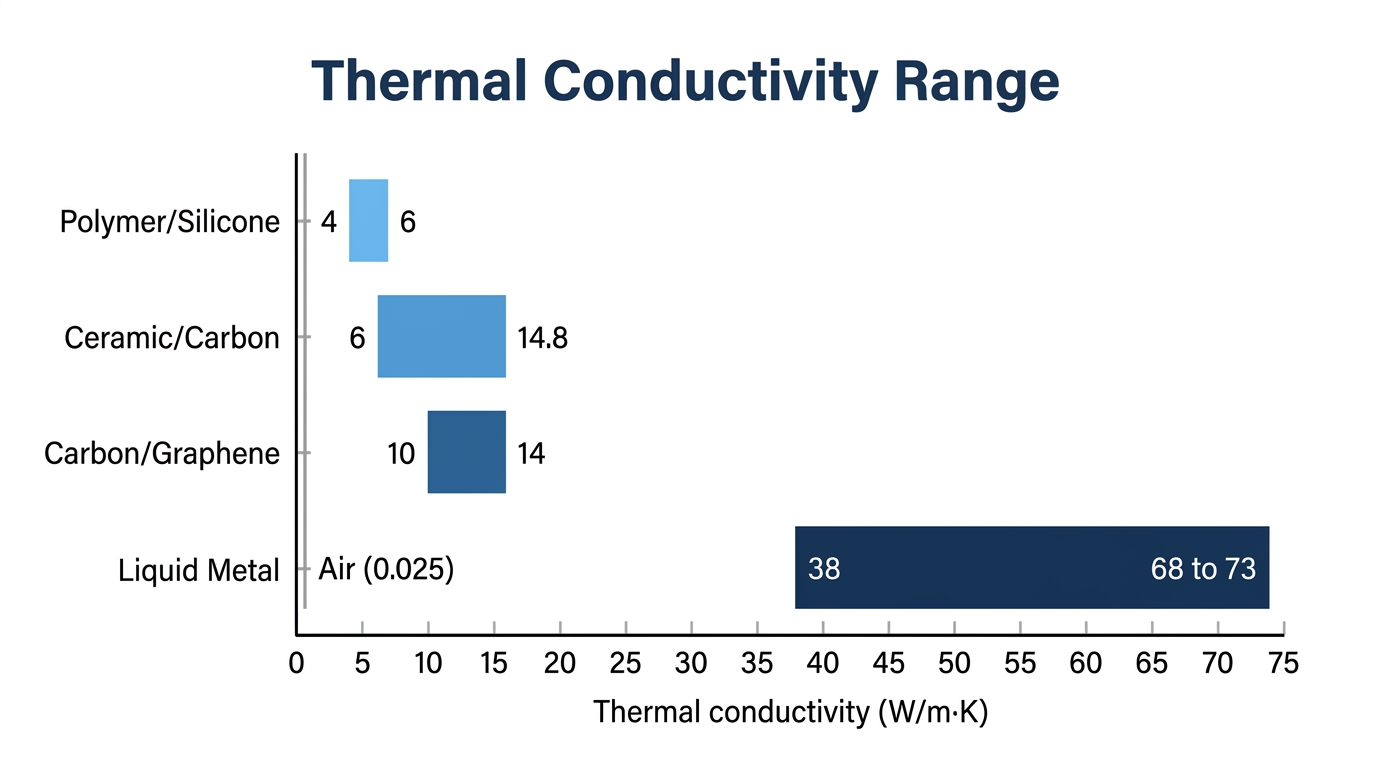
Thermal paste, also called thermal compound, thermal grease, or TIM (thermal interface material), fills the microscopic surface imperfections between your CPU’s integrated heat spreader (IHS) and your cooler’s base plate. Air has a thermal conductivity of roughly 0.025 W/m·K. A decent paste sits at 4–13 W/m·K. That gap is why skipping paste, or using dried-out paste, can cost you 10–20°C of cooling efficiency and push a processor straight into thermal throttling.
Most people think any paste will do, or that the pea-size blob their friend mentioned is just a rough guideline. Neither is quite right. The type of paste, how much you apply, and even how long you wait to benchmark temps all affect what your CPU actually runs at. Here’s what you actually need to know before you buy.
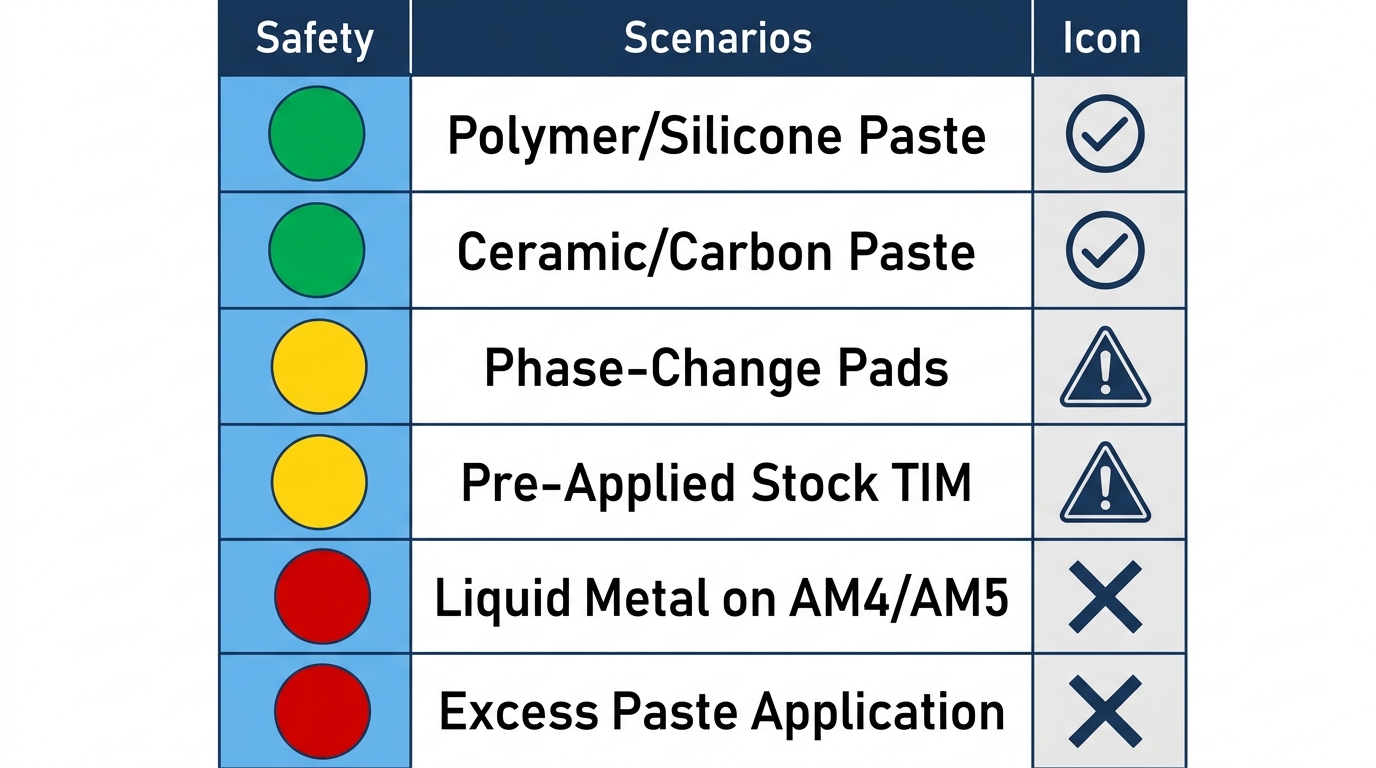
- 🟢 Polymer/silicone paste (non-conductive): Safe for all builders, including laptops and first-time builds
- 🟢 Ceramic/carbon paste (non-conductive): Safe for enthusiast and overclocking builds, easy to clean up
- 🟡 Phase-change pads: Safe but less re-workable; not ideal if you frequently reseat coolers
- 🟡 Pre-applied stock cooler TIM: Adequate at stock speeds, borderline on high-TDP chips
- 🔴 Liquid metal on AMD AM4/AM5: Never. Aluminum IHS causes galvanic corrosion. Permanent damage risk.
- 🔴 Too much of any paste: Excess squirts onto the socket or PCB. Use a pea-size amount only.
What Is Thermal Paste and Why Does Your CPU Need It?
The Physics Behind the Problem
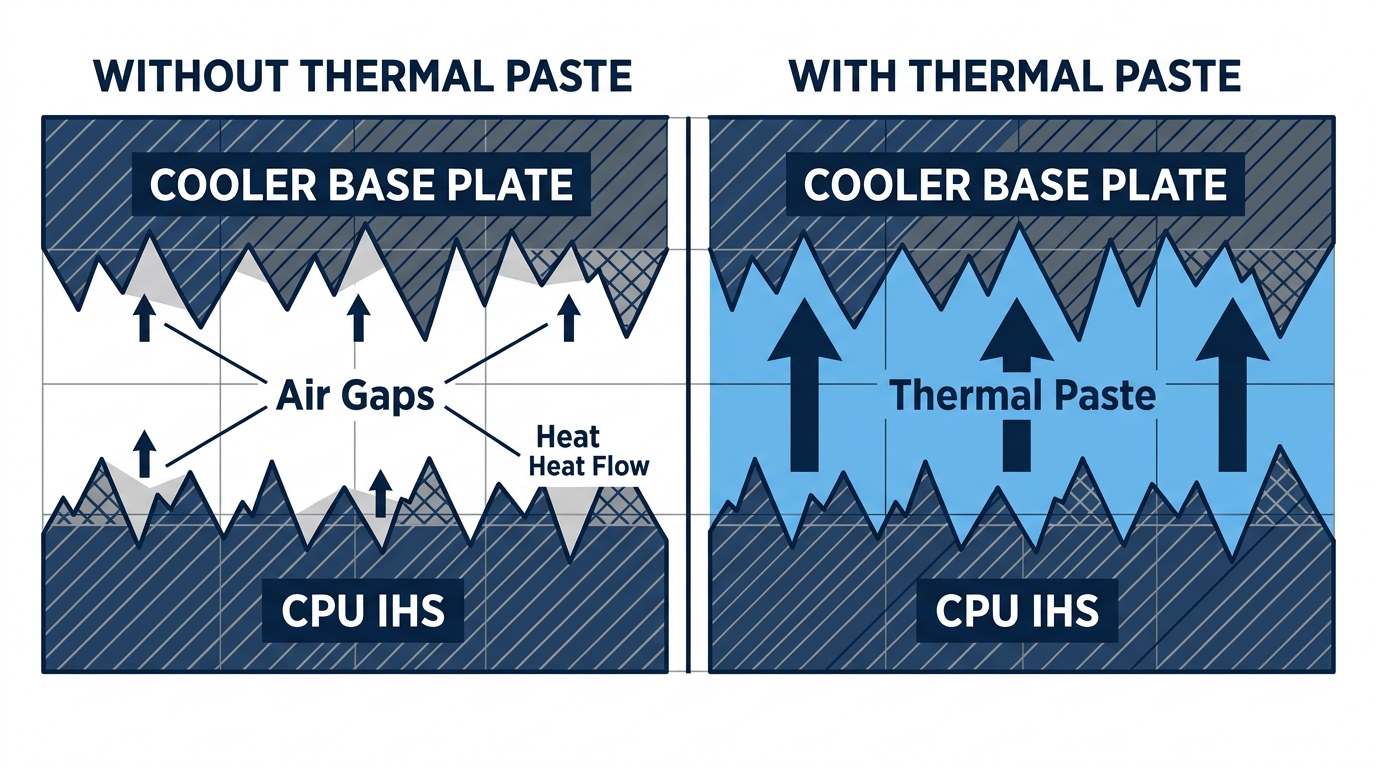
Your CPU’s IHS and your cooler’s base plate both look machined flat. They’re not, at a microscopic level. Both surfaces have tiny peaks and valleys that trap air when pressed together. Air is a terrible heat conductor at 0.025 W/m·K. A quality thermal paste fills those voids with something in the 4–14 W/m·K range, depending on formulation. That difference translates directly into lower CPU temperatures under load.
To put it bluntly: without paste, even a $100 tower cooler performs like a $15 stock cooler. The cooler itself isn’t contacting your CPU properly.
Here’s the conductivity range by paste type:
- Polymer/silicone-based: 4–8.5 W/m·K
- Ceramic/carbon-based: 6–14.8 W/m·K
- Carbon/graphene-based: 10–14 W/m·K
- Liquid metal (e.g. Thermal Grizzly Conductonaut): 38–73 W/m·K
A CPU running with no paste at all can hit thermal throttle thresholds, which are 100°C on Intel 13th/14th Gen chips, 105°C on Intel Core Ultra 200 series (Arrow Lake), and 95°C on AMD Ryzen 7000/9000 series, within seconds of a sustained load. Not an exaggeration.
When Do You Actually Need to Apply It?
You need to apply paste any time you install or reseat a CPU cooler. Specific situations include:
- New aftermarket cooler install: Always apply fresh paste, even if the cooler ships with pre-applied TIM (that stuff is mediocre)
- Reseating an existing cooler: Once you break the seal, reapply
- Paste replacement on an aging system: Every 3–5 years for standard paste, or when temps climb 10°C above your usual baseline
- Laptop re-paste: Laptops are often ignored here, but they need it most. Thin chassis, tiny fans, and three-year-old dried paste are a bad combination. Most laptops benefit from a re-paste every 3–4 years.
What you don’t need to paste yourself: GPU coolers (factory pre-applied and not user-serviceable unless you’re swapping to an aftermarket block), and most AIO liquid coolers, which ship with pre-applied TIM on the pump block. Just know that AIO paste degrades too, and a re-paste at the 3–5 year mark is worthwhile.
- 30°C = 86°F (idle, cool system)
- 50°C = 122°F (idle, warmer case)
- 65°C = 149°F (light gaming / productivity)
- 80°C = 176°F (heavy gaming, normal on modern CPUs)
- 90°C = 194°F (high but within spec for some chips)
- 95°C = 203°F (AMD Ryzen 7000/9000 throttle threshold)
- 100°C = 212°F (Intel 13th/14th Gen throttle threshold)
- 105°C = 221°F (Intel Core Ultra 200 series / Arrow Lake throttle threshold)
Formula: °F = (°C × 1.8) + 32.
Types of Thermal Paste: Picking the Right Formula for Your Build
Polymer/Silicone-Based (Beginner-Friendly, Non-Conductive)
This is the category most builders should start with. Polymer and silicone-based pastes like Arctic MX-7, Noctua NT-H1, and Noctua NT-H2 offer conductivity in the 4–8.5 W/m·K range. They’re electrically non-conductive, so if a little spreads onto the socket area during application it’s annoying but not catastrophic. Arctic rates the MX-series for an 8-year lifespan, making it genuinely a set-it-and-forget-it solution for most desktop builds.
Best for: first-time builders, casual gaming rigs, any standard ATX mid-tower build, and laptop re-pastes where non-conductive is non-negotiable.
Ceramic/Carbon-Based (Mid-Tier Performance)
Thermal Grizzly Kryonaut (12.5 W/m·K), Thermalright TF8 (13.8 W/m·K), and Cooler Master MasterGel Maker sit in this tier. These are still electrically non-conductive, so they’re safe to work with. The performance gap over a quality polymer paste is real, usually 3–6°C on high-TDP chips, but it barely registers on a 65W budget CPU. According to the testing team at Tom’s Hardware, which has evaluated over 90 TIM compounds, Thermal Grizzly’s Duronaut leads the field for outright performance, with Arctic MX-6 sitting in a strong second place among traditional pastes.
Best for: Intel Core Ultra 200 series (Arrow Lake), Ryzen 9 9950X/9900X3D builds, overclocking on air or AIO, anything with a TDP over 125W.
If you’re running a high-end chip and want to dig into whether Kryonaut is worth the price versus budget alternatives, the real-world temperature differences might surprise you.
Phase-Change Pads (Emerging Category)
Products like Thermal Grizzly PhaseSheet PTM7950 and be quiet! DC2 Pro are solid at room temperature. They soften and conform to the IHS surface once the CPU heats up. No syringe, no spreading, no mess. Just peel, place, and mount the cooler.
The catch: they’re harder to remove cleanly for re-application and cost more per use than an equivalent amount of tube paste. Worth the premium for tight SFF builds where application space is minimal, or for anyone who hates the tube application process.
Best for: Mini-ITX and SFF builds, tight cooler clearances, and builders who want zero application variability.
Liquid Metal (Expert Only)
Thermal Grizzly Conductonaut reaches 73 W/m·K conductivity. That’s a real, measurable advantage on delidded CPUs and Intel LGA socket builds where you’re pushing extreme overclocks. But it’s electrically conductive. One drop on a PCB trace or socket pin and you have a paperweight.
More important: do NOT use liquid metal on AMD AM4 or AM5 CPUs. Their IHS is aluminum. Liquid metal (a gallium alloy) causes galvanic corrosion with aluminum. The IHS will degrade over time and eventually fail. Intel’s LGA IHS is nickel-plated copper. That’s fine for liquid metal. AMD’s is not.
Best for: delidded Intel chips, extreme OC rigs, experienced builders only. Not for laptops. Not for AMD.
| Type | Conductivity (W/m·K) | Electrically Conductive | Best Use Case | Avg. Price | Lifespan |
|---|---|---|---|---|---|
| Polymer/Silicone | 4–8.5 | No | Beginners, standard desktops, laptops | $7–$12 | 5–8 years |
| Ceramic/Carbon | 8.5–14.8 | No | Enthusiast/OC builds, high-TDP CPUs | $8–$15 | 3–5 years |
| Phase-Change Pad | 10–17 | No | SFF/ITX, clean installs, no-mess builds | $12–$20/sheet | 3–5 years |
| Liquid Metal | 38–73 | Yes | Extreme OC, delidded Intel CPUs only | $10–$20/g | 3–5 years |
Best Thermal Paste for CPUs: Top Picks by Category
Best Overall: Arctic MX-7
Conductivity: 8.5 W/m·K. Price: roughly $9–$12 for 4g. Arctic’s MX-7 is the paste you’d hand to 90% of desktop builders without hesitation. It’s non-conductive, easy to apply straight from the syringe, and Arctic rates it for 8 years of stable performance. In real-world testing it sits 1–2°C behind Kryonaut on sustained all-core loads, but that’s genuinely within measurement variance on most test benches. The trade-off in application ease and safety is absolutely worth it for most people.
Recommended for: any Intel Core Ultra 200, Ryzen 7000/9000, or budget/mid-range desktop build at stock speeds.
Best High-Performance: Thermalright TF8
Conductivity: 13.8 W/m·K. Price: roughly $8–$10 for 6g. The TF8 is genuinely impressive value. You’re getting near-Kryonaut performance at a lower price per gram with a larger tube. It’s slightly thicker in consistency than Arctic MX-7, so a firm pea-drop or gentle spreader works better than relying on pressure alone to spread it. Non-conductive. Not messy.
Recommended for: Intel Core i9-14900K/Core Ultra 9 285K, Ryzen 9 9950X, 9950X3D, or any workstation chip pushing 200W+ TDP. This is also where the cooler you pair it with starts mattering as much as the paste itself.
Best for SFF/ITX Builds: Thermal Grizzly PhaseSheet PTM7950
Price: roughly $12–$18 per sheet. No tube. No smearing. You cut it to size, place it on the IHS, and mount the cooler. The PhaseSheet liquefies under operating temperatures and conforms perfectly to both surfaces. In constrained airflow scenarios where you can’t afford uneven paste application, this removes the human error variable entirely.
Recommended for: Mini-ITX systems, NUC-style builds, compact AIOs in SFF cases, and anyone who’s ever second-guessed their spread pattern.
Best Budget Pick: Arctic MX-4
Conductivity: 8.5 W/m·K. Price: roughly $7 for 4g. It’s older than the MX-7 and marginally behind it in conductivity, but MX-4 is still a completely valid choice for standard desktop builds. It’s widely available at Best Buy, Micro Center, and Walmart electronics sections, which matters if you’re in the middle of a build and need paste today.
Recommended for: budget builds, anyone who needs paste on short notice, or secondary systems where maximum performance isn’t the goal.
Best for Laptop Re-Paste: Noctua NT-H2 or Thermal Grizzly Kryonaut
Laptop CPUs have much smaller die sizes than desktop processors. A standard desktop IHS is roughly 65mm × 65mm. A laptop die might be 30mm × 30mm or smaller. You need less paste (a grain of rice, not a pea) and you absolutely need non-conductive compound, since laptop components are packed densely with almost no clearance for spills.
NT-H2 is easy to apply in small quantities and cleans up well. Kryonaut’s slightly higher conductivity is worth it on thin-and-light laptops where every degree counts for throttle behavior.
| Product | Conductivity (W/m·K) | Price/gram | Application Ease (1–5) | Best For |
|---|---|---|---|---|
| Arctic MX-7 (4g) | 8.5 | ~$2.50/g | 5 | Most desktop builds |
| Thermalright TF8 (6g) | 13.8 | ~$1.50/g | 4 | High-TDP, OC builds |
| Noctua NT-H2 (3.5g) | 8.5 | ~$3.50/g | 5 | Laptops, clean installs |
| Thermal Grizzly Kryonaut (1g) | 12.5 | ~$8/g | 4 | Enthusiast OC, laptop re-paste |
| Thermal Grizzly Conductonaut (1g) | 73 | ~$12/g | 2 | Extreme OC, delidded Intel only |
How to Apply Thermal Paste to Your CPU: Step-by-Step
What You’ll Need Before You Start
- Thermal paste: your chosen compound
- Isopropyl alcohol (IPA), 90% or higher: for cleaning old paste off both surfaces
- Lint-free cloth or coffee filter: paper towels leave fibers
- Plastic spreader (optional): only needed for large-die HEDT chips or spread method
Step 1: Clean the Surfaces
If you’re reseating a cooler or replacing paste, clean both the IHS and the cooler base plate first. Apply a small amount of IPA to your lint-free cloth and wipe in a circular motion until no paste residue remains. Let both surfaces dry for at least 30 seconds before applying new paste.
Use 90%+ IPA, not standard 70% rubbing alcohol. The 70% solution contains too much water and takes longer to evaporate, which can leave moisture trapped under your cooler if you’re rushing. Not great.
Step 2: Choose Your Application Method
The pea/rice-grain center dot method is recommended by Intel in their official thermal paste application documentation, and it’s what most major paste manufacturers recommend. Place a 3–4mm dot of paste at the center of the IHS and let cooler mounting pressure spread it.
Socket-specific guidance:
- Intel LGA1700/LGA1851 (rectangular IHS): A short vertical line or two-dot method works better than a single center dot. The elongated IHS shape means a single dot may not reach the edges under pressure alone.
- AMD AM4/AM5 (square IHS): Single pea-size center dot. The square shape distributes pressure evenly, so pressure spread works perfectly here.
- HEDT/Threadripper (70mm+ IHS): Manual thin-spread method with a card, or a 5-dot pattern. The IHS is large enough that a single center dot won’t reach the edges.
Don’t bother with the X pattern. It looks thorough, but it increases the chance of air pockets forming at the lines rather than being pushed out. Skip it.
Step 3: Mount the Cooler
Lower the cooler straight down onto the CPU in a single smooth motion. No twisting, no sliding. Twisting drags paste to one side and can introduce air pockets. Tighten mounting screws in a diagonal cross pattern to apply even clamping pressure across the IHS. Loose one side at a time and you’ll get an uneven paste spread.
Once the cooler is seated and tightened, don’t lift it to check the spread. If you pull it off, you’ve broken the seal and need to clean and reapply. Trust the process.
Step 4: The Break-In Period
Polymer and silicone-based pastes don’t reach their rated conductivity immediately after application. They need thermal cycling to settle into surface imperfections. Most modern polymer pastes work close to optimally from first boot, but temperatures often stabilize and may improve slightly over the first several heat-cool cycles. The practical difference between fresh paste and fully-settled paste is typically 2–5°C.
What this means for you: run a normal gaming session or a stress test cycle before you draw any conclusions about your CPU temperatures. The temps you see on first boot aren’t necessarily your actual stable temps. Liquid metal is the exception here — full conductivity immediately.
How Much Thermal Paste Does Your CPU Actually Need and What Does It Cost?
Quantity Guide by CPU Size
Builders consistently over-apply paste. More is not better. The correct amount by platform:
- Standard desktop CPU (65mm × 65mm IHS, Intel/AMD mainstream): 0.2–0.3g per application
- Large HEDT/Threadripper (70mm+ IHS): 0.4–0.5g per application
- Laptop CPU (small die, often 25–35mm): 0.1g or less. A grain of rice is genuinely sufficient.
| Product | Package Size | Price | Applications per Package | Cost Per Application |
|---|---|---|---|---|
| Arctic MX-7 | 4g | ~$10 | 13–20 | ~$0.50–$0.77 |
| Thermalright TF8 | 6g | ~$9 | 20–30 | ~$0.30–$0.45 |
| Noctua NT-H2 | 3.5g | ~$12 | 11–17 | ~$0.70–$1.09 |
| Thermal Grizzly Kryonaut | 1g | ~$8 | 3–5 | ~$1.60–$2.67 |
| Conductonaut (liquid metal) | 1g | ~$12 | 3–5 | ~$2.40–$4.00 |
When to Buy More Than You Need
If you’re building multiple systems in one session, a larger tube makes sense. It’s also worth keeping extra on hand for your next re-paste in a few years. Tubes do dry out if you leave them poorly capped between uses. Most polymer pastes have a sealed shelf life of 2–5 years. Once opened, cap it tightly and store it away from direct heat. The Arctic MX-series officially rates 5 years sealed.
Kryonaut has a known pump-out issue on chips that run hot with large temperature swings. If you’re running a Ryzen 9 9950X3D or Core Ultra 9 285K that spikes frequently, Kryonaut Extreme or TF8 holds up better under those thermal cycles. Worth knowing before you buy a small 1g tube.
When to Replace Your CPU Thermal Paste
Dried, cracked, or degraded paste is one of the most common causes of a CPU that suddenly runs 10–15°C hotter than it used to. The signs are consistent: temperatures that used to sit at 70°C under gaming load now idle at 75°C and spike past 90°C under load. Thermal throttling shows up as stutters in games and dropped clock speeds under sustained all-core workloads.
Replacement schedule by type:
- Standard silicone/polymer paste: Every 3–5 years under normal use, or sooner if temps spike unexpectedly
- Liquid metal: Every 3–5 years. Liquid metal can “pump out” under repeated thermal cycling and redistribute unevenly over time. Per Thermal Grizzly’s product documentation, reapplication at the 3–5 year mark is recommended for sustained performance.
- Pre-applied stock cooler paste: Replace whenever you reseat the cooler, or after 2–3 years of heavy use
- Laptop re-paste timing: Every 3–4 years, or when your fans spin loud under light browser loads and temperatures creep up significantly
For a deeper look at the signs that your paste has gone past its useful life and how to tell the difference between a paste issue and a failing cooler, the guide on how often you should replace thermal paste walks through it in detail.
FAQ: Thermal Paste for CPUs
How long should I wait after applying thermal paste to my CPU?
You don’t need to wait before booting. Thermal paste doesn’t need to cure before use. That said, polymer pastes can improve slightly over the first several heat-cool cycles and temperatures may settle a degree or two over the first day of use. Don’t benchmark your system immediately after a fresh paste application and use that as your final temperature reading. Run it for a day or two first.
Does thermal paste brand matter?
Within the same performance tier, the temperature differences between established brands are typically 1–5°C on standard desktop builds at stock speeds. That difference grows on high-TDP chips running overclocked, in SFF builds with limited airflow, and on laptops with aggressive thermal throttle points. Stick to established brands: Arctic, Noctua, Thermal Grizzly, Thermalright. Avoid unknown generic pastes with no documented conductivity testing. The $3 savings isn’t worth the uncertainty on a $400 CPU.
Can you use too much thermal paste?
Yes. Excess paste can overflow the IHS edges during cooler mounting and get onto the motherboard socket surround or, in worst cases, into socket pins. For non-conductive pastes this is messy but usually cleanable with IPA. For liquid metal, it’s potentially a catastrophic short circuit. The pea-size or rice-grain rule exists for a reason. More paste does not mean better heat transfer. It actually increases thermal resistance by creating a thicker, less efficient interface layer.
Is pre-applied thermal paste on stock coolers good enough?
For stock-speed operation on budget and mid-range chips (Core i5, Ryzen 5/7), the factory TIM is adequate. It won’t win any thermal benchmarks, but it’ll keep the CPU within spec. For any chip with a TDP over 125W, any overclocking scenario, or a warm case with restricted airflow, a $9 tube of Arctic MX-7 is absolutely worth buying separately. The stock paste on high-end cooler boxes like the Noctua NH-D15 is actually quite good, but most budget stock coolers ship with mediocre compound.
Can I use thermal paste on my GPU?
Factory GPU coolers come with pre-applied thermal compound on the die and thermal pads on VRAM and VRM components. Don’t touch it unless you’re removing the stock cooler for an aftermarket block. If you are swapping to an aftermarket GPU cooler, the same paste rules apply as a CPU: non-conductive polymer or ceramic paste for the die, and replace thermal pads with correct-thickness pads (not paste). Using paste where pads should go leaves a gap because paste can’t fill the physical distance between components and their heatsink contacts.
The Short Version
Thermal paste fills microscopic surface gaps between your CPU and cooler. Use a pea-size center dot for AM4/AM5, and a short line or two-dot pattern for Intel LGA1700/LGA1851. For most desktop builds, Arctic MX-7 at around $9 does the job well. Bump to Thermalright TF8 for high-TDP chips like the Ryzen 9 9950X3D or Core Ultra 9 285K. Avoid liquid metal unless you’re on an Intel socket and know exactly what you’re doing. Give polymer paste a day or two of normal use before drawing conclusions from your temperature readings. Knowing your paste handles the thermal interface; choosing the right cooler is the next piece of the equation, and the best budget CPU coolers guide covers what pairs well at every price point.

Alex has been building and tweaking custom PCs for over 12 years. From budget builds to full custom water loops, he’s assembled more than 50 systems and helped hundreds of builders troubleshoot their rigs. When he’s not benchmarking the latest hardware, you’ll find him optimizing airflow setups or stress-testing overclocks.


