GPU Sag Bracket: How to Pick and Install One
A GPU sag bracket is a case-mounted support accessory that props up a graphics card from below, preventing the PCIe x16 slot and card PCB from bending under the GPU’s weight.
Last updated: June 2026
Table of Contents
- Quick Answer: What Is a GPU Sag Bracket and Do You Need One?
- What Is GPU Sag and Why Does It Happen?
- The Physics of GPU Sag
- How Much Sag Is Actually Dangerous?
- Types of GPU Sag Brackets
- Adjustable Kickstand Brackets (Most Common)
- Riser-Style Horizontal Support Brackets
- RGB GPU Sag Brackets
- 3D-Printed GPU Sag Brackets
- DIY and No-Cost Alternatives
- GPU Anti-Sag Bracket Comparison: Top Picks at a Glance
- How to Choose the Right GPU Sag Bracket for Your Build
- Step 1: Measure Your GPU’s Weight and Sag Angle
- Step 2: Check Your Case’s Mounting Options
- Step 3: Decide on Aesthetics and RGB
- Step 4: Verify Header Compatibility for RGB Brackets
- How to Install a GPU Sag Bracket (Step-by-Step)
- GPU Sag Bracket Alternatives Worth Knowing
- Frequently Asked Questions About GPU Sag Brackets
- Do I really need a GPU sag bracket?
- Will a GPU anti-sag bracket void my warranty?
- What is the best GPU sag bracket for a white build?
- Can I use a GPU sag bracket in a small form factor case?
- How do I 3D print a GPU sag bracket?
- What You Should Do
Quick Answer: What Is a GPU Sag Bracket and Do You Need One?
A GPU sag bracket (also called a GPU anti-sag bracket or GPU sag support) mounts inside your PC case and contacts the underside of your graphics card to hold it level. If your GPU weighs more than about 1.0 kg, you probably need one. Most RTX 4080, RTX 4090, RTX 5090, and RX 7900 XTX-class cards are well above that threshold, and visible droop at the far end of the card is a sign the PCIe slot is taking stress it wasn’t designed to handle long-term.
You just built your rig, slid that beefy triple-fan GPU in, and noticed the far end is drooping like it’s tired. Not a good sign. This guide covers what GPU sag actually is, how to measure whether yours is a problem, which bracket type fits your build, and how to install one without scratching anything.
What Is GPU Sag and Why Does It Happen?
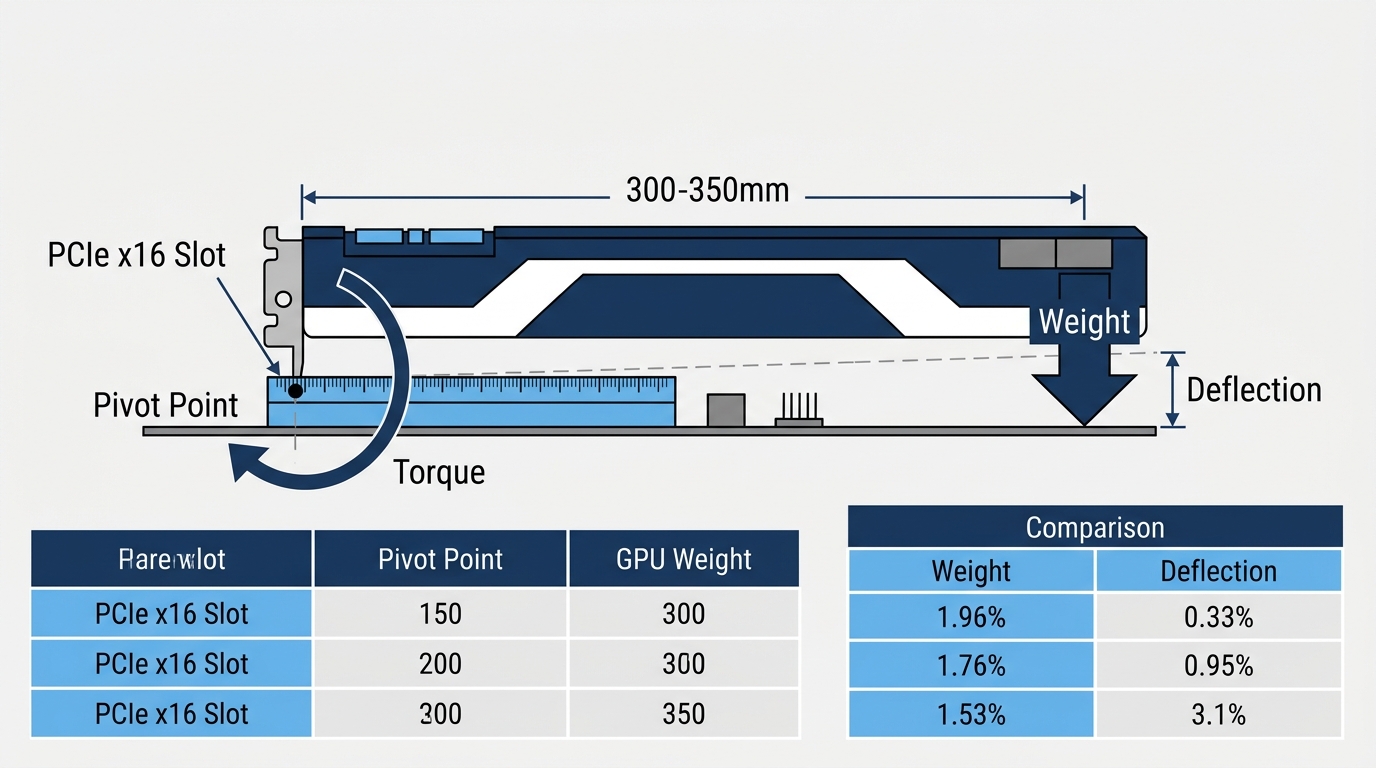
The Physics of GPU Sag
Your GPU hangs off a single PCIe x16 slot. That’s the only rigid anchor point. A modern triple-fan card can extend 300 to 350mm outward from that slot, and all its weight acts as rotational torque pulling the rear of the card downward. The longer and heavier the card, the worse the lever-arm problem gets.
Here’s how current flagship cards compare by weight:
| GPU Model | Approximate Weight | Sag Risk |
|---|---|---|
| NVIDIA RTX 5090 FE | ~1.8 kg | Very High |
| NVIDIA RTX 4090 FE | ~2.2 kg | Very High |
| AMD RX 7900 XTX | ~1.8 kg | High |
| NVIDIA RTX 4080 Super | ~2.1 kg | High |
| NVIDIA RTX 5080 | ~1.6 kg | Very High |
| NVIDIA RTX 3090 Ti | ~2.2 kg | High |
| NVIDIA RTX 4070 | ~1.0 kg | Low-Moderate |
| AMD RX 9070 XT | ~1.3–1.5 kg | Moderate-High |
Cards over 1.0 kg are generally where measurable sag starts becoming a real concern. Anything past 1.5 kg, and you’re looking at visible droop within a few months if nothing supports it.
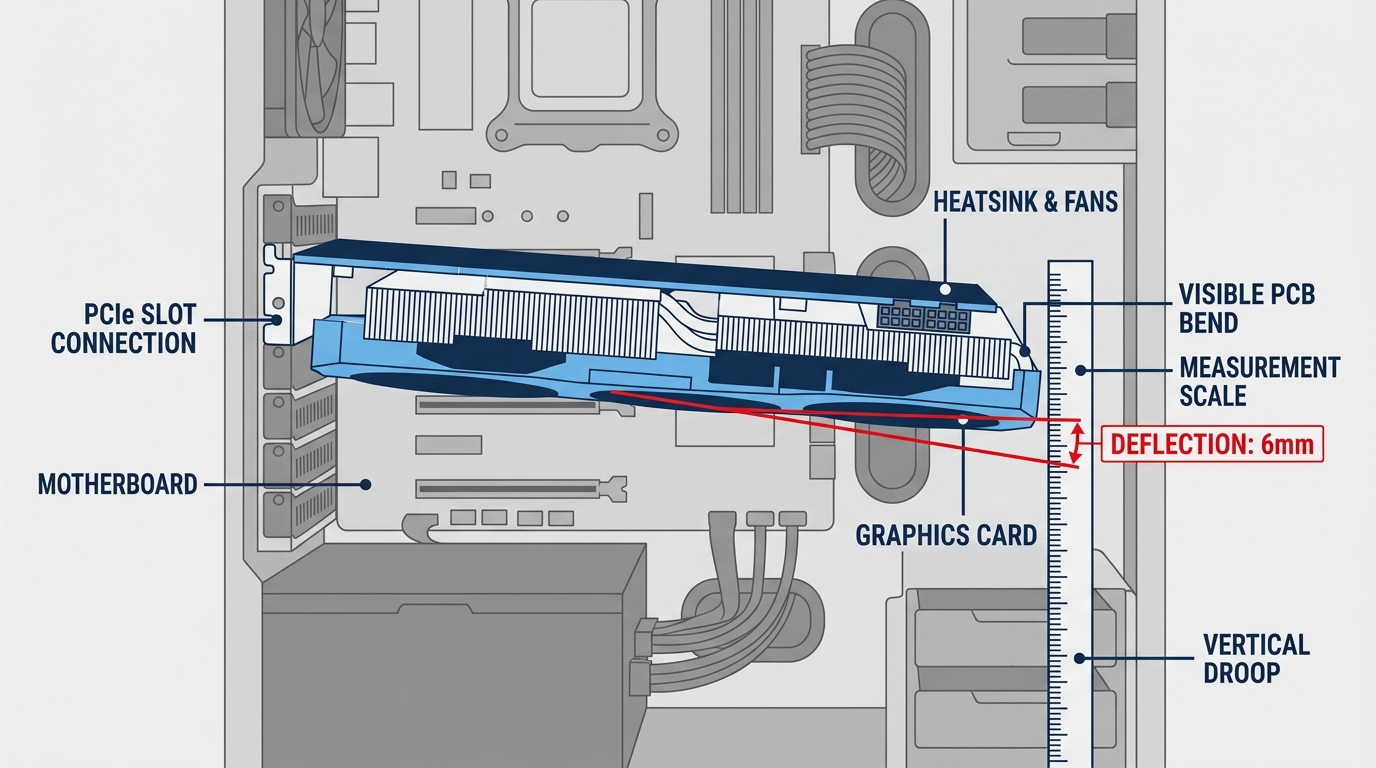
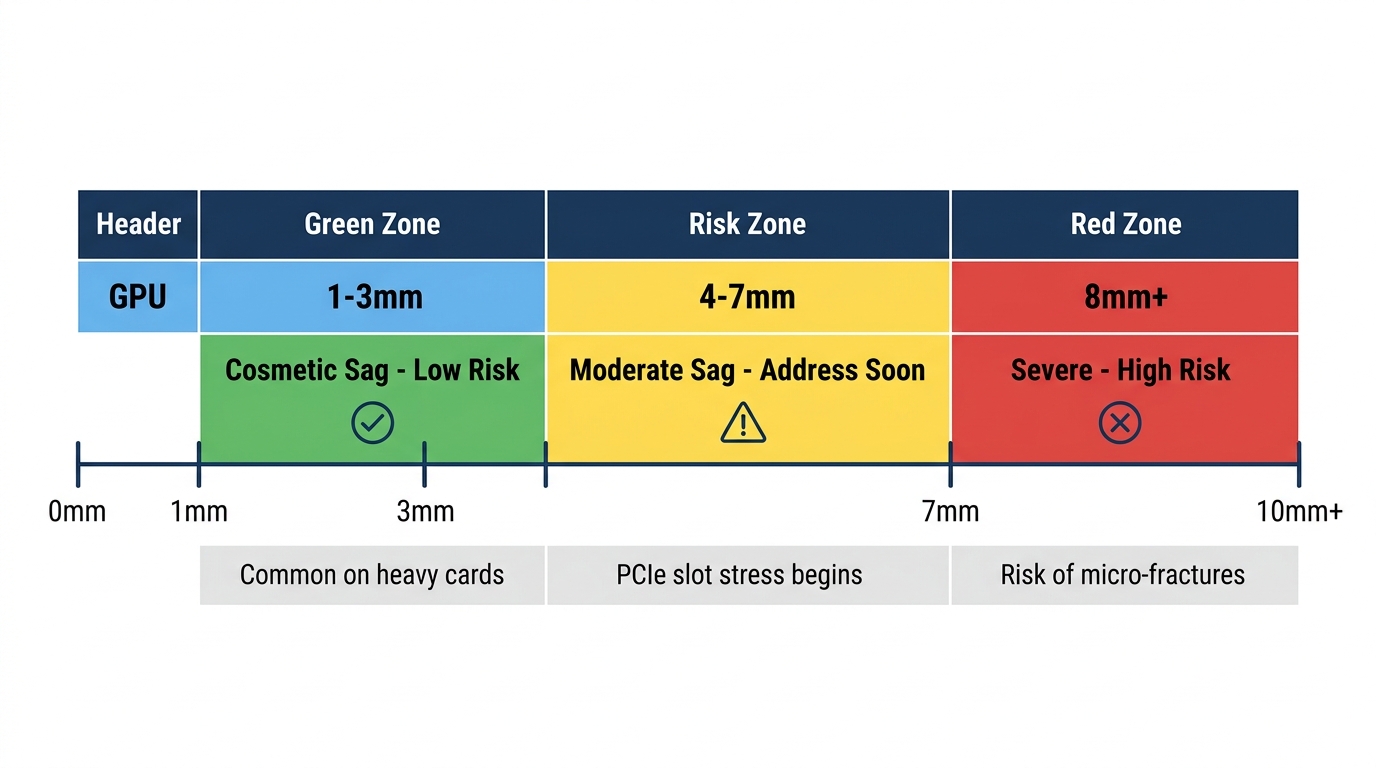
How Much Sag Is Actually Dangerous?
Not all sag is equal. Here’s how to think about deflection measured at the far end of the GPU:
- 1–3mm deflection: Cosmetic sag. Common on heavier cards, low risk short-term.
- 4–7mm deflection: Moderate sag. Starts stressing the PCIe slot retaining clip and PCB traces. Worth addressing within a few months.
- 8mm+ deflection: Severe. Real risk of PCIe connector micro-fractures, slot pin stress, and in bad cases, intermittent GPU signal loss or failure to post.
Most motherboard PCIe x16 slots are rated to handle the physical card weight during installation. They’re not rated for prolonged lateral bending stress. That’s the distinction manufacturers don’t advertise prominently. For cards with plastic shrouds, positioning the support under the corner of the GPU (closer to the glass panel, further from the PCIe slot) distributes the load more effectively than centering it. The community also notes that DIY options like threaded rod from a hardware store with plastic sleeves can be a viable low-cost alternative to commercial brackets, referenced at TechPowerUp Forums.
Types of GPU Sag Brackets
Adjustable Kickstand Brackets (Most Common)
These are what most people picture when they search “gpu anti sag bracket.” A vertical post mounts to the PCIe bracket area or case floor, and an adjustable arm with a rubber contact pad supports the GPU from below. Height is set via a threaded rod or notched post.
The Corsair GPU Anti-Sag Bracket is a solid example: 294mm case length, 54mm height range, 70mm wide, 0.37 kg. It fits most ATX mid-tower and full-tower cases and supports even the heaviest current-gen cards. Two-year warranty included. Straightforward.
Best for: standard ATX mid-tower and full-tower builds. If you don’t care about aesthetics and want something that just works, this category wins every time.
Riser-Style Horizontal Support Brackets
Instead of a single contact point, these attach to the case’s drive cage, PSU shroud, or dedicated mounting rails and cradle the GPU from below along a larger portion of its length. Better weight distribution. Less localized stress on any one point of the shroud.
The Lian Li GB-001 is a good example of a case-compatible riser-style bracket, rated to support thick 3- and 4-slot air-cooled cards in ATX and E-ATX builds. Best for triple-fan GPUs over 1.5 kg where you want the most rigid, sag-free result.
RGB GPU Sag Brackets
If your build has a tempered glass panel, a plain metal kickstand disappears visually. An RGB bracket changes that. Companies like V1 Tech (Phoenix, Nova, Sakura, White Marble designs at around $31.99 each), Asiahorse, and Lian Li all offer versions with addressable LED strips or acrylic panels built into the arm.
Before you buy, check two things:
- 3-pin ARGB (5V): Required for addressable per-LED color effects. Compatible with ASUS Aura Sync, MSI Mystic Light, and Gigabyte RGB Fusion 2.0.
- 4-pin RGB (12V): Single color zone, no addressable control. Found on older motherboards and some budget boards.
Some RGB brackets skip the motherboard header entirely and use a USB 2.0 internal header for their own controller. Check your motherboard’s available headers before ordering. For a full breakdown of header types and pinouts, see our guide on ARGB vs RGB differences.
Best for: windowed-panel builds where the bracket will actually be visible. Not worth the premium if you’re running a solid steel side panel.
3D-Printed GPU Sag Brackets
Custom-fit designs are available on Printables.com, Thingiverse, and MyMiniFactory. Search your specific case model and you’ll often find purpose-built brackets that fit cleanly without any adjustment needed.
Print in PETG at 40% infill minimum. PETG handles heat better than PLA, which can soften near warm components. ABS works too if you have an enclosed printer. Not recommended for GPUs over about 1.2 kg, filament shear strength just isn’t competitive with metal for heavier loads. Cost: essentially free if you own a printer, or $5 to $15 at a local print shop.
DIY and No-Cost Alternatives
The Reddit community has tested a bunch of these. Honest results:
- Zip tie suspension: Loop through a GPU fan shroud screw point and anchor to a top case fan mount. Works surprisingly well for lighter cards under 1.0 kg.
- Nylon fishing line: Suspend the GPU from the top panel. Lightweight, invisible, effective for cards under 1.2 kg.
- Foam riser blocks: Cut to fit between PSU shroud and GPU underside. Zero cost, but foam compresses over time and loses effectiveness.
- LEGO or action figure props: They do technically work, but vibration from fans can shift them and they can restrict airflow. Not a long-term solution.
Not great for adjustability or permanence. But for a temporary fix while you wait for a bracket to arrive, zip ties beat doing nothing.
GPU Anti-Sag Bracket Comparison: Top Picks at a Glance
| Bracket | Price | Material | RGB | Adjustable | Case Compatibility |
|---|---|---|---|---|---|
| Corsair GPU Anti-Sag Bracket | $19.99 | Steel + rubber pad | No (LC100 add-on optional) | Yes (variable height) | Most ATX, 294mm length |
| V1 Tech Phoenix RGB Bracket | ~$31.99 | Acrylic + aluminum | Yes (ARGB) | Limited | ATX mid/full tower |
| Asiahorse GPU Bracket | ~$15–22 | Aluminum alloy | Optional | Yes | ATX mid/full tower |
| Lian Li GB-001 | ~$25 | Aluminum | No | Yes | ATX and E-ATX |
| Lian Li O11 Built-in Support | Case-included | Aluminum | No | Yes | O11 series cases only |
| DIY Zip Tie | $0 | Nylon | No | No | Any (under ~0.8 kg) |
| 3D Print (PETG) | $0–15 | PETG/ABS | No | Design-dependent | Custom fit |
If you’re building a white system, the Corsair GPU Anti-Sag Bracket is available in white (model CC-8900684, $19.99) and V1 Tech’s White Marble RGB design gives you a windowed-panel-friendly option with addressable lighting. Both are solid picks for white builds.
How to Choose the Right GPU Sag Bracket for Your Build
Step 1: Measure Your GPU’s Weight and Sag Angle
Pull the GPU before installation and weigh it on a kitchen scale if you want an exact number. Or look up the spec sheet weight from the manufacturer’s product page. Most AIB partner cards weigh more than the Founders Edition reference specs because of their larger cooling shrouds and heatsinks.
After installation, use a digital level app on your phone held against the GPU PCB edge, or a straight edge and ruler to measure vertical deflection at the far end of the card. If you’re seeing more than 3mm of drop at the far end relative to the PCIe bracket end, a support bracket is recommended. More than 5mm, and it’s not optional at that point.
Step 2: Check Your Case’s Mounting Options
Some cases include native GPU support systems and you won’t need a third-party bracket at all. The Lian Li O11 Dynamic Evo, Fractal Torrent, and several Phanteks Enthoo cases include built-in rails or support slots. Check your case manual before buying anything.
For cases without native support, confirm whether your PCIe bracket area has accessible screw holes for a post-style bracket, or whether the PSU shroud top surface is accessible for a cradle-style mount. Measure the gap between the GPU’s underside and the PSU shroud so you know the minimum post height you’ll need.
Also verify the internal length clearance. The Corsair bracket needs 294mm. Some compact mid-towers don’t have enough depth to accommodate full-length brackets, so check your case specs first.
Step 3: Decide on Aesthetics and RGB
Windowed tempered glass panel: an RGB sag bracket gpu option is worth the extra $10 to $15 over a plain metal one. It’s visible. Might as well make it look intentional.
Solid steel panel or opaque case: a $10 to $20 metal kickstand is functionally identical to a $32 RGB acrylic bracket. Save the money.
Step 4: Verify Header Compatibility for RGB Brackets
This is the step people skip, then complain that the RGB doesn’t work. Before buying an RGB sag bracket, check which headers your motherboard has available:
- 3-pin ARGB (5V): Addressable color effects. Compatible with ASUS Aura Sync, MSI Mystic Light, Gigabyte RGB Fusion 2.0, and ASRock Polychrome Sync.
- 4-pin RGB (12V): Single-zone color, no individual LED control. Found on older B450/X570 boards and some current budget boards.
- USB 2.0 internal header: Some brackets use their own controller module instead. Needs a free 9-pin USB 2.0 header on the motherboard.
For a detailed look at RGB header pinouts and what each header controls, our guide on RGB headers on motherboards covers the full breakdown including voltage specs and connector diagrams.
How to Install a GPU Sag Bracket (Step-by-Step)
- Power down and ground yourself. Shut the PC down fully, flip the PSU switch to off, and touch bare metal on the case chassis to discharge any static before touching components.
- Remove the side panel. Slide or unscrew the tempered glass or steel panel and set it somewhere safe, away from the workspace.
- Identify your mounting point. Most kickstand brackets attach to the PCIe slot bracket screw holes at the rear of the case. Confirm which holes align with the bracket base before threading anything.
- Attach the bracket base. Screw the base plate to the PCIe bracket screw holes using the hardware included with your bracket. Don’t overtighten on thin case steel; finger-tight plus a quarter turn is enough.
- Set the post height before making contact. Raise or lower the threaded post or notched arm so the rubber contact pad is positioned just below the GPU’s underside. You want to close that gap in the next step, not push up on the card.
- Adjust to just contact, no pressure upward. Extend the post until the pad just touches the GPU shroud. You should not be pushing the GPU upward. The goal is support, not lift. If the bracket is pushing the card up, you’ll be stressing the PCIe slot from the opposite direction, which is equally bad.
- Check for zero upward pressure. Press the far end of the GPU gently downward with one finger. The bracket should resist without the post collapsing, and there should be no rocking in the PCIe slot. If there is, re-seat the GPU and re-check the bracket height.
- For RGB brackets: connect the header. Route the ARGB or RGB cable to the appropriate header on the motherboard. Cable manage with a small zip tie so it doesn’t drape over fans or obstruct airflow.
- Replace the side panel and power on. Before running any games, verify GPU detection in Device Manager or GPU-Z. Confirm it’s running at PCIe x16 bandwidth (GPU-Z’s Bus Interface reading will show this). Then check for any signal issues before doing a full boot into your OS.
The optimal position for the bracket contact point, according to builder community consensus, is at the far corner of the GPU (closer to the glass panel side, away from the PCIe slot). This is where the lever arm is longest and where you get the most effective correction for the sag angle.
GPU Sag Bracket Alternatives Worth Knowing
If a standard kickstand bracket isn’t the right fit for your build, there are a few other routes worth considering:
- Vertical GPU mount with riser cable: Mounting your GPU vertically eliminates sag entirely because gravity now pulls the card toward the bracket, not away from it. Costs $30 to $60 for a quality PCIe riser cable and vertical mount kit. Some Gen 4 and Gen 5 riser cables introduce a small bandwidth penalty on certain motherboards, so verify compatibility before committing.
- Case-integrated GPU support: The Lian Li O11 Dynamic Evo, Fractal Torrent, and Phanteks Enthoo Pro 2 include built-in GPU support rails or shelf systems. If you’re planning a case upgrade anyway, this is worth factoring into the decision.
- Reinforced PCIe slot (motherboard-side): ASUS ROG, MSI MEG, and some Gigabyte AORUS boards on the Z890 and X870E platforms include a reinforced PCIe slot brace or SafeSlot design. This reduces slot flex but doesn’t replace a bracket for cards over 2 kg.
- Foam riser blocks: Cut-to-fit foam between the PSU shroud and GPU underside. Costs nothing. Works short-term, but compresses over months and loses effectiveness. Not a long-term fix.
Frequently Asked Questions About GPU Sag Brackets
Do I really need a GPU sag bracket?
If your GPU weighs under 800g and you’re seeing less than 3mm of deflection at the card’s far end, it’s optional. If your card is 1.0 kg or heavier, which covers most RTX 4080, RTX 4090, RTX 5080, RTX 5090, and RX 7900 XTX-class GPUs, a bracket is strongly recommended. Prolonged sag stress can degrade the PCIe connector contact and slot retention over one to three years of use. A $15 to $20 bracket is cheap insurance on a $700 to $2,000 graphics card.
Will a GPU anti-sag bracket void my warranty?
No. GPU sag brackets are passive external supports. They don’t modify the GPU, the motherboard, or any firmware. They just hold the card up. The only thing to watch is the contact pad quality: cheap brackets with hard plastic pads can scuff the GPU cooler shroud over time. Look for brackets with rubber or silicone pads, which most commercial options include. A small piece of adhesive felt at the contact point works as a DIY buffer too.
What is the best GPU sag bracket for a white build?
The Corsair GPU Anti-Sag Bracket in White (CC-8900684, $19.99) is the cleanest option if you want a no-RGB, fully adjustable metal bracket. For a windowed panel build with RGB, V1 Tech’s White Marble RGB bracket gives you addressable lighting with a white aesthetic. If budget is tight, printing in white PETG filament is a fully color-matched, functional alternative for GPUs under 1.2 kg.
Can I use a GPU sag bracket in a small form factor case?
Most standard kickstand brackets are sized for ATX cases with 250 to 300mm or more of internal height. In a Mini-ITX or compact mATX case, those brackets physically won’t fit. For SFF builds, look for case-specific bracket designs on Printables.com or use the nylon fishing line suspension method as a low-profile workaround. The good news: ITX GPUs are generally lighter than 800g and are far less prone to severe sag in the first place.
How do I 3D print a GPU sag bracket?
Search Printables.com or Thingiverse for “GPU support bracket” combined with your specific case model. Many popular cases have community-designed brackets that fit cleanly without modification. Print in PETG at 40% infill or higher for structural rigidity. Avoid PLA near warm components since it can soften at temperatures above 60°C. Sand any rough contact edges before installing, and add a self-adhesive felt pad at the point where the bracket touches the GPU shroud to prevent scratching.
What You Should Do
For most builders running an RTX 4080-class card or heavier, the Corsair GPU Anti-Sag Bracket ($19.99) is the right call. Universal fit, adjustable height, rubber contact pad, two-year warranty. Done. If you’re building a showpiece rig with a tempered glass panel and ARGB headers to spare, a V1 Tech RGB bracket around $32 earns its price in aesthetics. Going budget? A generic aluminum kickstand bracket from Asiahorse or a similar brand in the $10 to $15 range does the same structural job. Whatever you pick, install it at the correct height: contact but no upward pressure. That’s the one step people get wrong most often, and it matters. Get your GPU seated properly first, then brace it, and your slot contacts will thank you two years from now.

Alex has been building and tweaking custom PCs for over 12 years. From budget builds to full custom water loops, he’s assembled more than 50 systems and helped hundreds of builders troubleshoot their rigs. When he’s not benchmarking the latest hardware, you’ll find him optimizing airflow setups or stress-testing overclocks.