How to Install an SSD (SATA and M.2)
An SSD is a storage device using NAND flash memory with no moving parts, delivering dramatically faster read and write speeds than a traditional hard disk drive.
Last updated: June 2026
Table of Contents
- Quick Answer: How Do You Install an SSD?
- SATA vs. M.2 SSD: Which Type Do You Have?
- SATA SSDs (2.5-Inch)
- M.2 SSDs (NVMe and SATA)
- Before You Start: Compatibility Check and What You’ll Need
- Check Your Motherboard Compatibility
- Tools and Materials Checklist
- How to Install a SATA SSD in a Desktop PC
- Step 1: Power Down and Open the Case
- Step 2: Ground Yourself
- Step 3: Mount the SSD in a Drive Bay
- Step 4: Connect the SATA Data Cable
- Step 5: Connect the SATA Power Cable
- Step 6: Close the Case and Boot Up
- How to Install an M.2 SSD
- Step 1: Locate the M.2 Slot on Your Motherboard
- Step 2: Remove the Heatspreader (If Present)
- Step 3: Insert the M.2 SSD
- Step 4: Secure the SSD
- Step 5: Boot Into BIOS to Confirm Detection
- How to Install an SSD in a Laptop
- Check Your Laptop’s Upgrade Path First
- Laptop-Specific Installation Steps
- SSD Not Detected? How to Troubleshoot
- Check These 5 Things First
- Enable NVMe in BIOS (If Required on Older Boards)
- After Installation: Setting Up Your New SSD
- Option A: Fresh Windows Install
- Option B: Clone Your Existing Drive
- Initialize and Format as Secondary Storage
- Frequently Asked Questions
- Can I install an SSD by myself?
- Do I need to reinstall Windows after installing a new SSD?
- Can I install an SSD alongside my existing HDD?
- Does it matter which M.2 slot I use?
- How do I know if my M.2 SSD is NVMe or SATA?
- The Short Version
Quick Answer: How Do You Install an SSD?
To install a SATA SSD, mount it in a 2.5″ drive bay, connect a SATA data cable to your motherboard and a SATA power cable from your PSU, then boot and initialize it in Disk Management. To install an M.2 SSD, insert it at a 30-degree angle into the M.2 slot on your motherboard, press flat, and secure with a single small screw. Both installs take under 15 minutes.
Most people think installing an SSD requires some kind of advanced technical skill. It doesn’t. It’s genuinely one of the easiest upgrades you can make to a PC. That said, there are real compatibility traps that catch beginners off guard, and the post-install setup steps get skipped constantly, leaving people confused when the drive doesn’t show up in Windows. This guide covers the full process: SATA 2.5″ install, M.2 install, laptop upgrades, and what to do after the drive is physically in the machine.
The performance jump is worth it. A typical HDD boots Windows in around 45 seconds. An NVMe Gen 4 SSD cuts that to 8-10 seconds. Sequential read speeds go from roughly 150 MB/s on a spinning disk to 550 MB/s on SATA SSD, and all the way to 7,000 MB/s on a PCIe Gen 4 NVMe drive. That’s not a subtle difference. You feel it every single time you use the machine.
- 🟢 SATA 2.5″ install in desktop, straightforward, hard to get wrong
- 🟢 M.2 install on modern board, takes 5 minutes, very beginner-friendly
- 🟡 M.2 on older boards (Z370/X299 era), may need BIOS update or manual NVMe enable
- 🟡 Laptop install, varies wildly by model; check repairability first
- 🔴 Installing M.2 NVMe in a SATA-only M.2 slot, drive won’t be detected; permanent confusion
- 🔴 Skipping initialization in Disk Management, new drive won’t appear in Windows at all
SATA vs. M.2 SSD: Which Type Do You Have?
Before you open your case, you need to know which type of SSD you’re working with. The installation process is completely different depending on the form factor, and putting the wrong drive in the wrong slot is a fast way to waste an afternoon.
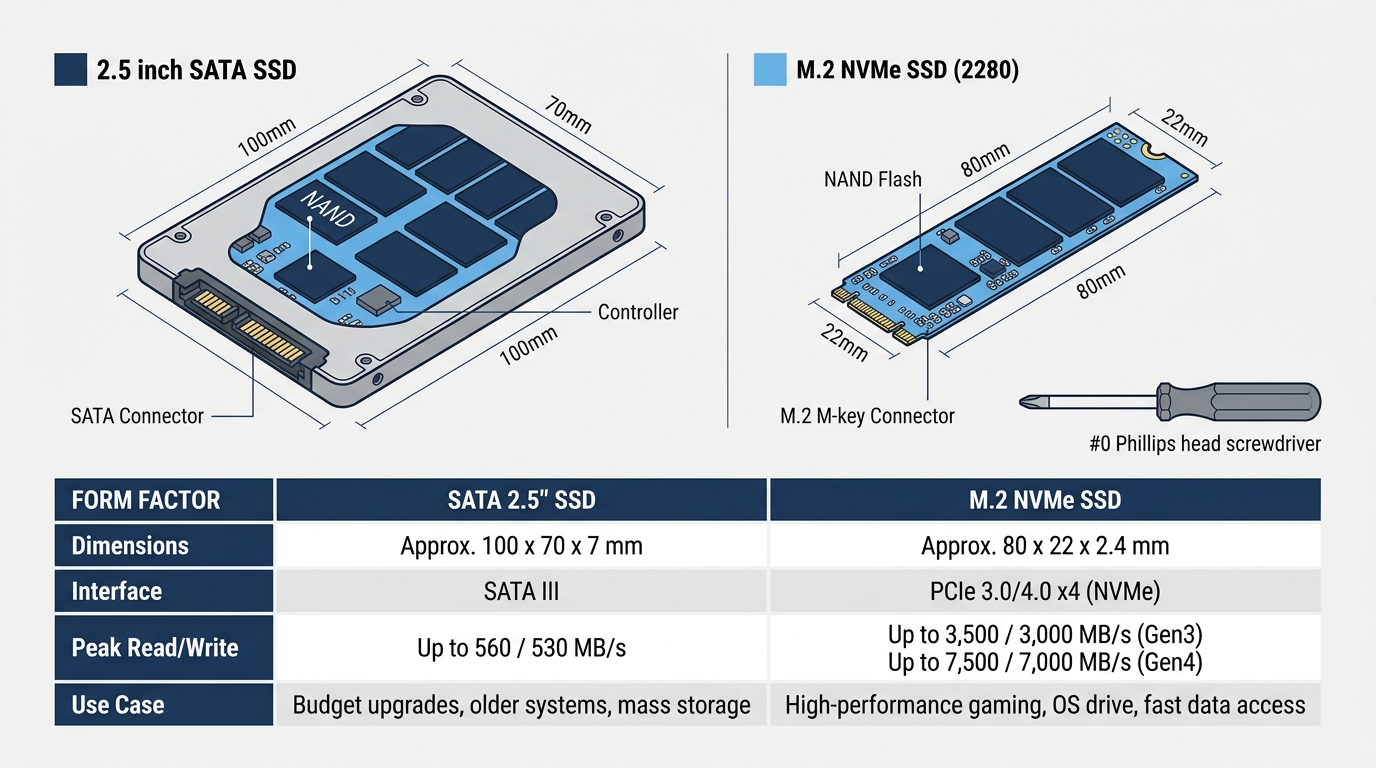
SATA SSDs (2.5-Inch)
These are the rectangular drives that look like a miniature hard drive. Standard size is 2.5 inches wide by 7mm thick. They use the SATA III interface, which caps sequential read speed at around 550 MB/s and write speed at around 520 MB/s. You connect them with two cables: an L-shaped SATA data cable running to your motherboard, and a flat SATA power connector from your PSU. Best choice for older systems without M.2 slots, or if you’re adding secondary storage alongside an existing NVMe boot drive.
M.2 SSDs (NVMe and SATA)
M.2 is a form factor, not a speed standard. That trips up a lot of people. An M.2 slot can house either a SATA-based drive (same 550 MB/s ceiling, just a smaller stick) or an NVMe drive running over PCIe lanes, which is where speeds get serious.
The most common M.2 length is 2280 (22mm wide, 80mm long). You’ll also encounter 2230 (used in the Steam Deck and some laptops), 2242, and 2260. Check what length your slot supports before ordering.
Typical NVMe speeds by PCIe generation:
- PCIe Gen 3 NVMe: up to ~3,500 MB/s read, ~3,200 MB/s write
- PCIe Gen 4 NVMe: up to ~7,000 MB/s read, ~6,500 MB/s write
- PCIe Gen 5 NVMe: up to ~14,000 MB/s read, available on Z790/X670E and newer
Key notch types matter. An M-key notch (single notch toward the right side) indicates NVMe capability. A B+M key (notches on both ends) typically means SATA M.2. Your motherboard slot has a corresponding key, and a drive with the wrong key physically won’t seat. Check your board’s manual to confirm which key type each slot supports.
| Feature | SATA 2.5″ | M.2 SATA | M.2 NVMe Gen 3 | M.2 NVMe Gen 4 |
|---|---|---|---|---|
| Max Read Speed | ~550 MB/s | ~550 MB/s | ~3,500 MB/s | ~7,000 MB/s |
| Max Write Speed | ~520 MB/s | ~520 MB/s | ~3,200 MB/s | ~6,500 MB/s |
| Requires SATA Cable | Yes | No | No | No |
| Requires Drive Bay | Yes | No | No | No |
| Typical Price (1TB, 2026) | $50–$70 | $55–$75 | $70–$100 | $90–$130 |
Before You Start: Compatibility Check and What You’ll Need
This step gets skipped constantly. Don’t skip it. Buying an NVMe Gen 4 drive for a board that only supports Gen 3 isn’t a disaster, but dropping a NVMe drive into a SATA-only M.2 slot means it won’t show up at all.
Check Your Motherboard Compatibility
First, find your motherboard model. On Windows, open Task Manager, click the Performance tab, then CPU. Your board model usually appears in the top right. Alternatively, CPU-Z (free tool) shows it under the Mainboard tab.
Once you have the model, pull up the manufacturer’s spec page or download your manual. Look for:
- Number of M.2 slots: some budget boards only have one
- Key type per slot: M-key (NVMe capable) vs. B+M key (SATA only)
- PCIe generation per slot: Gen 3, Gen 4, or Gen 5
- SATA port count: most boards have 4–6 SATA III ports
- Lane sharing warnings: some boards disable SATA ports when specific M.2 slots are occupied. This is in the fine print of your manual. Find it before you start.
As a general rule: AMD B650, X670, X670E, B850, X870 and X870E boards all support PCIe Gen 4 M.2 minimum, with Gen 5 on higher-end slots. Intel Z790, B860, and Z890 boards support Gen 4 and Gen 5 depending on the slot. Older B550 and X570 (AMD) or Z690 (Intel) boards typically max out at Gen 4 on the primary slot.
Tools and Materials Checklist
- #0 Phillips screwdriver: for M.2 standoff screws (these are tiny)
- #1 Phillips screwdriver: for drive bay screws and case panels
- Anti-static wrist strap: or just touch unpainted metal inside your case before handling the drive
- SATA data cable: often NOT included with the SSD, verify before you buy; most motherboards include one or two
- M.2 standoff and screw: usually included with your motherboard, rarely with the SSD itself. If you’ve misplaced yours, check out our guide on M.2 screw sizes and types to make sure you get the right replacement.
- Your board’s manual: physical copy or downloaded PDF from the manufacturer’s support page
How to Install a SATA SSD in a Desktop PC
According to the Tom’s Hardware community guides, the standard process for a SATA SSD involves physically mounting the drive, connecting both data and power cables, and if it’s a new primary drive, using a Windows installation USB to set up the OS cleanly. Here’s how each step works in practice.
Step 1: Power Down and Open the Case
Shut down completely. Not sleep, not hibernate. Full shutdown. Unplug the power cable from the wall. Press the power button once after unplugging to discharge any residual power in the capacitors. Then remove the side panel, which is typically held by two or three thumbscrews at the rear.
Step 2: Ground Yourself
Touch a bare metal surface inside the case before you handle any components. An unpainted area of the case frame works fine. If you have an anti-static wrist strap, clip it to the case and wear it throughout. Static discharge can silently damage NAND flash cells. Not worth the risk.
Step 3: Mount the SSD in a Drive Bay
Find an open 2.5″ bay. Many modern cases have dedicated 2.5″ mounting points on the back of the motherboard tray or behind drive cages. If your case only has 3.5″ bays, you’ll need a 2.5″-to-3.5″ adapter bracket (inexpensive, often bundled with budget cases).
Slide the SSD in, align the screw holes, and secure with two to four screws. Finger-tight is fine to start, then snug them with the screwdriver. Don’t crank them down hard. Some cases use tool-less trays where the drive clicks in without screws, if so, just slide the SSD into the tray until it locks.
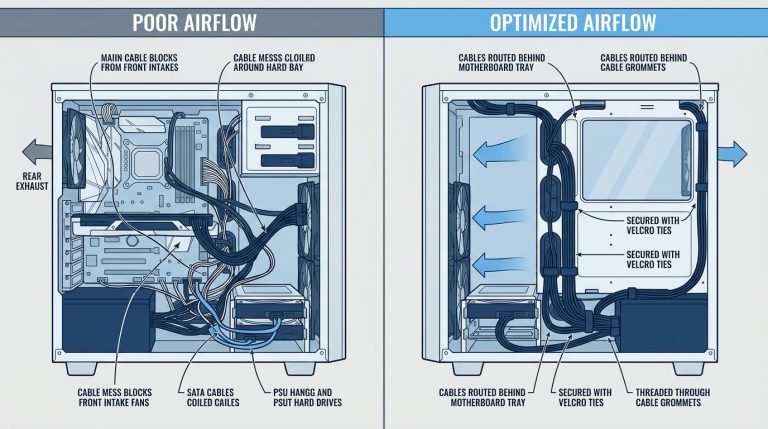
Good cable routing after the install makes a real difference. Routing your SATA cable cleanly behind the motherboard tray keeps airflow clear. Our PC cable management guide has the specifics on how to do this neatly.
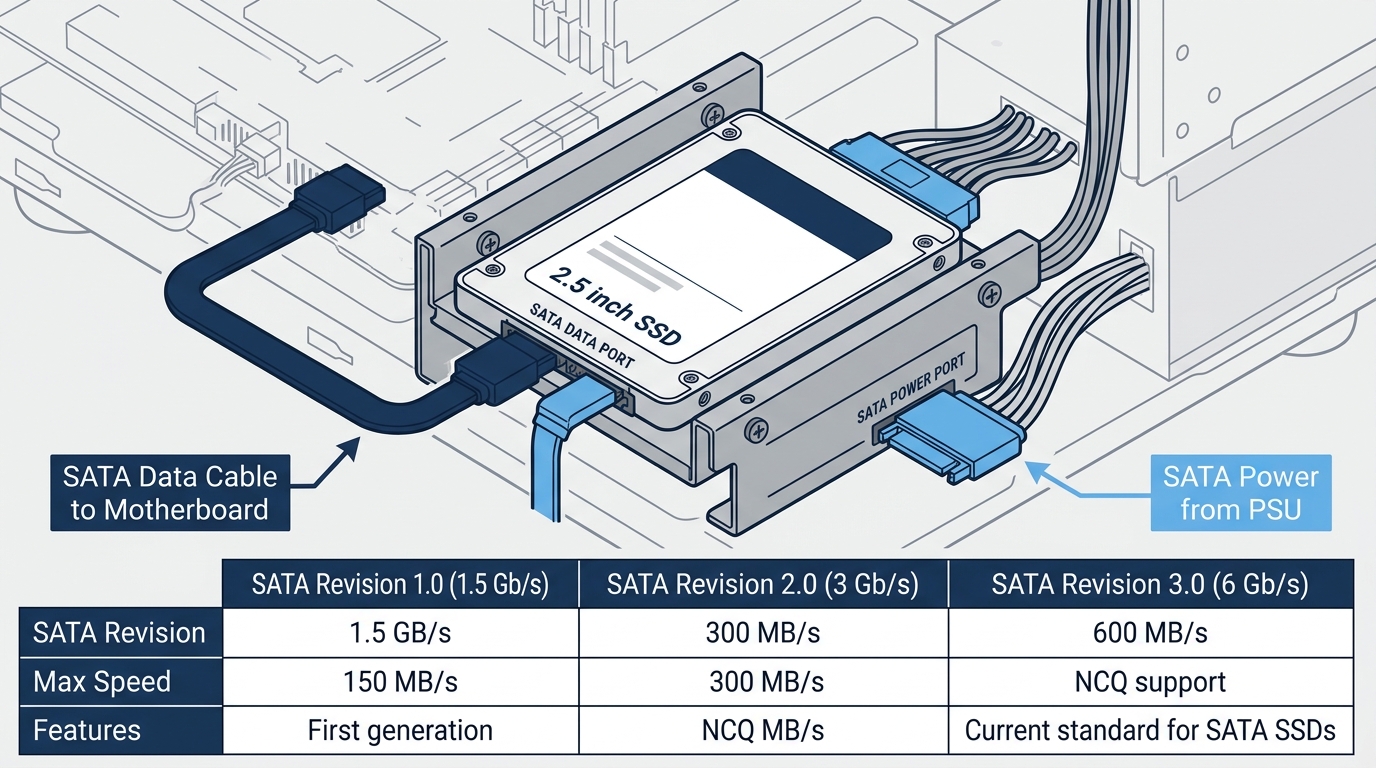
Step 4: Connect the SATA Data Cable
Take your SATA data cable (the thin, flat cable with an L-shaped connector on each end). Plug one end into the SSD’s data port. Run the cable to your motherboard and connect it to any available SATA III port, labeled “SATA3” or “SATA 6Gb/s” on the board. Make a note of which port number you used, you’ll reference it in BIOS if needed.
Step 5: Connect the SATA Power Cable
Find a free SATA power connector from your PSU. It’s the wide, flat, 15-pin connector. It only fits one way. Plug it into the power port on the SSD until it clicks. If your PSU has no free SATA power connectors, a Molex-to-SATA adapter will work, but check that your PSU has a Molex connector available first.
Step 6: Close the Case and Boot Up
Reinstall the side panel, reconnect all external cables, and power on. Head to the post-install setup section below before you start using the drive.
How to Install an M.2 SSD
No cables. No drive bay. Dramatically cleaner install. The M.2 process is actually faster than SATA once you know what you’re doing.
Step 1: Locate the M.2 Slot on Your Motherboard
M.2 slots are usually labeled “M.2_1,” “M2A_CPU,” or similar. On most ATX boards, the primary slot sits between the CPU socket and the first PCIe x16 slot. A second or third slot might be near the chipset, below the GPU.
Use the CPU-connected slot (usually M.2_1) for your primary NVMe drive. This connects directly to processor lanes with the lowest latency and full Gen 4 or Gen 5 bandwidth. Chipset-connected slots are fine for secondary storage. If your GPU is blocking access to the slot, temporarily remove it. Common on compact boards.
Step 2: Remove the Heatspreader (If Present)
Most modern motherboards include an M.2 thermal shield, a metal plate with a thermal pad that sits over the installed drive. Unscrew it and set it aside. Before reinstalling it later, peel the protective film off the thermal pad if it’s still on. It’s usually a thin clear or blue plastic sheet. Easy to miss.
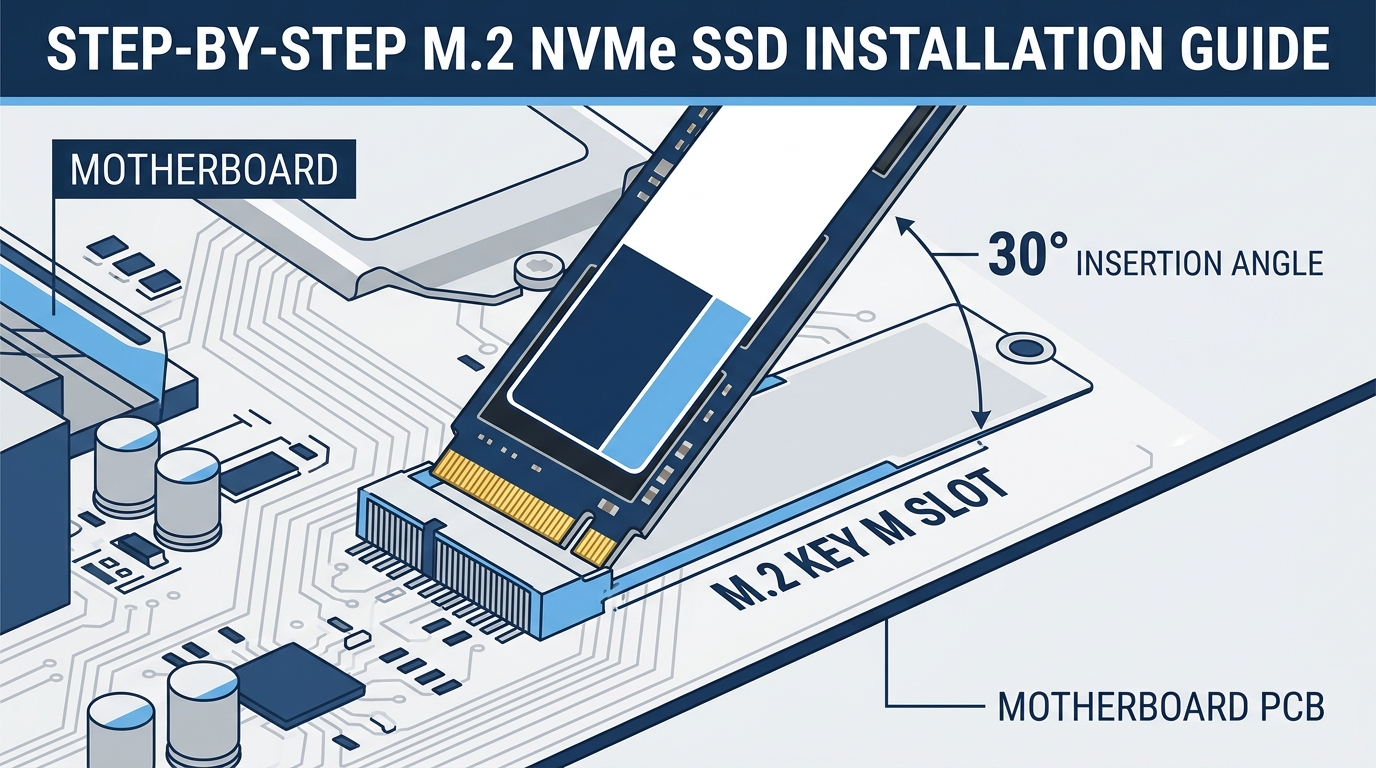
Step 3: Insert the M.2 SSD
Hold the drive at a 30 to 45-degree angle. Align the key notch with the slot’s key. Push the connector end in firmly, you’ll feel it seat. It takes a little more pressure than you’d expect. Normal. Do not force it if it’s not going in, wrong key type won’t physically fit, and the slot can be damaged.
Once seated, the free end of the drive will be angling upward. That’s correct. It doesn’t lie flat until you secure it.
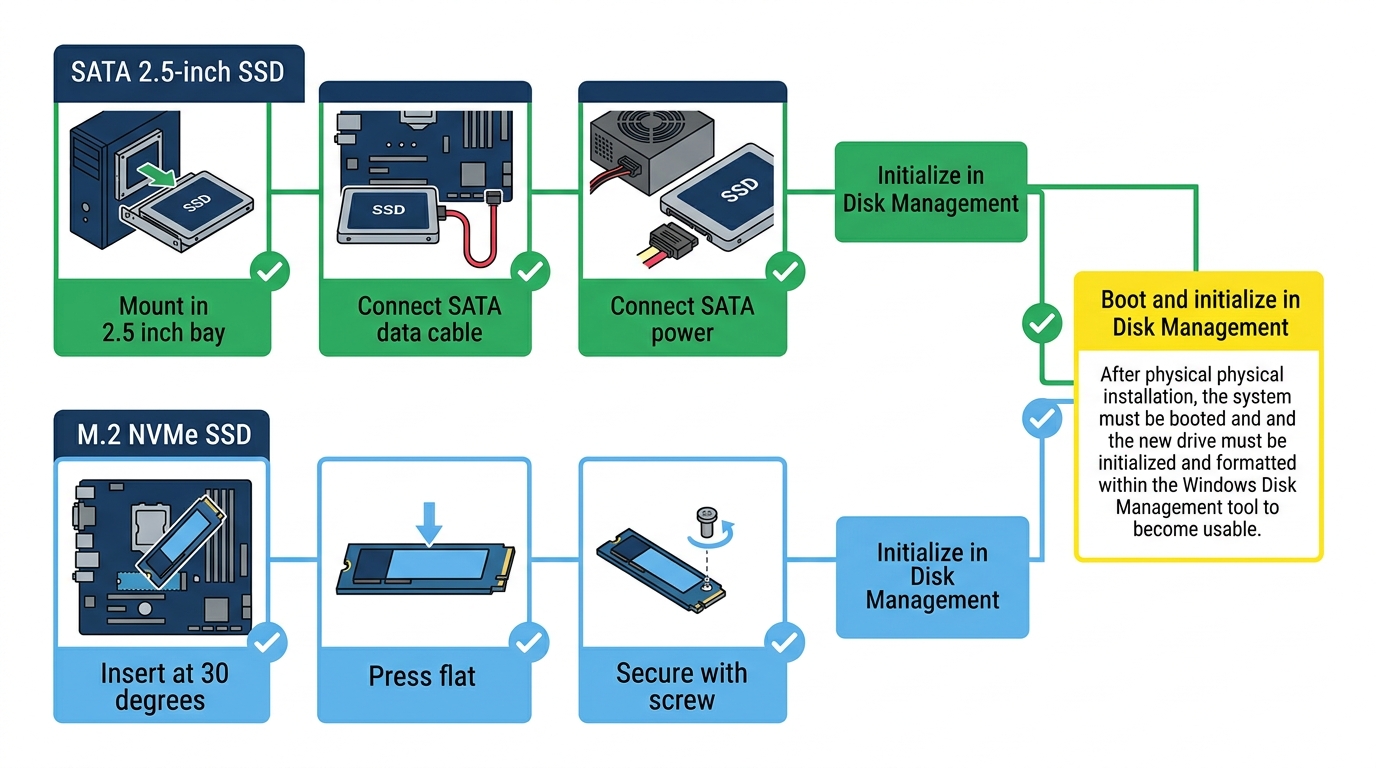
Step 4: Secure the SSD
Press the far end of the drive flat toward the motherboard. It’ll spring back up slightly when you let go, so hold it down while you thread in the standoff screw. The screw is M2 x 3mm (that tiny silver one that came with your board). Thread it into the brass standoff at the far end of the slot. Finger-tight plus a quarter turn with your screwdriver. That’s all it needs. Overtightening cracks the drive’s PCB. Just snug.
Reinstall the heatspreader if your board has one. Thermal contact between the drive and the pad matters, especially on Gen 4 and Gen 5 NVMe drives that run hot under sustained loads.
Step 5: Boot Into BIOS to Confirm Detection
Power on and immediately press DEL or F2 (check your board’s splash screen for the correct key). Navigate to the storage or boot section. Your drive should appear by model name. No model name? See the troubleshooting section below before assuming the drive is defective.
If you want the drive to work as a secondary storage device and you’re also configuring SATA hot plug behavior for other drives, our guide on SATA hot plug in BIOS explains what those settings do and when to touch them.
How to Install an SSD in a Laptop
Laptop upgrades are trickier, but doable on most consumer notebooks. The install itself is identical to the desktop process once you’re inside the chassis. Getting inside is the variable.
Check Your Laptop’s Upgrade Path First
Not all laptops have accessible storage. Check your model on iFixit’s repairability database or pull the manufacturer’s service manual. Some ultrabooks solder the SSD directly to the board. Not upgradeable. Full stop.
Common upgradeable laptop slots include M.2 2280 (most common), M.2 2242 (shorter, used in smaller chassis), and occasionally a 2.5″ SATA bay in older gaming laptops. Tools you’ll need: a small Phillips-head (#0 or #00), and a plastic pry tool to avoid scratching the chassis.
Laptop-Specific Installation Steps
Power off fully. Not sleep. If your laptop has a removable battery, pull it. If not, after opening the bottom panel, locate and disconnect the internal battery connector before touching anything else. This is the step most guides skip. Skip it and you risk a short.
Remove the bottom panel screws. Take a photo before you remove them, laptop screws are notoriously varied in length, and putting a long screw in a short hole strips the thread or punctures the board. Seriously, photograph first.
Once inside, the M.2 or 2.5″ install process follows the same steps as the desktop sections above. Reassemble, power on, and head to the post-install setup below.
SSD Not Detected? How to Troubleshoot
This is the section competitors don’t include. It’s also the most common follow-up problem after a first-time install.
Check These 5 Things First
- BIOS not updated: older firmware sometimes won’t recognize newer NVMe Gen 4 or Gen 5 drives. Check your motherboard manufacturer’s support page for BIOS updates. This is especially common on B550 boards with newer Gen 4 drives.
- Wrong M.2 slot: some slots on a board only support SATA M.2, not NVMe. An NVMe drive in a SATA-only slot will not appear. Check your manual’s slot compatibility chart.
- PCIe lane conflict: some boards disable a SATA port or a lower M.2 slot when the primary M.2 slot is occupied. Look for a note in your manual under “M.2 Bandwidth Sharing” or similar. A drive may disappear because a lane conflict knocked it offline.
- Not fully seated: remove and reseat. The connection feels more secure than it actually is sometimes. Push with firm, even pressure and confirm the notch alignment before screwing down.
- Not yet initialized: brand-new drives don’t automatically appear in Windows File Explorer. They show up in Disk Management as “Unallocated.” You need to initialize them first. See the setup section below.
Enable NVMe in BIOS (If Required on Older Boards)
On some older boards from the Z370 and X299 era, NVMe support must be manually enabled. Look for something like: Advanced > PCIe Configuration > M.2 Slot > set to NVMe (exact path varies by board and BIOS version). Check your board’s manual for the specific setting name.
If the drive still won’t appear after all of the above, test it in another PC if you can. That confirms whether the issue is the drive or the board.
After Installation: Setting Up Your New SSD
Physically installed doesn’t mean ready to use. You’ve got three possible paths depending on your situation.
Option A: Fresh Windows Install
If this SSD is your new primary boot drive, a clean Windows install is the right move. Download the Windows 11 Media Creation Tool from Microsoft and create a bootable USB (8GB minimum). Boot from the USB by pressing F11 or F12 on startup to open the boot menu. Select the USB drive. When prompted to choose an installation destination, select your new SSD. Clean. Fast. No legacy junk from the old drive.
Option B: Clone Your Existing Drive
Want to keep your OS, apps, and files exactly as they are? Clone. Tools like Macrium Reflect (free version) or Acronis True Image handle this well. With your new SSD already installed, connect the old drive via a USB-to-SATA adapter. Clone the old drive to the new SSD, verify it completed without errors, then enter BIOS and set the SSD as the first boot device. Done.
One catch: if your old drive is larger than your new SSD, you’ll need to shrink partitions first to fit. Most cloning software handles this automatically, but double-check.
Initialize and Format as Secondary Storage
If the SSD is a second drive (not your boot drive), initialize it in Windows before use. Right-click the Start button, open Disk Management. You’ll see the new drive listed as “Unallocated” with a black bar. Right-click it, select Initialize Disk, choose GPT (recommended for all modern systems), and confirm. Then right-click the unallocated space, choose New Simple Volume, follow the wizard, format as NTFS, and assign a drive letter. It’ll appear in File Explorer within seconds.
The Seagate SSD installation guide also covers this initialization process for reference, with screenshots of the Disk Management interface.
Frequently Asked Questions
Can I install an SSD by myself?
Yes. Installing an SSD is one of the most beginner-friendly PC upgrades you can do. A SATA install takes 10–15 minutes. An M.2 install takes 5–10 minutes. You don’t need any specialized knowledge beyond knowing which end of a screwdriver to hold. Follow the compatibility check steps first, and you’ll be fine.
Do I need to reinstall Windows after installing a new SSD?
Not if you clone your existing drive to the new SSD using something like Macrium Reflect. If you’re installing the SSD as a fresh boot drive (replacing your old one), a clean Windows install is the better call for performance and a clean starting point. Secondary storage drives don’t require any OS reinstall at all, just initialize and format.
Can I install an SSD alongside my existing HDD?
Yes, and it’s a great setup. Use the SSD as your boot drive (Windows, apps, games) and the HDD for mass storage (documents, media, backups). Connect both to separate SATA ports, install Windows on the SSD, then go into BIOS and set the SSD as the first boot device in the boot priority order. Your HDD will appear as a secondary drive in File Explorer automatically.
Does it matter which M.2 slot I use?
It does. Slots labeled “CPU” connect directly to the processor with dedicated PCIe lanes, lowest latency, full rated bandwidth. Chipset-connected M.2 slots route through the chipset, which adds a small amount of latency and may share bandwidth with other devices. For a primary NVMe boot drive, always use the CPU-connected slot. Secondary storage can go in a chipset slot without any practical problem.
How do I know if my M.2 SSD is NVMe or SATA?
Check the product listing or the label printed on the drive itself. NVMe drives will say “NVMe” or “PCIe” on the label. M.2 SATA drives will say “SATA” or sometimes just list no protocol, defaulting to SATA. Physically, NVMe drives use an M-key notch (one notch, toward the right side of the connector). M.2 SATA drives typically use a B+M key (notches at both ends). Your board’s manual specifies which type each slot supports, match them before you buy.
The Short Version
SATA SSD: mount it, plug in two cables, boot. M.2 SSD: angle it in, screw it down, boot. Either way, confirm the drive appears in BIOS, then initialize it in Disk Management if it’s not your boot drive, or run the Windows installer if it is. Check your board’s manual for slot compatibility before you buy anything, that one step prevents 90% of post-install headaches. Get that compatibility check done first, and the rest of the process is genuinely straightforward.

Alex has been building and tweaking custom PCs for over 12 years. From budget builds to full custom water loops, he’s assembled more than 50 systems and helped hundreds of builders troubleshoot their rigs. When he’s not benchmarking the latest hardware, you’ll find him optimizing airflow setups or stress-testing overclocks.