EZ Debug LED Stuck on CPU, DRAM, or VGA? How to Fix
The EZ Debug LED is a row of diagnostic indicators on MSI motherboards that lights solid during POST to identify which component, CPU, DRAM, VGA, or BOOT, is preventing the system from starting.
Last updated: August 2026
Table of Contents
- Quick Answer: What Does the EZ Debug LED CPU Light Mean?
- What Is the EZ Debug LED and What Do the Indicators Mean?
- The Four EZ Debug LED Indicators Explained
- Red LED vs. White LED, Does the Color Matter?
- How Long Should EZ Debug LEDs Stay On?
- EZ Debug LED Stuck on CPU, Causes and Fixes
- Why Is the EZ Debug CPU LED On?
- Step-by-Step Fix for EZ Debug LED CPU
- EZ Debug LED CPU Red Light, Is It Different From White?
- EZ Debug LED Stuck on DRAM, Causes and Fixes
- Common Causes of a Stuck DRAM Debug LED
- How to Fix EZ Debug LED DRAM
- EZ Debug LED Stuck on VGA, Causes and Fixes
- Common Causes of a Stuck VGA Debug LED
- How to Fix EZ Debug LED VGA
- How to Clear CMOS to Fix EZ Debug LED Issues
- Method 1, CMOS Jumper (Fastest)
- Method 2, Remove CMOS Battery
- When Clearing CMOS Fixes EZ Debug LEDs
- MSI EZ Debug LED Codes, Full Reference Table
- EZ Debug LED Is On But the PC Boots Fine, Should You Worry?
- When to RMA, CPU, Motherboard, or RAM?
- Decision Tree: What Do You RMA?
- FAQ, EZ Debug LED Questions Answered
- How do I fix the CPU EZ Debug LED?
- What does it mean if the EZ Debug LED is on?
- What does the CPU debug LED light mean on a motherboard?
- How do I clear CMOS to fix EZ debug LEDs?
- Can the EZ Debug LED be on even if the PC boots fine?
- What You Should Do
Quick Answer: What Does the EZ Debug LED CPU Light Mean?
A solid EZ Debug LED on CPU means your MSI motherboard could not initialize the processor during POST. The most common causes are an unseated CPU, a missing or loose EPS power connector, bent socket pins, or a BIOS version that doesn’t support the installed CPU. In most cases, the fix is physical, reseating, checking cables, or flashing the BIOS via USB FlashBack before anything else gets replaced.
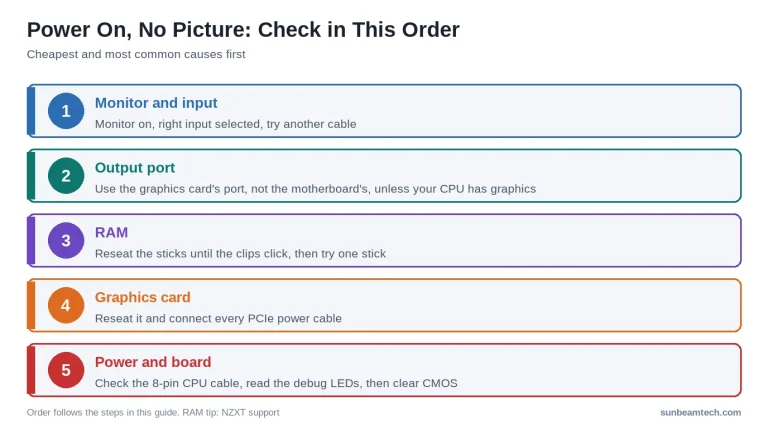
You just finished a new build, press the power button, fans spin up, and nothing. No display. You look at the motherboard and see a small red or white LED glowing next to “CPU” on the EZ Debug panel. It’s one of the most common POST failure scenarios, and it’s rarely the catastrophic hardware death people assume it is. This guide walks through every cause and fix for a stuck EZ Debug LED, whether it’s sitting on CPU, DRAM, or VGA.

What Is the EZ Debug LED and What Do the Indicators Mean?
EZ Debug LEDs are a row of four small indicator lights built into MSI motherboards, positioned on the right edge or bottom-right corner of the board depending on the model. During POST, the board lights each LED in sequence as it tests each subsystem. If it can’t move past one, that LED stays on. That’s your diagnostic signal, the board is telling you exactly where it got stuck.
Other brands have similar systems. ASUS calls theirs Q-LED, Gigabyte uses debug LEDs on higher-end boards, and ASRock labels them Dr. Debug with a two-digit display. The logic is the same across all of them. This guide focuses on MSI’s EZ Debug implementation, but the troubleshooting steps apply universally.
The Four EZ Debug LED Indicators Explained
| LED Label | Component It Tests | Common Meaning If Stuck |
|---|---|---|
| CPU | Processor and socket | CPU not detected, incompatible CPU, bent pins, missing EPS power |
| DRAM | RAM modules | RAM not seated, wrong slots, incompatible kit, XMP instability |
| VGA | GPU or integrated graphics | GPU not detected, PCIe power missing, wrong slot |
| BOOT | Storage device and OS | No bootable drive, corrupted OS, bad SATA cable or NVMe slot |
Red LED vs. White LED, Does the Color Matter?
Short answer: no. The color tells you about the motherboard generation, not the severity of the failure. MSI’s older boards, the Z490, B450, X470, and X570 generation, used red EZ Debug LEDs. Newer boards from the Z690, B550 (on some models), B650, X670, and X870 generation switched to white LEDs. A lot of users search separately for “ez debug led cpu white” thinking it means something different from a red light. It doesn’t. The diagnostic logic is identical regardless of LED color.
If your board has a white CPU debug LED that won’t turn off and you have no display output, you’re dealing with the exact same problem as someone with a red LED on an older board. Same fixes apply. According to community contributors at the Tom’s Hardware Forums, the EZ Debug CPU LED points most frequently to socket issues or BIOS incompatibility, and in many cases the culprit turns out to be the motherboard rather than the CPU itself, worth keeping in mind before you RMA the processor.
For a broader explanation of what each indicator light means across different board brands, the EZ Debug LEDs explained guide covers the full POST sequence in detail.
How Long Should EZ Debug LEDs Stay On?
Normal behavior during a healthy POST: each LED lights briefly for one to three seconds as the board tests that subsystem, then goes out as the system moves to the next component. You may see them flash in sequence, CPU, then DRAM, then VGA, then BOOT, and that’s fine. That’s the board doing its job.
A stuck LED is any indicator that stays on for more than roughly 10 seconds without the system progressing to display output. If you see all four cycling rapidly without stopping, that points to a PSU issue rather than a specific component failure. One LED, solid, no display: that’s where you focus.
EZ Debug LED Stuck on CPU, Causes and Fixes
This is the most searched EZ Debug issue, and for good reason, it’s the most alarming. No display, CPU LED lit. Here’s what’s actually going on and how to work through it systematically.

Why Is the EZ Debug CPU LED On?
Ranked by how often each cause actually shows up:
- CPU not fully seated in the socket
- Missing or loose CPU power connector (8-pin or 8+4-pin EPS)
- CPU incompatible with the current BIOS version on the board
- Bent or damaged pins in the socket (AMD AM4/AM5) or on the CPU underside (Intel LGA)
- RAM issue misreported as a CPU failure (this happens more than you’d expect)
- Faulty CPU
- Faulty or damaged motherboard
That fifth point is worth highlighting. Community reports consistently show cases where the EZ Debug CPU LED was actually caused by a RAM seating issue, the board gets stuck on CPU during POST before it even reaches the DRAM check. If you’ve already reseated the CPU and confirmed power is good, pull the RAM next before you conclude it’s a CPU problem.
Step-by-Step Fix for EZ Debug LED CPU
Step 1, Check the CPU Power Connectors
The EPS connector is the square 8-pin plug that runs to the top-left area of most motherboards. Some boards, particularly higher-end B550, B650, X570, X670, and X870 models, have an 8+4 layout. The secondary 4-pin connector is technically optional for stock-speed operation on most boards, but you should connect it anyway. More importantly: confirm the 8-pin clicks fully into place. A partially seated EPS connector is a surprisingly common cause of a CPU debug LED on new builds, especially when cable routing is tight.
Step 2, Reseat the CPU
For AMD AM4 and AM5 sockets: these are zero-insertion-force (ZIF) designs. The CPU drops straight in with no pressure needed, if you’re pushing, something is wrong. Lift the lever, set the CPU so the triangle markers align (CPU corner to socket corner), lower the lever to lock. That’s it. For Intel LGA1700 and LGA1851 (Arrow Lake): the CPU sits in a load plate that closes over it. Confirm the IHS sits flush and the load plate closes without forcing. A tilted CPU here will absolutely trigger the CPU debug LED.
Step 3, Inspect for Bent Pins
On AMD AM4 and AM5 boards, the pins are on the motherboard socket, not the CPU. Use a phone camera with flash or a magnifying glass at an angle to the socket under bright light. The AM5 socket has 1,718 pins, a single bent pin can prevent CPU initialization and light up the debug LED. On Intel LGA1700 and LGA1851, the contact pads are on the socket and pins are on the CPU underside. Inspect both under good lighting.
If you find bent pins, they can sometimes be carefully straightened using a mechanical pencil tip (without the lead) or a fine sewing needle. Work slowly. This is delicate. Not impossible. Not always successful either.
Step 4, Try Removing All RAM
Pull all RAM sticks out entirely and attempt to power on. The system won’t boot without RAM, but if the CPU LED turns off and the DRAM LED comes on instead, your problem was never the CPU, it was a RAM seating or compatibility issue all along. This eliminates a major variable before you go any further.
Step 5, Update BIOS via USB FlashBack (No Working CPU Required)
This is the fix most people miss, and it’s the correct solution for a specific and very common scenario: you bought a CPU that came out after the board shipped. The motherboard’s BIOS doesn’t know that CPU exists yet, so it can’t initialize it. The CPU debug LED stays on. You’re stuck, you can’t enter BIOS to update because the board won’t POST.
MSI’s solution is FlashBack. Here’s how to use it:
- Download the latest BIOS file for your board from the MSI support page
- Rename the file to MSI.ROM (exactly, capital letters, no other characters)
- Place it in the root directory of a FAT32-formatted USB drive
- With the PC powered off but PSU switched on, insert the USB into the designated FlashBack port (check your board’s manual, it’s usually a specific rear I/O USB port, often blue or labeled)
- Press the Flash BIOS button; the LED starts flashing and goes off when the update is done
- Wait 5–10 minutes. Do not interrupt power. When the LED stops flashing, the update is complete
Real-world example: AM4 3D V-Cache refreshes like the Ryzen 7 5700X3D and 5800X3D need a BIOS built after their launch to POST correctly. If you drop a newer 3D V-Cache CPU into a board still running an older BIOS build, you’ll get exactly this symptom, CPU debug LED, no POST. FlashBack fixes it without needing a working CPU to enter BIOS.
The same situation applies to newer boards. An X870E board bought early might need a BIOS update before it recognizes a Ryzen 9 9950X3D. Always check the board’s CPU support list and the required BIOS version before assuming hardware is dead.
EZ Debug LED CPU Red Light, Is It Different From White?
Same diagnostic logic, different board generation. Red LED means you’re on an older MSI board, Z490, B450, X470, X570 era. White LED means you’re on Z690, B550 (some models), B650, X670, X870, or newer. If you’re searching for “ez debug led cpu red” specifically, every step above applies without any changes. Don’t let the color fool you into thinking it’s a different problem.
EZ Debug LED Stuck on DRAM, Causes and Fixes

Common Causes of a Stuck DRAM Debug LED
- Wrong slots: RAM installed in A1/B1 instead of A2/B2, the single most common mistake on new builds
- Clips not engaged: One or both retention clips didn’t fully click, leaving the stick partially seated
- XMP/EXPO profile instability: Board can’t POST at the rated speed, falls back but gets confused
- RAM not on QVL: The specific kit isn’t validated for your board at its rated speed
- Mixed RAM kits: Different IC manufacturers cause training failures
- Faulty RAM stick: One bad stick prevents POST entirely
A note on the DRAM debug LED and XMP: the board applies XMP settings during early POST initialization. If your RAM kit isn’t stable at its XMP speed on your specific board, the DRAM LED lights up even though the RAM itself is physically fine. This is more common with DDR5 kits running at 6000 MHz or higher on B650 boards, which have tighter bandwidth headroom than X670E.
How to Fix EZ Debug LED DRAM
Step 1, Check Slot Population Order
Two sticks go into A2 and B2 on most MSI boards. Not A1 and B1. Not A1 and A2. The slots are counted from the CPU socket outward, you want the second and fourth slots filled.
| Number of Sticks | Recommended Slots (MSI Standard Layout) | Notes |
|---|---|---|
| 1 stick | B2 (slot 2 from CPU) | Single-channel mode |
| 2 sticks | A2 + B2 | Dual-channel, use these slots first |
| 4 sticks | A1 + A2 + B1 + B2 | Fill all slots |
Step 2, Reseat Each Stick
Pull both sticks out. Wipe the gold contacts with a dry cloth. Reinsert firmly, pressing down on both ends simultaneously until both retention clips snap shut. You should hear a click on each side. A partially seated stick that looks installed but isn’t fully clicked causes this exact symptom.
Step 3, Test One Stick at a Time
If reseating doesn’t fix it, test each stick individually in the B2 slot. If one stick lets the system POST and the other doesn’t, you’ve found a faulty module. Replace it under warranty.
Step 4, Disable XMP/EXPO Temporarily
If you can get into BIOS by other means (using only one stick, for instance), disable XMP or EXPO and let the RAM run at JEDEC defaults (2133 MHz for DDR4, 4800 MHz for DDR5). If the system posts normally at JEDEC speeds, your RAM kit isn’t compatible at its rated speed on your board. Check the MSI QVL database for your board model, if your kit isn’t listed, consider swapping for a QVL-approved set. You can find guidance on enabling memory profiles correctly in this XMP BIOS setup walkthrough.
Step 5, Clear CMOS
See the dedicated CMOS section below. A CMOS clear resets all memory training data and BIOS settings, often resolving a stuck DRAM LED caused by a previous bad XMP attempt or corrupted memory training state.
If you’re dealing specifically with a DRAM LED that appears without any other symptoms, the dedicated DRAM debug LED troubleshooting guide covers edge cases in more depth.
EZ Debug LED Stuck on VGA, Causes and Fixes
Common Causes of a Stuck VGA Debug LED
- GPU not fully seated: PCIe x16 slot locking tab didn’t click, looks inserted but isn’t making full contact
- Missing PCIe power: 6-pin, 8-pin, or 16-pin 12VHPWR connector not plugged in or not fully clicked
- Wrong PCIe slot: GPU installed in a x4 slot instead of the primary x16 slot
- No iGPU with no discrete GPU: AMD Ryzen “F” suffix CPUs (Ryzen 7 9700F, for example) have no integrated graphics. Some older AM4 chips lack it too regardless of suffix, the Ryzen 7 5700X3D has no iGPU at all because the entire non-G Ryzen 5000 desktop lineup shipped without one. Either way, if there’s no GPU installed, no display is expected
- Insufficient PSU wattage: Card initializes but can’t sustain power draw during POST
- Faulty GPU: Less common than the above, but it happens
On the iGPU point: most Ryzen 9000 series desktop CPUs, including non-G models, actually include a basic 2 CU RDNA2 integrated GPU built into the I/O die for display output, separate from the more capable graphics on the G-suffix desktop APU lineup (Ryzen 8700G, 9700G). Only F-suffix models (like the Ryzen 7 9700F) omit the iGPU entirely. So if you’re building with a Ryzen 9 9900X or Ryzen 9 9950X3D and your GPU isn’t seated, you should still get basic display output from the onboard graphics, a VGA debug LED alongside total display loss on these chips points to the discrete GPU or its power connection, not an absent iGPU. Make sure your GPU is in and powered before booting either way.
How to Fix EZ Debug LED VGA
Step 1, Reseat the GPU
Pull the card, confirm the PCIe x16 slot locking tab is fully open, reinsert the card with firm even pressure until the tab clicks back into place. Check it’s in the primary x16 slot, on most MSI boards, that’s the topmost full-length PCIe slot closest to the CPU socket.
Step 2, Check All Power Connectors
Different GPUs require different power configurations:
- RTX 3060: 1x 8-pin PCIe
- RTX 4070: 1x 8-pin PCIe on most partner cards (Founders Edition uses 1x 16-pin 12VHPWR)
- RTX 4080 / RTX 5080: 1x 16-pin 12VHPWR, use the adapter with 3x 8-pin sources from the PSU, not 2x 8-pin
- RTX 5090: 1x 16-pin 12VHPWR, NVIDIA recommends a native 12VHPWR cable from the PSU where possible
- RX 7900 XTX / RX 9070 XT: 2x 8-pin PCIe
Confirm every connector clicks fully into the card. A partially seated PCIe power connector is enough to prevent POST on modern high-draw GPUs.
Step 3, Test With Integrated Graphics
If your CPU has integrated graphics (most Intel Core Ultra 200 series CPUs include an iGPU, though KF variants like the Core Ultra 7 265KF and Core Ultra 5 245KF skip it, and AMD Ryzen 8000G and 9000G series APUs do too), remove the discrete GPU, connect your monitor to the motherboard’s HDMI or DisplayPort output, and attempt to boot. If the system reaches BIOS or Windows, your GPU is the problem, either faulty or underpowered.
Step 4, Verify PSU Wattage
| GPU | Minimum Recommended PSU |
|---|---|
| RTX 3060 | 550W |
| RTX 4070 | 650W |
| RTX 4080 | 750W |
| RTX 5080 | 850W |
| RTX 5090 | 1000W |
| RX 9070 XT | 700W |
| RX 7900 XTX | 800W |
These figures come from NVIDIA’s official product specifications. A PSU that’s under-specced for the GPU can cause the card to fail initialization at POST, triggering a VGA debug LED even when the hardware is physically fine.
How to Clear CMOS to Fix EZ Debug LED Issues

A CMOS clear wipes all BIOS settings back to factory defaults, including overclocks, XMP profiles, boot order, and any stored memory training data. It’s a reliable fix when the debug LED is caused by corrupted settings rather than a hardware failure. Always power off the system and flip the PSU switch to off (or unplug the power cord) before clearing CMOS.
Method 1, CMOS Jumper (Fastest)
On MSI boards the clear CMOS header is labeled JBAT1. On current boards it’s two pins; older boards have three pins with a jumper cap on pins 1 and 2. To clear CMOS:
- Power off the PC and unplug the PSU from the wall
- 2-pin JBAT1: short both pins with a screwdriver tip for 5 to 10 seconds. 3-pin JBAT1: move the cap from pins 1-2 to pins 2-3 for 10 seconds, then back
- Remove the screwdriver, or make sure the cap is back on pins 1-2
- Reconnect power and boot
Method 2, Remove CMOS Battery
If the JBAT1 jumper is buried under a large GPU or bulky cooler, the battery method is easier. Locate the CR2032 coin cell battery on the motherboard (it’s a silver disc, usually near the PCIe slots), pop it out with a flathead screwdriver or finger, wait 60 seconds, and reinsert it. Same result as the jumper method.
When Clearing CMOS Fixes EZ Debug LEDs
CMOS clear is most effective in three scenarios: you tried an overclock or XMP setting that caused the board to hang on every subsequent boot, your BIOS settings became corrupted during a failed update, or you’re troubleshooting a first-boot failure on a new build where default BIOS settings are causing conflicts. Not great for bent pins or dead hardware, but fast and zero-risk to try.
MSI EZ Debug LED Codes, Full Reference Table
Here’s the complete reference for all four MSI EZ Debug LED indicators, including what else to check alongside the obvious component:
| LED | Solid = Problem With | Also Check |
|---|---|---|
| CPU | Processor, socket, BIOS compatibility | EPS power cable, BIOS version vs. CPU support list |
| DRAM | RAM modules | Slot population order, XMP settings, MSI QVL database |
| VGA | Dedicated GPU or iGPU | PCIe power connectors, PSU wattage, correct PCIe slot |
| BOOT | Storage device or operating system | NVMe slot compatibility, SATA cable, boot drive detection in BIOS |
On older MSI boards you might see the label “Debug LED” rather than “EZ Debug LED”, same functionality, same diagnostic logic. The naming changed around the B450/Z390 generation as MSI standardized the branding.
EZ Debug LED Is On But the PC Boots Fine, Should You Worry?
Some MSI boards leave the last-tested indicator lit after a successful POST. Sounds alarming. Usually isn’t. On specific board models, particularly some B550 and B650 variants, the CPU or DRAM LED remains amber or white after the system reaches Windows. This is firmware behavior, not a hardware alarm.
The rule is simple: if the system reaches Windows and runs stably, a lingering debug LED is almost always a display quirk of that specific board’s firmware. Monitor for actual instability, crashes, BSODs, unexpected shutdowns. If you see those alongside the LED, investigate further. If the PC runs normally for hours and days, the LED can be safely ignored.
When to act: LED stays on AND no display output. That’s the real problem. LED stays on AND Windows loads without issues? Watch it, but don’t panic.
When to RMA, CPU, Motherboard, or RAM?
Decision Tree: What Do You RMA?
| Scenario | Most Likely Culprit | Action |
|---|---|---|
| CPU LED on, new build, BIOS outdated for the CPU | BIOS version (not hardware) | If an outdated BIOS could be the cause, flash it via the Flash BIOS button before you RMA anything |
| CPU LED on, bent pins confirmed in socket | Motherboard (AM4/AM5) or CPU (LGA) | RMA the component with physical damage |
| CPU LED on, all physical checks passed, BIOS current | CPU or motherboard | Test CPU in a second system if possible; RMA board first (more commonly faulty) |
| DRAM LED on, RAM not on QVL at rated speed | Compatibility (not a defect) | Exchange for a QVL-approved kit |
| VGA LED on, GPU fails to POST in a second system too | GPU | RMA the GPU |
| All LEDs cycling, nothing POSTs, fans spin | PSU | Test with a known-good PSU before RMAing anything else |
RMA timelines if you get there: MSI’s standard board RMA runs 5–10 business days. AMD CPU RMA through AMD’s support portal typically takes 7–14 business days. Intel’s warranty process is similar. Neither is fast, which is why exhausting every software and physical fix first is worth the time.
FAQ, EZ Debug LED Questions Answered
How do I fix the CPU EZ Debug LED?
Start with the EPS power connector, confirm it’s fully seated in the CPU power port. Then reseat the CPU, checking for bent pins in the socket (AMD) or on the CPU (Intel). If the board shipped with an older BIOS that doesn’t support your CPU, use MSI FlashBack to update it without needing a working CPU. After those steps, clear CMOS and retry. If the LED persists through all of that, the CPU or motherboard may need to be RMA’d.
What does it mean if the EZ Debug LED is on?
It means the motherboard couldn’t complete initialization for the labeled component during POST. That doesn’t automatically mean the component is dead. A stuck EZ Debug LED can indicate a seating issue, missing power, BIOS incompatibility, or incorrect slot population, all of which are fixable without replacing anything. Think of it as a starting point for diagnosis, not a verdict.
What does the CPU debug LED light mean on a motherboard?
Specifically, it means the board failed to detect or initialize the processor during the POST sequence. On new builds, the most frequent cause is a BIOS version that predates the installed CPU, the board simply doesn’t have the microcode to recognize it yet. On existing systems that were working before, it more often points to a physical issue: loose EPS power, a dislodged CPU, or in some cases the beginning of a hardware failure.
How do I clear CMOS to fix EZ debug LEDs?
Power off the PC and unplug it from the wall. On current MSI boards, short the two JBAT1 pins for 5 to 10 seconds; on older 3-pin versions, move the cap from pins 1-2 to 2-3 and back. Either method resets all BIOS settings to factory defaults, which resolves debug LED failures caused by bad overclocks, corrupted XMP settings, or misconfigured boot options.
Can the EZ Debug LED be on even if the PC boots fine?
Yes, on some MSI boards, particularly certain B550 and B650 models, the last-tested debug LED stays illuminated after a successful POST. If your system reaches Windows without issues and runs stably, this is typically normal firmware behavior for that specific board revision. If you’re seeing crashes, BSODs, or POST failures alongside the lit LED, that’s when you investigate further.
What You Should Do
EZ Debug LEDs are diagnostic indicators, not damage reports. A solid CPU light means start with the EPS connector and CPU seating, not a new processor. A solid DRAM light means check your slot order before you buy new RAM. Work through the physical checks first, use FlashBack if BIOS compatibility is the issue, and clear CMOS before you conclude anything needs replacing. Most EZ Debug failures on new builds come down to one small physical mistake or a BIOS that needs updating. Fix the obvious things first, and you’ll solve it faster than waiting on an RMA. If you’re also dealing with a broader POST failure and no display output, the PC won’t turn on checklist covers the full diagnostic process from power supply to display output.

Alex has been building and tweaking custom PCs for over 12 years. From budget builds to full custom water loops, he’s assembled more than 50 systems and helped hundreds of builders troubleshoot their rigs. When he’s not benchmarking the latest hardware, you’ll find him optimizing airflow setups or stress-testing overclocks.