BIOS Flashback: How to Update the BIOS Without a CPU (Every Brand)
BIOS Flashback updates your motherboard’s BIOS from a USB drive at the press of a button, with the PC switched off and, on most boards, no CPU or RAM installed.
Last updated: September 2026
Table of Contents
- What BIOS Flashback Is
- When You Need It
- Does Your Board Have It?
- What You Need
- BIOS Flashback by Brand
- ASUS: USB BIOS FlashBack
- MSI: Flash BIOS Button
- Gigabyte: Q-Flash Plus
- ASRock: BIOS Flashback
- What the LED Is Telling You
- BitLocker, TPM and Intel ME: Read This First
- Flashback vs the Normal BIOS Update
- After the Flash: Settings to Check
- Frequently Asked Questions
- What is BIOS Flashback?
- Do I need a CPU to use BIOS Flashback?
- How long does a BIOS Flashback take?
- Why is flashing the BIOS risky?
- Can I use any USB port for Flashback?
- Why does the Flashback light stay solid?
- Does BIOS Flashback reset my BIOS settings?
- If Flashback Still Doesn’t Work
You built a new PC, pressed the power button, and got nothing but a CPU debug light. On a new build, one likely cause is a board that shipped with a BIOS older than your processor. BIOS Flashback is the way out: it flashes a new BIOS from a USB stick without booting the system. Each brand calls it something different and wants a different file name, so this guide gives you the exact steps for ASUS, MSI, Gigabyte and ASRock, what the LED is telling you, and what to do when the light goes solid instead of out.
- 🟢 Only works on boards with a dedicated button: USB BIOS FlashBack, Flash BIOS Button, Q-Flash Plus or BIOS Flashback
- 🟢 USB drive formatted FAT32 (MBR), BIOS file renamed as your brand requires, in the root folder
- 🟢 PSU connected and switched on, PC shut down, stick in the marked USB port
- 🟡 Using BitLocker? Suspend it first, or have your recovery key ready
- 🔴 Never cut power or pull the USB drive while the LED is flashing
- 🟢 Light goes out = done. Light goes solid = something is wrong with the drive or file
What BIOS Flashback Is
In the ROG Strix B550-F Gaming WiFi II manual, ASUS describes BIOS FlashBack as a way to update the BIOS without entering the existing BIOS or operating system.
That’s what makes it different from the normal update tools inside the BIOS, such as ASUS EZ Flash 3 or Gigabyte Q-Flash, and the equivalents from MSI and ASRock. Those need a system that boots far enough to show the BIOS screen. Flashback doesn’t.
The brands are explicit about the CPU question, with one nuance:
- MSI says you can refresh the BIOS with the Flash BIOS Button without a CPU and RAM.
- Gigabyte says Q-Flash Plus updates the BIOS when the system is off (S5 shutdown state). On boards with DualBIOS, it updates only the main BIOS when run without a CPU.
- ASRock only asks for the 24-pin power connector and the power supply switched on, without powering on the system.
- ASUS says to shut down but not remove the power.
When You Need It
- New CPU, old BIOS. A board that shipped before your processor launched may not recognize it. The typical result is a stuck CPU light and no display. Our guide to an EZ Debug LED stuck on CPU, DRAM or VGA walks through how to confirm this with the board’s CPU support list.
- A failed or interrupted update. If a normal BIOS update was cut short and the board no longer shows a picture, ASUS’s advice is to run through the Flashback steps again.
- No working display at all. Flashback needs no graphics output, so it’s also useful when you can’t reach the BIOS screen for other reasons, such as a white VGA light on the motherboard.
If your PC boots fine and you just want a newer BIOS, the in-BIOS tool is the simpler route. Gigabyte’s own BIOS FAQ goes further and suggests keeping your current version if you don’t have instability or bugs.
Does Your Board Have It?
Look at the rear I/O panel. A board with the feature has a small labeled button next to one specific USB port, usually marked as the BIOS or Flashback port. MSI notes that the feature is only available on models with the Flash BIOS Button, and ASRock offers it on select models only. If there’s no button, check the rear panel page of your manual before you assume it’s missing. ASUS also keeps a list of supported boards in its USB BIOS FlashBack FAQ.
If you press the button and nothing happens, check the port first. The Flashback port is a single, specific port. Gigabyte’s X570 manual calls it the white USB port on the back panel, and MSI’s guide refers to the USB port labeled “BIOS”.
What You Need
- A USB flash drive. ASUS asks for 1 GB or more, formatted FAT16 or FAT32 with an MBR partition layout. ASRock asks for MBR and FAT32. The ASUS manual recommends a USB 2.0 drive for better compatibility.
- The BIOS file for your exact board model and revision, downloaded from the maker’s support page.
- A power supply connected to the board, and a PC that is shut down with the PSU switched on.
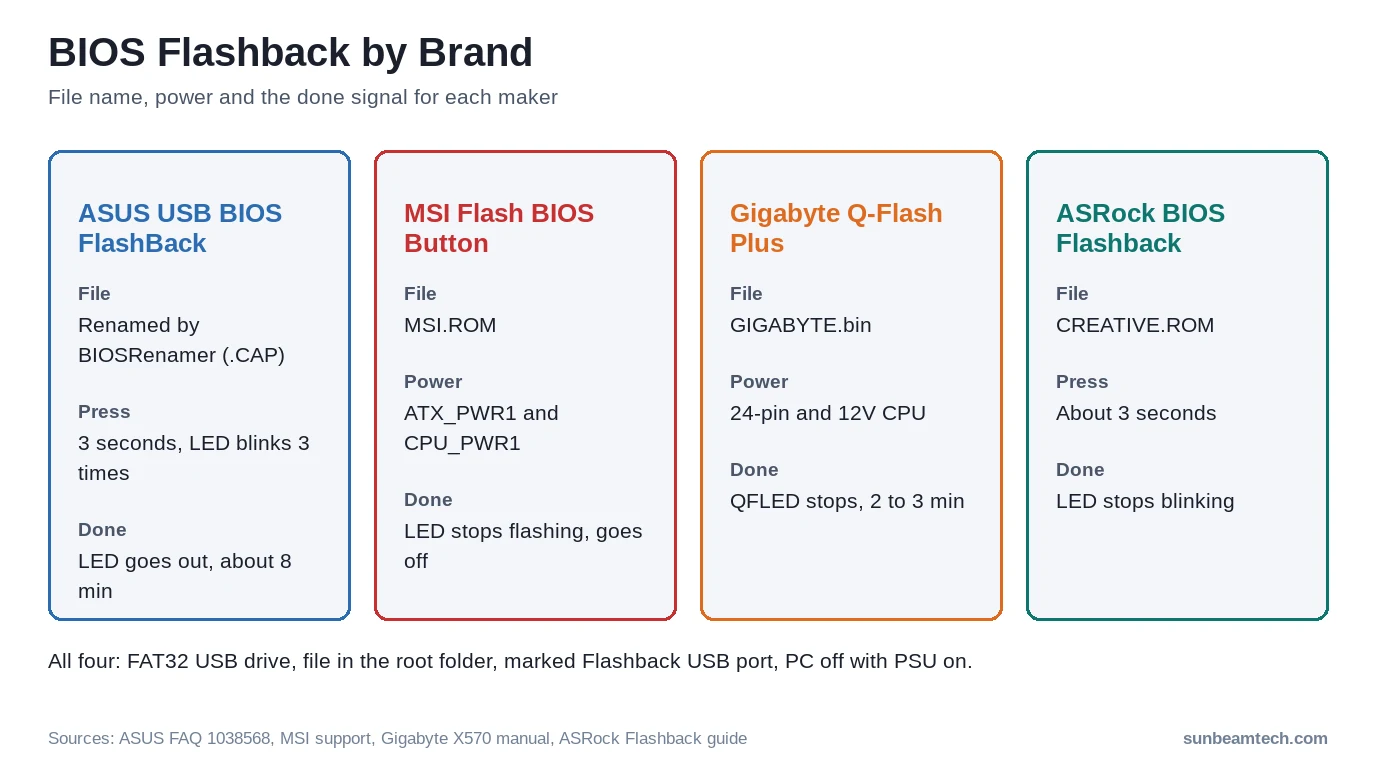
BIOS Flashback by Brand
| Brand | Feature name | File name on USB | Power needed | Done when |
|---|---|---|---|---|
| ASUS | USB BIOS FlashBack | Model-specific .CAP name, set by BIOSRenamer | Shut down, power left connected | FlashBack LED goes out (about 8 minutes) |
| MSI | Flash BIOS Button | MSI.ROM | 24-pin ATX_PWR1 and CPU_PWR1 | Button LED stops flashing and goes off |
| Gigabyte | Q-Flash Plus | GIGABYTE.bin | 24-pin main and 12V CPU power | QFLED stops flashing (2 to 3 minutes) |
| ASRock | BIOS Flashback | CREATIVE.ROM | 24-pin, PSU switched on | LED stops blinking (a few minutes) |
ASUS: USB BIOS FlashBack
- Download the BIOS for your board from ASUS support and extract it. The download contains the .CAP file and a tool called BIOSRenamer.
- Double-click BIOSRenamer. It renames the .CAP file to the name your board expects (for the ROG Strix B550-F Gaming WiFi II, the manual gives SB550FW2.CAP).
- Copy the renamed file to the root of the FAT32 USB drive.
- Shut the PC down, but leave the power connected, then plug the drive into the FlashBack port.
- Press the BIOS FlashBack button for three seconds, until the FlashBack LED blinks three times. That means the function has started.
- Wait until the light goes out. ASUS says the update can be completed in about 8 minutes.
Afterwards, ASUS suggests entering the BIOS with F2 or Delete and checking on the Main page that the version matches the one you flashed.
MSI: Flash BIOS Button
- Download the BIOS for your exact board from MSI, extract it and rename the file to MSI.ROM.
- Save it to the root of a FAT32 USB drive. MSI’s FAQ warns against keeping many other files on the drive, because the board has to search for MSI.ROM.
- Connect the power supply to CPU_PWR1 and ATX_PWR1. MSI says a CPU and memory are not needed.
- Plug the drive into the Flash BIOS port on the rear I/O panel.
- Press the Flash BIOS Button. The LED starts flashing.
- Wait. When the LED goes off, the update is complete, and MSI says the system can then restart automatically.
MSI also warns not to power off or shut down during the refresh, as this may damage the BIOS chip.
Gigabyte: Q-Flash Plus
- Download and extract the BIOS for your model, then rename the file to GIGABYTE.bin. Gigabyte’s X570 feature manual says the drive must use FAT32 or FAT16.
- Insert the drive into the Q-Flash Plus USB port (white on the X570 boards).
- Connect the main 24-pin connector and the 12V CPU connector. If there are two 12V connectors, either one is enough.
- Make sure the system is off (S5 shutdown state). If the board has a BIOS switch and an SB switch, set them to their defaults: boot from the main BIOS, and Dual BIOS.
- Press the Q-Flash Plus button. The QFLED and the button flash while the board matches and flashes the file.
- Wait 2 to 3 minutes until the QFLED stops flashing.
On DualBIOS boards with a CPU installed, the system reboots after the main BIOS is flashed and then updates the backup BIOS as well, before rebooting again. Without a CPU, only the main BIOS is updated and the system shuts down when it’s done.
ASRock: BIOS Flashback
- Format the USB drive as FAT32 with the MBR partition style.
- Download the BIOS for your board, rename the file to CREATIVE.ROM and save it to the root of the drive.
- Plug in the 24-pin power connector and turn on the power supply’s switch. Do not power on the system.
- Insert the drive into the Flashback port listed in your manual.
- Press the BIOS Flashback switch for about three seconds. The LED starts blinking.
- Wait until the LED stops blinking. After that, ASRock’s Flashback guide says to turn off the power supply for about two minutes before powering on normally.
What the LED Is Telling You
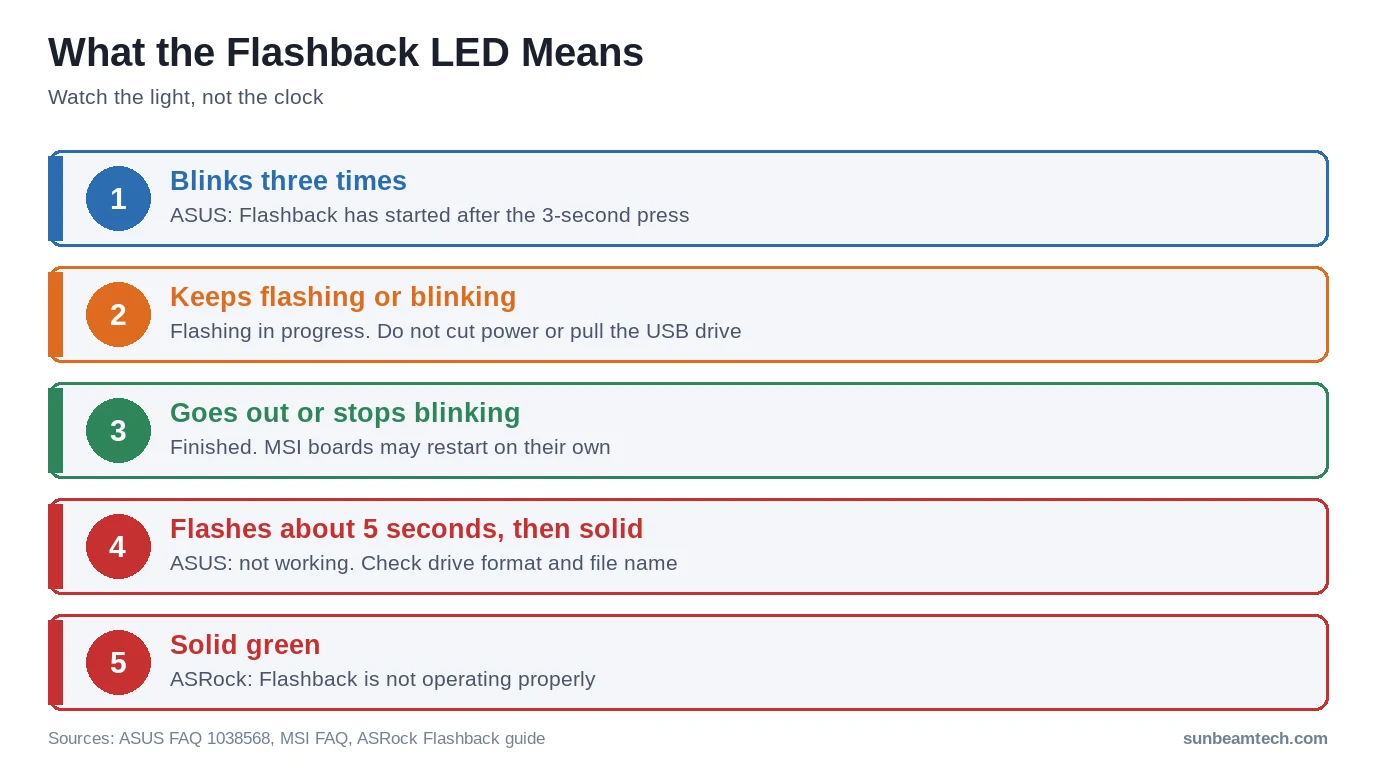
The two readings that matter: a light that goes out means success, and a light that stays solid means the board couldn’t use the drive or file. ASUS describes the failure as a light that flashes for five seconds and then turns solid. ASRock says a solid green light means Flashback isn’t working properly. A solid light is not a bricked board. It usually means the flash never started.
BitLocker, TPM and Intel ME: Read This First
BitLocker. ASRock warns that the TPM is reset by a BIOS Flashback and tells you to suspend BitLocker and any encryption that relies on the TPM beforehand. Microsoft’s recovery overview lists BIOS or UEFI firmware upgrades among the events that trigger BitLocker recovery. If Windows still boots, suspend protection in an administrator PowerShell with Suspend-BitLocker -MountPoint "C:" -RebootCount 0, which Microsoft documents as keeping it suspended until you run Resume-BitLocker -MountPoint "C:". If the PC doesn’t boot, which is the usual reason to use Flashback, you can’t suspend it, so make sure you have the recovery key from your Microsoft account at aka.ms/myrecoverykey.
Intel Management Engine firmware. ASUS notes that Flashback writes the BIOS .CAP file only. On its Intel 800 series boards, you still need to download and install the ME firmware update separately. On some 400 series boards, ASUS says an 11th gen Intel CPU needs ME firmware 14.1.51.1528 or newer. Check the support page for your board for firmware listed next to the BIOS.
Flashback vs the Normal BIOS Update
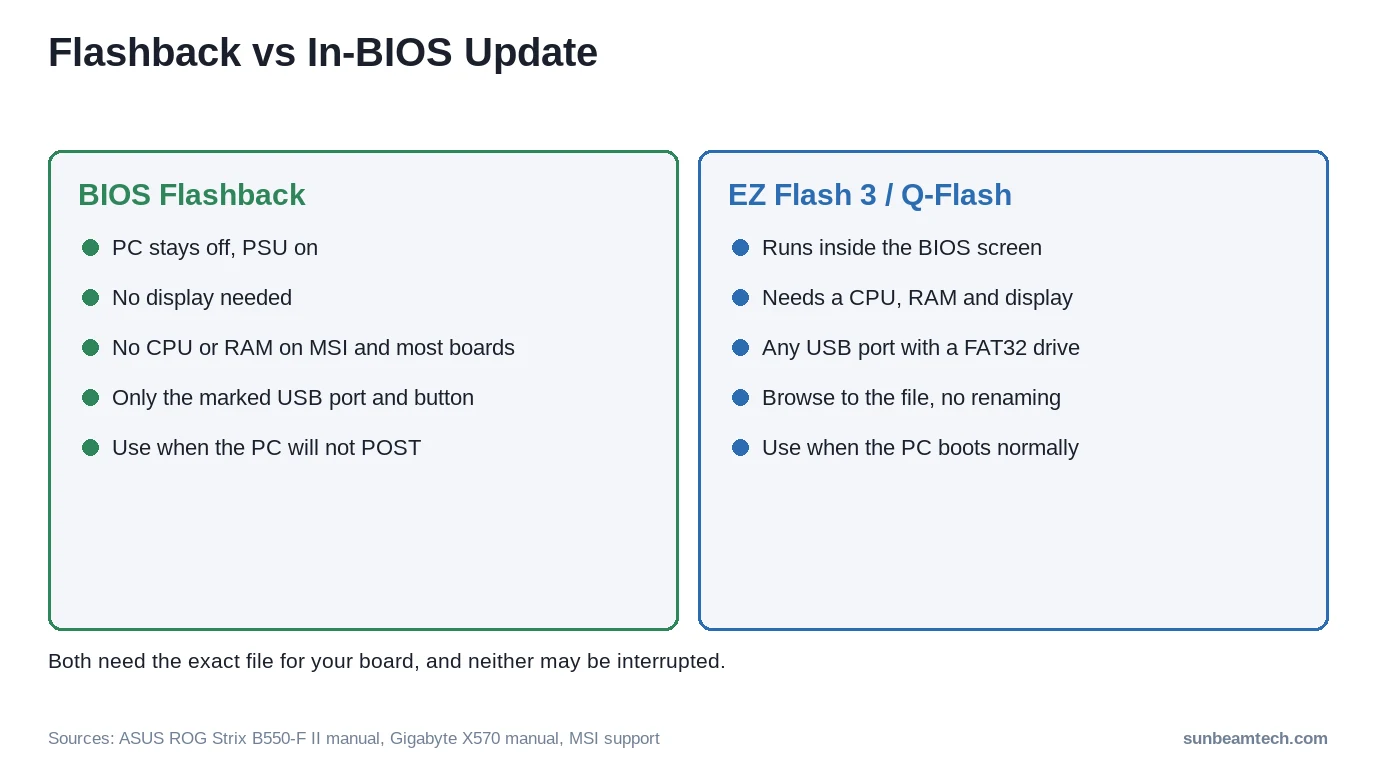
If the system boots, the in-BIOS tools are fine and often faster to reach. Whichever you use, the rule is the same: the file must match your exact board model, and the update must not be interrupted. Gigabyte puts it plainly: inadequate BIOS flashing may result in system malfunction.
After the Flash: Settings to Check
- Enter the BIOS and confirm the new version on the Main page, as ASUS suggests.
- Load the defaults. The ASUS manual recommends loading optimized defaults (F5) after a BIOS update for compatibility and stability.
- Switch the firmware TPM back on if it was reset. Our guide on how to enable TPM 2.0 covers fTPM and PTT on each brand.
- Re-enable your memory profile with our steps to enable XMP in the BIOS.
- Check boot order, Secure Boot and any fan curves you had set.
- If you suspended BitLocker, resume it once Windows is running.
Frequently Asked Questions
What is BIOS Flashback?
It’s a button-driven feature that writes a BIOS file from a USB drive to the motherboard’s BIOS chip while the PC is off. ASUS, MSI, Gigabyte and ASRock each have their own version, and most don’t need a working CPU, RAM or display.
Do I need a CPU to use BIOS Flashback?
On most boards, no. MSI states that the Flash BIOS Button works without a CPU and RAM, and Gigabyte’s Q-Flash Plus updates the main BIOS without a CPU. You do need the power supply connected to the board.
How long does a BIOS Flashback take?
It varies by brand. ASUS says about 8 minutes, Gigabyte says 2 to 3 minutes for Q-Flash Plus, and ASRock says a few minutes. Wait until the LED goes out or stops blinking, however long that takes.
Why is flashing the BIOS risky?
If the write is interrupted, the BIOS chip can end up with an incomplete image and the board won’t start. MSI warns that powering off during the refresh may damage the BIOS chip, and Gigabyte says inadequate flashing may result in system malfunction.
Can I use any USB port for Flashback?
No. Only the one port marked for Flashback works, usually right next to the button on the rear I/O panel. Your manual’s rear panel page shows which one it is.
Why does the Flashback light stay solid?
ASUS and ASRock both say a solid light means the function isn’t working properly. Check that the drive is FAT32 with an MBR layout, that the file name is exactly right, and that the file is for your board, then try again.
Does BIOS Flashback reset my BIOS settings?
Expect to set things up again. ASRock states that the TPM is reset, and ASUS recommends loading defaults after a BIOS update, so re-enable TPM, Secure Boot, XMP and your boot order afterwards.
If Flashback Still Doesn’t Work
Work through these checks, one at a time:
- The file name. Windows can hide file extensions, so a file you named MSI.ROM may really be MSI.ROM.ROM or MSI.ROM.txt. Turn on file name extensions in File Explorer and check.
- The drive. Reformat it as FAT32 with MBR, put only the BIOS file on it, and try a different, preferably USB 2.0, stick.
- The port and power. Confirm you’re in the Flashback port and that every power connector the brand asks for is plugged in and the PSU switch is on.
- The file itself. Download it again for your exact model and board revision. A file for a similarly named board won’t flash.
If the board still won’t flash or won’t POST afterwards, contact the board maker’s support, as ASUS advises for an update that fails repeatedly. Note down the exact board model and revision, the BIOS file name and version you used, how you formatted the drive, and exactly what the LED did and for how long. The DRAM light guide and PC powers on but no display are the next stops if the BIOS is now current but the system still won’t start. If you changed BIOS settings before the problem began, try to clear CMOS as well.

Alex has been building and tweaking custom PCs for over 12 years. From budget builds to full custom water loops, he’s assembled more than 50 systems and helped hundreds of builders troubleshoot their rigs. When he’s not benchmarking the latest hardware, you’ll find him optimizing airflow setups or stress-testing overclocks.