How to Enable Secure Boot in BIOS (Every Brand, Step by Step)
Enable Secure Boot by disabling CSM in BIOS, then switching Secure Boot on and installing the factory default keys if your board asks for them, on a GPT-formatted drive.
Last updated: October 2026
Table of Contents
- What Secure Boot Actually Does
- Before You Touch Anything
- How to Enable Secure Boot, Brand by Brand
- ASUS
- MSI
- Gigabyte
- ASRock
- How to Verify Secure Boot Is Actually On
- Common Errors and Fixes
- Secure Boot Is Greyed Out
- “Secure Boot Requires CSM Disabled” or Similar Warning
- Key Restoration Fails or the Option Disappears After a Reset
- Game Still Won’t Launch After Enabling Secure Boot
- PC Won’t Boot at All After Enabling Secure Boot
- Frequently Asked Questions
- How do I know if Secure Boot is already enabled?
- Do I need to disable CSM to enable Secure Boot?
- Will enabling Secure Boot delete my files?
- Is Secure Boot required for Windows 11?
- Why does Secure Boot need CSM disabled specifically?
- Can I use Secure Boot with a Linux dual-boot setup?
- My Secure Boot Mode only shows “Standard,” not “Custom.” Is that a problem?
- Do I need Secure Boot for anti-cheat games like Valorant or Call of Duty?
Secure Boot shows up in three very different contexts: a Windows 11 install that refuses to continue, an anti-cheat error before a match in Valorant or Call of Duty, or a security audit that flags it as off. All three have the same fix. The setting itself is simple once CSM is out of the way, but CSM is exactly what trips people up, since most boards will not let Secure Boot turn on while CSM is active. This guide covers the brand-by-brand steps, the GPT requirement underneath all of it, and what to do when the toggle is greyed out.
- 🟢 Confirm your drive is GPT, not MBR, before doing anything else (Disk Management > right-click the disk > Properties > Volumes > Partition style)
- 🟢 Turn CSM off first. On most boards Secure Boot can’t be enabled, or doesn’t even show, while CSM is on
- 🟡 Turn Secure Boot on. On ASUS that’s OS Type > Windows UEFI mode; MSI, Gigabyte and ASRock have you set Secure Boot Mode to Custom, and Gigabyte and ASRock then install the default keys
- 🔴 If BitLocker is active, suspend it before this change or you will hit a recovery key prompt on next boot
What Secure Boot Actually Does
Microsoft describes Secure Boot as “a security feature that helps prevent malicious software from loading when a Windows PC starts up,” working by allowing only software with a trusted digital signature to run during the boot process. It is a UEFI firmware feature, which is why it requires UEFI mode rather than legacy BIOS/CSM emulation to function at all.
It shows up in two very different places for most PC builders. First, Windows 11’s official hardware requirements list “UEFI, Secure Boot capable” firmware alongside TPM 2.0 and a supported 64-bit CPU, and setup checks both at the same time. Second, and increasingly common, several major anti-cheat systems check for it directly. Riot Games’ own support documentation for Vanguard states plainly that “some games and applications require Secure Boot to be enabled in order to run properly,” and points to the VAN: STATUS_SB_POLICY error as the specific symptom when it is not.
Before You Touch Anything
Press Win+R, type msinfo32, and press Enter. Check two fields: BIOS Mode should say UEFI, and Secure Boot State will already tell you whether it is currently On, Off, or Unsupported. msinfo32 doesn’t show your disk’s partition style, though. For that, open Disk Management, right-click the disk Windows is on, choose Properties and check Partition style on the Volumes tab, or run Get-Disk in PowerShell. If BIOS Mode says Legacy or the disk shows MBR, converting your existing Windows install to GPT is a separate step (Microsoft’s built-in mbr2gpt tool converts the disk without deleting data) that has to happen before Secure Boot will work on that drive.
If BitLocker protects the drive, be careful. Riot’s Secure Boot guide warns that resetting Secure Boot keys changes your TPM measurements and triggers BitLocker recovery on the next boot. Microsoft’s BitLocker recovery overview says you can avoid recovery during planned firmware changes by suspending BitLocker first. In PowerShell, run Suspend-BitLocker -MountPoint "C:" -RebootCount 0, make the change, then run Resume-BitLocker -MountPoint "C:". With a reboot count of 0, protection stays suspended until you resume it yourself. Save your 48-digit recovery key somewhere outside that PC before you start, not after something goes wrong.
How to Enable Secure Boot, Brand by Brand
Enter BIOS by tapping Delete or F2 right after the power button. If you miss it, Windows also offers Settings > System > Recovery > Advanced startup > Restart now, then Troubleshoot > Advanced options > UEFI Firmware Settings.
ASUS
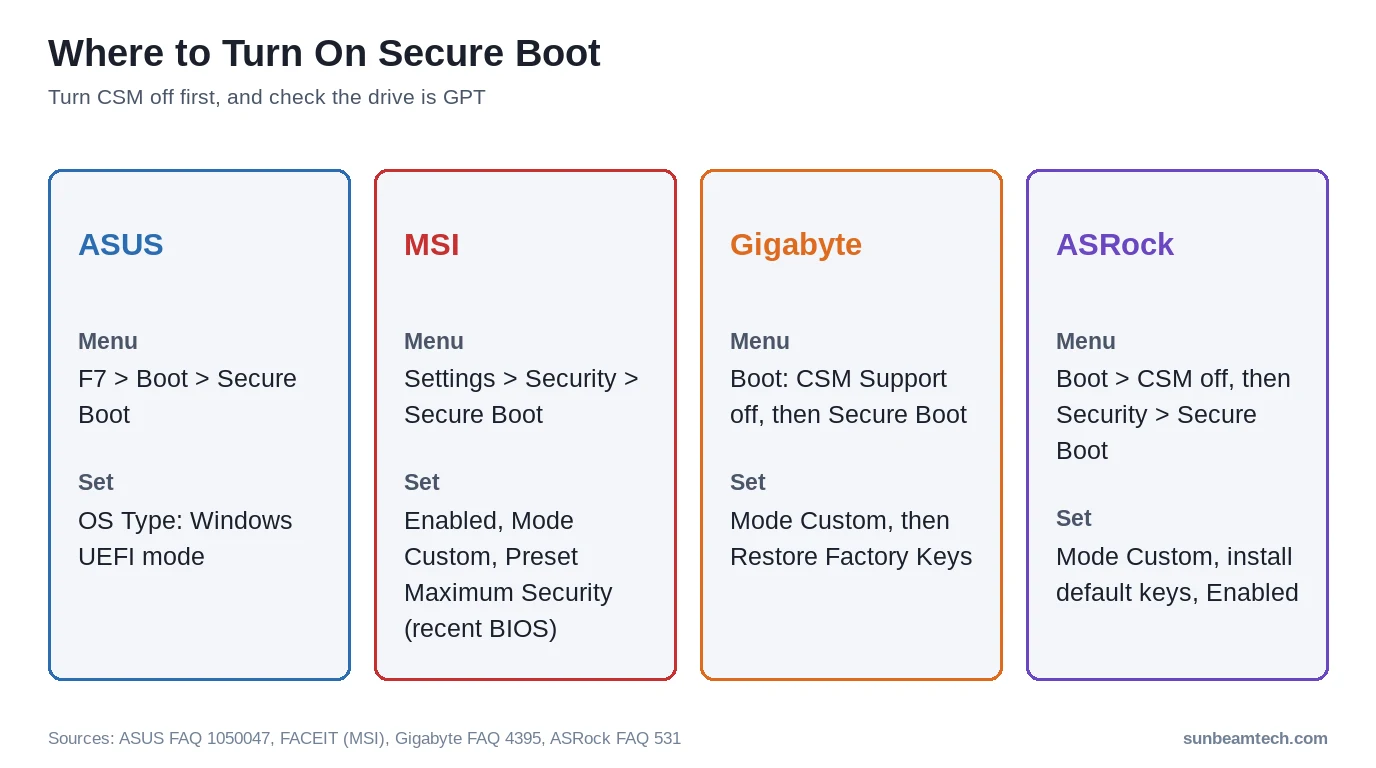
Press F7 for Advanced Mode, then go to Boot > Secure Boot. Change OS Type from “Other OS” to “Windows UEFI Mode.” Per ASUS’s own documentation, Windows UEFI mode turns Secure Boot on and Other OS turns it off. You can’t set the Secure Boot State line by hand. It follows whether Secure Boot keys are installed. If you need to restore the keys, set Secure Boot Mode to Custom, open Key Management, choose Clear Secure Boot Keys and then Install Default Secure Boot Keys. Press F10 to save.
MSI
Press Delete during startup to enter BIOS, then go to Settings > Security > Secure Boot, the path FACEIT’s anti-cheat support guide uses for MSI boards. Check that Secure Boot is Enabled, set Secure Boot Mode to Custom, and on recent BIOS versions set Secure Boot Preset to Maximum Security. Don’t skip that last part. FACEIT says some MSI boards show Secure Boot as enabled on default settings while it doesn’t actually work. Save with F10 and reboot.
Gigabyte
Under Boot, set CSM Support to Disabled first. Then go to Secure Boot > Secure Boot Mode and select Custom. Select Restore Factory Keys, answer Yes to Install Factory Defaults, then Yes again to Reset Without Saving. The system will reboot; go back into the Secure Boot menu afterward and confirm it now shows Active. Gigabyte’s FAQ for AM4 and TRX40 boards documents this exact sequence, and covers TPM 2.0 in the same walkthrough since Windows 11 setup wants both.
ASRock
Go to Boot > CSM and set it to Disabled. Then go to Security > Secure Boot, set Secure Boot Mode to Custom, and select “Install default Secure Boot keys,” confirming Yes. Set Secure Boot itself to Enabled and save. ASRock’s documentation notes a quirk on AM5 boards specifically: if a “Discard Changes and Exit” prompt appears right after installing the default keys, select No and continue to the final Enabled step rather than exiting.
How to Verify Secure Boot Is Actually On
Back in Windows, run msinfo32 again and check Secure Boot State. It should read On. If it reads Unsupported, the drive is still MBR, CSM is still active somewhere, or the motherboard genuinely predates UEFI Secure Boot support, which is rare on anything built in the last decade.
Common Errors and Fixes
Secure Boot Is Greyed Out
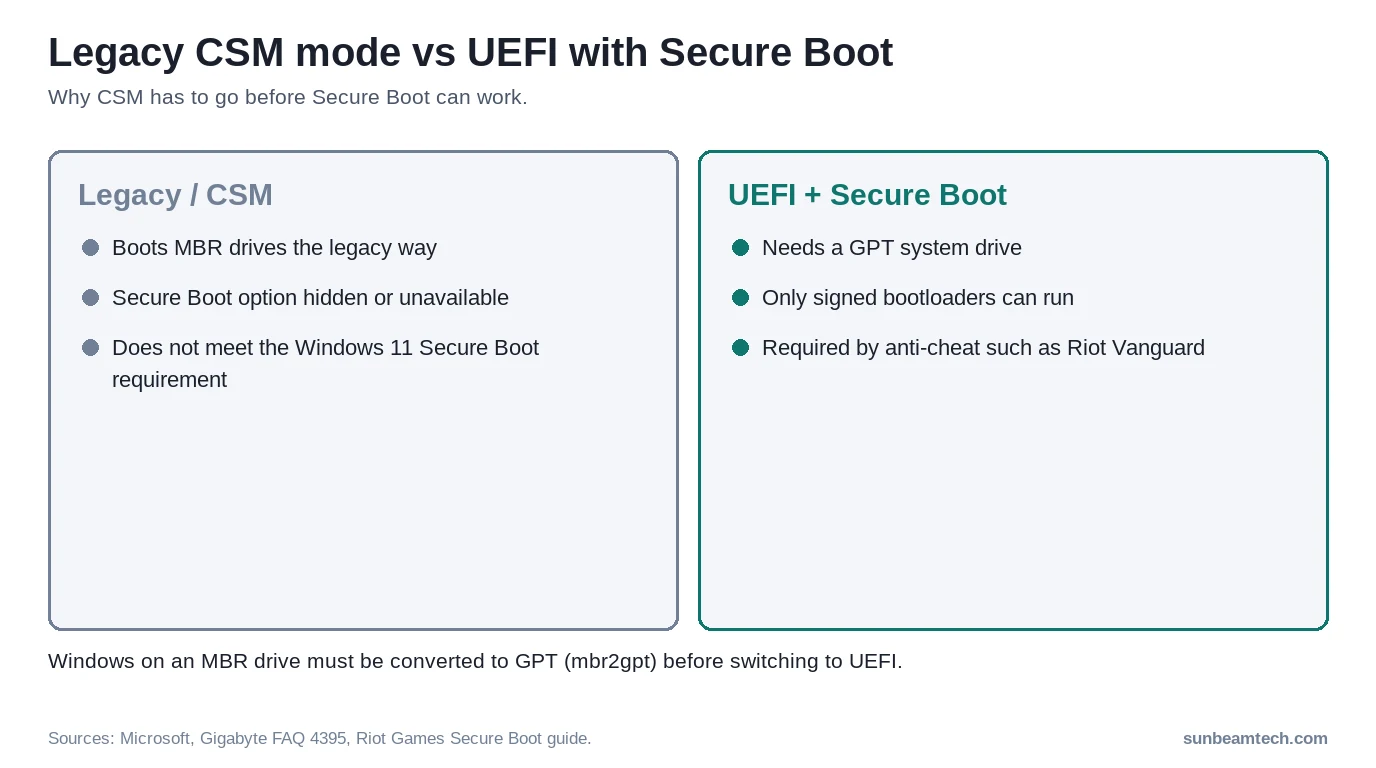
This is almost always CSM. Most boards physically hide or lock the Secure Boot option while CSM is active, since the two are mutually exclusive by design; CSM emulates legacy BIOS for MBR drives, and Secure Boot depends on UEFI’s own boot signing chain. Turn CSM off first, then Secure Boot becomes selectable. Our full CSM setting guide covers every brand’s exact menu wording for that step, since it varies more than Secure Boot’s own labeling does. It is also worth checking SVM mode and Fast Boot while you are in the same BIOS section, since a Windows 11 setup failure is often more than one setting away from passing.
“Secure Boot Requires CSM Disabled” or Similar Warning
Take it literally. Go disable CSM in the Boot menu, then come back to Secure Boot. On several boards this message appears even after you think CSM is off, because CSM has separate per-device sub-toggles (storage, network, video) that all need to be off, not just a master switch.
Key Restoration Fails or the Option Disappears After a Reset
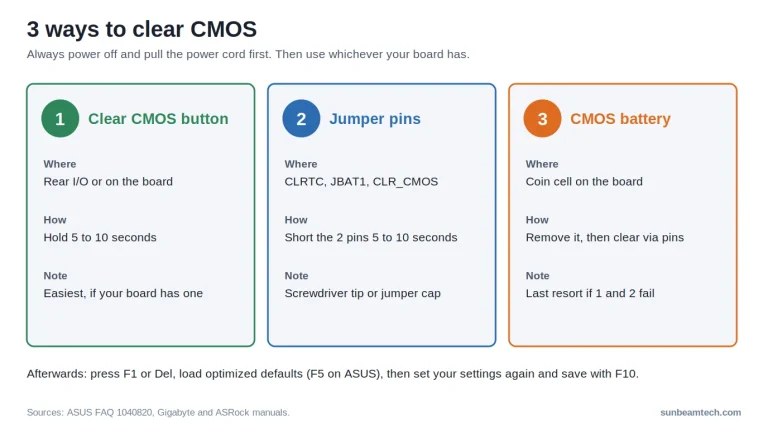
If “Restore Factory Keys” or “Install default Secure Boot keys” fails silently, a BIOS update is the most common fix, since older BIOS versions on some boards shipped with incomplete or corrupted default key databases. Check your motherboard manufacturer’s support page for a newer BIOS version before troubleshooting further. Clearing CMOS and starting over sometimes resolves it too, though that also resets XMP, fan curves, and any other customized settings alongside it.
Game Still Won’t Launch After Enabling Secure Boot
Modern anti-cheat systems like Riot Vanguard, Easy Anti-Cheat, and BattlEye increasingly check Secure Boot and TPM 2.0 together, not separately. If Secure Boot is confirmed On in msinfo32 and the game still blocks launch, check TPM state next using the steps in our TPM 2.0 guide, since both are usually required by the same anti-cheat check. A pending Windows update or an outdated anti-cheat driver is the other common cause once both firmware settings check out.
PC Won’t Boot at All After Enabling Secure Boot
Usually Windows was installed in legacy mode on an MBR drive, or something in the boot path isn’t signed for Secure Boot, such as some Linux bootloaders or older RAID or storage drivers. If you dual-boot Linux, that OS needs a Secure Boot-compatible bootloader (shim, in most modern distributions) or Secure Boot needs to stay off. For a Windows-only system that suddenly won’t boot, switch Secure Boot back off in the BIOS, or use our PC won’t turn on checklist to clear CMOS if you can’t reach the BIOS.
Frequently Asked Questions
How do I know if Secure Boot is already enabled?
Press Win+R, type msinfo32, and press Enter. Secure Boot State appears near the top of the System Summary and reads On, Off, or Unsupported directly, without needing to enter BIOS.
Do I need to disable CSM to enable Secure Boot?
In practice, yes. Secure Boot needs UEFI boot, and CSM is the legacy mode. Gigabyte, for example, only shows the Secure Boot option once CSM Support is disabled, and ASRock’s Secure Boot guide starts by setting CSM to Disabled.
Will enabling Secure Boot delete my files?
No, not directly. The real risk is indirect: if your drive is still MBR, Windows will not boot at all under Secure Boot until it is converted to GPT, and if BitLocker is active, the setting change alone can trigger a recovery key prompt. Back up first regardless, as with any firmware or partition change, and have your BitLocker recovery key saved outside the PC before you start.
Is Secure Boot required for Windows 11?
Windows 11’s official requirement is “UEFI, Secure Boot capable” firmware, meaning the capability needs to exist. Microsoft suggests turning it on for better security, and some games now need it actually on, not just supported. So leaving it off isn’t a good long-term plan, even where setup lets you through.
Why does Secure Boot need CSM disabled specifically?
CSM (Compatibility Support Module) emulates legacy BIOS so older, MBR-formatted drives and operating systems can boot on modern UEFI motherboards. Secure Boot only validates signed UEFI bootloaders, a mechanism that legacy boot mode does not use at all, which is why the two settings cannot both be active.
Can I use Secure Boot with a Linux dual-boot setup?
Usually yes. Most current Linux distributions ship a signed shim bootloader that works alongside Windows under Secure Boot. Older or more obscure distributions, and custom kernels you compile yourself, may need Secure Boot turned off for that specific boot entry, or their own key enrolled manually.
My Secure Boot Mode only shows “Standard,” not “Custom.” Is that a problem?
Not by itself. On ASUS desktops you turn Secure Boot on through OS Type, and ASUS notes Key Management is greyed out in Standard mode, so you only switch to Custom when you need to restore keys. Gigabyte, ASRock and MSI do have you pick Custom in their own steps. That doesn’t mean you’re enrolling your own keys: on Gigabyte and ASRock you install the factory default keys from there.
Do I need Secure Boot for anti-cheat games like Valorant or Call of Duty?
It depends on the game. Riot’s support guide says some games and applications require Secure Boot to run properly, and its checklist asks for three things: BIOS Mode set to UEFI, a GPT partition style, and Secure Boot enabled in BIOS. For other titles, check the game’s own support page.
If Secure Boot still will not stick after working through CSM, the drive format, and a BIOS update, the last practical step is contacting your motherboard manufacturer’s support directly with your exact model, current BIOS version, and the precise error text from Windows or the game launcher. That combination is what lets their support team point to the right known issue instead of guessing alongside you.
Want our guides higher in your Google results? Add SunbeamTech as a preferred source.


Alex Rivera writes SunbeamTech’s guides on BIOS settings, motherboard headers, cooling and PC builds. Every guide starts from the manufacturer’s documentation and the questions builders actually search for, and gets checked against AMD, Intel, NVIDIA and board-vendor sources before it goes live. Spotted a mistake? Email [email protected] and it gets fixed.