Thermal Paste Patterns: Dot, Line, or Spread?
The best thermal paste pattern is one that achieves full, even coverage across the CPU’s integrated heat spreader with no air pockets, using a pea-sized amount of paste.
Last updated: October 2026
Table of Contents
- Quick Answer: What Is the Best Thermal Paste Pattern?
- What Does Thermal Paste Actually Need to Do?
- Filling Microscopic Surface Imperfections
- Why Thin Beats Thick Every Time
- Every Thermal Paste Pattern Explained
- The Center Dot (Single Dot Method)
- The Line Method (Single or Double Line)
- The X Pattern
- The Spread (Buttered Toast Method)
- The Cross (Plus Pattern)
- The Spiral, Circle, and Ring, Why You Should Avoid Them
- Best Thermal Paste Pattern by CPU Platform
- AMD AM4 (Ryzen 3000 / 5000 Series)
- AMD AM5 (Ryzen 7000 Series / 7800X3D)
- Intel LGA1700 / LGA1851 (12th–14th Gen / Arrow Lake)
- AMD Threadripper / HEDT Platforms
- Laptop CPUs
- GPUs
- Does Paste Viscosity Change Which Pattern You Should Use?
- How to Apply Thermal Paste Correctly (Best Way to Apply Thermal Paste)
- What You’ll Need
- Step-by-Step Application (X Pattern, Recommended Method)
- How to Check Your Application
- Does Thermal Paste Pattern Actually Matter? The Real Numbers
- FAQ: Thermal Paste Pattern Questions Answered
- What is the most efficient thermal paste pattern?
- What is the best thermal paste pattern for AMD Ryzen (AM4 / AM5)?
- Does the thermal paste pattern matter for laptops?
- How much thermal paste should I use regardless of pattern?
- Can I reuse thermal paste if I remove my cooler?
- Quick Reference: Best Thermal Paste Pattern Cheat Sheet
- The Short Version
Quick Answer: What Is the Best Thermal Paste Pattern?
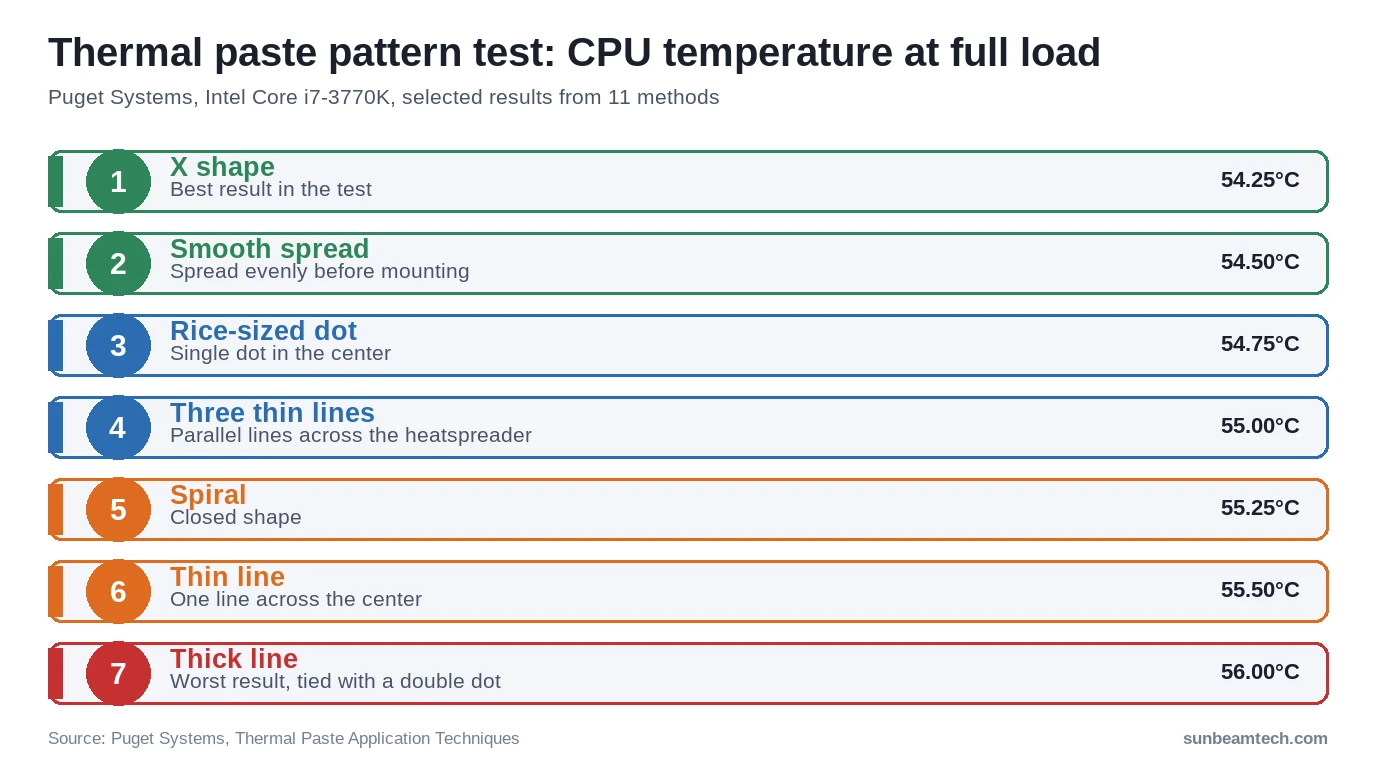
The X pattern is the best thermal paste pattern for most desktop CPUs. According to Puget Systems’ controlled testing on a Core i7-3770K, the X pattern achieved 54.25°C under full load, edging out the smooth spread (54.50°C) and outperforming the other methods it tried. That said, the manual spread is nearly as effective and better suited for first-time builders or large IHS surfaces. Avoid any closed shape (circles, rings, squares), those trap air and are the only patterns that consistently run hotter.
The pattern matters less than most guides suggest, and so does the brand: the best thermal paste comparison has the measured numbers.
The debate has been going on for years. Forums argue endlessly about dots vs. lines vs. spreads. Here’s the reality: the pattern matters far less than you think, and far more than some people admit. In Gamers Nexus’ test, the full range from best to worst was less than one degree, and its advice is that “the biggest goal is not doing too little.” So the real job is full coverage, and the pattern is how you get there.
- 🟢 X pattern: Best overall for standard desktop CPUs, controlled spread, low air bubble risk
- 🟢 Manual spread (buttered toast): Best for beginners and large IHS surfaces, guarantees full coverage
- 🟢 Center dot: Acceptable for small or round IHS surfaces with experienced hands
- 🟡 Single or double line: Works for elongated IHS designs, slight corner coverage risk
- 🟡 Cross / plus pattern: Similar to X, slightly less tested, performs comparably
- 🔴 Circle / ring / closed spiral: Traps air at center, avoid entirely
What Does Thermal Paste Actually Need to Do?
Filling Microscopic Surface Imperfections
No CPU integrated heat spreader (IHS) and no heatsink base are perfectly flat at a microscopic level. Both surfaces have tiny peaks and valleys that create air gaps when pressed together. Air has a thermal conductivity of roughly 0.024 W/m·K. A quality paste like Arctic MX-6 sits at approximately 12.7 W/m·K. That’s a massive difference. Those gaps, left unfilled, act as insulators between your CPU and cooler.
The goal isn’t to glob on as much paste as possible. It’s to fill the gaps with the thinnest uniform layer you can achieve. That’s it.
Why Thin Beats Thick Every Time
Thermal paste is a gap filler, not a conductor. Intel says too much paste “reduces the efficacy of the paste, due to the metal surfaces being too far apart”, though Gamers Nexus found that excess generally doesn’t hurt temperatures because tightening the cooler squeezes it out.
For a standard desktop CPU, Intel’s guide recommends an amount “roughly the size of a pea or a grain of rice”. Larger IHS surfaces like Threadripper need more. GPUs and laptop bare dies need significantly less.
According to research compiled by Kooling Monster’s 15+ hour case study, all correct-volume methods converged within 1.5°C under sustained stress testing. Volume accuracy matters more than pattern choice. Get the volume right first, then worry about the pattern.
Every Thermal Paste Pattern Explained
The Center Dot (Single Dot Method)
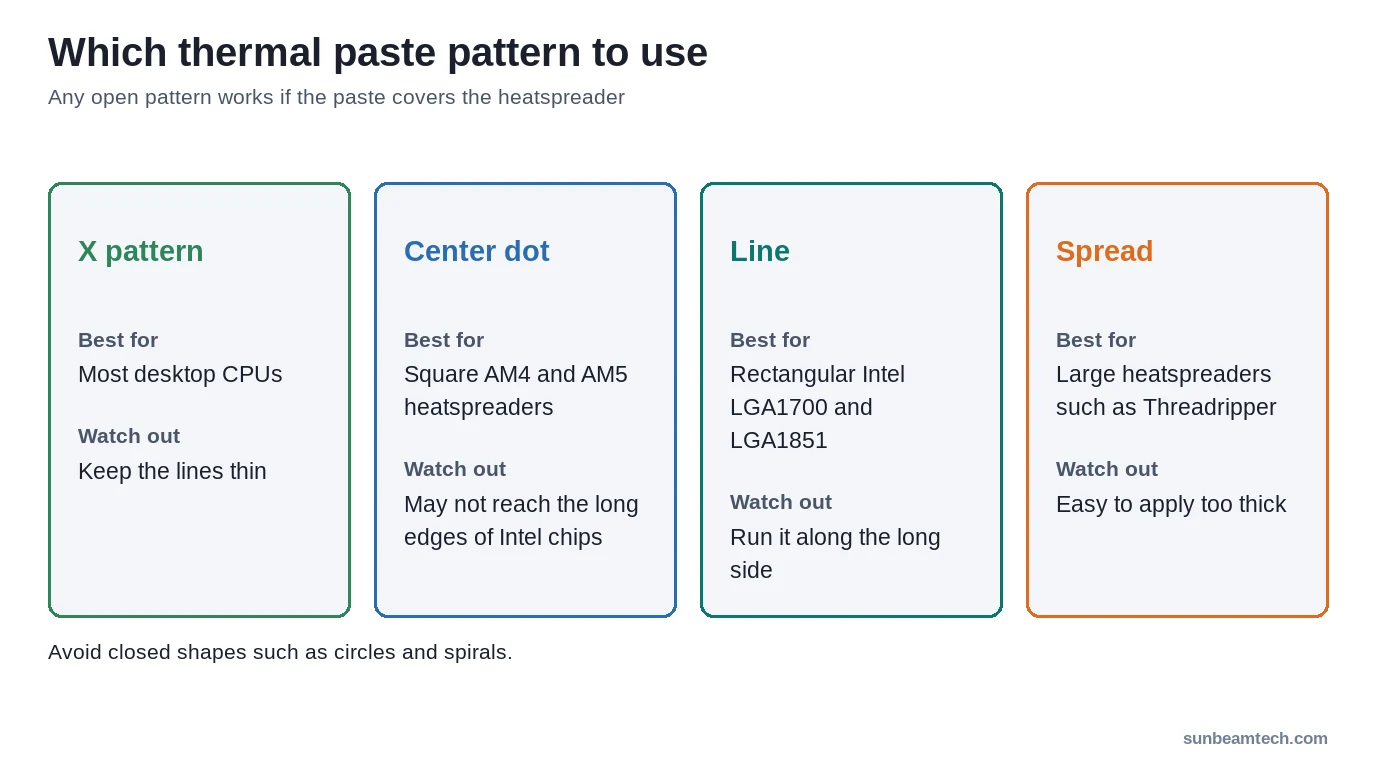
Place a rice-grain to pea-sized dot dead center on the IHS and let the heatsink’s mounting pressure spread it outward. Simple. Low bubble risk. Forgiving for beginners who nail the volume.
The weakness shows up on larger or rectangular IHS designs. A single dot may not reach the corners of an LGA1700 CPU’s wider footprint before the paste runs out. On those platforms, check the imprint: incomplete coverage means hot spots.
Best for: small or round IHS surfaces, first-time builders who have a good grasp on volume.
The Line Method (Single or Double Line)
Draw a single horizontal or vertical line across the center of the IHS. Coverage is strong along the line axis but can miss corners perpendicular to it. A double parallel line improves this but introduces a small air-trapping risk between the two lines.
Best for: rectangular heatspreaders such as Intel’s LGA1700 and LGA1851 chips, which Intel lists with a 45 x 37.5 mm package.
The X Pattern
Two diagonal lines crossing at the center. This is the top performer in controlled testing. Puget Systems found the X pattern hit 54.25°C under full load, the best result across all methods they tested. The diagonal geometry means heatsink pressure naturally pushes paste outward from the center toward all four corners simultaneously, with minimal air bubble risk.
One caveat: volume control matters more here than with a spread. Too much paste and you’ll get overflow. Keep the lines thin.
Best for: most standard desktop CPUs. The go-to recommendation for intermediate builders.
The Spread (Buttered Toast Method)
Use a spatula, spreader card, or even a plastic bag over your finger to manually cover the entire IHS before mounting the cooler. You guarantee full coverage before any heatsink pressure is applied. No guessing. No reliance on mount pressure to push paste into corners.
The risk is technique-dependent. Rushing the spread or pressing too hard can introduce tiny air bubbles. Done carefully, it’s nearly identical to the X pattern. Puget Systems clocked the smooth spread at 54.50°C, just 0.25°C behind the X pattern.
Best for: beginners who want certainty, large IHS CPUs (LGA1700, Threadripper), and reapplication scenarios where you want to verify full coverage.
The Cross (Plus Pattern)
One horizontal and one vertical line forming a plus sign, as opposed to the X pattern’s diagonals. Performance is similar to the X pattern in most testing. It’s less commonly studied independently and usually grouped with the X in data comparisons.
Best for: same situations as the X pattern. Either works.
The Spiral, Circle, and Ring, Why You Should Avoid Them
Closed shapes are the one category where the pattern absolutely does matter. A circle, ring, or closed spiral traps air at the center of the IHS during compression. That air pocket sits directly over the die, acting as an insulator. In Puget Systems’ test the spiral ran 1°C warmer than the X shape (55.25°C against 54.25°C). A small gap, but there’s no reason to accept it.
| Pattern | Avg. Coverage | Air Bubble Risk | Difficulty | Best For | Puget Systems result (full load) |
|---|---|---|---|---|---|
| Center Dot | Moderate | Low | Beginner | Small / round IHS | 54.75°C (rice-sized dot) |
| Single Line | Moderate | Low | Beginner | Elongated IHS | 55.50°C (thin line) |
| X Pattern ⭐ | High | Low | Intermediate | Most desktop CPUs | 54.25°C |
| Spread (Buttered Toast) | Very High | Medium | Beginner–Int. | Large IHS, reapplication | 54.50°C (smooth spread) |
| Cross (Plus) | High | Low | Intermediate | Most desktop CPUs | Not tested separately |
| Circle / Ring 🔴 | Low (center void) | Very High | Any | Not recommended | 55.25°C (spiral) |
Best Thermal Paste Pattern by CPU Platform
AMD AM4 (Ryzen 3000 / 5000 Series)
On AM4, the active die area is smaller and concentrated toward the center, so you don’t need aggressive full-surface coverage. A center dot or X pattern both work well here. For higher-TDP chips like the Ryzen 7 5800X or Ryzen 9 5900X, the X pattern is preferred, those chips run hot enough that the extra corner coverage matters.
Amount: pea-sized. Don’t over-apply.
AMD AM5 (Ryzen 7000 Series / 7800X3D)
AM5 uses the same cooler mounting as AM4, according to Corsair, and the same patterns work. AMD lists a maximum operating temperature (Tjmax) of 95°C for chips such as the Ryzen 9 9950X, so running warm under load is expected behavior rather than a sign of bad paste.
The Ryzen 7 7800X3D doesn’t need a special pattern or amount: use the same X or center dot as on any AM5 chip. What is different is its temperature limit. AMD lists a Tjmax of 89°C for the 7800X3D, lower than the 95°C of other Ryzen 7000 chips. For the full process, see our guide on how to apply thermal paste.
Intel LGA1700 / LGA1851 (12th–14th Gen / Arrow Lake)
LGA1700 is one of the widest consumer IHS designs at approximately 45×37.5mm. That rectangular footprint is why the center dot method can fail here, it simply may not reach the corners before spreading stops. The X pattern, full spread, or a three-dot horizontal line (three dots in a row across the center) all work well on this platform.
13th and 14th Gen Core i9 chips (i9-13900K, i9-14900K) can hit 253W under PL2 loads. Full coverage isn’t optional on these. Use a spread or X pattern. Arrow Lake (LGA1851) is no different: Intel lists the Core Ultra 9 285K at up to 250 W Maximum Turbo Power, against 253 W for the i9-14900K.
AMD Threadripper / HEDT Platforms
Threadripper heatspreaders are several times the area of a mainstream desktop CPU’s, so a single center dot won’t reach the edges. The only reliable method here is a full manual spread, or a 2×2 or 3×3 grid of dots placed evenly across the IHS to seed multiple spread zones simultaneously.
Amount: scale up with the surface area. This is the one platform where using “too little” is the more common mistake.
Laptop CPUs
Most mobile CPUs are bare dies, no IHS, just the raw chip. That changes everything. There’s no metal spreader to buffer your application, and the capacitors and other SMD components surrounding the die sit very close. A thick dot risks overflowing onto those components during heatsink mounting.
Use an extremely thin manual spread. Volume: less than a half grain of rice. Do not use the X pattern or dot method on a bare die, the reliance on mount pressure to spread paste is unpredictable with laptop cooler clamp mechanisms.
GPUs
GPU dies are small bare dies, similar situation to laptop CPUs but often even smaller. A dot the size of half a grain of rice, or a minimal manual spread using the GPU’s included applicator, is the correct approach. Excess paste can contact PCB components and cause shorts. Worth the extra care.
- 54°C = 129°F (X pattern result, Puget Systems test)
- 65°C = 149°F (low-end normal desktop load temp)
- 80°C = 176°F (acceptable under heavy load for most CPUs)
- 89°C = 192°F (Ryzen 7 7800X3D Tjmax, per AMD)
- 95°C = 203°F (Tjmax of Ryzen 7000 and 9000 chips such as the Ryzen 9 9950X, per AMD)
- 100°C = 212°F (Tjmax of the Core i9-14900K, per Intel)
Formula: °F = (°C × 1.8) + 32.
Does Paste Viscosity Change Which Pattern You Should Use?
Yes. A lot. This is something most pattern guides skip entirely, and it’s a real mistake.
Thick, high-viscosity pastes like Thermal Grizzly Kryonaut or Noctua NT-H2 don’t flow easily under heatsink pressure. If you drop a center dot of Kryonaut on an LGA1700 CPU and expect it to spread edge-to-edge, you’ll be disappointed. With high-viscosity pastes, the spread method or X pattern gives the heatsink a better starting position to achieve full coverage without needing the paste to travel far.
Low-viscosity pastes like Dowsil TC-5026 are much more cooperative under mount pressure. A center dot will spread readily. You have more flexibility in pattern choice.
Liquid metal (Thermal Grizzly Conductonaut, for example) is a different category entirely. You must manually spread it with its included applicator. Never apply liquid metal with a dot and rely on mount pressure, it will spread laterally off the IHS edge and contact PCB components. Manual spread only, and use masking tape around the IHS perimeter as a safeguard during application. The review of Thermal Grizzly Kryonaut covers the viscosity characteristics of that specific paste in more detail if you’re deciding between standard and premium ceramic options.
| Paste | Type | Viscosity | Recommended Pattern |
|---|---|---|---|
| Thermal Grizzly Kryonaut | Ceramic | High | X or Spread |
| Arctic MX-6 | Carbon | Medium | X, Dot, or Spread |
| Noctua NT-H2 | Hybrid | Medium-High | X or Spread |
| Cooler Master MasterGel Maker | Carbon nano | Medium | Dot, Line, or X |
| Thermal Grizzly Conductonaut | Liquid Metal | Very Low / Liquid | Manual Spread ONLY |
| Dowsil TC-5026 | Silicone | Low | Dot acceptable |
How to Apply Thermal Paste Correctly (Best Way to Apply Thermal Paste)
What You’ll Need
- Isopropyl alcohol (IPA): 90% concentration or higher, 99% is ideal for clean removal of old paste
- Lint-free cloth or coffee filter: microfiber cloths or coffee filters leave no residue
- Thermal paste: a pea-sized amount for standard desktop CPUs
- Spreader card or spatula (optional): included with many paste tubes, or use a plastic bag over your fingertip
Step-by-Step Application (X Pattern, Recommended Method)
- Clean the CPU IHS and heatsink base with IPA-dampened cloth. Remove all old paste completely.
- Let both surfaces dry for 30–60 seconds. Any remaining IPA will evaporate quickly at room temperature.
- Dispense a pea-sized amount of paste onto the center of the IHS.
- Draw a diagonal line from the upper-left corner toward the lower-right corner of the IHS.
- Draw a second diagonal line from the upper-right corner toward the lower-left corner, crossing the first line at center.
- Lower the heatsink straight down onto the CPU with even, controlled downward pressure. Do not drag or slide the heatsink sideways once it contacts the paste.
- Secure the heatsink mounting screws in a cross pattern, tighten diagonally opposite screws in sequence to apply even pressure across the IHS.
- Do not remove the heatsink to check the spread. Lifting it introduces air channels and ruins the compression. Trust the process.
How to Check Your Application
Boot the system and run a stress test like Cinebench or Prime95 for 10–15 minutes. Check temperatures in HWiNFO64 or similar. If temps are within expected ranges for your cooler, you’re done. Good application result looks like thin, even coverage reaching all four corners with slight overflow at the edges. Some overflow onto the PCB surrounding the IHS socket is harmless on standard desktop CPUs (non-bare-die). Wipe excess away if you remove the cooler later.
Only remove the heatsink to investigate if temps are abnormally high after first boot. That means more than 15–20°C above what your cooler’s rated TDP suggests you should be hitting. For a proper step-by-step of the full process, the guide on how to apply thermal paste the right way goes deeper into cooler-specific mounting techniques.
Does Thermal Paste Pattern Actually Matter? The Real Numbers
Here’s where people land on opposite sides of the argument. Both camps are partially right.
Puget Systems tested multiple methods with a custom acrylic heatsink analog that let them visually confirm spread coverage before thermal testing. The X pattern hit 54.25°C under full load and the smooth spread 54.50°C. The worst results, a thick line and a double rice-sized dot, ran 56.00°C, so the whole range across eleven methods was 1.75°C. The test used a Core i7-3770K.
Kooling Monster’s 15+ hour study found that when volume was accurate, all open-shape methods converged within 1.5°C. Their conclusion was direct: volume accuracy matters more than pattern. A bad volume with a “good” pattern will outperform a good pattern with too much or too little paste.
GamersNexus tested how paste volume alone affects temperatures, comparing a correctly-sized blob against oversized and undersized applications. According to their results, even a noticeably too-large application produced less than a 1°C difference versus a correctly-sized one, reinforcing that volume control matters more than the specific pattern used to apply it.
For almost everyone, any open-shape method that covers the heatspreader will produce good results. The exception is a very large heatspreader such as Threadripper’s, where a single dot simply can’t reach the edges.
Pattern selection is the last 5%. But if you’re reading this, you might as well do it right.
FAQ: Thermal Paste Pattern Questions Answered
What is the most efficient thermal paste pattern?
The X pattern and manual spread are the most thermally efficient options, within 0.25°C of each other in Puget Systems’ test. It measured the X pattern at 54.25°C and the smooth spread at 54.50°C under identical full-load conditions. The X pattern edges out slightly due to lower air bubble risk during application, but either method delivers results you can’t meaningfully distinguish in real-world use. For most desktop CPUs, the X pattern is the default recommendation.
What is the best thermal paste pattern for AMD Ryzen (AM4 / AM5)?
For standard AM4 chips (Ryzen 3000 and 5000 series), both the X pattern and center dot work reliably. The X pattern is preferred for higher-TDP chips like the 5800X and 5900X. For AM5, use the X pattern across the board. The Ryzen 7 7800X3D needs no special treatment, but note that AMD lists a lower Tjmax for it: 89°C.
Does the thermal paste pattern matter for laptops?
Yes, more so than on desktops. Laptop CPUs typically have bare dies with no IHS to buffer the paste layer or contain overflow. Excess paste contacts PCB components and capacitors around the die. Always use a thin, manually spread layer, no more than a half grain of rice worth of volume. Avoid dot and X methods on bare dies, since laptop cooler clamp pressure varies significantly by chassis and can spread paste unpredictably.
How much thermal paste should I use regardless of pattern?
For standard desktop CPUs, Intel recommends an amount “roughly the size of a pea or a grain of rice”. Large HEDT and Threadripper heatspreaders need proportionally more, and small bare GPU and laptop dies need less. The aim is full coverage after the cooler is tightened: Gamers Nexus calls not doing too little “the biggest goal”.
Can I reuse thermal paste if I remove my cooler?
No. Once a heatsink is removed, the existing paste layer has compression channels, air pockets from the lift, and often dried or oxidized spots around the perimeter. Always clean both surfaces with 90%+ IPA and reapply fresh paste. The cost of a tube of paste is far cheaper than the cost of running your CPU hotter than necessary for years.
Quick Reference: Best Thermal Paste Pattern Cheat Sheet
| Your Situation | Recommended Pattern | Amount |
|---|---|---|
| First-time builder, any platform | Spread (buttered toast) | Pea-sized |
| Experienced builder, standard Intel / AMD | X pattern | Pea-sized |
| AMD Ryzen 7 7800X3D | X pattern or center dot | Pea-sized |
| Intel i9-13900K / i9-14900K | X or full spread | Pea-sized, spread to the long edges |
| Threadripper / HEDT | Manual spread or dot grid | More, scaled to the surface |
| Laptop (bare die) | Thin manual spread | Less than a desktop CPU |
| GPU (bare die) | Dot or thin manual spread | Less than a desktop CPU |
| Liquid metal paste | Manual spread ONLY | Minimal |
The Short Version
Coverage first, pattern second. Use a pea-sized amount on a standard desktop IHS, pick an open pattern (X pattern for most, spread for large IHS or first-time builds), mount with even pressure, and you’re done. Avoid closed shapes entirely. If you’re on a high-heat chip like the 7800X3D or an i9-14900K, the extra 30 seconds to apply an X pattern instead of a careless blob is genuinely worth it. Bookmark the cheat sheet table above, use the right volume for your platform, and your CPU temps will reflect the effort. Have a specific CPU or cooler question? Drop it in the comments.

Alex has been building and tweaking custom PCs for over 12 years. From budget builds to full custom water loops, he’s assembled more than 50 systems and helped hundreds of builders troubleshoot their rigs. When he’s not benchmarking the latest hardware, you’ll find him optimizing airflow setups or stress-testing overclocks.


