Repasting a GPU: Thermal Paste Guide
GPU thermal paste is a thermally conductive compound applied between a graphics card’s GPU die and its cooler cold plate to eliminate microscopic air gaps and maximize heat transfer.
Last updated: July 2026
Table of Contents
- Quick Answer: What Is GPU Thermal Paste and Do You Need to Replace It?
- Does Your GPU Actually Have Thermal Paste?
- Why Repasting Your GPU Actually Matters
- Factory Paste: The Problem
- Real-World Temperature Gains
- GPU Thermal Paste vs. Thermal Pads: What’s the Difference?
- Thermal Paste
- GPU Thermal Pads
- Best Thermal Paste for a GPU: Top Picks Compared
- A Note on Liquid Metal for GPUs
- What Reddit’s GPU Community Actually Recommends
- How to Repaste a GPU: Step-by-Step
- Step 1: Safety First
- Step 2: Remove the GPU and Disassemble the Cooler
- Step 3: Clean Off Old Thermal Paste
- Step 4: Apply New Thermal Paste
- Step 5: Reassemble and Test
- GPU Thermal Paste for Laptops: Special Considerations
- GPU Thermal Paste Lifespan: When Should You Repaste?
- Signs It’s Time to Repaste
- Repaste Intervals by Use Case
- GPU Thermal Paste Change: Common Mistakes to Avoid
- FAQ: GPU Thermal Paste Questions Answered
- Does replacing GPU thermal paste void the warranty?
- How much does GPU thermal paste replacement cost?
- Can I use CPU thermal paste on a GPU?
- What temperature should my GPU run at after repasting?
- Is GPU thermal paste the same as GPU thermal pads?
- What You Should Do
Quick Answer: What Is GPU Thermal Paste and Do You Need to Replace It?
Every discrete graphics card ships with thermal paste pre-applied between the GPU die and the heatsink cold plate. Over time, that factory paste dries out, thermal resistance increases, and your GPU runs hotter than it should. Replacing it takes about 45 minutes, costs under $15 in materials, and commonly drops load temperatures by around 8°C. If your card is 3+ years old and running hot, a repaste is almost always worth doing.
For which compound or pad to use on a graphics card, see the best thermal paste guide.
You just noticed your GPU fans are screaming louder than usual, and your temps in GPU-Z are 10°C higher than they were a year ago. Nothing’s changed in your case. Airflow is fine. The card isn’t dusty. The paste is the likely culprit. This guide covers everything you need to repaste a GPU correctly, pick the right thermal compound, and avoid the mistakes that make temperatures worse instead of better.

Does Your GPU Actually Have Thermal Paste?
Yes, every discrete GPU ships with factory-applied thermal paste. No exceptions. The paste sits between the GPU die (the main silicon chip on the PCB) and the cold plate on the bottom of the heatsink assembly.
Unlike CPUs, most GPUs don’t have an Integrated Heat Spreader. On a CPU, the paste goes between the IHS and the cooler’s contact plate. On a GPU, paste goes directly die-to-cold plate, with nothing in between. That bare die is more sensitive to uneven paste application and pressure, which is why technique matters.
Some GPUs have had well-documented factory cooling defects, though not all of them are paste-related. The AMD RX 7900 XTX reference card is a notable example: some units shipped with hotspot temperatures hitting 110°C under load. AMD confirmed the cause was insufficient coolant fluid inside the vapor chamber itself, not the thermal interface material, and replaced affected units rather than recommending a repaste, since the defect sits inside the sealed vapor chamber rather than at the die-to-cold-plate interface.
One more thing: thermal paste isn’t the only interface material in your GPU. Thermal pads cover the VRAM modules and VRM components on the same card. They’re different from paste and serve a different purpose. More on that in the next section.
Why Repasting Your GPU Actually Matters
Factory Paste: The Problem
Most add-in board (AIB) manufacturers apply budget silicone-based paste at the factory. It’s functional when new, but silicone-based compounds degrade faster than premium alternatives. After 3–5 years of heat cycling, that paste dries out, develops micro-cracks, and loses contact with parts of the die. Air pockets form. Thermal resistance climbs. Your GPU runs hotter, fans spin faster, and the chip has less thermal headroom to boost.
This isn’t theoretical. Factory paste degradation is one of the most consistent causes of gradual GPU temperature increases in aging cards, and it’s entirely fixable for the cost of a $10 tube of paste.
Real-World Temperature Gains
The numbers below come from community testing and documented results across multiple GPU models. Results vary based on cooler design, ambient temperature, and how badly the original paste degraded, but the trend is consistent.
| GPU Model | Stock Temp (°C) | After Repaste (°C) | Delta | Note |
|---|---|---|---|---|
| RTX 3080 (Founders Edition) | 83°C load | 75°C load | -8°C | Common community result |
| RTX 2080 Ti | 87°C load | 79°C load | -8°C | Aged 4+ years |
| RX 6800 XT | 85°C load | 77°C load | -8°C | Stock paste fully dried |
| GTX 1080 Ti (3yr+) | 88°C load | 80°C load | -8°C | Verified user data |
Lower temperatures also mean more thermal headroom for your GPU’s boost clock algorithm. Modern cards like the RTX 4080, RTX 5080, and RX 9070 XT all use aggressive thermal-based boost behavior. A cooler GPU sustains higher clocks longer. That’s a real performance benefit, not just a noise reduction.
- 30°C = 86°F (normal idle)
- 50°C = 122°F (warm idle / light load)
- 70°C = 158°F (normal gaming load)
- 80°C = 176°F (acceptable gaming load)
- 85°C = 185°F (getting warm, monitor closely)
- 90°C = 194°F (hot, repaste recommended)
- 95°C = 203°F (AMD hotspot limit)
- 105°C = 221°F (action required)
- 110°C = 230°F (throttling territory)
Formula: °F = (°C × 1.8) + 32.
GPU Thermal Paste vs. Thermal Pads: What’s the Difference?

Thermal Paste
Thermal paste is a semi-liquid compound applied to the main GPU die. Its job is to fill the microscopic surface imperfections between the die and the cold plate so heat transfers efficiently across the entire contact surface. It’s the material most people mean when they say “repasting.” Paste needs replacement every 3–5 years depending on the compound type and thermal cycling frequency. For guidance on application technique that applies equally to GPUs and CPUs, the article on how to apply thermal paste the right way covers the process in detail.
GPU Thermal Pads
Thermal pads are solid or semi-rigid sheets applied to VRAM chips, VRM components, and inductors on the GPU PCB. They fill the larger, more consistent gap between those flat components and the heatsink fins or backplate above them. Getting the thickness wrong is a real problem. Too thin and you don’t have proper contact. Too thick and you apply excessive pressure that can crack delicate components or prevent the heatsink from seating flush.
Before removing any thermal pads, photograph everything and measure pad thickness with calipers. That’s the most common repasting mistake. Many builders replace the paste, wonder why temps are still high, and find out later they installed 1.5mm pads where 1.0mm pads should have been.
Replace thermal pads alongside paste on any GPU older than 4–5 years. Gelid GP-Extreme and Thermalright Odyssey are the two most consistently recommended options in the PC building community.
| Property | Thermal Paste | Thermal Pads |
|---|---|---|
| Applied to | GPU die | VRAM, VRM, inductors |
| Consistency | Semi-liquid | Solid/semirigid sheet |
| Replace interval | 3–5 years | 5–7 years (or as needed) |
| DIY difficulty | Easy | Moderate (sizing matters) |
| Top products | Kryonaut, MX-6 | Gelid GP-Extreme, Thermalright Odyssey |
Best Thermal Paste for a GPU: Top Picks Compared
The best choice depends on your budget and how comfortable you are with the risks of each compound type. For most people, a non-conductive paste in the 12–13 W/m·K range is all you’ll ever need.

| Product | Conductivity | Type | Ease of Use | Best For | Price (approx) |
|---|---|---|---|---|---|
| Thermal Grizzly Kryonaut | 12.5 W/m·K | Non-conductive | Easy | Most users, daily driver | ~$10 |
| Thermal Grizzly Kryonaut Extreme | 14.2 W/m·K | Non-conductive | Easy | Overclocking, extreme cooling | ~$15 |
| Arctic MX-6 | 12.6 W/m·K | Non-conductive | Very Easy | Budget pick, beginners | ~$9 |
| Arctic MX-4 | 8.5 W/m·K | Non-conductive | Very Easy | Casual users | ~$7 |
| Arctic Silver 5 | 8.9 W/m·K | Silver-based | Moderate | Budget, DIY veterans | ~$7 |
| Thermal Grizzly Conductonaut | 73 W/m·K | Liquid metal | Advanced | Max performance, experts only | ~$14 |
According to community benchmarking data compiled by igor’s Lab’s thermal paste database, the gap between a premium paste like Kryonaut and a mid-tier option like MX-4 typically measures 2–4°C in real-world GPU tests. That’s meaningful but not dramatic. The bigger jump comes from replacing severely degraded factory paste with anything fresh. It’s thicker than MX-4, requires a bit more effort to spread evenly, but it performs well and costs almost nothing. For the article on choosing paste for CPUs (which applies equally here), see our guide on the best thermal paste for CPUs.
A Note on Liquid Metal for GPUs
Liquid metal (primarily gallium-based, like Thermal Grizzly Conductonaut) delivers dramatically better conductivity: 73 W/m·K versus roughly 12 W/m·K for standard paste. The performance gains are real. Not great for most people, though.
The risks are significant. Liquid metal is electrically conductive. Any overflow onto bare PCB traces or SMD components permanently damages the card. It also causes galvanic corrosion on aluminum heatsinks, which rules out a large portion of budget and mid-range GPU coolers. Use liquid metal on GPUs only if you’re experienced, you’ve confirmed the heatsink is copper or nickel-plated, and you’re prepared for the consequences of a mistake.
What Reddit’s GPU Community Actually Recommends
Across r/buildapc, r/hardware, and r/nvidia, the consensus is consistent: Arctic MX-6 and Thermal Grizzly Kryonaut are the two most recommended pastes for GPU repasting. MX-4 is still praised for its thin consistency, which makes it forgiving on first attempts. Avoid no-name pastes from Amazon and the generic white paste bundled with aftermarket coolers. Those compounds are often low-conductivity filler compounds that outperform dried factory paste but not by much.
How to Repaste a GPU: Step-by-Step

This process works for desktop GPUs from any generation, including RTX 30/40/50 series and RX 6000/7000/9000 series cards. Gather everything before you start.
Tools you need:
- Isopropyl alcohol: 90%+ concentration (99% preferred)
- Lint-free cloth or coffee filters: for cleaning the die and cold plate
- Thermal paste: your compound of choice from the table above
- Plastic spudger or guitar pick: for safely separating heatsink from PCB
- JIS/Phillips screwdriver set: JIS is critical for Japanese-manufactured cards (most ASUS, MSI)
- Anti-static wrist strap: recommended, especially for high-end cards
- Smartphone: for documenting screw positions and pad placement before disassembly
Step 1: Safety First
Power down your system completely and unplug the power cable from the wall. Don’t just shut down. Unplug it. Ground yourself with an anti-static wrist strap clipped to the bare metal of your case, or touch a grounded metal object before handling the card.
Warranty warning: Disassembling your GPU cooler typically voids the manufacturer warranty. If your card is under 3 years old and running hot enough to warrant repasting, contact the manufacturer about a potential RMA before opening it yourself. Check your specific warranty terms first.
Step 2: Remove the GPU and Disassemble the Cooler
Remove the GPU from its PCIe x16 slot. Before you touch a single screw, photograph the entire card from multiple angles. Document where every screw is, what length it is, and where every thermal pad sits. This takes two minutes and saves hours of frustration during reassembly.
Remove backplate screws first, then the heatsink mounting screws. Loosen screws in a cross-pattern (like you’re tightening lug nuts on a car wheel) to distribute pressure evenly. Never loosen one corner completely before the others. Uneven pressure can crack the GPU die. Use your plastic spudger to gently separate the heatsink if it’s stuck from old paste.
Step 3: Clean Off Old Thermal Paste
Apply 90%+ IPA to your lint-free cloth. Never apply liquid directly to the die. Clean the GPU die and cold plate contact surface with light circular motions. Do multiple passes. You want zero residue. Old paste can look deceptively clean but leave an invisible film that reduces contact quality.
Allow both surfaces to dry completely before applying new paste. Thirty to sixty seconds is usually enough at room temperature.
Step 4: Apply New Thermal Paste
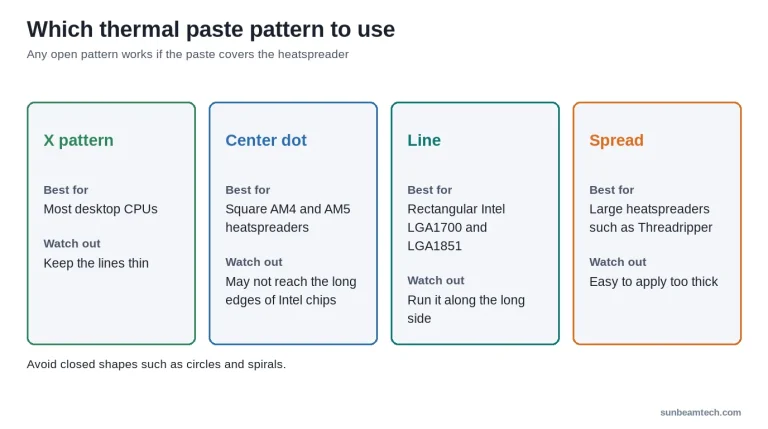
The recommended application method for most GPU dies is a centered pea-sized dot, approximately 4mm in diameter. That’s it. One dot, center of the die. The mounting pressure from the heatsink spreads it evenly across the contact surface.
Don’t use an X pattern or a line pattern on standard GPU dies. Most GPU dies are nearly square and a single centered dot spreads more evenly than other patterns. The exception: very large dies like the AD102 on the RTX 4090 or the GB202 on the RTX 5090. On those large dies, a two-dot or cross pattern provides better coverage. More paste isn’t better. Overflow onto bare PCB components is a real risk and a real nightmare to clean up. Apply from center outward and let the heatsink do the spreading.
Step 5: Reassemble and Test
Reattach the heatsink carefully, aligning mounting holes before any screws go in. Tighten in the same cross pattern you used to loosen. Don’t overtighten. Finger-tight plus a quarter turn is usually sufficient for GPU heatsink screws.
Reinstall the GPU in your system, power on, and run a stress test for 10–15 minutes. FurMark, 3DMark’s stress test loop, or a demanding game at max settings all work. Monitor temperatures with GPU-Z or MSI Afterburner. Target load temperatures after repasting: below 80°C junction for most modern GPUs. For a full breakdown of what normal looks like, see our guide on normal GPU temp ranges by load type.
GPU Thermal Paste for Laptops: Special Considerations
Laptop GPU repasting is more involved than desktop repasting, but the thermal gains are often even larger. Many gaming laptops are notorious for poor factory paste jobs, and thermal throttling after 2–3 years is common on ASUS ROG and MSI gaming lines.
Key differences from desktop repasting:
- Shared vapor chamber: Most laptop GPUs and CPUs share a single vapor chamber or heat pipe assembly. Repaste both chips at the same time while you have it apart. It’s the same job.
- Smaller screws: JIS screwdrivers aren’t optional here. Standard Phillips will strip laptop screws.
- Thin thermal pads: Laptop VRAM pads are often 0.5mm thick. Order replacements before you start. They tear easily and the correct thickness matters more in the tighter tolerances of a laptop chassis.
- Smaller die, smaller dot: Some laptop GPU dies are tiny. A 2–3mm dot is enough. Scale your application to the die size.
- Liquid metal on laptops: Popular among enthusiasts for good reason. Drops like 10–20°C are documented on many gaming laptops. Some manufacturers, including Framework, officially support liquid metal application. Most don’t. Proceed with caution and verify your heatsink material before using any gallium-based compound.
GPU Thermal Paste Lifespan: When Should You Repaste?
Signs It’s Time to Repaste
- Temperature creep: GPU load temps have risen 5–10°C+ from your documented baseline
- Fan behavior change: Fans spinning higher than normal under identical workloads
- Age + heavy use: Card is 3+ years old and has seen daily gaming sessions
- Thermal throttling: Clock speeds dropping under sustained load where they didn’t before
- Visible degradation: If you’ve ever had the cooler off, dried or cracked paste is obvious
Repaste Intervals by Use Case
| Use Case | Recommended Interval |
|---|---|
| Light gaming / casual | Every 5–6 years |
| Heavy gaming (daily) | Every 3–4 years |
| Overclocking / 24/7 load | Every 2–3 years |
| Mining rigs | Every 12–18 months |
| Laptops | Every 2–3 years |
GPU Thermal Paste Change: Common Mistakes to Avoid
- Too much paste: Overflow onto PCB traces or capacitors is a real risk. A pea-sized dot is the maximum.
- Too little paste: Creates hotspots where die and cold plate don’t make contact. Don’t go smaller than 3mm.
- Skipping surface prep: Applying new paste over residue from the old compound kills performance. Clean both surfaces completely.
- Ignoring thermal pads: Replaced the paste and still running hot? Check the pads. This is the most overlooked step.
- Wrong thermal pad thickness: Too thick prevents the heatsink from seating properly. Too thin loses contact. Measure before ordering replacements.
- Cross-threading screws: Take your time. Feel for thread engagement before applying torque.
- Skipping the stress test: Always verify temps after reassembly. Catching a seating problem immediately is far better than discovering it after reinstalling everything.
- No photo documentation: One photo before disassembly has saved countless builds. Take several.
- Using electrically conductive paste on a GPU: Silver-based paste near the die edge is generally fine since the die has a raised surface. Liquid metal near bare PCB traces is not fine.
According to Arctic’s technical documentation for MX-6, the paste achieves full performance immediately after application with no burn-in period required. That’s worth knowing: you don’t need to run any “curing” period like some older silver-based compounds required before getting accurate temperature readings.
FAQ: GPU Thermal Paste Questions Answered
Does replacing GPU thermal paste void the warranty?
Yes, in most cases. Disassembling the GPU cooler to access the die is considered user modification by virtually every AIB manufacturer, including ASUS, MSI, Gigabyte, and Sapphire. EVGA was historically more lenient before leaving the GPU market. As a general rule, wait until your warranty expires (typically 3 years) before repasting, unless temperatures are critically high and the manufacturer won’t address it through RMA. If your card is throttling severely within warranty, push for an RMA first.
How much does GPU thermal paste replacement cost?
DIY cost runs $7–$15 for a quality paste, plus a screwdriver set if you don’t own one (roughly $15–$25 total for the full kit). A professional PC repair shop will charge $30–$80 depending on labor rates in your area. If you’re comfortable handling hardware, the DIY route is straightforward and saves real money. Not complicated.
Can I use CPU thermal paste on a GPU?
Absolutely. Thermal paste formulations work identically whether you apply them to a CPU or GPU. The same tube of Kryonaut, MX-6, or Arctic Silver 5 works for both applications without any performance penalty. Despite marketing language on some products suggesting “GPU-specific” chemistry, there’s no meaningful difference in how paste compounds behave based on whether they’re sitting on a CPU IHS or a GPU die. Buy what performs well. Use it everywhere.
What temperature should my GPU run at after repasting?
Under gaming load, 70–80°C is healthy for most modern GPUs including RTX 30/40/50 series and RX 6000/7000/9000 series cards. AMD GPUs report hotspot temperatures separately from average junction temps; hotspot readings up to 95°C are normal and expected. Above 105°C hotspot warrants action. Idle temps of 30–50°C are normal. If your temps are still elevated after repasting, check thermal pad thickness and verify your case has adequate airflow. GPU-Z and MSI Afterburner both give you accurate per-sensor readouts during stress testing.
Is GPU thermal paste the same as GPU thermal pads?
No. Paste is a semi-liquid compound applied to the main GPU die to fill microscopic surface imperfections. Thermal pads are solid sheets applied to VRAM chips and VRM components to fill larger gaps between those components and the heatsink structure above them. Both degrade over time. Both should be replaced when you’re doing a full repaste on an aging card. Replacing only the paste on a 5-year-old card and leaving degraded pads in place will leave thermal performance on the table. Check the Thermal Grizzly product pages for detailed specs on both paste and pad options if you’re comparing materials before purchasing.
What You Should Do
If your GPU is 3+ years old and temperatures have climbed noticeably, pick up a tube of Arctic MX-6 or Thermal Grizzly Kryonaut, grab a JIS screwdriver set, and set aside an hour. The process isn’t difficult, the materials cost less than $20, and around an 8°C temperature drop is a realistic outcome on most aging cards. Document everything before disassembly, clean both surfaces thoroughly, apply a small centered dot of paste, and stress-test after reassembly. That’s the entire job. For a card that’s running hot, there’s no easier fix with a better return.

Alex has been building and tweaking custom PCs for over 12 years. From budget builds to full custom water loops, he’s assembled more than 50 systems and helped hundreds of builders troubleshoot their rigs. When he’s not benchmarking the latest hardware, you’ll find him optimizing airflow setups or stress-testing overclocks.