How to Remove and Clean Off Old Thermal Paste
Thermal paste removal is the process of safely stripping degraded thermal interface material from a CPU heat spreader and cooler base using isopropyl alcohol (IPA) at 90% or higher concentration before reapplication.
Last updated: June 2026
Table of Contents
- Quick Answer: How Do You Remove Thermal Paste from a CPU?
- When Should You Remove Thermal Paste? Signs It’s Time
- Temperature Thresholds That Signal Degraded Paste
- Other Signs Your Thermal Paste Needs Replacing
- What You’ll Need: Tools and Materials
- Recommended Cleaning Agents (Ranked Best to Worst)
- Physical Tools Needed
- How to Identify Your Thermal Paste Type Before Cleaning
- Why Paste Type Affects Removal Method
- How to Remove Thermal Paste: Step-by-Step Guide
- Step 1: Power Down and Prepare Your Workspace
- Step 2: Remove the CPU Cooler
- Step 3: Dry Wipe First
- Step 4: Apply Isopropyl Alcohol and Wipe the CPU
- Step 5: Clean the Cooler Base
- Step 6: Cleaning Thermal Paste Off the Motherboard (Accidental Spills)
- Step 7: Final Inspection and Drying Time
- How to Remove Thermal Paste Without Isopropyl Alcohol
- Removing Thermal Paste from Other Surfaces
- How to Remove Thermal Paste from Your Hands
- How to Remove Thermal Paste from Clothes
- After Cleaning: Reapplying Thermal Paste
- FAQ: Thermal Paste Removal Questions Answered
- Can I use toilet paper to remove thermal paste?
- Is 70% isopropyl alcohol safe for cleaning thermal paste?
- How often should I remove and replace thermal paste?
- Can I remove thermal paste without removing the CPU from the socket?
- What happens if thermal paste gets on the motherboard?
- The Bottom Line
Quick Answer: How Do You Remove Thermal Paste from a CPU?
Dampen a lint-free cloth with 90%+ isopropyl alcohol, then wipe the CPU heat spreader in circular motions until the surface is clean and residue-free. Do a dry wipe first to pull off the bulk of old paste, then follow with the IPA wipe for the remaining film. The whole process takes about 10 minutes and requires almost no special tools. Let the surface fully dry (30–60 seconds with 90%+ IPA) before applying fresh paste.
Old thermal paste dries out, cracks, and loses thermal conductivity. When that happens, CPU temperatures can climb 10°C–20°C above your normal baseline, which pushes modern chips into thermal throttle territory. According to the team at Tom’s Hardware, the correct approach is gentle wiping with isopropyl alcohol and a lint-free cloth, without applying heavy pressure, and warming a stuck cooler with brief power-on time or a hair dryer before attempting a cold pull. This guide covers the CPU lid, cooler base, and what to do if paste lands on the motherboard. If you want to know how often you actually need to do this, our guide on thermal paste replacement schedules has the full breakdown by paste type and usage pattern.
- 🟢 IPA 90%–99%: Best choice. Fast evaporation, safe on PCB, excellent solvent action.
- 🟢 ArctiClean / thermal remover wipes: Pre-made solution, great IPA alternative.
- 🟡 IPA 70%: Works in a pinch. Wait 2–4 minutes before reapplying paste.
- 🟡 Coffee filter (dry only): Better than toilet paper for a lint-free dry wipe, but leaves residue without solvent.
- 🔴 Acetone: Damages plastic clips and some PCB coatings. Not recommended.
- 🔴 Water, WD-40, hand sanitizer, screen cleaner: None of these. Ever.
When Should You Remove Thermal Paste? Signs It’s Time
Most people only think about this when something breaks. Don’t be that person. Catching degraded paste early means you fix a temperature problem before it becomes a throttling problem or worse.
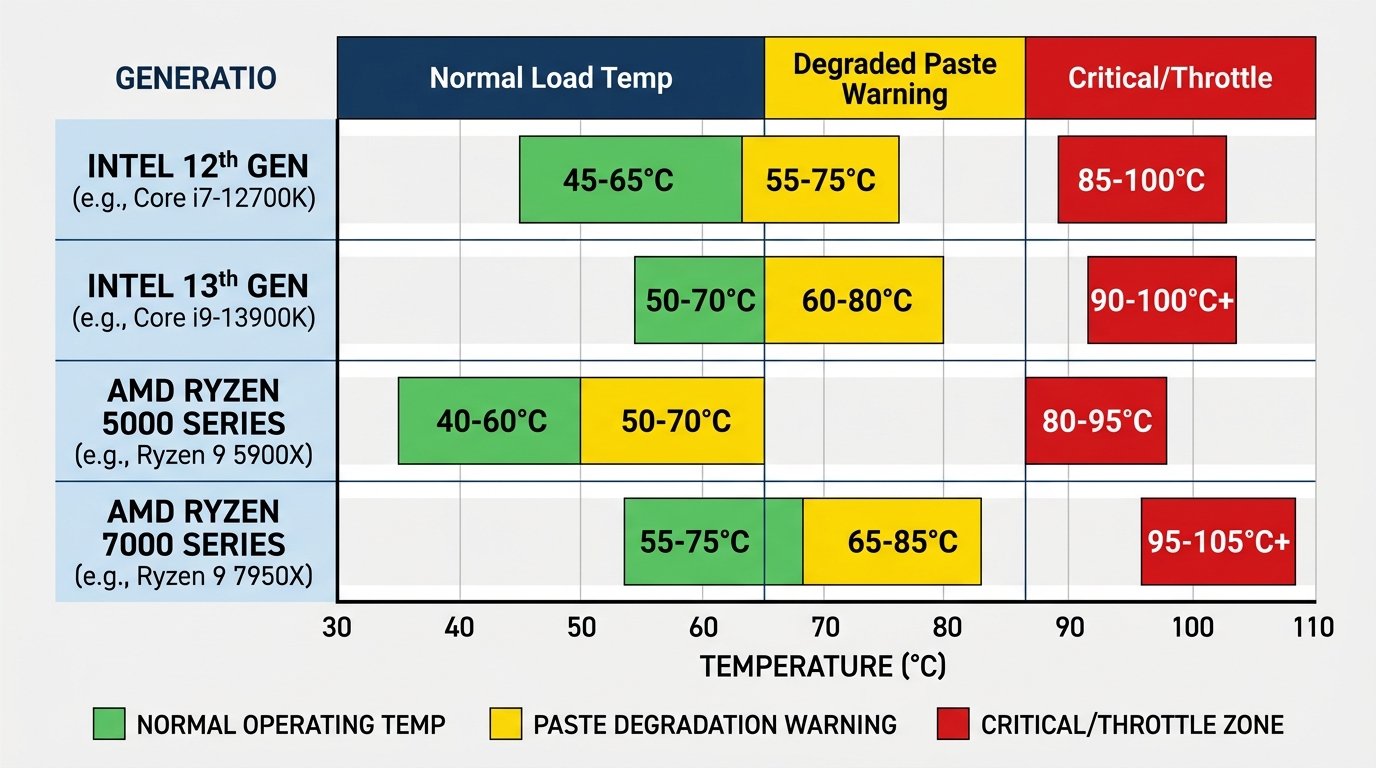
Temperature Thresholds That Signal Degraded Paste
Monitor with HWiNFO64, HWMonitor, or Ryzen Master. If your load temps have crept up by 10°C or more compared to when you first built the system, degraded paste is a likely cause. Use this table as a reference.
| CPU Generation | Normal Load Temp | Degraded Paste Warning | Critical / Throttle |
|---|---|---|---|
| Intel 13th/14th Gen (i9, i7) | 75–85°C | 90–95°C | 100°C (throttle) |
| Intel 15th Gen Core Ultra 200 (Arrow Lake) | 65–75°C | 82–88°C | 105°C (throttle) |
| Intel 12th Gen (i5/i7) | 65–80°C | 88–92°C | 100°C (throttle) |
| AMD Ryzen 9000 / 9000X3D (Zen 5) | 68–83°C | 90–95°C | 95°C (boost ceiling) |
| AMD Ryzen 7000 (non-X3D, Zen 4) | 70–85°C | 90–95°C | 95°C (boost ceiling) |
| AMD Ryzen 7000X3D (Zen 4) | 65–82°C | 83–88°C | 89°C (boost ceiling) |
| AMD Ryzen 5000 (Zen 3) | 65–80°C | 88–92°C | 90°C+ (throttle) |
Important Ryzen 7000/9000 note: Most Ryzen 7000 (non-X3D) and all Ryzen 9000/9000X3D chips are designed to run right up to 95°C during boost. That’s normal behavior, not a problem. The exception is Ryzen 7000X3D (7800X3D, 7900X3D, 7950X3D), which has a lower 89°C boost ceiling because of the stacked 3D V-Cache die. If you’re seeing sustained temps at or above your chip’s boost ceiling under light loads, or if temps have climbed from a previous baseline, that’s when paste is worth investigating. If you want to understand what “normal” looks like in more detail, our guide to good CPU temperature ranges by use case breaks it down by workload and generation.
- 65°C = 149°F
- 70°C = 158°F
- 75°C = 167°F
- 80°C = 176°F
- 85°C = 185°F
- 90°C = 194°F
- 95°C = 203°F
- 100°C = 212°F
Formula: °F = (°C × 1.8) + 32.
Other Signs Your Thermal Paste Needs Replacing
Temperature creep is the main signal, but there are a few others worth watching.
- Visible cracking or separation: If you remove the cooler and the paste looks like dried mud with cracks, it’s done.
- Pump-out: Paste squeezed out beyond the CPU lid edges, leaving a thin or absent center layer, common under heavy vibration or repeated heat cycling.
- Age alone: Quality aftermarket pastes like Arctic MX-6 or Thermal Grizzly Kryonaut last 3–5 years. Pre-applied OEM grey paste on stock coolers can degrade in 1–2 years under regular gaming or rendering loads.
- Any cooler removal: Always replace paste after removing a cooler, even briefly. Displaced paste is never worth reusing.
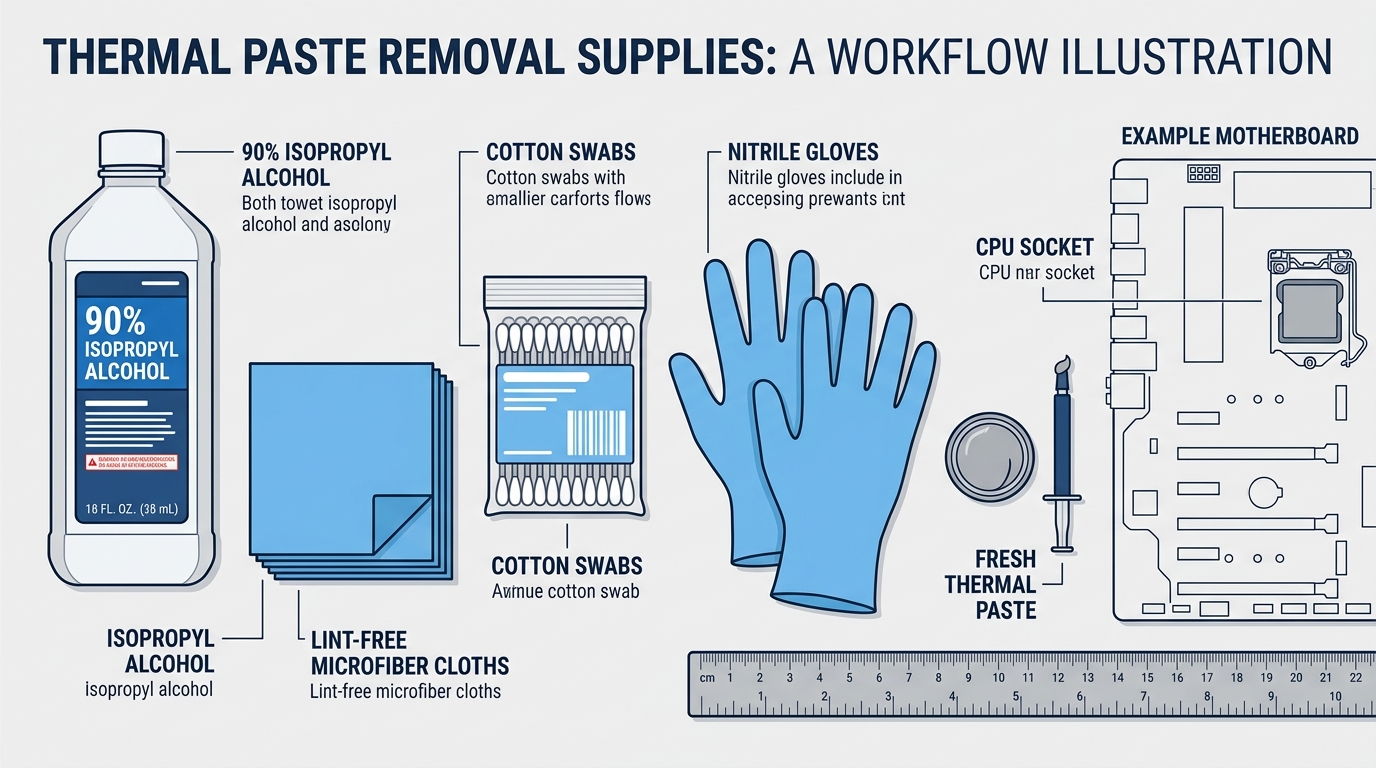
What You’ll Need: Tools and Materials
Recommended Cleaning Agents (Ranked Best to Worst)
| Cleaning Agent | Purity Needed | Dry Time | Safe for PCB? | Rating |
|---|---|---|---|---|
| Isopropyl Alcohol (IPA) | 90%+ (99% ideal) | 15–60 seconds | Yes (careful) | ⭐⭐⭐⭐⭐ |
| ArctiClean / Thermal Remover Wipes | Pre-made solution | 60–90 seconds | Yes | ⭐⭐⭐⭐⭐ |
| IPA 70% | 70% | 2–4 minutes | Caution | ⭐⭐⭐ |
| Acetone (nail polish remover) | N/A | Fast | No | ⭐ |
| Distilled Water | N/A | Very slow | No | ⭐ |
| WD-40 / household cleaners | N/A | N/A | No | ❌ |
The reason 90%–99% IPA outperforms 70% comes down to water content. 70% IPA is roughly 30% water. That water doesn’t evaporate quickly, which extends the time your components sit damp and marginally raises corrosion risk around surface-mount components. With 99% IPA, the water content drops to about 1%, and it evaporates off the CPU surface in 15–20 seconds at room temperature. Better solvent action, faster dry time, lower risk. Worth buying the right stuff.
Physical Tools Needed
- Lint-free cloths: First choice. Microfiber cloths and coffee filters both work well.
- Cotton swabs: For cleaning edges, corners, and around the CPU lid perimeter.
- Nitrile gloves: Optional for standard paste, but strongly recommended if you’re dealing with liquid metal (gallium-based) compounds, these are electrically conductive and you don’t want them on your skin or spreading.
- Anti-static mat or wrist strap: Use one whenever handling a bare CPU outside the socket.
- Soft plastic spudger: Only if you have genuinely baked-on chunks that won’t budge. Never use metal tools.
How to Identify Your Thermal Paste Type Before Cleaning
Why Paste Type Affects Removal Method
Not all thermal paste is the same, and the type you have on your CPU changes how careful you need to be during removal.
- Ceramic or carbon-based paste (Arctic MX-4, MX-6, Noctua NT-H1): The most common type. Not electrically conductive. Wipes off easily with IPA and a cloth. Low removal risk.
- Metal-based or silver paste (standard silver compounds): Slightly conductive. Keep it away from exposed SMD components on the motherboard. Gloves recommended.
- Liquid metal (Thermal Grizzly Conductonaut, Phobya Liquid Metal): Highly electrically conductive and gallium-based. This stuff can corrode aluminum heatsinks if left in contact. Never let it bridge any contacts or pads. Use extra care, work slowly with cotton swabs, and wear nitrile gloves. If any gets on the motherboard, treat it as critical.
- Pre-applied OEM grey paste (Intel and AMD stock coolers): Usually silicone-based. After years of use it dries out and becomes almost chalky. You may need a slightly wetter cloth and a bit more patience before it starts to lift.
- Phase-change pads (some OEM and laptop coolers): Don’t use IPA. These are solid at room temperature and simply peel off cleanly. No solvent needed.
The damage risk matrix below shows how each combination of paste type and cleaning tool stacks up.
| Paste Type | IPA 99% + Lint-free | IPA 70% + Cloth | Dry Wipe Only | Acetone |
|---|---|---|---|---|
| Ceramic / Carbon (MX-6, NT-H1) | 🟢 Safe | 🟢 Safe (wait longer) | 🟡 Leaves residue | 🔴 Damages clips |
| Silver / Metal-based | 🟢 Safe with gloves | 🟡 Extra dry time | 🔴 Residue risk | 🔴 Do not use |
| Liquid Metal (Conductonaut) | 🟡 Very careful, swabs | 🔴 Too slow to dry | 🔴 Spreads it | 🔴 Do not use |
| OEM Silicone (dried) | 🟢 Safe, wetter cloth | 🟡 Works slowly | 🔴 Won’t fully clean | 🔴 Do not use |
| Phase-change Pad | 🟡 Unnecessary | 🟡 Unnecessary | 🟢 Just peel it off | 🔴 Do not use |
How to Remove Thermal Paste: Step-by-Step Guide
Step 1: Power Down and Prepare Your Workspace
Full shutdown. Not sleep, not hibernate. Shut it down completely, then unplug the PSU cable from the wall. Hold the power button for 5 seconds to discharge any residual capacitor energy. Set up on a clean, non-conductive surface, and either clip on your anti-static wrist strap or ground yourself by touching the metal case frame before handling the CPU.
Step 2: Remove the CPU Cooler
How you do this depends on your cooler type.
- Intel stock push-pins: Twist each pin counter-clockwise, then pull up. All four must be unlocked before lifting.
- AMD AM5 screws (stock or aftermarket): Loosen the mounting screws in a diagonal alternating pattern, same as tightening but in reverse, to release pressure evenly.
- Tower coolers and AIOs: Remove the backplate mounting screws, again alternating diagonally to avoid uneven pressure on the socket.
If the cooler feels stuck: Don’t yank it. Paste can bond the cooler base to the IHS over time. Power the PC on for 5–10 minutes to soften the paste through heat, then shut down and try again with a gentle twisting motion.
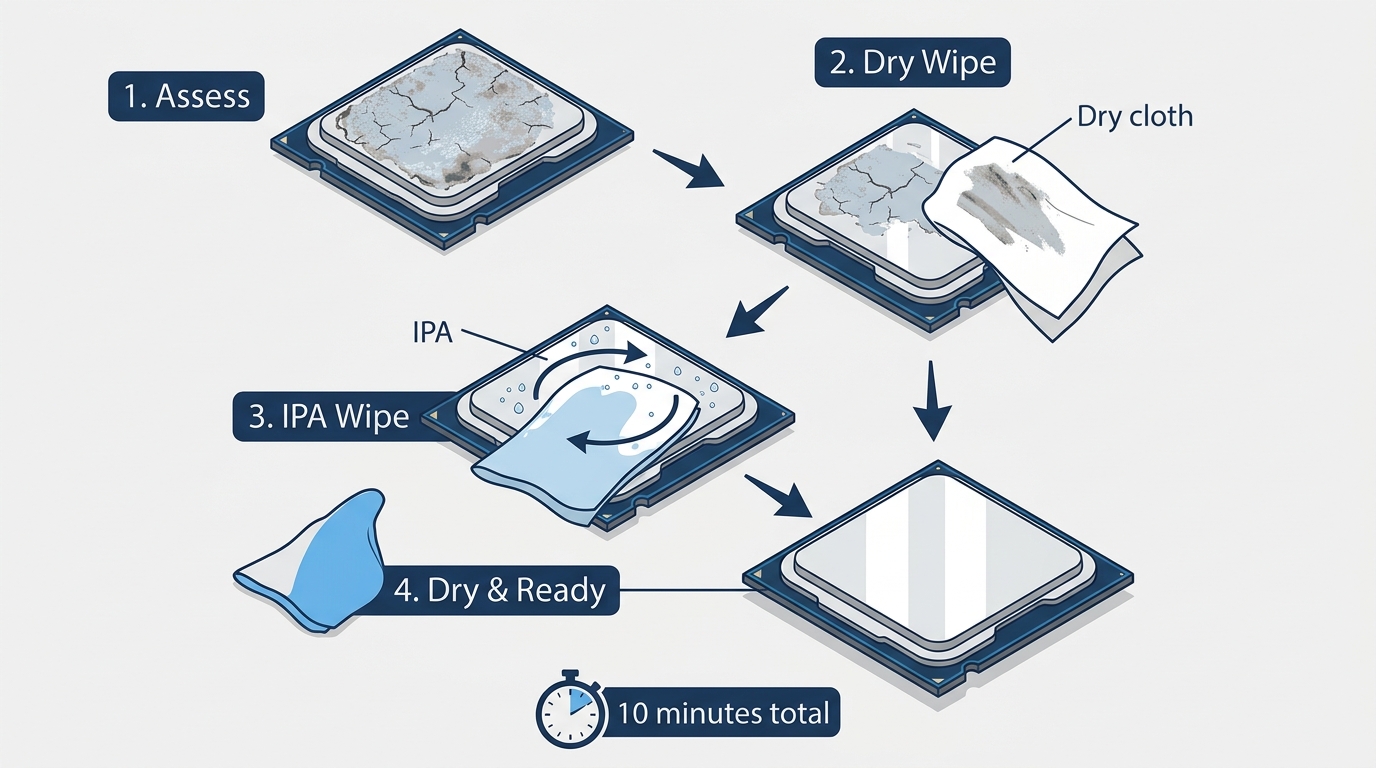
Step 3: Dry Wipe First
Before you touch the IPA, do a dry pass. Use a dry lint-free cloth to lift off the bulk of the paste. This matters because if you go straight to IPA, you’re dissolving a large amount of paste into liquid and risk smearing it into crevices or toward components. Remove as much as possible dry first, then use the solvent for the remaining film. Simple. Effective.
Step 4: Apply Isopropyl Alcohol and Wipe the CPU
Dampen a clean lint-free cloth with 90%+ IPA. Damp, not soaked. You don’t want liquid dripping off the cloth onto the motherboard. Wipe the CPU integrated heat spreader (IHS) in circular motions, which lifts residue rather than smearing it across the surface. Work from center outward. Switch to cotton swabs for the edges where the IHS meets the CPU package. Target result: a mirror-bright, uniformly clean surface with zero visible residue. If you hold the CPU up to a light and you can see any hazy spots, go again.
Step 5: Clean the Cooler Base
Same method: lint-free cloth with 90%+ IPA, circular motions, cotton swabs for edges. A couple of specifics worth knowing:
- Copper or nickel-plated cooler bases: Totally safe with IPA. Standard process.
- Aluminum cooler bases: IPA is fine, but don’t let any liquid metal residue sit on aluminum. Gallium-based paste corrodes aluminum fast.
- Direct-die or delidded CPUs: You’re cleaning bare silicon, which is fragile. Use minimal IPA and zero pressure. Let the solvent do the work.
Step 6: Cleaning Thermal Paste Off the Motherboard (Accidental Spills)
Act fast. Do not power on. If paste has landed on the motherboard, your first move is to stop everything and clean it before starting the system.
- Standard ceramic or carbon paste: Not electrically conductive, but still clean it thoroughly. Moisten a cotton swab with a minimal amount of IPA and work from the outer edge of the spill inward, never outward. You’re containing it, not spreading it.
- Liquid metal on the PCB: This is serious. Gallium-based paste is electrically conductive and can absorb into PCB pads and permanently bridge contacts. Power off immediately. Do not restart. Clean carefully with cotton swabs and IPA, working extremely slowly. If any got near SMD components or between pins, take the board to a professional before powering on.
Step 7: Final Inspection and Drying Time
Evaporation times by IPA concentration:
- 99% IPA: 15–20 seconds at room temperature.
- 90% IPA: 30–60 seconds.
- 70% IPA: 2–4 minutes. Wait the full time before touching the surface or applying new paste.
Hold the CPU at an angle under a bright light. You’re looking for any haze, smearing, or fibers. A properly cleaned IHS looks like a mirror. If it doesn’t, one more pass and check again.
How to Remove Thermal Paste Without Isopropyl Alcohol
IPA is the right tool. These are your options when you don’t have it.
Pre-made thermal remover wipes (ArctiClean, Thermal Grizzly Kryoclean): The best IPA alternative. These are formulated specifically for thermal interface materials and are safe on most surfaces. If you’re doing a planned maintenance session and want to skip sourcing IPA, these work great.
Dry wipe with no solvent: Acceptable for fresh, non-dried paste that hasn’t had time to bond or oxidize. Completely inadequate for paste that’s been on a chip for two or three years. You’ll pull off the surface layer and leave residue behind.
Acetone (nail polish remover): Works on metal surfaces but damages plastic retention brackets, some PCB surface coatings, and any plastic nearby. Not recommended even in an emergency.
70% IPA from a pharmacy: It works. The Reddit consensus and real-world experience both confirm this. Just be careful not to let it drip on the motherboard, and give it the full 2–4 minutes to evaporate before doing anything else. Not ideal, but not a disaster either.
What not to use under any circumstances: water, WD-40, cooking oil, hand sanitizer (contains glycerin and other additives that leave residue), or screen/lens cleaner (optical coatings contain different chemical formulations). None of these.
Removing Thermal Paste from Other Surfaces
How to Remove Thermal Paste from Your Hands
For ceramic or carbon-based paste, soap and warm water is usually enough. Rub, rinse, done. For liquid metal (gallium-based compounds), blot the excess with a paper towel first before washing. Rubbing gallium paste into skin spreads it further. IPA on skin is safe for a quick wipe-down if residue persists.
How to Remove Thermal Paste from Clothes
Don’t rub. Blot the excess with a dry cloth first. Apply dish soap or a laundry pre-treatment (Dawn works well) directly to the stain, then rinse with cold water. For stubborn staining, apply rubbing alcohol to the fabric and test on a hidden area first since some fabrics react poorly. One critical point: don’t put the item in the dryer before treating the stain. Heat sets silicone-based paste into fabric permanently. Treat it cold, verify it’s out, then dry.
After Cleaning: Reapplying Thermal Paste
Confirm both surfaces (CPU IHS and cooler base) are fully dry before applying new paste. With 90%+ IPA this means waiting about 60 seconds. With 70% IPA, wait at least 4 minutes and verify visually.
For most CPUs, a pea-sized center dot is the right method. The mounting pressure from the cooler spreads it evenly across the IHS. Large heat spreaders like AMD’s Threadripper or Intel’s HEDT chips benefit from an X pattern or cross, since the larger surface area means the center dot won’t reach the edges. Don’t apply new paste to the cooler base, always apply to the CPU lid only. And never reuse old paste scraped from the cooler.
FAQ: Thermal Paste Removal Questions Answered
Can I use toilet paper to remove thermal paste?
You can, but it’s not ideal. Toilet paper leaves lint particles on the CPU surface that can slightly insulate the contact between the IHS and cooler base. A coffee filter or lint-free cloth performs meaningfully better. If toilet paper is all you have, use it for the bulk dry wipe, then follow with a cotton swab dampened in IPA to catch leftover fibers before you call it clean.
Is 70% isopropyl alcohol safe for cleaning thermal paste?
It works, and plenty of builders have used it without issues. The trade-off is that 70% IPA contains roughly 30% water, which extends evaporation time to 2–4 minutes and marginally raises corrosion risk near SMD components compared to 90%+ IPA. If 70% is what you have, use it carefully, keep it off the motherboard surface, and wait the full 4 minutes before reapplying paste or reinstalling the cooler.
How often should I remove and replace thermal paste?
Quality aftermarket pastes like Arctic MX-6 or Thermal Grizzly Kryonaut are good for 3–5 years under normal conditions. Pre-applied OEM pastes on stock coolers tend to degrade faster, consider replacing after 1–2 years of heavy use, or any time your load temps have risen more than 10°C from your original baseline. You should also replace paste any time you remove the cooler for any reason, even briefly. For a full breakdown by paste type, see our guide on how often to replace thermal paste.
Can I remove thermal paste without removing the CPU from the socket?
Yes. You don’t need to pull the CPU from the motherboard to clean the IHS. Remove the cooler, clean the lid and cooler base in place, reapply, and reinstall. Only remove the CPU itself if paste has somehow entered the socket area around the pins or pads, which is uncommon with standard application methods.
What happens if thermal paste gets on the motherboard?
Standard ceramic or carbon-based paste is not electrically conductive, so it doesn’t immediately short anything, but it should still be cleaned off promptly before powering on. Liquid metal paste is a different situation entirely. It’s electrically conductive and can permanently short components or absorb into PCB contact pads if it bridges any connections. If liquid metal contacts the motherboard, power off immediately, don’t restart, and clean carefully with IPA and cotton swabs before attempting to turn the system on. If you’re uncertain whether any bridging occurred, treat it as a serious situation and get professional eyes on it. Liquid metal on PCB is one of the few thermal paste scenarios that can actually kill a board.
The Bottom Line
This whole process takes 10–15 minutes and costs almost nothing beyond a bottle of 90%+ IPA. It’s one of the highest-value maintenance tasks in PC building because the payoff, dropping your CPU temps by 10°C–20°C, is immediate and measurable. Use the right solvent, do a dry wipe first, work in circular motions, and let everything dry completely before applying fresh paste. If your temperatures have been creeping up or it’s been more than three years since your last paste job, today is a good day to fix it. Check your temps in HWiNFO64 before and after, and you’ll likely see the difference on the first stress test.

Alex has been building and tweaking custom PCs for over 12 years. From budget builds to full custom water loops, he’s assembled more than 50 systems and helped hundreds of builders troubleshoot their rigs. When he’s not benchmarking the latest hardware, you’ll find him optimizing airflow setups or stress-testing overclocks.