USB Header Splitters and Adapters: Add More Ports
A USB header splitter is an internal cable that connects to one USB header on a motherboard and breaks it into two or more identical headers, letting multiple devices share a single connection.
Last updated: August 2026
Table of Contents
- Quick Answer: What Is a USB Header Splitter?
- What Is a USB Header Splitter (And How Does It Work)?
- The Physical Connection Explained
- Passive vs. Active Splitters: What’s the Difference?
- USB Header Types and Compatibility: Know Before You Buy
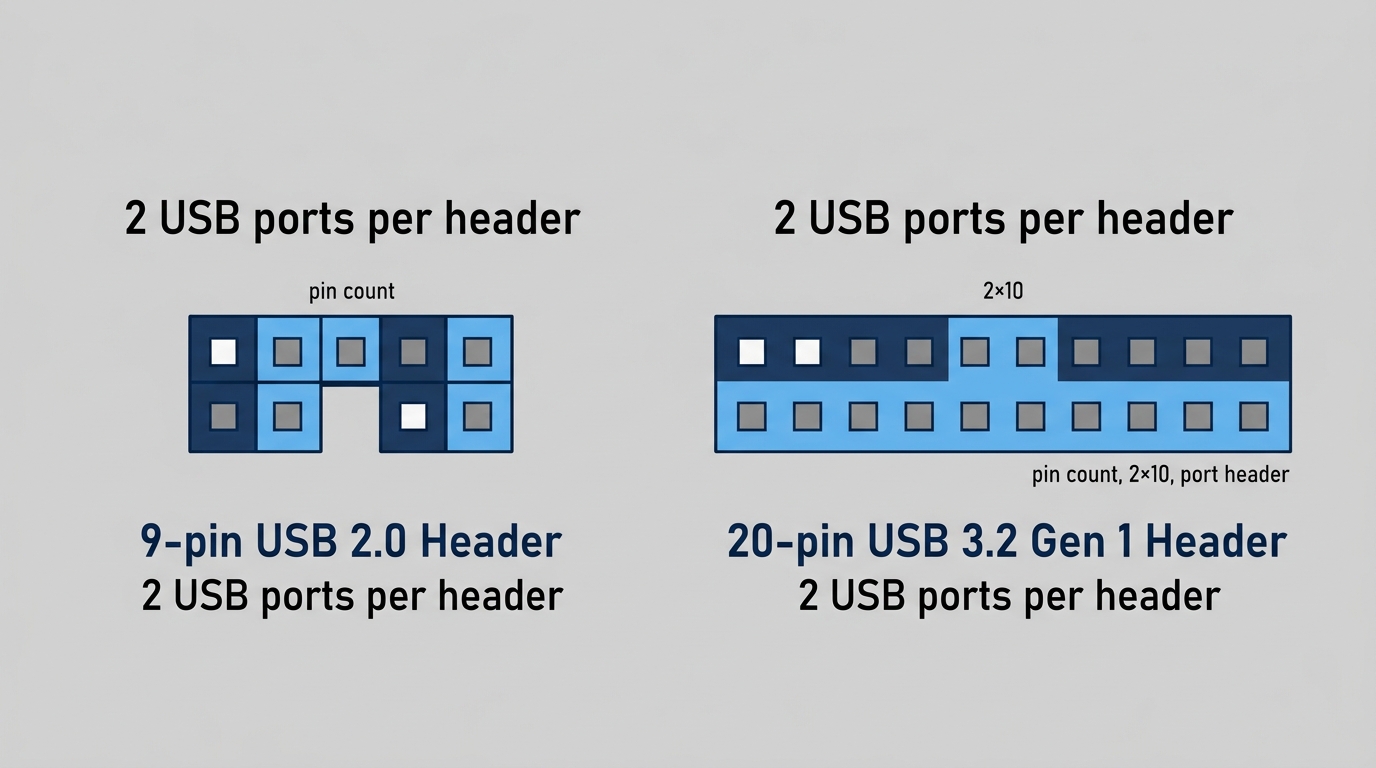
- USB 2.0 Headers (9-Pin)
- USB 3.2 Gen 1 Headers (19-Pin)
- USB 3.2 Gen 2 Headers (20-Pin, Type-C Variant)
- USB Header Adapter Types: Bridging the Generation Gap
- USB 2.0 to USB 3.2 Gen 1 Header Adapters
- USB 3.2 Gen 1 to USB 3.2 Gen 2 Header Adapters
- Can You Split a USB Header? Bandwidth and Power Limits Explained
- Yes, But There Are Hard Limits
- Bandwidth Sharing Math
- Power Budget: The Number Most Guides Skip
- When to Skip the Splitter: Better Alternatives
- PCIe USB Expansion Cards
- USB-A Hub via Rear I/O
- Upgrading the Motherboard
- Top USB Header Splitter Picks by Use Case
- How to Install a USB Header Splitter
- Step-by-Step Installation
- FAQ: USB Header Splitters
- Can I split a USB header?
- How many times can you split a USB header?
- Will a USB header splitter slow down my devices?
- Is a USB 2.0 to USB 3.2 Gen 1 header adapter worth buying?
- Do USB header splitters work with all motherboards?
- What You Should Do
Quick Answer: What Is a USB Header Splitter?
A USB header splitter plugs into one of your motherboard’s internal USB headers (either a 9-pin USB 2.0 or 19-pin USB 3.2 Gen 1 connector) and outputs two or more identical sockets. This lets you connect additional front-panel ports or internal controllers without needing extra headers on the board. Bandwidth and power are shared across all connected devices, so what you gain in port count you trade against available throughput per connection.
You just finished wiring up your new mid-tower and you’re already one USB header short. The front panel has a USB 3.0 cable, an RGB controller cable, and a fan hub cable, but your motherboard only has two USB 2.0 headers and one Gen 1 header. It’s a frustrating and increasingly common situation. Modern cases ship with two or three internal USB connections, but even current mid-range boards from AMD and Intel often don’t have enough headers to match. This guide covers every type of splitter and adapter available, what the bandwidth and power limits actually mean in practice, and when buying a splitter is the wrong call entirely.
What Is a USB Header Splitter (And How Does It Work)?
The Physical Connection Explained
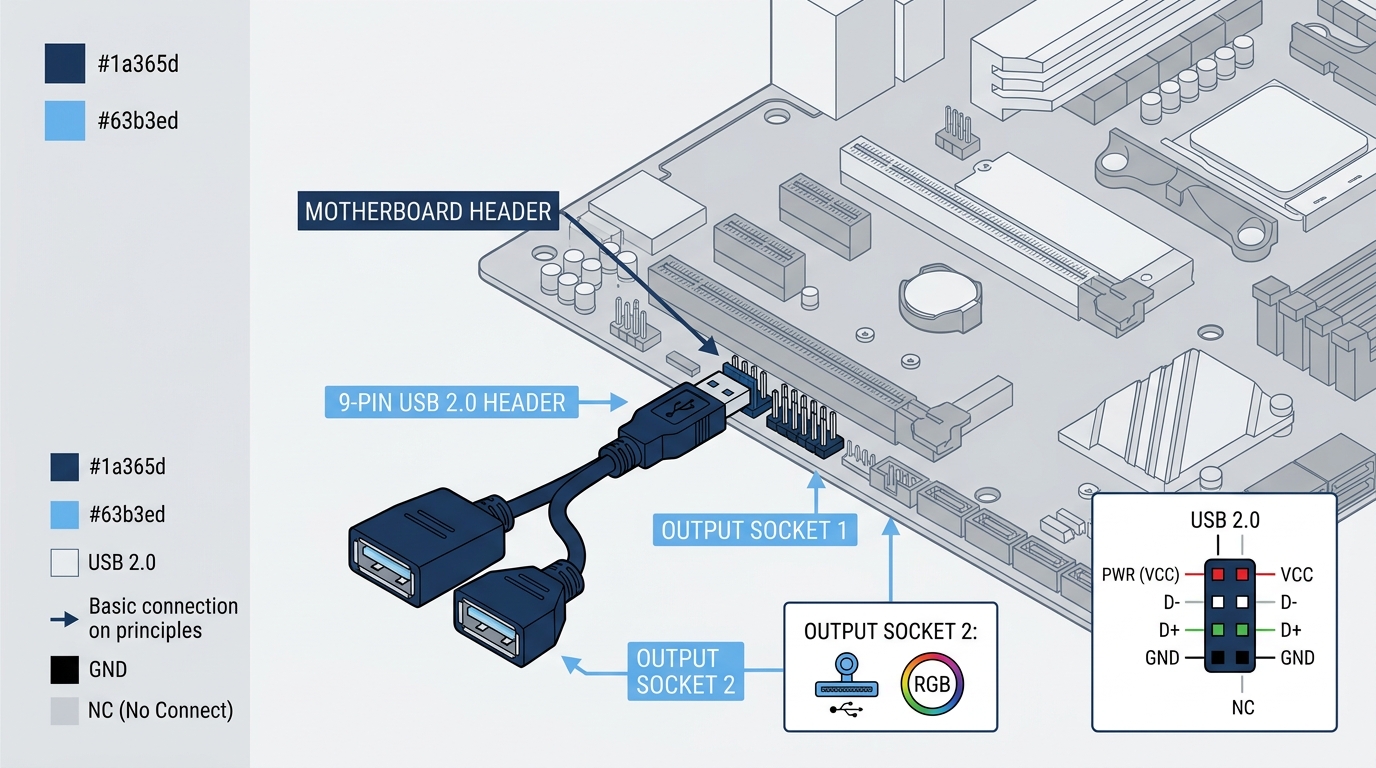
USB headers on motherboards come in two main physical formats. The USB 2.0 header uses a 9-pin layout (a 2×5 grid with one pin position left empty as a key to prevent reversed insertion). Each 9-pin header supports two USB ports. The USB 3.2 Gen 1 header uses a 19-pin layout (a 2×10 block with one position removed as a key) and also supports two ports but at much higher speeds. USB 3.2 Gen 2 for front-panel USB-C uses an entirely different 20-pin Type-E connector that is not physically interchangeable with the Gen 1 header. That last detail matters a lot, and we’ll get to why in a later section.
A splitter cable takes the male plug that fits one of those headers and adds a second (or third) female socket on the output end. You connect the splitter to the motherboard header, then plug your devices into the splitter outputs. No driver installation, no configuration. Just hardware.
Passive vs. Active Splitters: What’s the Difference?
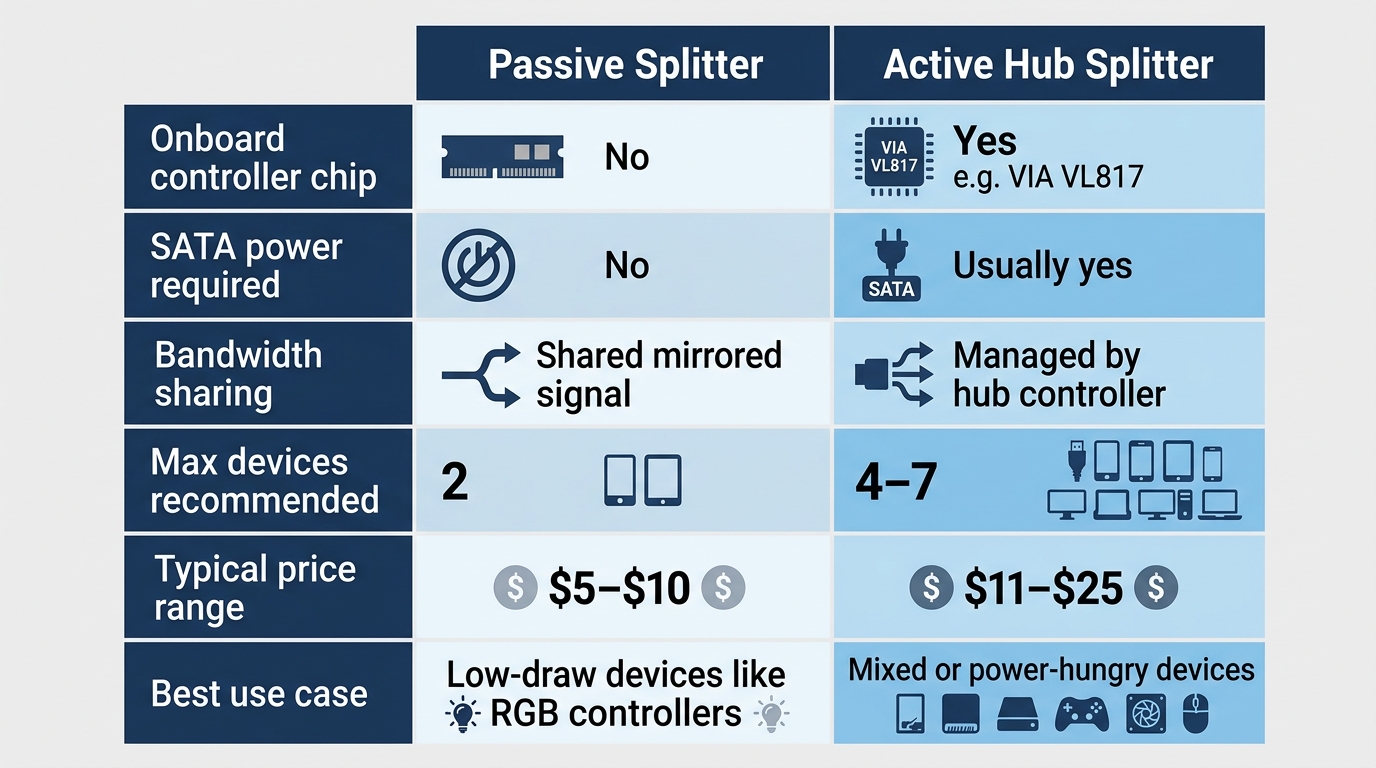
Most cheap splitters you’ll find online are passive. There’s no controller chip inside. The signal from the motherboard header gets electrically mirrored to both output sockets. Active splitters include an onboard USB hub controller chip (such as a VIA VL817) and usually require a SATA power cable to supplement power delivery from the 5V rail.
| Feature | Passive Splitter | Active Hub Splitter |
|---|---|---|
| Onboard controller chip | No | Yes (e.g., VIA VL817) |
| SATA power required | No | Usually yes |
| Bandwidth sharing | Shared (mirrored signal) | Managed by hub controller |
| Max devices recommended | 2 | 4–7 |
| Typical price range | $5–$10 | $11–$25 |
| Best use case | Low-draw devices like RGB controllers | Mixed or power-hungry devices |
The key distinction most buyers miss: passive splitters don’t add any intelligence to traffic management. Both ports share the header’s full bandwidth simultaneously. An active hub behaves like a proper USB hub, with the controller arbitrating requests between devices. Worth knowing before you buy.
USB Header Types and Compatibility: Know Before You Buy
Understanding which header type you’re working with determines which splitter or adapter will actually work in your system. For a deeper look at how these headers are wired and what each pin does, the guide on USB 2.0 vs 3.0 vs 3.2 headers covers the full electrical differences.
USB 2.0 Headers (9-Pin)
- Transfer speed: Up to 480 Mbps theoretical; real-world throughput is roughly 40 MB/s
- Power per port: Up to 500 mA (0.5A) per the USB 2.0 specification; the header’s total shared budget is typically 1A
- Common use cases: RGB hub controllers, internal Bluetooth adapters, front-panel USB-A ports for keyboards and mice
- Pin layout: VCC, D−, D+, GND (two sets for two ports) plus one keyed (missing) pin
USB 3.2 Gen 1 Headers (19-Pin)
- Transfer speed: Up to 5 Gbps
- Power per port: Up to 900 mA per the USB 3.1 specification
- Backward compatibility: Accepts USB 3.0 and USB 2.0 devices without issue
- Pin layout: 2×10 block with one position removed as a key, 19 populated pins
USB 3.2 Gen 2 Headers (20-Pin, Type-C Variant)
- Transfer speed: Up to 10 Gbps
- Physical footprint: A distinct 20-pin Type-E connector, different in shape and keying from the Gen 1 19-pin header, not a simple pin-for-pin match
- Primary use case: Front-panel USB-C ports on modern cases
That last bullet is the expensive mistake builders make. A Gen 1 header and a Gen 2 Type-C header use different, non-interchangeable connectors, not a same-size swap. A dedicated Type-E-to-Type-A adapter can bridge them, but it doesn’t upgrade anything. You get Gen 1 speeds at best, or a non-functional port at worst. Not great.
USB Header Adapter Types: Bridging the Generation Gap
USB 2.0 to USB 3.2 Gen 1 Header Adapters
This adapter solves a specific problem: your case came with a USB 3.0 (Gen 1) front-panel cable using a 19-pin connector, but your motherboard only has USB 2.0 9-pin headers available. The adapter is a bridge cable that physically converts the 19-pin plug to a 9-pin connection.
There’s a hard caveat here. The adapter doesn’t upgrade the signal. Your front-panel USB-A port will operate at USB 2.0 speeds, capped at 480 Mbps. That’s fine for flash drives, input devices, and controllers. It’s not acceptable for an external SSD or anything else that benefits from Gen 1’s 5 Gbps. Brands like Sintech and NFHK make reliable versions in the $6–$14 range.
When is it acceptable? Connecting a keyboard, mouse, or USB headset through a front panel port running at USB 2.0 speeds is completely invisible in real-world use. You won’t notice. Connecting a high-speed storage drive? You will notice immediately.
USB 3.2 Gen 1 to USB 3.2 Gen 2 Header Adapters
This is the scenario that trips up even experienced builders. You have a new case with a USB 3.2 Gen 2 front-panel USB-C cable, and your motherboard only has a Gen 1 header. A dedicated Type-E-to-Type-A adapter (20-pin to 19-pin, not a generic same-pin-count cable) will physically fit, but your USB-C port will run at Gen 1 speeds (5 Gbps, not 10 Gbps).
According to contributors at the Tom’s Hardware Forums, a standard USB 3.2 header provides up to 0.9A at 5VDC, making power delivery the secondary concern when chaining adapters. Speed is the primary one. To get true 10 Gbps on a front-panel USB-C port when your motherboard lacks a Gen 2 header, you need a PCIe add-in card with a dedicated Gen 2 header. No passive adapter will change that.
| Adapter Direction | Physical Fit | Actual Speed | Recommended? |
|---|---|---|---|
| USB 2.0 header → Gen 1 cable | Yes (with adapter) | 480 Mbps | Only for low-speed devices |
| Gen 1 header → Gen 2 cable | Yes (with adapter) | 5 Gbps max | Acceptable with caveats |
| Gen 2 header → Gen 1 cable | Yes | 5 Gbps (no downside) | Yes |
| No header → PCIe expansion card | N/A | Up to 10+ Gbps | Best for full speed |
Can You Split a USB Header? Bandwidth and Power Limits Explained
Yes, But There Are Hard Limits
Yes, you can split a USB header. The practical limits are 2 ports on a passive splitter and 4–7 ports on an active hub with SATA power. Beyond those numbers, either bandwidth or power becomes a real constraint. Understanding the math here is what most guides skip entirely.
Bandwidth Sharing Math
Think of it like a pipe. The pipe doesn’t get wider when you add a splitter. Every device plugged into a passive USB 2.0 splitter shares the same 480 Mbps that the header provides. Two devices split that equally under simultaneous load.
- USB 2.0 header, 2-device passive split: ~240 Mbps theoretical maximum per device under simultaneous transfer
- USB 2.0 header, 4-device active hub: ~120 Mbps theoretical maximum per device under simultaneous transfer
- USB 3.2 Gen 1 header, 2-device passive split: ~2.5 Gbps per device under simultaneous transfer
- USB 3.2 Gen 1 header, 4-device active hub: ~1.25 Gbps per device under simultaneous transfer
In practice, most internal devices like RGB controllers and Bluetooth adapters generate almost no sustained bandwidth. The math above only matters when you’re actively transferring files through the front panel simultaneously across multiple connections.
Power Budget: The Number Most Guides Skip
Bandwidth gets most of the attention. Power is the problem that actually bricks devices.
- USB 2.0 header total power budget: Typically 1A (1,000 mA) shared across both ports
- USB 3.2 Gen 1 header per-port power: Up to 900 mA per the USB 3.2 specification published by USB-IF; total header output varies by motherboard but commonly sits at 1.5A–2A
- Active hubs with SATA power: Devices draw from the 5V SATA rail instead of the header, effectively removing the header power bottleneck
The rule of thumb: if you’re connecting anything that charges a phone, powers a device, or draws more than 500 mA, use an active hub with SATA power. Passive splitters for charging-capable devices is a recipe for instability or slow charging. Not worth it.
When to Skip the Splitter: Better Alternatives
PCIe USB Expansion Cards
A PCIe x1 USB expansion card adds dedicated internal headers that pull bandwidth directly from the PCIe bus. No shared allocation from existing motherboard headers. Cards using a chipset like the ASMedia ASM3142 provide genuine Gen 2 headers at 10 Gbps (VIA’s VL805/VL806 controllers are USB 3.0/Gen 1 parts, capped at 5 Gbps, so check the chipset before buying if you need the full 10 Gbps). Prices run $20–$45, which sounds expensive until you consider you’re getting multiple new headers with full, unshared bandwidth. If you need more than two additional header connections, or need true Gen 2 speeds, this is the right answer. Full stop.
USB-A Hub via Rear I/O
For external peripherals like keyboards, mice, game controllers, and headsets: a powered USB hub plugged into your rear I/O panel is cleaner and more reliable than splitting internal headers. The rear I/O ports have their own direct controller connections. You free up internal headers for front-panel ports and internal controllers where having a physical cable run to the back of the PC isn’t practical.
Upgrading the Motherboard
If your build needs two or more additional USB 3.2 Gen 2 or USB4 headers, you’re better off shopping for a new motherboard. Stacking adapters and splitters to approximate hardware you don’t have is both unreliable and more expensive in aggregate than a mid-cycle motherboard upgrade on the same platform. Understanding what’s actually on your board before you buy is half the battle. The guide on USB headers on a motherboard breaks down exactly what to look for in your board’s spec sheet.
Top USB Header Splitter Picks by Use Case
| Use Case | Product Type | Connector Type | Power Source | Approx. Price |
|---|---|---|---|---|
| Adding a second RGB or fan hub | Passive 9-pin USB 2.0 1-to-2 splitter | 9-pin USB 2.0 | Header only | $5–$9 |
| Connecting 4 USB 2.0 devices internally | Active 4-port USB 2.0 hub with SATA power | 9-pin USB 2.0 in | SATA + header | $11–$16 |
| Case with USB 3.0 cable, no Gen 1 header | USB 2.0 to USB 3.2 Gen 1 adapter | 9-pin → 19-pin | Header only | $6–$14 |
| Adding front USB-C without Gen 2 header | Gen 1-to-Gen 2 passive adapter | 19-pin → 20-pin | Header only | $8–$15 |
| Maximum ports, full speed | PCIe USB expansion card | PCIe x1 | PCIe slot | $20–$45 |
One practical note on the “Adding front USB-C” row: the passive Gen 1-to-Gen 2 adapter gets the cable connected, but the port runs at 5 Gbps. If that’s acceptable for your use case, the $8–$15 adapter is fine. If you actually need 10 Gbps throughput on that front USB-C port, budget for the PCIe card instead.
How to Install a USB Header Splitter
Step-by-Step Installation
- Power down your PC completely and unplug the power cable from the wall.
- Open your motherboard manual and locate the USB header you’re targeting. Headers are labeled on the PCB itself and in the manual (common labels: USB2_1, USB2_2, USB3_1).
- For a 9-pin USB 2.0 header: identify the keyed position (the one missing pin in the 2×5 grid). For a 19-pin Gen 1 header: locate the notch on the plastic shroud of the connector.
- Align the splitter’s male plug with the key or notch and press firmly and evenly until the connector seats fully. You’ll feel a slight resistance, then a solid stop. Don’t force it at an angle.
- Connect your devices (fan controller, front-panel cable, RGB hub) to the female outputs on the splitter.
- If you’re using an active hub that requires SATA power, route the SATA cable from a spare connector on your PSU and plug it in before you power on.
- Boot the system. Passive splitters need no driver installation. Active hubs may trigger a brief Windows hardware detection, after which they install automatically.
One hard warning: reversing a USB 2.0 header connector doesn’t just cause the port to not work. It can damage connected devices or the motherboard controller. The keyed pin exists precisely to prevent this. If your splitter plug doesn’t have a key pin hole (some cheaper cables omit it), double-check pin 1 orientation against your motherboard manual before pressing down. Motherboard manuals from Intel, AMD, and their board partners mark pin 1 clearly on header diagrams.
For keeping the splitter and its associated cables tidy inside your case, the approach outlined in a solid PC cable management guide applies here too. A short splitter cable that’s zip-tied and routed neatly along the motherboard tray looks far better than a loose cable flopping across your components.
FAQ: USB Header Splitters
Can I split a USB header?
Yes. A USB header splitter connects to one USB header on your motherboard and outputs two or more identical sockets. Bandwidth and power are shared across all connected ports. For reliable performance, passive splitters should be limited to two connections. Active splitters with SATA power can support four to seven connections without hitting the header’s power ceiling.
How many times can you split a USB header?
Two-way passive splits are safe and reliable for low-draw devices. Active hubs can extend this to four to seven connections, but total bandwidth stays capped at the header’s maximum (480 Mbps for USB 2.0, 5 Gbps for USB 3.2 Gen 1). Going beyond four connections without supplemental SATA power is not recommended, because you’ll exceed the header’s current output before you run out of port slots.
Will a USB header splitter slow down my devices?
It depends on simultaneous usage. Two devices on a passive USB 2.0 splitter share 480 Mbps total. If both transfer data at the same time, each gets roughly half the available bandwidth. For low-speed devices like keyboards, mice, or RGB controllers, the shared bandwidth is completely imperceptible. For storage devices doing sustained file transfers, you’ll see a measurable throughput drop if both ports are active simultaneously.
Is a USB 2.0 to USB 3.2 Gen 1 header adapter worth buying?
Only if you need to connect a USB 3.0 front-panel cable and have no Gen 1 header available on your board. The port will work, but it’ll operate at USB 2.0 speeds (480 Mbps). For low-speed peripherals, that’s perfectly acceptable. For anything that benefits from 5 Gbps throughput, a PCIe USB expansion card is a better long-term solution.
Do USB header splitters work with all motherboards?
Yes, as long as the connector type matches. USB 2.0 9-pin splitters are compatible with virtually all ATX, mATX, and ITX boards from both Intel and AMD platforms going back to the early 2000s. USB 3.2 Gen 1 19-pin splitters work across modern motherboards from all major manufacturers. The only compatibility issue arises when confusing the Gen 1 19-pin header with the Gen 2 Type-C 20-pin header, which use different connectors despite the similar naming.
What You Should Do
Start with the simplest solution that fits your situation. Adding a second RGB controller or fan hub? A passive $6 USB 2.0 9-pin splitter handles that without any complexity. Connecting four or more internal devices or anything that draws power? Go with an active hub that has SATA power. Got a Gen 1/Gen 2 generation mismatch between your case and motherboard? Use the appropriate adapter with realistic speed expectations. Need full 10 Gbps throughput on a front-panel USB-C port and your board doesn’t have a Gen 2 header? Skip the adapter stack and budget $20–$45 for a PCIe expansion card. Matching the right solution to the actual problem saves you from buying adapters twice.

Alex has been building and tweaking custom PCs for over 12 years. From budget builds to full custom water loops, he’s assembled more than 50 systems and helped hundreds of builders troubleshoot their rigs. When he’s not benchmarking the latest hardware, you’ll find him optimizing airflow setups or stress-testing overclocks.