PC Fan Controller Guide: PWM, DC, and How to Pick the Right One
A fan controller is a hardware device or software utility that regulates PC cooling fan speeds by adjusting voltage or PWM signal duty cycle to balance thermals and noise.
Last updated: May 2026
Table of Contents
- What Is a Fan Controller? (And Why Your PC Needs One)
- The Core Job: Speed = Noise + Thermals
- What Is a Fan Controller Called? (Terminology Breakdown)
- PWM vs DC Fan Control, The Real Difference
- What Is a PWM Fan? (PWM Fan Meaning Explained)
- What Is DC Fan Control?
- PWM vs DC Fan, Head-to-Head Comparison
- PWM Fan Pinout, What Each Pin Actually Does
- The 4-Pin PWM Standard (Intel Spec)
- RGB and ARGB, Are Those Fan Controller Pins Too?
- Types of PC Fan Controllers, Hardware vs Software
- Hardware Fan Controllers
- Software Fan Controllers
- Best PC Fan Controller Software (Free and Paid Options)
- Fan Control (getfancontrol.com), The Enthusiast Standard
- BIOS Fan Curves, Should You Use Them Instead?
- OEM Software Comparison
- PWM Fan Control via Software, How It Actually Works
- Fan Controller Setup, A Real-World Configuration Walkthrough
- Recommended Starting Curve Values (By Use Case)
- Common Fan Controller Mistakes (And How to Fix Them)
- Fan Controller Buying Guide, Hardware Picks for Different Builds
- Do You Actually Need a Dedicated Hardware Controller?
- Recommended Hardware Fan Controllers by Budget
- Fan Controller Compatibility, What Works With What
- PWM Fan on 3-Pin Header, What Happens?
- 3-Pin Fan on 4-Pin Header, What Happens?
- Daisy-Chaining and Splitters, Amperage Warning
- FAQ, PC Fan Controller Questions Answered
- What is a fan controller called?
- What is a PWM fan and how is it different from a regular fan?
- Can I use fan control software on Windows 11?
- Is a fan hub the same as a fan controller?
- Do I need a fan controller if my motherboard has PWM headers?
- Final Thoughts
72°C idle. That’s what you get when your case fans pin themselves at 100% the moment you hit the desktop, then scream through a spreadsheet session because nobody told them the CPU is barely warm. On the flip side, letting fans run at a fixed low voltage means your GPU hits 90°C mid-render with no response. Neither extreme is good. A proper fan controller, whether it’s a software curve or a hardware hub, gives you the middle ground: quiet at idle, aggressive when temps climb, and precise enough to stay there.
This guide covers both approaches. You’ll understand exactly what a PWM fan is and how it differs from DC control, how the 4-pin pinout actually works, which software to use on Windows 10 and 11, and when you genuinely need a hardware controller versus just configuring what’s already on your motherboard. If you’ve ever wondered why your PC sounds like a jet during boot and a library five minutes later, this is why, and here’s how to fix it.
- 🟢 PWM (4-pin): Best control precision, works down to ~200 RPM, full 12V always delivered
- 🟢 Software control (Fan Control app): Free, universal, supports mix curves across CPU + GPU + SSD temps
- 🟡 DC (3-pin): Functional but limited to ~40–100% speed range, voltage-stepping only
- 🟡 Passive fan hub/splitter: Works for 1–2 fans; risky above 2 fans without SATA power
- 🔴 Splitter with 3+ fans, no SATA power: Can exceed header amperage rating (1A max on most boards)
- 🔴 0 RPM mode on unsupported fans: Risk of thermal spike if fan doesn’t restart cleanly
What Is a Fan Controller? (And Why Your PC Needs One)
The Core Job: Speed = Noise + Thermals
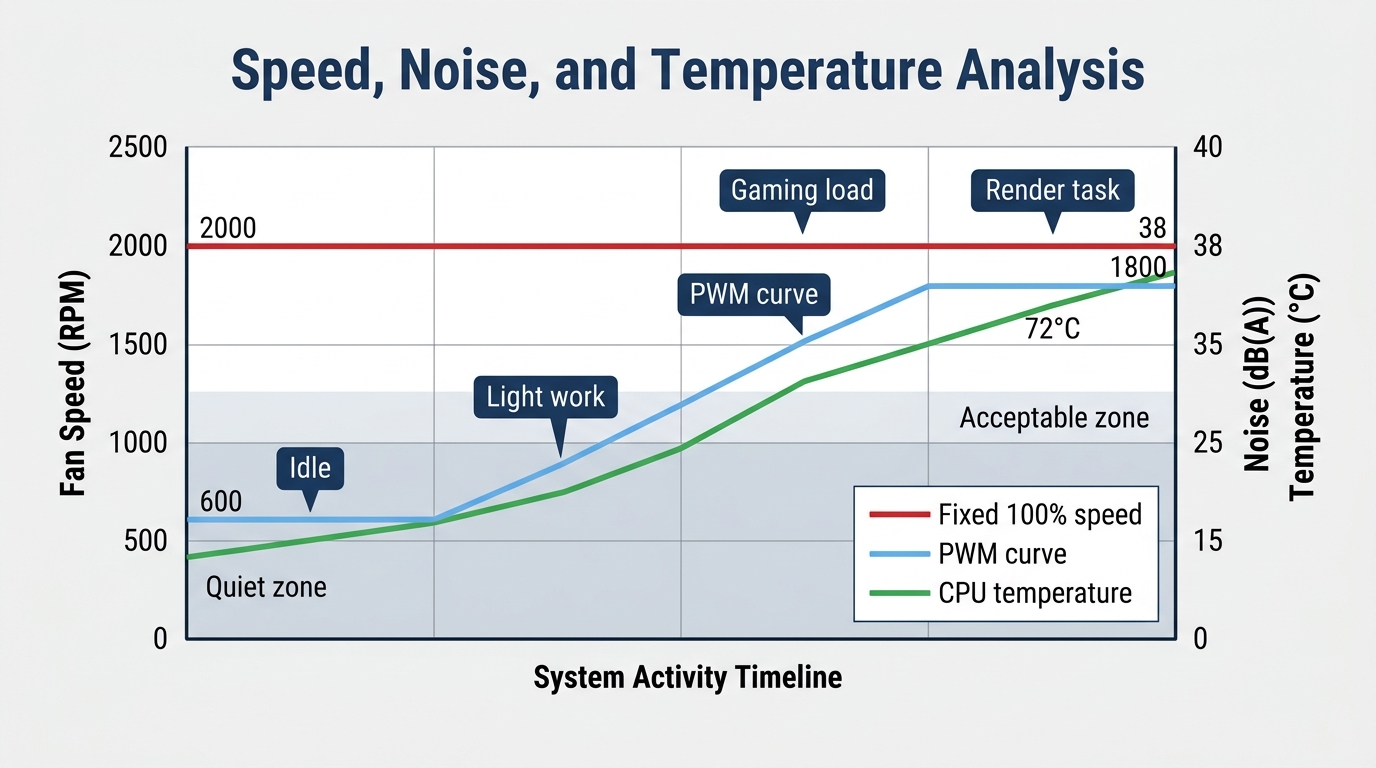
Every case fan operates on a simple principle: spin faster, move more air, make more noise. A typical 120mm fan covers a range of roughly 400 to 2,000 RPM. At the low end, you’re looking at around 20 dB(A), which is nearly inaudible. Push it to max, and that same fan hits 35–38 dB(A), which is noticeable even through a closed case panel. Without any control logic, fans either run at 100% constantly or rely on basic voltage stepping with no awareness of actual system temperature. Neither approach ages well.
A fan controller solves this by tying fan speed to thermal data. When the CPU is cool, fans run slow. When temps climb, fans ramp up proportionally. The result is a system that’s quiet during light work and genuinely effective under load, without you touching anything.
What Is a Fan Controller Called? (Terminology Breakdown)
The naming gets inconsistent fast. Here’s what each term actually means:
- Fan controller: The umbrella term. Covers anything that modulates fan speed.
- Fan speed controller: Same thing, just more user-facing language. Common in product listings.
- Case fan controller: Usually refers to the hardware panel form, installed in a drive bay or front of the case.
- PWM fan controller: A controller that uses pulse-width modulation signal to regulate speed. Most modern motherboards qualify.
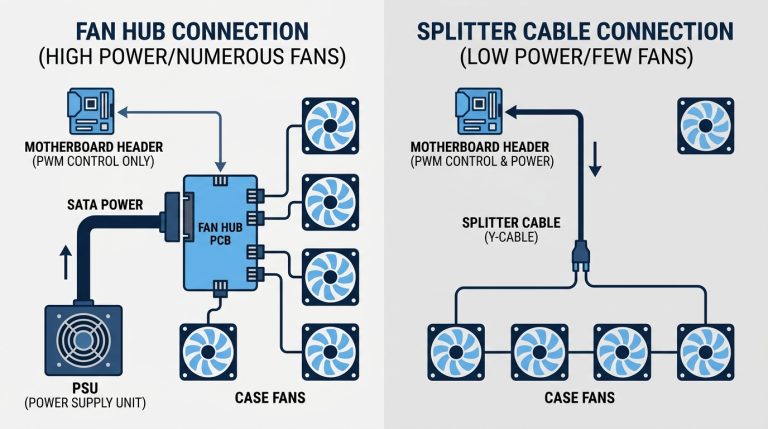
- Fan hub: Not a controller by default. A passive fan hub is just a splitter, it distributes one header’s signal to multiple fans with no independent logic. An active fan hub adds temperature sensors or software integration and is a proper controller.
The distinction between a passive hub and an active controller matters for compatibility and safety. We’ll get into that in the hardware section below. If you’re still figuring out how many fans your build actually needs, our guide on how many case fans you need walks through that decision first.
PWM vs DC Fan Control, The Real Difference
What Is a PWM Fan? (PWM Fan Meaning Explained)
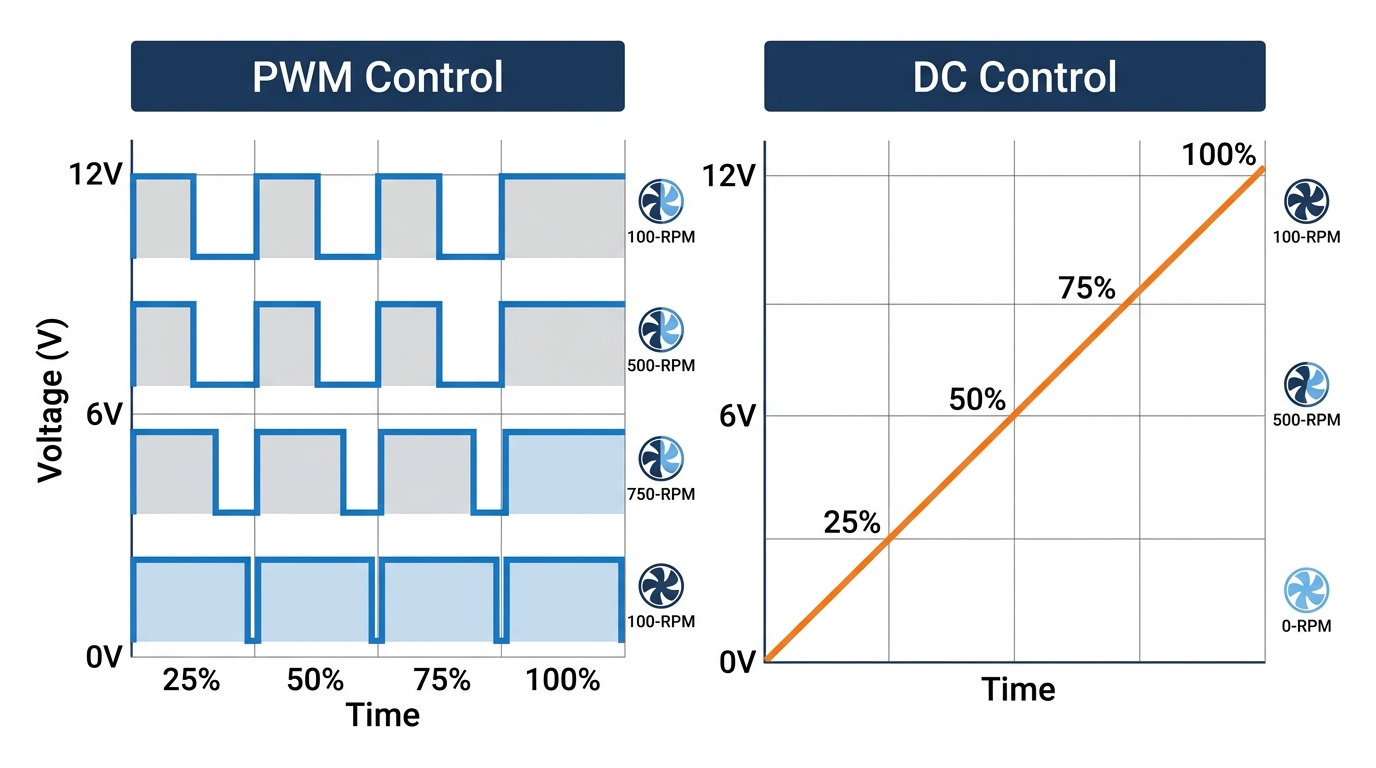
PWM stands for Pulse Width Modulation. The name describes exactly what happens: instead of reducing voltage to slow the motor, the controller rapidly switches the full 12V supply on and off. The ratio of “on” time to “off” time within each cycle is called the duty cycle. 100% duty cycle means full power, full speed. 25% duty cycle means the motor receives power for only a quarter of each cycle.
The switching happens at 25 kHz, per the Intel 4-wire fan specification. That frequency sits above the range of human hearing, so there’s no audible buzz from the switching itself. This matters because it means you get genuine speed control without the tonal artifacts that come from audible-frequency modulation.
The practical advantage: PWM fans can run at very low speeds, sometimes as low as 200–300 RPM on quality units like Noctua’s NF series, without stalling. The motor always receives full voltage when powered, so torque stays consistent even at low duty cycles. That’s what enables the near-silent operation that makes a good PWM setup feel so different from basic voltage control.
What Is DC Fan Control?
DC control is the older method. Instead of switching the signal, the motherboard (or controller) reduces the actual supply voltage from 12V down toward 5–7V. Below about 4–5V, most fans stall entirely because the motor can’t overcome static friction. That’s your real-world floor: roughly 40% of max speed for most DC fans.
Less precise. Limited range. Still common on older motherboards and budget builds where 3-pin headers are the norm. 3-pin fans can only be controlled this way unless they have PWM circuitry built in, which most don’t.
PWM vs DC Fan, Head-to-Head Comparison
| Feature | PWM Fan | DC Fan |
|---|---|---|
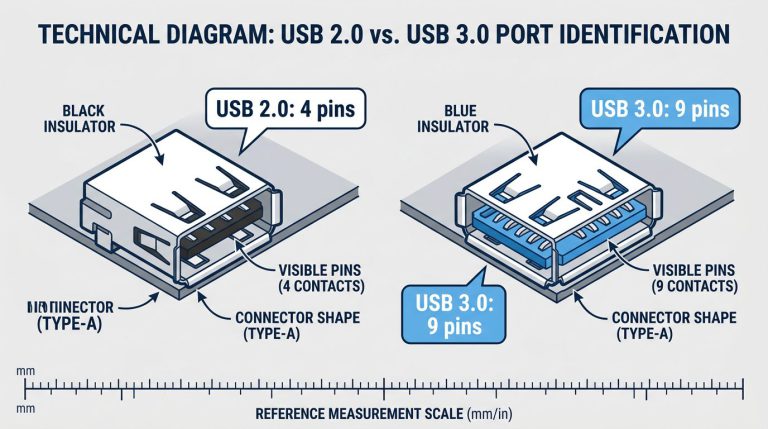
| Connector pins | 4-pin | 3-pin |
| Voltage to motor | Constant 12V | Variable (5V–12V) |
| Speed range | ~0–100% (200–2000+ RPM) | ~40–100% |
| Control precision | High (1% duty cycle steps) | Low (voltage steps) |
| Noise floor | Lower (finer low-speed tuning) | Higher (stalls below ~5V) |
| Compatibility | Backward compatible with 3-pin headers | Cannot use PWM signal |
| Best use case | High-end builds, quiet builds | Budget systems, older hardware |
One important note on compatibility: a 4-pin PWM fan plugged into a 3-pin header runs fine, it just loses PWM control and runs at whatever voltage the header provides. The PWM pin is simply unused. Going the other direction, a 3-pin fan on a 4-pin header causes the motherboard to default to DC control mode on that header. It still works, just without PWM precision. Check your BIOS “Fan Control Mode” setting to confirm it’s set correctly for whichever fan type you’re running.
PWM Fan Pinout, What Each Pin Actually Does
The 4-Pin PWM Standard (Intel Spec)
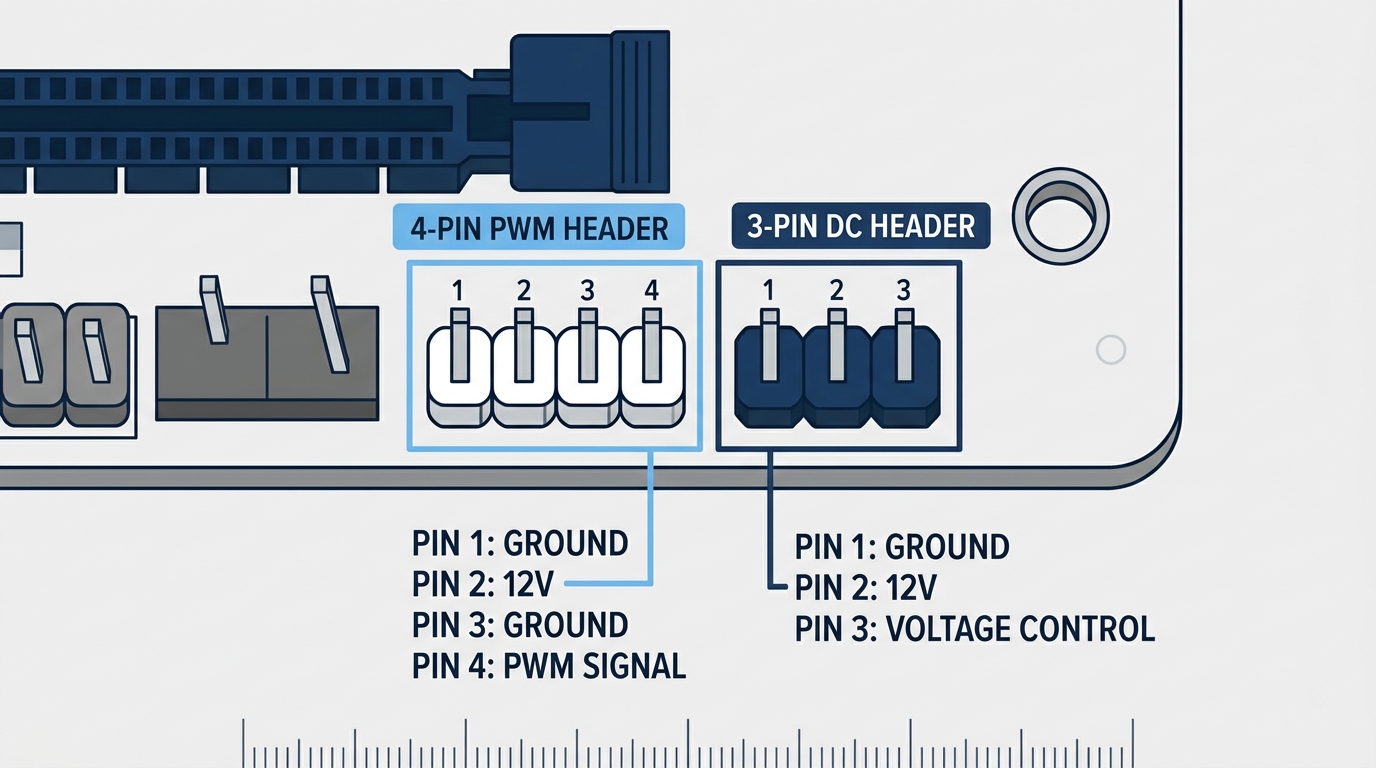
The 4-pin PWM connector is standardized by Intel. Every compliant fan uses the same pinout, which is why you can mix brands without rewiring anything. Here’s the full breakdown:
| Pin # | Wire Color (Standard) | Function |
|---|---|---|
| Pin 1 | Black | Ground (GND) |
| Pin 2 | Yellow | +12V Power |
| Pin 3 | Green | Tachometer (RPM signal back to motherboard) |
| Pin 4 | Blue | PWM Control Signal (25 kHz) |
Pin 3 sends 2 pulses per revolution back to the motherboard. The board calculates RPM from pulse frequency, which is how your BIOS and fan control software display real-time RPM readings. If this wire is cut or disconnected, the motherboard will often trigger a fan warning or fan-fail alarm even if the fan is spinning normally.
Pin 4 is the control signal and uses an open-drain design. This matters in practice: if pin 4 is disconnected or the software stops sending a signal, the fan defaults to 100% speed. That’s a deliberate failsafe. Not ideal for noise levels, but it means a software crash won’t leave your CPU without cooling. Worth knowing before you blame the hardware.
The 3-pin connector is physically identical to pins 1 through 3. That’s the entire reason backward compatibility works cleanly: you’re plugging in the same three wires, just skipping the control pin.
RGB and ARGB, Are Those Fan Controller Pins Too?
No. RGB and ARGB headers are entirely separate from speed control headers and serve a different purpose. The 3-pin 5V ARGB header and 4-pin 12V RGB header carry lighting data, not motor control signals. A fan with both PWM and ARGB will have two separate connectors: one 4-pin for speed, one 3-pin (or 4-pin) for lighting. You can read more about the differences in our ARGB vs RGB header guide. Mixing these up is a common mistake in first builds and it can damage the LED strip if you apply 12V to a 5V ARGB connector.
Types of PC Fan Controllers, Hardware vs Software
Hardware Fan Controllers
Drive bay controllers (5.25″ panels) are the classic hardware solution: physical knobs or sliders, no software required. Brands like Lamptron, Aquacomputer, and older NZXT units made these popular when optical drives were standard. They’re becoming rare as 5.25″ bays disappear from modern cases. Their main advantage is still real: they function without an OS, making them useful for servers, HTPCs, and headless systems. The downside is no automatic temperature response, no curve logic. You set it manually and that’s where it stays.
Passive fan hubs connect to one motherboard header and split the signal to four or eight fans. No logic, no temperature input. Every fan on the hub runs at whatever speed the single header dictates. Good for cases with many fans that you want to control as one group. The critical spec: check the total amperage rating. Most hubs handle 1A per channel or 10W total. Going over that can damage the header or hub.
Smart hubs sit in between. The NZXT Smart Device 2 (included with H-series cases), Lian Li L-Connect hubs, and similar products include temperature probes and software integration. They give you per-channel control without consuming multiple motherboard headers. These are the practical choice for fan-heavy builds.
Software Fan Controllers
BIOS/UEFI fan control is available on nearly every modern motherboard and has zero software overhead. You get 4–6 curve points, basic temperature sources (usually CPU temp only), and it runs before the OS loads. Good baseline. Not great for multi-sensor logic.
OEM tools like ASUS Fan Xpert 4, MSI Center, and Gigabyte EasyTune are functional for their respective brands. Fan Xpert 4 in particular is genuinely capable on ASUS boards. The common limitation: they’re siloed by brand and don’t mix temperature sources the way dedicated software does.
Third-party universal software is where the real control lives. Covered in full below.
Best PC Fan Controller Software (Free and Paid Options)
Fan Control (getfancontrol.com), The Enthusiast Standard
Free. Open source. No installation required. Fan Control (currently V264 at the time of writing) is the best fan control software available on Windows 10 and 11, and it’s not particularly close.
The feature that sets it apart is the Mix Curve. Most software lets you build one curve per fan tied to one temperature sensor. Fan Control lets you combine multiple curves, CPU temp driving one curve, GPU temp driving another, SSD temp driving a third, then apply a function like Maximum, Average, or Minimum across all of them to produce a single output for your case fans. Your intake fans now respond to the hottest component in your system, not just the CPU. That’s the correct way to manage case airflow.
Beyond mix curves, you get:
- 7 curve types: flat, linear, target, graph, mix, sync, and sensor-based
- Fan calibration to map actual RPM response to duty cycle percentage
- Hysteresis control to prevent fan speed hunting
- Step-up and step-down response time settings for smooth ramping
- 0 RPM stop/start logic where the hardware supports it
- Temperature readings in the system tray (CPU, GPU, SSD)
- Plugin system via .NET for third-party sensor and control extensions
- Backend powered by LibreHardwareMonitor, an open-source fork with broad hardware support
JayzTwoCents, in his review of the software, described it as what happens when an enthusiast programmer sees a problem and solves it properly. That’s an accurate summary. There’s no equivalent free option that comes close to this level of control.
Best for: enthusiasts, multi-fan builds, anyone building a silent PC.
BIOS Fan Curves, Should You Use Them Instead?
Sometimes, yes. If you’re running a headless server, don’t want background software, or just want a dead-simple setup, BIOS curves are sufficient. Set a conservative curve that keeps temps safe and leave it.
The practical approach for most builds: use BIOS settings to establish a hard minimum and maximum as a safety net, then layer Fan Control on top for active management. If Fan Control ever crashes or doesn’t start, the BIOS floor keeps your fans moving. Not a hypothetical scenario, it does happen after major Windows updates.
OEM Software Comparison
| Software | Compatible Brands | PWM + DC Support | Mix Curves | Free | Win 11 |
|---|---|---|---|---|---|
| Fan Control | Universal | ✅ | ✅ | ✅ | ✅ |
| ASUS Fan Xpert 4 | ASUS only | ✅ | ❌ | ✅ | ✅ |
| MSI Center | MSI only | ✅ | ❌ | ✅ | ✅ |
| Gigabyte EasyTune | Gigabyte only | ✅ | ❌ | ✅ | ✅ |
| Argus Monitor | Universal | ✅ | Limited | Paid ($14.90) | ✅ |
PWM Fan Control via Software, How It Actually Works
When Fan Control (or any fan software) adjusts a fan’s speed, it writes a duty cycle percentage to your motherboard’s embedded controller (EC) registers. The EC is a small chip on the motherboard that handles low-level hardware functions including fan headers. Software doesn’t control fans directly; it tells the EC what to do, and the EC sends the PWM signal to the header.
This has a practical implication: not every header on every motherboard is exposed through the EC in a way that software can reach. Before spending an hour building elaborate mix curves, open Fan Control’s “Controls” panel and verify each header shows up and responds to manual changes. Some headers, particularly pump headers labeled “AIO_PUMP” or “W_PUMP,” are sometimes locked to 100% in certain BIOS configurations.
Fan Controller Setup, A Real-World Configuration Walkthrough
Recommended Starting Curve Values (By Use Case)
These are the starting points I’d use for a new build. Adjust based on your specific hardware once you’ve stress-tested and verified temps. All percentages refer to duty cycle, not RPM, since RPM varies by fan model.
| Use Case | Temp Source | 40°C | 50°C | 65°C | 75°C | 80°C+ |
|---|---|---|---|---|---|---|
| Silent Home/Office | CPU package | 20% | 30% | 50% | 70% | 100% |
| Gaming Build | Max(CPU, GPU) | 30% | 40% | 65% | 85% | 100% |
| Workstation/Rendering | CPU + SSD mix | 35% | 50% | 70% | 90% | 100% |
| Home Server (quiet) | CPU package | 25% | 35% | 55% | 75% | 100% |
Set hysteresis to 2–4°C. Without it, a temperature hovering around a curve point causes the fan to oscillate rapidly between two speeds, which is audible and adds wear. The hysteresis setting forces the temperature to drop a set number of degrees below a step before the fan ramps back down.
Step-up and step-down response time: 2–4 seconds is a good default. Faster response means quicker cooling reaction but more audible speed changes. Longer response means smoother transitions. For gaming, 2 seconds is reasonable. For a quiet office build, 4–5 seconds keeps transitions inaudible.
Common Fan Controller Mistakes (And How to Fix Them)
- Running case fans off the CPU header only: Your GPU produces significant heat independently. A gaming build where case fans respond only to CPU temp will have poor airflow during GPU-heavy loads. Use a Mix Curve with Max(CPU, GPU) as the source.
- Enabling 0 RPM stop without confirming fan support: Not all fans restart cleanly from a full stop. Check your fan’s datasheet or spec page. If it doesn’t explicitly list 0 RPM support, don’t enable it.
- Forgetting to check “Apply on Startup” in Fan Control: The software won’t load your curve automatically after boot unless this option is enabled. Common source of confusion after a Windows update.
- No BIOS minimum set as a failsafe: If Fan Control doesn’t start (power outage, driver issue), your fans default to whatever the BIOS says. Set a 30–40% minimum in BIOS as your safety floor.
Fan Controller Buying Guide, Hardware Picks for Different Builds
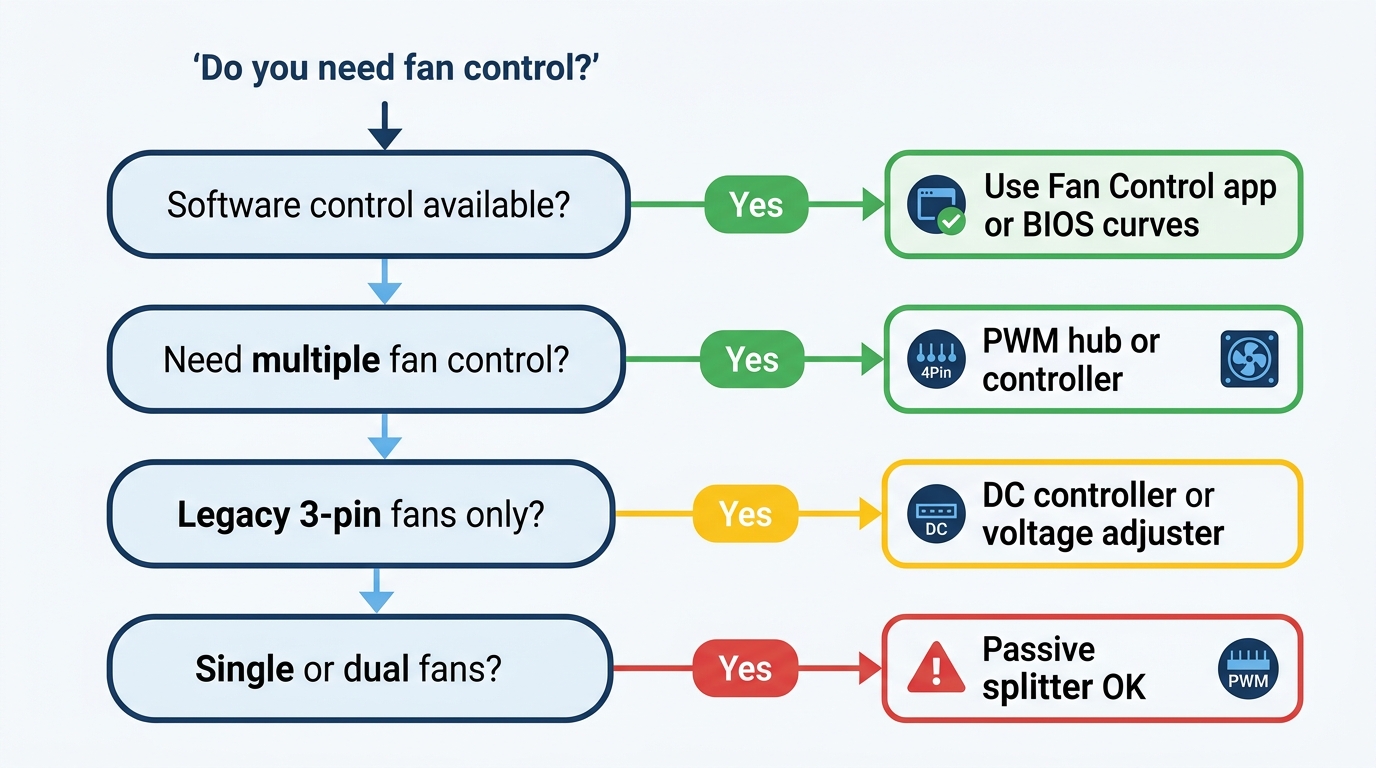
Do You Actually Need a Dedicated Hardware Controller?
Probably not, for most builds. Here’s the actual decision logic:
- Fewer than 6 fans on a modern motherboard: Software control via Fan Control is enough. You don’t need to spend anything.
- 6–12 fans: Add a PWM fan hub with independent SATA power (~$10–20). Run everything through Fan Control.
- You want physical knobs and no software at all: A 5.25″ bay controller works if your case has a bay, or look at a smart hub with its own display.
- Custom water loop with multiple pumps and fans: A dedicated controller like the Aquacomputer QUADRO is worth the investment. It has 4 channels at 25W each and proper pump control logic.
Recommended Hardware Fan Controllers by Budget
| Budget | Product | Channels | Max Load | PWM | Price |
|---|---|---|---|---|---|
| Budget | Phanteks PH-PWHUB_01 | 6-ch | 30W total | ✅ | ~$8 |
| Mid-range | Lian Li UNI HUB (SL-INF) | 4-ch + ARGB | 30W total | ✅ | ~$30 |
| Premium | NZXT Smart Device 2 | 3-ch variable | 10W/ch | ✅ | ~$40 (H-series cases) |
| Enthusiast | Aquacomputer QUADRO | 4-ch | 25W/ch | ✅ | ~$75 |
Verify current pricing before purchasing, these fluctuate. The Phanteks hub is the right call for a simple build that just needs more headers. The Aquacomputer QUADRO is overkill for air-cooled systems but genuinely useful in a custom loop where each pump and radiator fan has different control requirements.
Fan Controller Compatibility, What Works With What
PWM Fan on 3-Pin Header, What Happens?
The fan runs. The PWM pin (pin 4) has nothing to connect to, so it’s ignored. Your speed control drops to DC mode with the reduced range that comes with it. Some motherboards auto-detect when a 4-pin PWM fan is plugged into a 3-pin header and switch control modes accordingly; check your BIOS fan header settings to confirm what mode is active. Not ideal, but functional.
3-Pin Fan on 4-Pin Header, What Happens?
The motherboard defaults to DC control mode on that header. The fan responds to voltage changes, not the PWM signal. Go into BIOS and look for a “Fan Control Mode” option on that header. Set it to DC manually if the board didn’t auto-detect. Running in PWM mode with a 3-pin fan can cause erratic behavior on some boards.
Daisy-Chaining and Splitters, Amperage Warning
This is the safety point most guides skip. Every motherboard fan header is rated for a maximum current, typically 1A at 12V, which works out to 12W. A standard 120mm case fan draws around 0.15–0.3A. A 140mm fan draws roughly 0.2–0.4A at full speed.
Do the math: three fans on a passive splitter from a single header can pull up to 1.2A. That exceeds the header rating. Over time, this can damage the header circuit or cause voltage instability.
The fix is simple. Use a fan hub with its own SATA power connector. The SATA power delivers the current directly from the PSU; the motherboard header only carries the PWM signal and tach data, which draws negligible current. Never use a passive splitter for more than two fans on a single header without checking your motherboard’s header spec in the manual. Not great to find out the hard way.
FAQ, PC Fan Controller Questions Answered
What is a fan controller called?
A fan controller goes by several names depending on its form. Common terms include fan speed controller, case fan controller, and PWM fan controller. Hardware versions installed in drive bays are often called bay fan controllers or panel controllers. Software versions are typically called fan control software or fan curve software. All of these refer to tools that regulate how fast your PC’s cooling fans spin.
What is a PWM fan and how is it different from a regular fan?
A PWM fan uses a 4-pin connector and receives a 25 kHz pulse-width modulation signal on its fourth pin to regulate motor speed. A standard DC fan uses a 3-pin connector and is controlled by varying the supply voltage between roughly 5V and 12V. PWM fans deliver full 12V to the motor at all times and adjust speed by modulating the duty cycle, which gives them a wider speed range (down to ~200 RPM), better low-speed precision, and quieter operation at partial loads compared to DC fans.
Can I use fan control software on Windows 11?
Yes. The most capable free option, Fan Control from fancontrol.net, is fully compatible with Windows 10 and Windows 11 (64-bit). Most OEM tools, including ASUS Fan Xpert 4 and MSI Center, are also Windows 11 compatible but only work with their respective motherboard brands. If you’re on a non-ASUS, non-MSI board, Fan Control is your best bet regardless of Windows version.
Is a fan hub the same as a fan controller?
Not exactly. A passive fan hub (or splitter) distributes one header’s signal to multiple fans with no independent control per channel. Every fan on the hub runs at the same speed dictated by the single source header. An active fan controller or smart hub includes its own logic, temperature sensors, or software integration to adjust each channel independently. The passive hub is cheaper and simpler; the active controller gives you real per-fan management.
Do I need a fan controller if my motherboard has PWM headers?
For most builds, no. A modern motherboard with multiple PWM headers and solid BIOS fan curve options is sufficient for basic control. However, a dedicated software controller like Fan Control unlocks multi-sensor mixing (combining CPU, GPU, and SSD temperatures to drive case fans), finer curve control than most BIOS interfaces offer, and the ability to manage more fans than your available headers support. If you want the quietest possible idle with proper thermal response under load, Fan Control adds real value even with a good motherboard.
Final Thoughts
For most builds, the answer is already in front of you. Fan Control software (free, no installation) plus your existing PWM headers covers 90% of what anyone needs. Set a mix curve using Max(CPU, GPU) as your source, dial in 3°C hysteresis, and configure a BIOS minimum as a fallback. That’s a complete fan control setup at zero cost.
Where hardware controllers actually earn their place: builds with six or more fans that need a dedicated hub with SATA power, custom water loops where pump control matters, or headless systems that need fan management without a running OS. Outside those scenarios, software wins on flexibility every time.
- PWM fans use 25 kHz duty cycle modulation at constant 12V for precise, wide-range speed control
- DC fans vary voltage from 5V to 12V, limiting control to roughly 40–100% of max speed
- The 4-pin PWM pinout is standardized by Intel: GND, 12V, tach, PWM signal
- Fan Control (getfancontrol.com) is the best free software option, with mix curves and full Windows 11 support
- Never run more than two fans from a passive splitter on a single header, header ratings cap at 1A
- Always set a BIOS speed floor as a failsafe in case your fan software doesn’t load
If your GPU is running hot and you’re not sure whether your case airflow is the problem, check our guide on normal GPU temperature ranges to establish whether you actually have a thermal issue before adjusting fan curves.

Alex has been building and tweaking custom PCs for over 12 years. From budget builds to full custom water loops, he’s assembled more than 50 systems and helped hundreds of builders troubleshoot their rigs. When he’s not benchmarking the latest hardware, you’ll find him optimizing airflow setups or stress-testing overclocks.