Vertical GPU Mount: Pros, Cons, and What to Buy
A vertical GPU mount is a bracket-and-riser-cable kit that repositions a graphics card to a vertical orientation, displaying the cooler face-out through the case’s side panel.
Last updated: June 2026
Table of Contents
- Quick Answer: What Is a Vertical GPU Mount?
- What Is a Vertical GPU Mount?
- How a Vertical GPU Mount Works
- The Standard Horizontal GPU Position
- How the Vertical Mount Changes the Orientation
- Vertical GPU Mount Pros
- Aesthetics: Show Off Your GPU
- Reduced GPU Sag
- Airflow Benefits in Specific Case Layouts
- Cleaner Cable Routing Appearance
- Vertical GPU Mount Cons
- Thermal Impacts: The Biggest Concern
- PCIe Gen Compatibility and Signal Loss Risk
- Case Compatibility Limitations
- Installation Complexity
- Cost
- Is Vertical GPU Mounting Safe?
- Vertical GPU Mount vs. Horizontal: Side-by-Side Comparison
- What to Look for in a Vertical GPU Mount Kit
- PCIe Generation Rating
- Riser Cable Length and Shielding
- Bracket Adjustability
- Case Compatibility
- ARGB and Aesthetics Features
- Best Vertical GPU Mount Kits: Top Picks
- Best Overall: Lian Li VG4v4 Gen 5 Vertical GPU Bracket
- Best Budget Pick: EZDIY-FAB SHIELD ARGB Vertical Mount
- Best for Corsair Cases: Corsair Vertical GPU Bracket Kit
- Best PCIe 5.0 Cable: LINKUP Ultra PCIe 5.0 Riser
- How to Install a Vertical GPU Mount (Step-by-Step)
- Vertical GPU Mount Compatibility by Case Brand
- Vertical GPU Mount and PCIe 5.0: What You Need to Know for 2025 and 2026 Builds
- Unique Buying Scenarios: Which Vertical GPU Mount Is Right for You?
- FAQ: Vertical GPU Mount Questions Answered
- Is vertical GPU mounting safe?
- Does a vertical GPU mount affect performance?
- What PCIe riser cable do I need for an RTX 5090?
- Will any vertical GPU mount work with my case?
- How much clearance do I need between a vertically mounted GPU and the side panel?
- The Bottom Line
Quick Answer: What Is a Vertical GPU Mount?
A vertical GPU mount kit consists of two parts: a metal bracket that replaces your PCIe slot covers, and a riser cable that extends the PCIe x16 connection from your motherboard to the new bracket position. Your GPU rotates 90 degrees, cooler facing the side panel. Most kits cost $25 to $140 depending on PCIe generation support and build quality. They work in most standard ATX cases, but not all.
The appeal is obvious. If you spent serious money on an RTX 4090 or RTX 5090 with a premium triple-fan shroud, you probably don’t want it hidden face-down under a motherboard. Vertical mounting puts it on display. But there are thermal and compatibility tradeoffs that matter, and getting them wrong costs you real GPU performance. Here’s everything you need to know before buying.
- 🟢 Safe: PCIe Gen 4 or Gen 5 rated cable, 30mm+ clearance, mesh side panel
- 🟢 Safe: Quality brand (Lian Li, LINKUP, EZDIY-FAB, Corsair), GPU temps monitored post-install
- 🟡 Caution: Solid tempered glass panel with 15–25mm clearance, expect 5–10°C temp rise
- 🟡 Caution: PCIe 4.0 cable with RTX 5090 or RX 9070 XT, bandwidth capped at 64 GB/s
- 🔴 Danger: Unbranded riser cable under $10, solid glass panel with under 15mm clearance
- 🔴 Danger: No temp monitoring after install, Corsair case with a third-party universal bracket
What Is a Vertical GPU Mount?
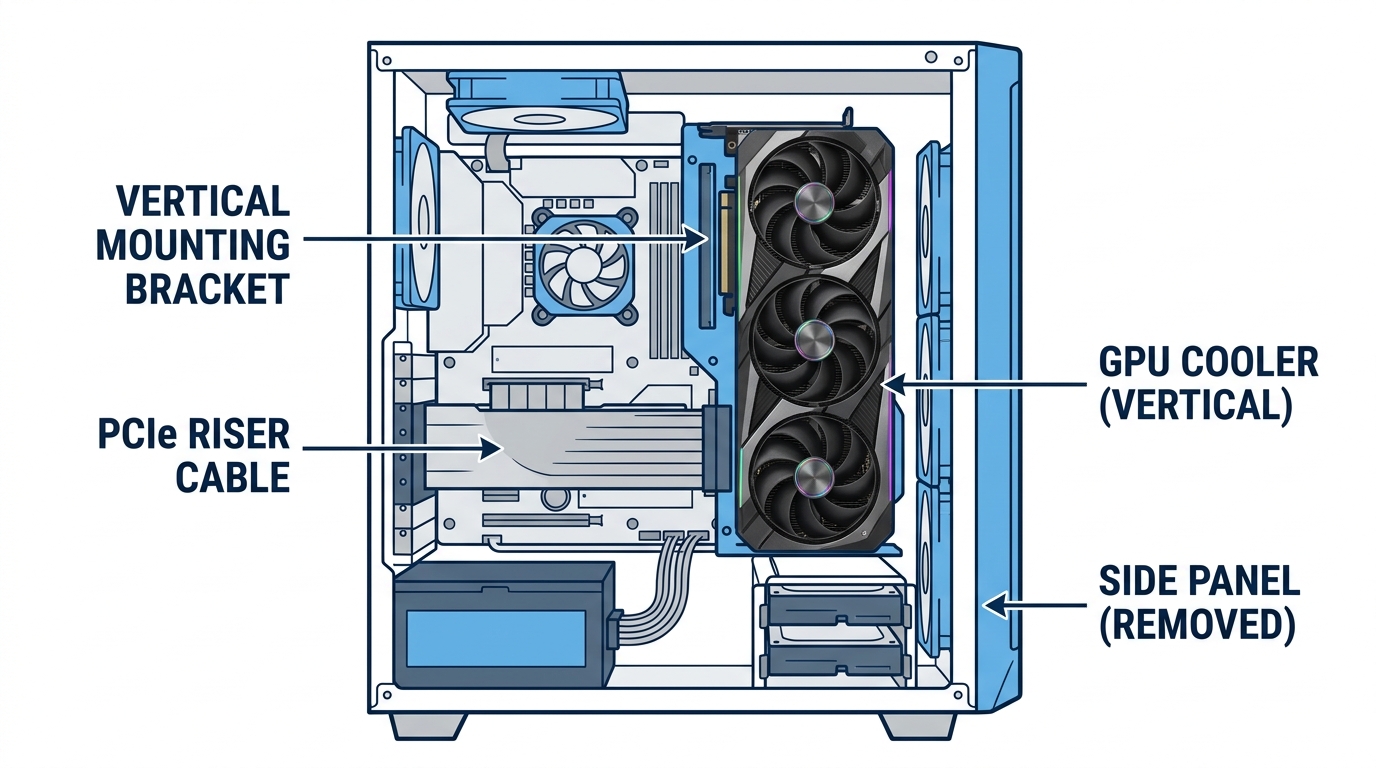
In a standard build, your GPU plugs directly into the PCIe x16 slot on the motherboard, sitting horizontally with its fans pointing toward the case floor. A gpu vertical mount changes that. The bracket bolts into the ATX expansion slot area (typically occupying 2 to 3 slot covers), and a flexible riser cable bridges the motherboard’s PCIe x16 slot to the bracket’s female PCIe connector. Your GPU then mounts into that bracket, rotated 90 degrees with the cooler facing the side panel.
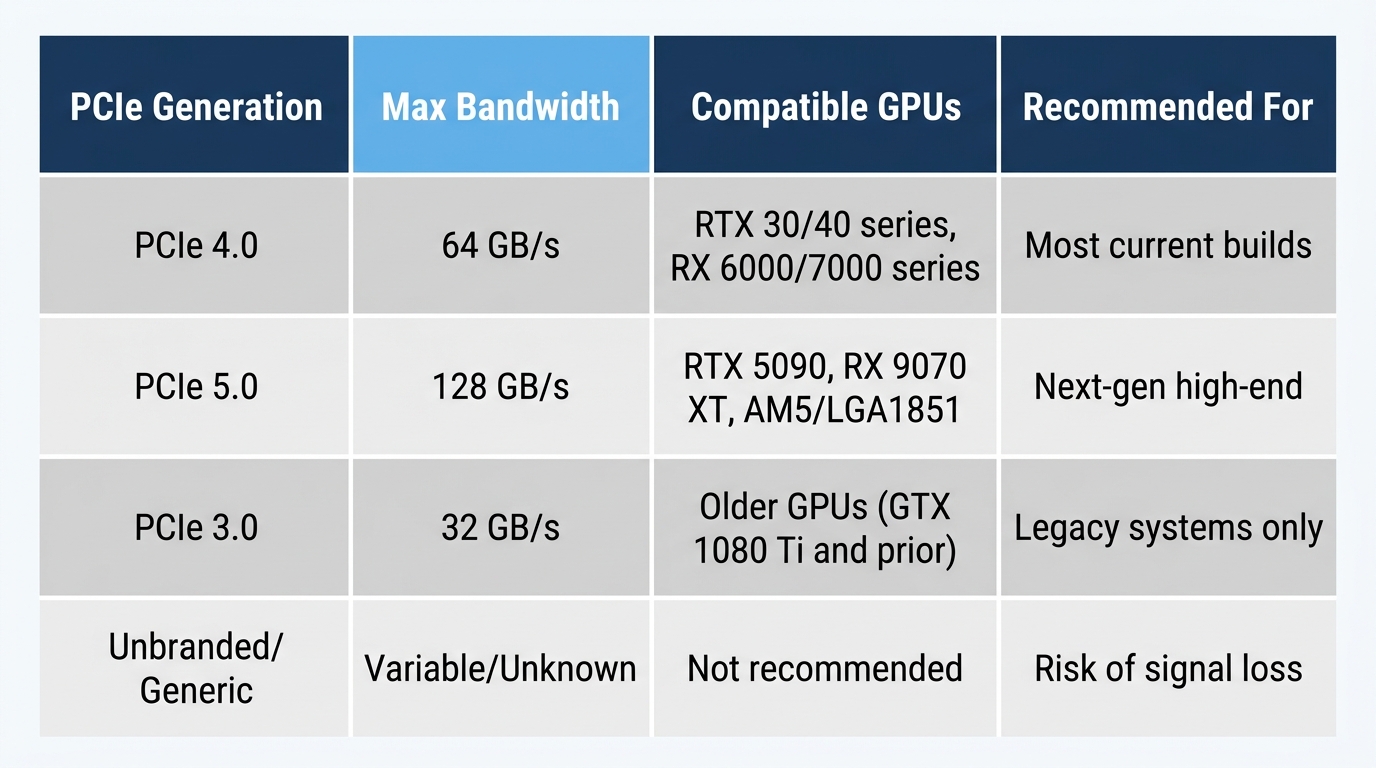
Most kits include the riser cable and the mounting bracket as a bundle. PCIe generation matters here. PCIe 4.0 riser cables work fine for RTX 30 and 40 series, RX 6000 and 7000 series, and any CPU platform through AM4 or LGA1700. If you’re building around an RTX 5090, RX 9070 XT, or any other PCIe 5.0 GPU on AM5 or LGA1851, you need a PCIe 5.0 certified riser cable. Not “compatible.” Certified. There’s a difference, and it affects signal stability at full bandwidth. For help choosing the right riser cable for your setup, the PCIe riser cable guide covers lengths, shielding, and what to look for by generation.
How a Vertical GPU Mount Works
The Standard Horizontal GPU Position
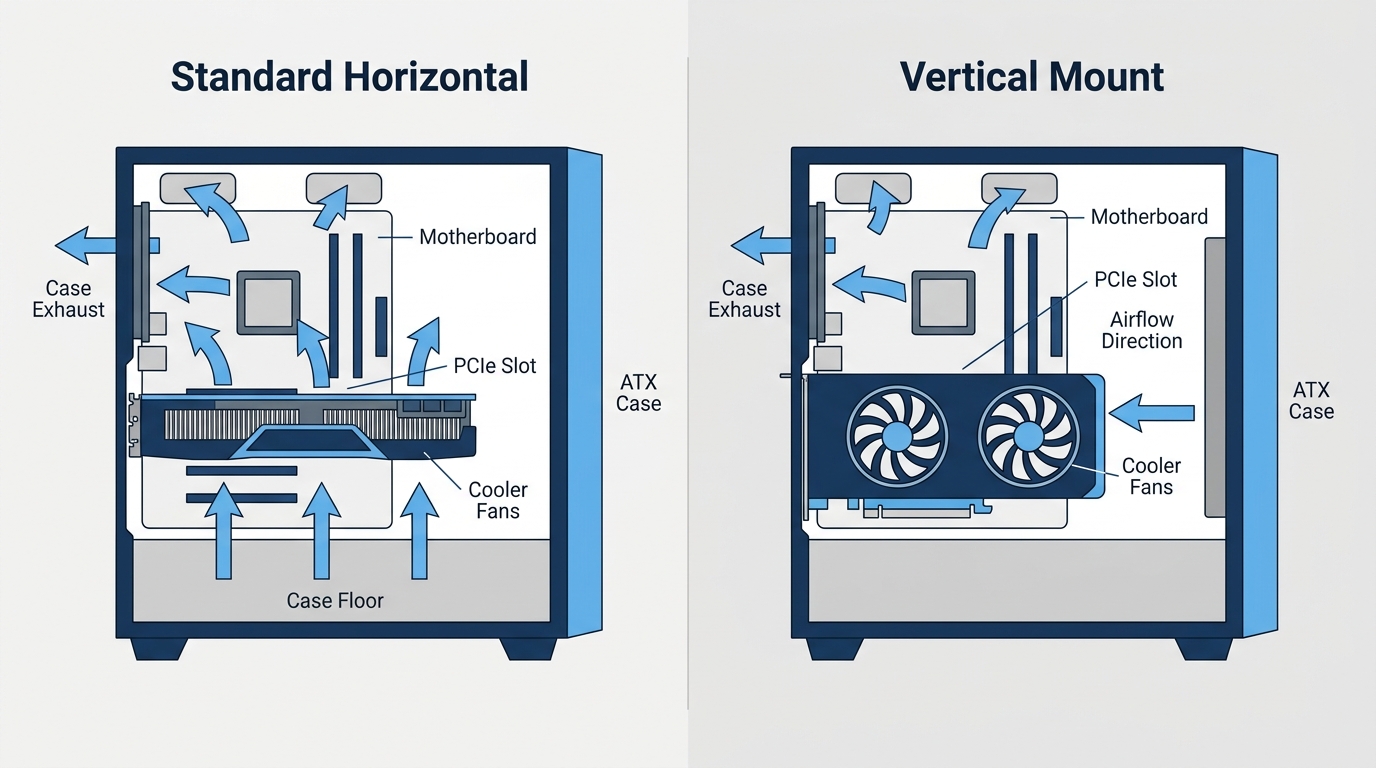
By default, your GPU hangs horizontally off the motherboard’s PCIe x16 slot. The fans point toward the case floor, pulling cool air up through the heatsink fins and exhausting warm air out the back of the card and upward through the case toward the rear and top exhaust fans. It’s a clean, tested airflow path that motherboard and case designers have optimized around for decades. The downside: your GPU cooler faces the motherboard. Nobody sees it.
How the Vertical Mount Changes the Orientation
When you install a vertical GPU mount, the GPU rotates 90 degrees. Fans now face the side panel instead of the case floor. The riser cable runs from the motherboard’s PCIe x16 slot to the bracket’s connector, bridging the gap. The bracket itself bolts into the same expansion slot screws that held your PCIe slot covers.
Most brackets support 2-slot and 3-slot GPU thickness. The Lian Li VG4v4 Gen5 bracket, for example, provides three mounting heights, each adjustable in 10.16mm increments with a single-screw adjustment, which lets you fine-tune GPU position relative to bottom-mounted fans or non-standard PCIe slot locations. That kind of adjustability matters in tighter builds. The Phanteks Premium Vertical GPU Bracket Gen5 goes further, allowing up to 30 degrees of tilt for a visually distinct angled display, not just straight vertical.
Vertical GPU Mount Pros
Aesthetics: Show Off Your GPU
This is why most builders do it. Full stop. An RTX 4090 Founders Edition or RTX 5090 with a triple-fan shroud and RGB lighting is a significant piece of hardware. Horizontal mounting hides all of that. Vertical mounting puts the cooler face-out through tempered glass, making it the visual centerpiece of the build. If you’ve spent $1,200 or more on a GPU, that’s a reasonable thing to want.
It’s especially popular in custom water-cooling setups, where the GPU waterblock design is half the point of the build aesthetically. And in high-end air-cooled builds with premium shroud designs, vertical mounting is practically standard at this point.
Reduced GPU Sag
Heavy GPUs bend. The RTX 4090 weighs approximately 2.2 kg (around 4.8 lbs). The RTX 5090 is heavier still. PCIe x16 slots are rated for mechanical loads up to roughly 1 kg, meaning flagship GPUs exceed that threshold by a significant margin without a GPU support bracket or alternative solution.
Vertical mounting eliminates lateral torque on the PCIe x16 slot entirely. The bracket takes the GPU’s weight. No sag, no gradual slot stress over months of use. for anyone running a $1,500+ graphics card long-term.
Airflow Benefits in Specific Case Layouts
Cases with mesh side panels, like the Fractal Torrent or Lian Li O11 Dynamic EVO with mesh side panels, can actually benefit from vertical GPU mounting. The GPU fans draw fresh air directly through the mesh rather than recirculating case-internal air. In those configurations, vertical mounting’s thermal performance can match or approach horizontal orientation. The key word is mesh. Solid glass panels are a different story entirely, addressed below.
Cleaner Cable Routing Appearance
Riser cables can be routed along the case’s internal channels to keep visible wiring minimal. In cases designed for vertical mounts, the riser cable path is often tucked behind motherboard trays or routed through rubber grommets. Not every build benefits, but with some planning it contributes to a cleaner interior presentation.
Vertical GPU Mount Cons
Thermal Impacts: The Biggest Concern
GPU fans face the side panel after vertical mounting. If there isn’t enough space between the fans and the panel, they recirculate their own hot exhaust instead of drawing in fresh air. The numbers matter here.
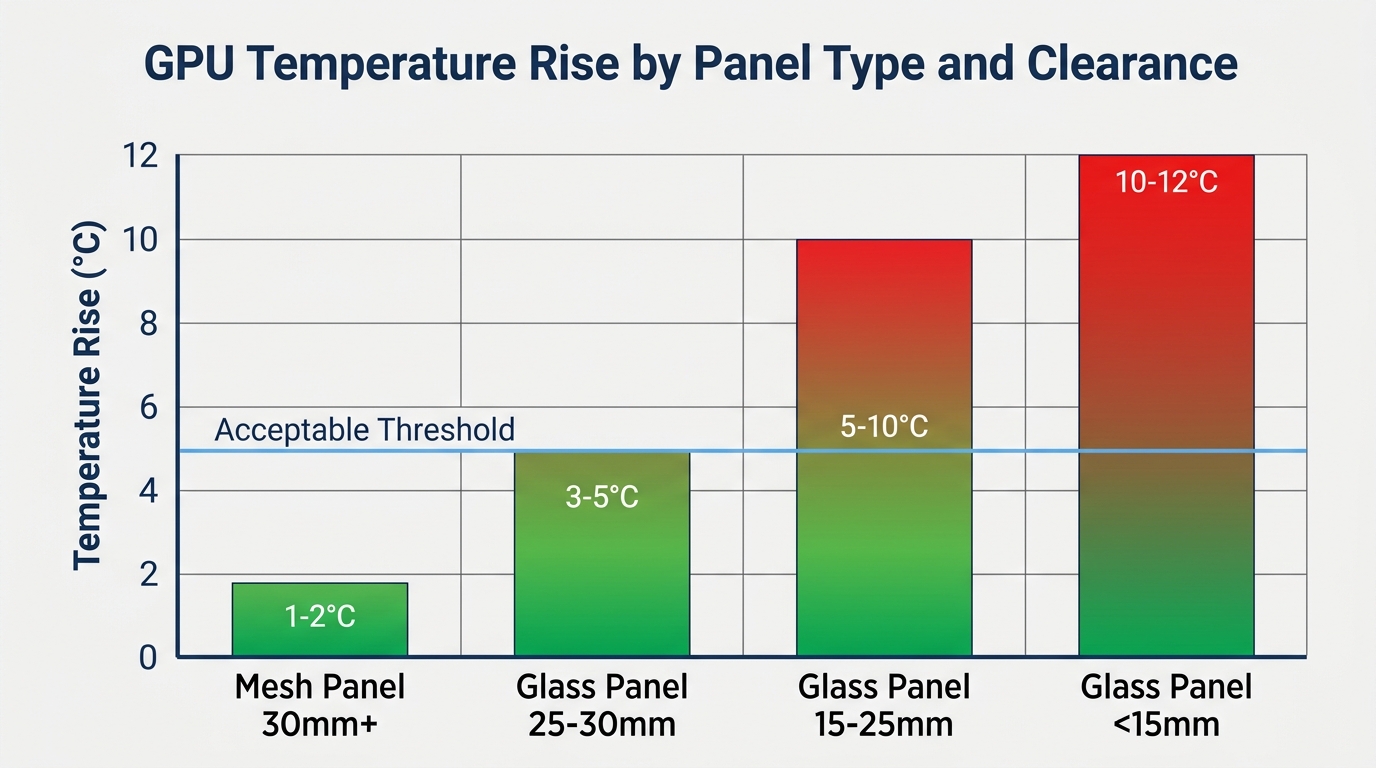
- 10–15mm clearance with solid glass panel: GPU temperatures typically increase 5–15°C. Significant throttling risk under sustained load.
- 20mm clearance with solid glass panel: Still problematic. Community testing consistently shows meaningful temperature deltas.
- 25–30mm+ clearance with solid glass panel: Borderline acceptable, but still warmer than horizontal.
- 20mm+ clearance with mesh side panel: Near-neutral thermal impact. Airflow can still reach GPU fans through the mesh.
- Open-frame or test bench case: No thermal penalty at all. Multiple threads on r/buildapc report 10°C or more GPU temperature increases in glass-panel cases with less than 20mm clearance.
The recommended minimum clearance is 30mm between the GPU fans and the side panel for acceptable thermals. Measure your case before buying a kit. If you’re working with a solid tempered glass panel and the geometry doesn’t give you that gap, either plan to run higher fan speeds or consider whether the aesthetics tradeoff is actually worth it. Knowing your safe GPU temperature ranges before and after install helps you catch thermal problems early.
PCIe Gen Compatibility and Signal Loss Risk
Cheap riser cables are genuinely dangerous to your build’s stability. Unshielded cables introduce signal degradation that shows up as artifacting, random crashes, or link speed fallback from PCIe 4.0 to 3.0. Not great.
PCIe 4.0 riser cables are stable at lengths up to around 600mm with quality shielding and suit any GPU through the RTX 40 or RX 7000 series. PCIe 5.0 x16 runs at 128 GB/s total bandwidth. A poorly shielded or Gen 4 cable used with a PCIe 5.0 GPU like the RTX 5090 causes the link to negotiate down to PCIe 4.0 x16 speeds, halving available bandwidth to approximately 64 GB/s. In current gaming titles, that bandwidth reduction is largely imperceptible. In GPU compute, AI workloads, and potentially future titles, it may matter. Use a certified Gen 5 cable for Gen 5 hardware.
Case Compatibility Limitations
Not every case supports vertical GPU mounting. Corsair cases like the 4000D Airflow and 5000D Airflow require Corsair’s proprietary vertical GPU bracket kit. A universal third-party bracket won’t fit correctly. NZXT has its own kits for supported models. Smaller mATX and Mini-ITX cases frequently have no physical room for a vertical orientation at all, or lack the expansion slot geometry required by most bracket designs.
Installation Complexity
Some bracket systems require removing the motherboard to access the PCIe slot from the correct angle. Riser cable routing in tight cases can be awkward, especially with stiffer PCIe 5.0 cables. Lian Li’s multi-direction bracket system is easier than most, but it still requires careful alignment across three adjustment points. Budget extra time for first installs.
Cost
- Budget range ($25–$45): PCIe 4.0, minimal shielding, adequate for RTX 30/40 series
- Mid-range ($45–$75): PCIe 4.0 with ARGB lighting, better shielding (EZDIY-FAB SHIELD ARGB at $49.99 is the benchmark here)
- Premium ($75–$140+): PCIe 5.0 certified, case-specific fit, adjustable height (Lian Li Gen 5, LINKUP Ultra PCIe 5.0)
Is Vertical GPU Mounting Safe?
Yes. Vertical GPU mounting is safe if you use a quality riser cable rated for your PCIe generation and maintain adequate side-panel clearance. Two conditions, both non-negotiable.
Safety breaks down into two separate questions. First, electrical and signal safety: use a PCIe-generation-matched, properly shielded cable from a reputable brand. Lian Li, LINKUP, EZDIY-FAB, and Corsair all produce cables that hold up under sustained use. Second, thermal safety: measure your clearance before installing. Run HWiNFO64 or MSI Afterburner during a GPU stress test like FurMark or 3DMark and compare your post-install temps to your baseline. If temps climb more than 10°C, you have a clearance or airflow problem to solve.
- 🟢 Quality Gen 4 or Gen 5 certified riser cable
- 🟢 30mm or more clearance between GPU fans and side panel
- 🟢 Mesh side panel or open-frame case
- 🟢 GPU temp monitoring enabled post-install
- 🔴 Cheap unbranded riser cable
- 🔴 Less than 15mm clearance with solid glass panel
- 🔴 Gen 4 cable with RTX 5090 or RX 9070 XT at PCIe 5.0 speeds
- 🔴 No thermal baseline comparison after install
Vertical GPU Mount vs. Horizontal: Side-by-Side Comparison
| Factor | Horizontal (Default) | Vertical GPU Mount |
|---|---|---|
| Aesthetics | GPU cooler hidden from view | GPU cooler visible through glass |
| GPU Sag | Risk with heavy GPUs | Eliminated by bracket support |
| Cooling (glass panel) | Optimal | 5–15°C temperature increase risk |
| Cooling (mesh panel) | Optimal | Near-neutral impact |
| PCIe Signal | Direct, no cable loss | Dependent on riser cable quality |
| Install Difficulty | Easy | Moderate to complex |
| Cost | No extra cost | $25–$140+ |
| PCIe Gen 5 Support | Native (direct connection) | Requires Gen 5-rated cable |
What to Look for in a Vertical GPU Mount Kit
PCIe Generation Rating
Match the cable’s PCIe generation to your platform. PCIe 4.0 covers AMD AM4 and Intel LGA1700, along with all RTX 30 and 40 series and RX 6000 and 7000 series GPUs. PCIe 5.0 is required for AM5 (Ryzen 7000, 9000 series), Intel LGA1851 (Core Ultra 200 series, Arrow Lake), and GPU platforms like the RTX 5090 or RX 9070 XT. Look for “PCIe 5.0 certified” on the product listing. The word “compatible” means nothing without third-party certification.
Riser Cable Length and Shielding
Standard lengths run at 150mm, 200mm, and 300mm. Measure the distance from your motherboard’s PCIe x16 slot to the bracket position before ordering. A cable that’s too short pulls on connectors. Too long creates routing problems and excess slack. Shielding is non-negotiable: look for double-layer shielding, gold-plated contacts, and reinforced connector housings. Avoid unbranded cables under $10 on marketplace listings. Seriously. The failure mode is crashes, artifacting, and data corruption. Not worth it.
Bracket Adjustability
Fixed-height brackets work fine in purpose-built cases where the PCIe slot position is predictable. Adjustable brackets are better for everything else. They let you clear bottom-mounted fans, account for non-standard PCIe slot positions in mATX boards, and dial in GPU height precisely. Most brackets target standard 7-slot ATX cases. If you’re building in a 5-slot mATX case, verify the bracket fits your available expansion area before buying.
Case Compatibility
Check the manufacturer’s compatibility list. Corsair, Lian Li, and NZXT all publish them. Corsair’s 4000D Airflow, 5000D Airflow, and 5000X require Corsair’s proprietary vertical GPU kit. A universal bracket physically won’t mount correctly in those cases. Other brands are more flexible, but clearance and slot positioning vary enough that you should confirm before purchasing.
ARGB and Aesthetics Features
Some kits include ARGB accent lighting along the bracket itself. EZDIY-FAB’s ARGB variant is the most popular budget option. Confirm your motherboard has a 3-pin 5V ARGB header before buying an ARGB kit. If your board only has a 4-pin 12V RGB header, the ARGB lighting won’t work correctly. The RGB header guide on this site breaks down header types and pinouts in detail if you need to confirm what your board has.
Best Vertical GPU Mount Kits: Top Picks
| Product | PCIe Gen | Cable Length | ARGB | Price | Best For |
|---|---|---|---|---|---|
| Lian Li O11D-1X Gen 5 (VG4v4) | PCIe 5.0 | 200mm | No | ~$79 | Premium / RTX 5090 builds |
| EZDIY-FAB SHIELD ARGB Vertical Mount | PCIe 4.0 | 200mm | Yes | ~$49 | Budget RGB builds |
| Corsair Premium PCIe 4.0 Riser Kit | PCIe 4.0 | 175mm | No | ~$59 | Corsair case owners |
| LINKUP Ultra PCIe 5.0 Riser | PCIe 5.0 | 300mm | No | ~$89 | High-bandwidth Gen 5 builds |
| EZDIY-FAB SHIELD Upright GPU Mount | PCIe 4.0 | Integrated | No | ~$140 | Upright / pedestal builds |
Best Overall: Lian Li VG4v4 Gen 5 Vertical GPU Bracket
The Lian Li VG4v4 is the kit to get if you want something that will last across multiple GPU generations. It’s PCIe 5.0 certified, supports the RTX 5090 and RX 9070 XT at full bandwidth, and offers three height adjustment positions with 10.16mm increments per step via a single-screw adjustment mechanism. That flexibility makes it usable across a wide range of ATX cases without modification. Installation is more involved than a fixed bracket, but the adjustability compensates. Lian Li’s product page has the full spec sheet and case compatibility list.
Best Budget Pick: EZDIY-FAB SHIELD ARGB Vertical Mount
At $49.99, the EZDIY-FAB ARGB kit is the best value for RTX 30 and 40 series builds, or any platform running PCIe 4.0. Wide case compatibility, ARGB bracket lighting, and reliable shielding at this price point. Not future-proof for PCIe 5.0, but the right call if you’re not running a next-gen GPU and want the RGB aesthetic without spending $80+.
Best for Corsair Cases: Corsair Vertical GPU Bracket Kit
If you own a Corsair 4000D Airflow, 5000D Airflow, or 5000X, this is the only practical choice. Third-party brackets don’t fit these cases correctly. The Corsair kit is PCIe 4.0 rated, which covers the majority of current GPU installs. Not the most exciting option, but it’s the one that actually fits and mounts securely.
Best PCIe 5.0 Cable: LINKUP Ultra PCIe 5.0 Riser
The LINKUP Ultra is currently one of the few cables independently verified for PCIe 5.0 x16 operation at full 128 GB/s bandwidth. Its 300mm length suits larger tower cases where shorter cables create routing problems. Required if you’re running an RTX 5090 and need full PCIe 5.0 bandwidth. Expensive, but the RTX 5090 itself isn’t cheap, so skimping on the cable connecting it to your motherboard isn’t the place to save money.
How to Install a Vertical GPU Mount (Step-by-Step)
- Remove the GPU from the motherboard: power down completely, discharge static by touching the case frame, unplug all PCIe power cables from the GPU, then release the PCIe slot retention clip and lift the card free.
- Remove PCIe slot covers: your vertical mount bracket replaces 2 to 3 slot covers. Remove the appropriate ones and save the screws.
- Install the vertical mount bracket: align the bracket with the expansion slot openings and secure it using the slot cover screws you just removed. Confirm it’s seated flush and doesn’t flex.
- Connect the riser cable to the motherboard PCIe x16 slot: seat it fully until the retention clip engages. Don’t force it. If it’s not sliding in smoothly, check the orientation.
- Seat the GPU into the riser cable’s PCIe x16 female connector: same process as a standard GPU install, same retention clip mechanism.
- Mount the GPU to the vertical bracket: use the included thumb screws or the screws that held your old slot covers. The GPU’s I/O bracket should align with the vertical bracket’s mounting points.
- Reconnect PCIe power cables: route them carefully to avoid strain on the 12VHPWR or 16-pin connector. Don’t let cables pull at an angle on the GPU’s power connector.
- Measure side-panel clearance before closing up: physically measure the gap between GPU fans and the side panel. Aim for at least 25 to 30mm. If you’re under 20mm with a solid glass panel, seriously reconsider before closing.
- Boot and monitor GPU temperatures: run HWiNFO64 alongside FurMark or a 3DMark Time Spy run and compare temps to your pre-install baseline. A 5°C rise is acceptable. 10°C or more signals a clearance problem.
Pro tip: If GPU temps climb more than 10°C after vertical mounting, increase case fan speed on any side-mounted intake fans, or seriously consider switching to a mesh side panel. The glass panel is the thermal bottleneck, not the mount itself.
Vertical GPU Mount Compatibility by Case Brand
| Case Brand | Native Vertical Support | Recommended Kit | Notes |
|---|---|---|---|
| Lian Li | Yes (most models) | Lian Li VG4v4 / UNI bracket | Best ecosystem support overall |
| Corsair | Yes (5000D, 4000D, 7000X) | Corsair Vertical GPU Kit only | Proprietary fit, third-party won’t work |
| NZXT | Yes (H510, H710 with kit) | NZXT Vertical GPU Mount Kit | PCIe 4.0 only as of 2024 |
| Fractal Design | Partial (Torrent, Define 7) | Third-party universal bracket | Torrent’s mesh side panel is ideal for thermals |
| Phanteks | Yes (P400A, P600S) | EZDIY-FAB or Phanteks kit | Check PCIe slot positioning per model |
| be quiet! | Limited | Third-party bracket | Measure clearance carefully, many glass panels |
| Generic ATX cases | Varies | Universal bracket kits | Verify 2 to 3 slot cover access and clearance |
Vertical GPU Mount and PCIe 5.0: What You Need to Know for 2025 and 2026 Builds
If you’re building around an RTX 5090, RX 9070 XT, or any future GPU on a PCIe 5.0 platform (AM5 with Ryzen 9000 series, Intel LGA1851 with Core Ultra 200 Arrow Lake), the riser cable choice becomes a real decision with measurable consequences.
PCIe 5.0 x16 delivers 128 GB/s of bidirectional bandwidth. Using a PCIe 4.0 riser cable causes the GPU and motherboard to negotiate down to PCIe 4.0 x16 speeds, which runs at approximately 64 GB/s. That’s a 50% bandwidth reduction at the interface level. In 2025 and 2026 gaming, that difference is barely detectable in frame rate testing. Most games don’t come close to saturating PCIe 4.0 x16 bandwidth. But GPU compute tasks, AI inference workloads, and future software may push those boundaries, so building with a Gen 4 cable on a Gen 5 GPU is a knowable limitation worth understanding.
The practical consideration is cable stiffness. PCIe 5.0 riser cables are physically stiffer than Gen 4 cables because of the additional shielding required to maintain signal integrity at higher frequencies. The LINKUP Ultra at 300mm and the Lian Li VG4v4 Gen 5 at 200mm both need routing planned ahead of time. You can’t bend a PCIe 5.0 cable at sharp angles without risking signal issues. Plan the cable path before you buy. LINKUP’s product spec page has bend radius specifications for the Ultra Gen 5 cable.
Unique Buying Scenarios: Which Vertical GPU Mount Is Right for You?
- RTX 5090 or RX 9070 XT build: Get a PCIe 5.0 certified kit. Lian Li VG4v4 Gen 5 or LINKUP Ultra PCIe 5.0. Don’t compromise here.
- RTX 4070, 4080, or RX 7900 build with RGB priority: EZDIY-FAB SHIELD ARGB at $49.99 is the best value. PCIe 4.0 is plenty for these GPUs.
- Corsair case owner: Only the Corsair proprietary vertical GPU kit fits correctly. Don’t try to make a universal bracket work.
- White build aesthetics: EZDIY-FAB and Lian Li both offer white bracket finishes. If a clean all-white build is the goal, the white gaming setup ideas guide covers component pairing and color-matching in detail.
- Solid glass side panel and tight clearance: Factor the 5 to 15°C thermal penalty into your cooling plan. Add a side intake fan if your case supports it, or consider a mesh side panel replacement. Don’t ignore the temps after install.
- mATX or Mini-ITX build: Measure everything first. Many compact cases don’t have the physical space for a vertical GPU orientation. The PCIe slot position relative to the side panel gap is the determining factor.
FAQ: Vertical GPU Mount Questions Answered
Is vertical GPU mounting safe?
Yes, with two conditions: use a quality riser cable rated for your PCIe generation (Gen 4 or Gen 5 as appropriate) and ensure at least 25 to 30mm of clearance between your GPU fans and the side panel. The two primary risk factors are cheap, unshielded riser cables that introduce signal instability, and solid glass panels with under 15mm of clearance that cause hot air recirculation and thermal throttling. Use a reputable brand’s cable and measure your clearance before finalizing the install.
Does a vertical GPU mount affect performance?
A quality PCIe 4.0 riser cable used with a PCIe 4.0 GPU causes no measurable gaming performance loss. A PCIe 4.0 cable used with a PCIe 5.0 GPU like the RTX 5090 caps available bandwidth at 64 GB/s instead of 128 GB/s, though current games rarely approach PCIe 4.0 x16 saturation. Thermal throttling from insufficient clearance is the more likely performance concern, reducing GPU output by 3 to 8% in sustained workloads when temperatures climb above the throttle threshold.
What PCIe riser cable do I need for an RTX 5090?
The RTX 5090 runs on PCIe 5.0 x16. For full bandwidth in a vertical mount setup, use a certified PCIe 5.0 riser cable such as the LINKUP Ultra or the Lian Li VG4v4 Gen 5. A PCIe 4.0 cable will allow the system to boot and run normally, but it caps bandwidth at approximately 64 GB/s instead of the full 128 GB/s. For current gaming that difference is small, but if you’re running GPU compute tasks or want to future-proof the build, the Gen 5 cable is the correct choice.
Will any vertical GPU mount work with my case?
Not necessarily. Corsair and NZXT cases typically require brand-specific brackets for a correct fit. Universal ATX vertical GPU mount kits work with most standard 7-slot ATX cases, but you need to verify available expansion slot count, PCIe slot-to-panel distance, and bracket height compatibility for your specific case before purchasing. Always check the mount manufacturer’s compatibility list, and measure your internal clearance rather than relying on estimated specs.
How much clearance do I need between a vertically mounted GPU and the side panel?
A minimum of 25 to 30mm is the recommended clearance for adequate airflow to GPU fans in a vertical mount configuration. At 10 to 15mm with a solid tempered glass panel, GPU temperatures typically increase by 5 to 15°C in community testing and Gamers Nexus thermal evaluations. Cases with mesh side panels are more forgiving because air can still exchange through the panel, but 20mm or more is still preferred. Open-frame cases have no clearance constraint and no thermal penalty from vertical mounting.
The Bottom Line
A vertical GPU mount is a legitimate upgrade for the right build and a potential thermal liability for the wrong one. The deciding factors are clearance, cable quality, and PCIe generation matching. If your case has a mesh side panel and 30mm or more of space between the GPU fans and the panel, the thermal concern mostly disappears. If you’re running a PCIe 5.0 GPU like the RTX 5090, spend the extra $30 to $40 on a certified Gen 5 cable. And measure before you buy. Check your case’s internal dimensions, confirm bracket compatibility, and run a stress test after installation with HWiNFO64 open. Do those three things and the vertical orientation will look exactly as good as you’re hoping, without costing you GPU performance.

Alex has been building and tweaking custom PCs for over 12 years. From budget builds to full custom water loops, he’s assembled more than 50 systems and helped hundreds of builders troubleshoot their rigs. When he’s not benchmarking the latest hardware, you’ll find him optimizing airflow setups or stress-testing overclocks.