SSD Not Showing Up in BIOS? How to Find Out Why (M.2 and SATA)
If your SSD isn’t in the BIOS, reseat it, confirm the slot supports that drive type with your CPU, and check that no other slot switched its port off.
Last updated: November 2026
Table of Contents
- Check the screen that actually lists drives
- Not in the BIOS at all? Work through these in order
- 1. Reseat the drive and check the cable
- 2. Make sure the slot supports your drive type
- 3. Check the slot works with your CPU
- 4. Check for shared lanes
- 5. Update the BIOS and undo any overclock
- 6. Swap things around
- Slot catches from real manuals, brand by brand
- It’s in the BIOS but not in the boot list
- Laptops and prebuilts: Windows Setup finds no drives
- It’s in the BIOS but not in Windows
- Frequently Asked Questions
- How do I enable an SSD in BIOS?
- Why is my M.2 SSD not showing up in BIOS?
- Why does my SSD show in BIOS but not in Windows?
- Why did my hard drive disappear after I installed an M.2 SSD?
- Will a BIOS update fix an SSD that isn’t detected?
- How can I tell if my SSD is dead?
- Before you RMA it, write this down
You’ve fitted an SSD, pressed Delete on the next boot, and the drive isn’t there. Or a drive that worked last week vanished after a crash or a hardware swap. Annoying. The BIOS is still the right place to start, because it sees the hardware before Windows does.
First make sure you’re looking at the screen that actually lists drives. Then confirm the drive is missing there, not just from the boot list or from Windows, and work through the hardware checks in order. Most of them cost nothing.
One rule before you touch anything: don’t initialize or format the drive yet. If it holds data, that wipes it.
Check the screen that actually lists drives
Not every BIOS page shows every drive. On ASUS boards, press Delete at power-on to open EZ Mode and look at Storage Information. If you land in Advanced Mode instead, F7 takes you back. ASUS’s own troubleshooting page sends you to the same box.
There’s a catch on older ASUS boards. On models like the TUF B450-PLUS GAMING, NVMe drives don’t appear in Storage Information at all, and ASUS treats that as normal. So on those boards, an empty list doesn’t prove your M.2 drive is missing. Check your manual’s BIOS chapter for where that board lists NVMe devices.
On MSI boards, go to Settings, then System Status, which shows whether the board detects the drive. On ASUS NUC mini PCs, press F2 at boot and open Advanced > Devices > SATA or Advanced > Storage. The drive should be listed there on its SATA or M.2 port.
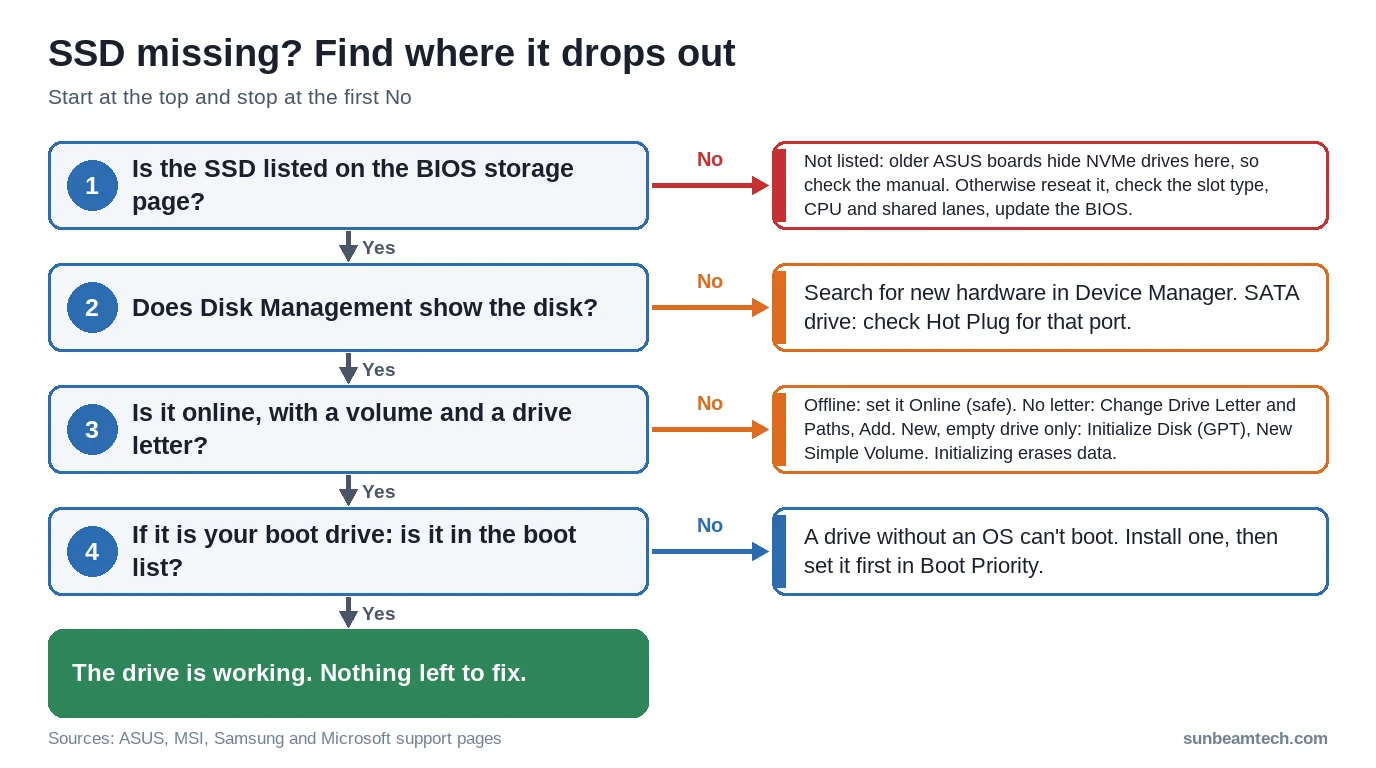
The picture below puts the two lists side by side. The storage list shows what the board detects. Boot Priority is only the order the board tries drives in, and a drive with no operating system on it can’t boot, wherever it sits in that list.
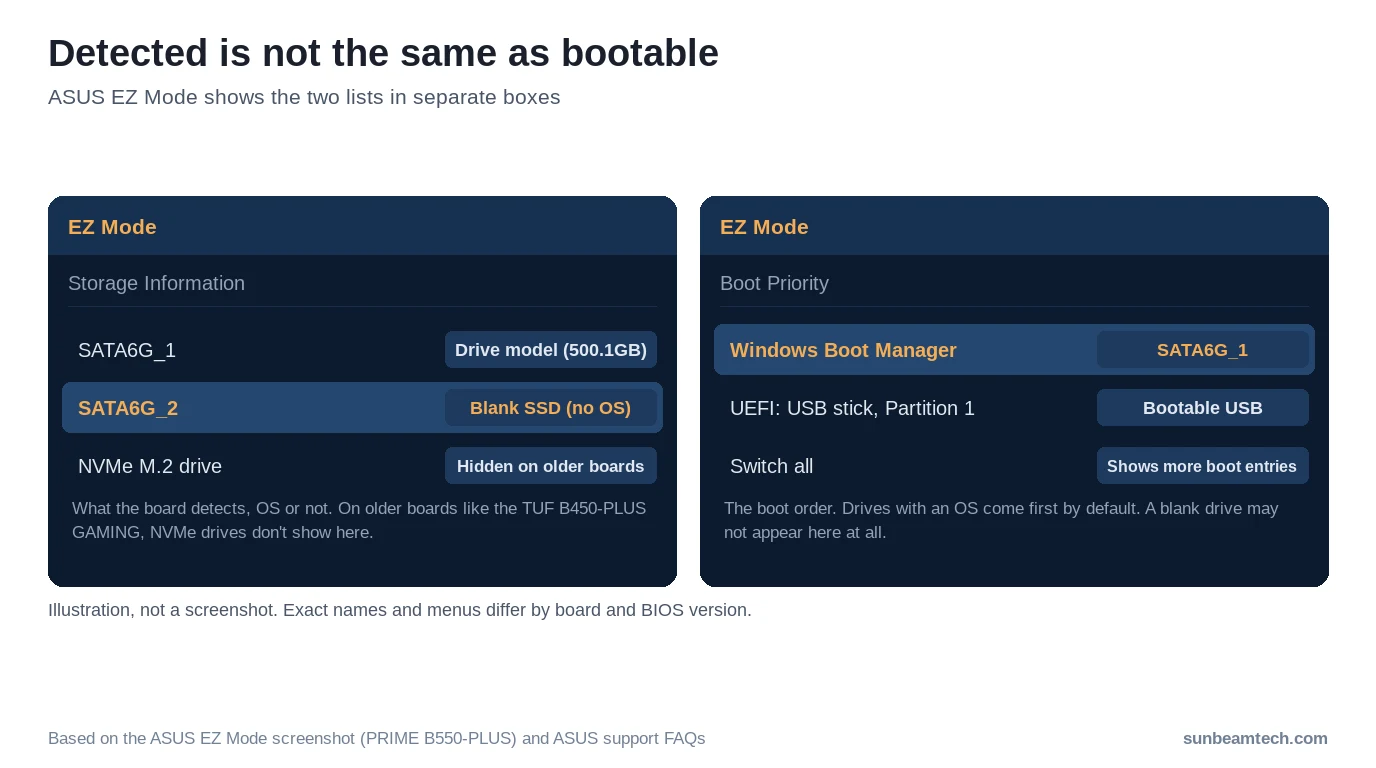
If your drive is on the storage list, the board, slot and cable are working, so skip ahead to the boot list or Windows sections. If it isn’t, keep going.
Not in the BIOS at all? Work through these in order
Shut down and switch the PSU off before you touch anything inside. The checks run from cheapest to slowest. Don’t skip the first one.
1. Reseat the drive and check the cable
For an M.2 drive, take it out and put it back. It goes in at an angle, then you press the far end down and lock it. Make sure the screw or latch actually holds it flat against the standoff. Lost the screw? Our M.2 screw size guide lists what fits. If this is your first M.2 build, the step-by-step M.2 NVMe install guide walks through the whole job.
For a 2.5-inch SATA SSD, reseat the data cable and the power plug at both ends. Then swap in a known-good data cable, try another SATA port on the board, and try another SATA plug from the PSU. A creased cable can break inside while it still looks fine, so a different cable is the quickest test. If you’re short on plugs, here’s how many drives one PSU SATA cable can run.
While you’re in the BIOS, check that the SATA port itself isn’t off. A drive can go undetected simply because it’s turned off in setup. Find the port on the board’s SATA or storage page and make sure it’s enabled. Our SATA and M.2 install guide covers the cabling side if you’re starting from scratch.
2. Make sure the slot supports your drive type
M.2 is a shape, not a protocol. An M.2 SSD is either SATA or PCIe (NVMe), and a slot doesn’t have to take both. Check the label on the drive, then find that slot in your board’s spec list.
This is where M.2 SATA drives get caught. The Gigabyte B650 AORUS ELITE AX doesn’t support M.2 SATA SSDs in any of its three slots. On some ASUS boards the M.2_2 slot is PCIe only, and a SATA M.2 drive in it simply isn’t recognized. If you’ve got an M.2 SATA drive, it needs a slot that lists SATA mode.
3. Check the slot works with your CPU
Some M.2 slots are wired to the CPU, and not every CPU drives them. On the ASUS PRIME B560-PLUS, M.2_1 needs an 11th gen Intel processor. With any other CPU that slot is disabled, so your SSD can be perfectly fine and still invisible.
AMD boards can carry the same kind of footnote. On the ASRock B550M Pro RS, NVMe SSDs aren’t supported at all with an Athlon 3000G. If you run a budget chip or an APU, read the storage lines of the spec sheet twice.
4. Check for shared lanes
Some M.2 slots share lanes with SATA ports, so you can’t use both at once. On the MSI MEG Z590 ACE, a drive in M2_2 makes SATA2 unavailable. On the PRIME B560-PLUS, a SATA-mode drive in M.2_2 knocks out SATA6G_2.
It works both ways. Add an M.2 SSD and your old SATA drive can vanish. Plug a new SATA SSD into a shared port and the new drive is the one that’s missing. The fix is to move the SATA cable to a port your manual doesn’t list as shared. ASUS’s troubleshooting page uses SATA6G_3 or SATA6G_4 as its example.
On the ASUS spec page, that rule is a footnote with an asterisk. Read the small print. If you’re planning more drives, our guide to how many SSDs a PC can have explains the lane limits behind it.
5. Update the BIOS and undo any overclock
An outdated BIOS may not support your SSD, so flash the latest version before you blame the drive. It’s the first item on ASUS’s own checklist. On boards with BIOS Flashback, the update runs from a USB stick. On ASRock’s version the system doesn’t even need a CPU.
Using BitLocker on your system drive? Suspend it and save the recovery key before you run Flashback. If encryption is still active and the key is gone, the system won’t boot into Windows afterwards. ASRock’s B650M Pro RS WiFi manual warns about exactly that.
Overclocked the CPU or memory? Load defaults too, because overclock instability can stop a drive being detected on ASUS boards. On those boards F5 loads defaults and F10 saves.
ASUS’s list also includes turning Launch CSM on, under Boot. If you try it, note the old value first and put it back if nothing changes. Our CSM guide explains what that switch means for Windows 11.
6. Swap things around
Still nothing? Put the SSD in another PC, or put a known-good drive in this slot. Testing in another computer tells you whether the SSD itself is the problem. If a working drive also disappears in your slot, look at the board and the slot instead.
Slot catches from real manuals, brand by brand
Every board is different, but these are the kinds of notes to look for. Here’s one example per brand, taken from the maker’s own manual, spec sheet or support page.
| Brand | Board | The catch | What to do |
|---|---|---|---|
| ASUS | PRIME B560-PLUS | M.2_1 only works with 11th gen Intel CPUs. A SATA-mode drive in M.2_2 disables SATA6G_2. | With another CPU, use M.2_2. Move a SATA drive off SATA6G_2. |
| MSI | MEG Z590 ACE | A drive in M2_2 makes SATA2 unavailable. | Move the SATA drive to another port. |
| Gigabyte | B650 AORUS ELITE AX | All three M.2 slots take PCIe SSDs only. No M.2 SATA support. | Use an NVMe drive, or a 2.5-inch SATA SSD on a SATA port. |
| ASRock | B550M Pro RS | M2_1 is PCIe only. M2_2 takes SATA or PCIe. No NVMe support with an Athlon 3000G. | Put an M.2 SATA drive in M2_2. |
It’s in the BIOS but not in the boot list
For a new, empty drive, that’s expected. Drives without an operating system can’t be used as boot devices, so there’s nothing on it to boot yet. On ASUS desktop boards, drives with an OS go to the top of the boot order by default. The Switch all button in the Boot Priority box shows more boot entries, but a blank drive may not appear there at all. To confirm the board sees it, check the Storage Information list instead.
Once Windows is installed or cloned onto it, set it as the first boot device. On an ASUS desktop board, drag it to the top of Boot Priority in EZ Mode and press F10 to save. On ASUS NUCs it’s Advanced > Boot > Boot Priority (or Boot > Boot Priority), then F10 to save.
Look for the right name, too. On ASUS boards a bootable Windows drive can be listed as Windows Boot Manager, with the port and the drive model in brackets after it.
Laptops and prebuilts: Windows Setup finds no drives
Here the BIOS sees the drive, but the Windows installer shows an empty list. On Dell systems with Intel 11th to 14th gen processors, storage runs through Intel VMD. Retail Windows media won’t find any drives until you load the Intel Rapid Storage Technology (IRST) driver. A Media Creation Tool USB behaves the same way.
Download the IRST driver from the support page for your exact model, because Dell’s own table shows a driver that works on one CPU generation failing on another. Copy it onto the install USB first. In Setup, choose Load driver, browse to the VMD folder, pick Intel RST VMD Controller and click Next, and the drive appears. Dell’s own recovery images don’t have this problem.
On another brand of laptop or prebuilt, check its support page for an IRST or VMD storage driver before you start the install.
It’s in the BIOS but not in Windows
Good sign: the board, slot and cable are doing their job. A new disk isn’t usable in File Explorer until Windows initializes it. Type Create and format hard disk partitions into Start and run it as administrator to open Disk Management. Find the disk, and if it says Offline, right-click it and choose Online.
Stop before the next step if the drive should have data on it. Initializing a disk that’s already in use erases everything on it, so leave that one uninitialized.
On a new, empty drive, right-click it, choose Initialize Disk and keep the default GPT partition style. Right-click the unallocated space, pick New Simple Volume and follow the wizard. Microsoft’s walkthrough covers each step.
Already got a volume but no drive letter? Right-click the volume, choose Change Drive Letter and Paths, click Add and pick a letter. Microsoft’s drive letter guide has the details.
If the disk doesn’t show in Disk Management at all, scan for new hardware in Device Manager. On a SATA drive, also check Hot Plug for that port, because with it set to Off, Windows may not recognize the SSD. Our SATA Hot Plug guide shows where that setting lives.
Looking at a USB drive rather than an internal one? That’s a different job. Start with our guide to an external hard drive that isn’t showing up.
Frequently Asked Questions
How do I enable an SSD in BIOS?
There may not be a setting with that name. Make sure the SATA port it’s on isn’t turned off in setup, and that the M.2 slot supports the drive’s type with your CPU. Then confirm it’s listed under Storage Information on ASUS, or Settings > System Status on MSI.
Why is my M.2 SSD not showing up in BIOS?
Check four things: it’s fully seated and screwed down, the slot accepts SATA or NVMe to match the drive, the slot works with your CPU, and your manual doesn’t list lane sharing that turns it off. An outdated BIOS may not support the drive either.
Why does my SSD show in BIOS but not in Windows?
A brand-new drive has to be initialized and given a volume before File Explorer shows it. You do that in Disk Management, and only on an empty drive, because initializing wipes it. If Disk Management can’t see it either, check Device Manager and the port’s Hot Plug setting.
Why did my hard drive disappear after I installed an M.2 SSD?
Check your manual first. On some boards the new M.2 slot shares lanes with a SATA port, and filling the slot switches that port off (on some, only an M.2 SATA drive does). If yours does, move the SATA cable to a port the manual doesn’t list as shared. Also check you didn’t knock the SATA cable loose while you were inside the case.
Will a BIOS update fix an SSD that isn’t detected?
It can, if the old firmware doesn’t support the drive. It won’t fix a SATA M.2 drive in a PCIe-only slot, a slot your CPU doesn’t drive, a port switched off by lane sharing, or a dead drive.
How can I tell if my SSD is dead?
Test it in another PC, and test a known-good drive in your slot. If your SSD is missing everywhere while the other drive works in your slot, the SSD is the problem and it’s time for a warranty claim.
Before you RMA it, write this down
If the drive fails in a second PC and a known-good drive works in yours, it’s a warranty case. Stop troubleshooting there and start the replacement, which is where Seagate’s own checklist ends too. Write these down before you open the ticket:
- Board model and BIOS version
- CPU model, since it decides which slots are live
- Drive model and type: SATA or NVMe
- Which slot or SATA port you used, and what else is plugged in
- Every check you’ve done, in order, and what happened
One last thing. If the drive holds data you can’t lose, don’t run format or repair tools on it first. Talk to the maker’s support before anything writes to it.
Want our guides higher in your Google results? Add SunbeamTech as a preferred source.


Alex Rivera writes SunbeamTech’s guides on BIOS settings, motherboard headers, cooling and PC builds. Every guide starts from the manufacturer’s documentation and the questions builders actually search for, and gets checked against AMD, Intel, NVIDIA and board-vendor sources before it goes live. Spotted a mistake? Email [email protected] and it gets fixed.