External Hard Drive Not Showing Up? Here’s How to Fix It
An external hard drive not showing up almost always means a connection, driver, or drive-letter problem rather than dead hardware, and it’s fixable in under ten minutes in most cases.
Last updated: September 2026
Table of Contents
- Why external hard drives stop showing up
- Fix it on Windows
- 1. Check Disk Management before anything else
- 2. Swap the cable and the port
- 3. Reinstall the drive in Device Manager
- 4. Rule out a power problem
- Fix it on Mac
- Portable SSDs and branded drives: a few extra checks
- If it’s an internal drive, not an external one
- Recover your data before you do anything destructive
- When it’s a physical failure
- Prevent this from happening again
- Frequently Asked Questions
- Why does my drive show up in Device Manager but not in File Explorer?
- Is it safe to format a drive Windows says is unreadable?
- Can I get files back from a drive that shows as “RAW”?
- Why does my external drive work in one USB port but not another?
- When should I stop troubleshooting myself and call a professional?
You plug the drive in. Nothing shows up in File Explorer. No icon, no drive letter, nothing on the desktop either if you’re on a Mac. Windows and macOS are both terrible at telling you what actually went wrong, so you’re left staring at a blank window wondering if you just lost everything on it.
Here’s the good news: in the large majority of cases, the drive is fine. It’s a connection issue, a missing drive letter, or a driver hiccup, and each of those is a five-minute fix. This guide walks through them in the order that solves the problem fastest, then covers the smaller number of cases where the drive really is in trouble, and what to do about your data before you make things worse.
Quick triage, read this first:
🟢 Drive shows up in Disk Management but not in File Explorer: your data is untouched. This is a software fix, keep reading.
🟡 Drive shows as “RAW” or “Unallocated”: don’t format it yet. Back your files up first, then fix it.
🔴 Drive is clicking, grinding, or spinning up and down on its own: stop plugging it in and out. Skip straight to the physical failure section near the bottom.
Why external hard drives stop showing up
There’s a short list of usual suspects, and most of them have nothing to do with the drive’s actual health. Here’s roughly how often each one turns out to be the culprit, based on what shows up in troubleshooting threads and support forums constantly.
| Cause | How common | What fixes it |
|---|---|---|
| Bad or loose USB cable/port | Very common | Different cable, different port |
| No drive letter assigned | Common | Assign one manually in Disk Management |
| Outdated or corrupted driver | Common | Update or reinstall in Device Manager |
| Drive not initialized (brand new drive) | Common on new drives | Initialize it in Disk Management |
| Corrupted file system, shows as “RAW” | Occasional | Recover your data, then reformat |
| Not enough power for a bus-powered drive | Occasional | Powered hub or a different, higher-output port |
| Physical drive failure | Less common than people assume | Stop using it, attempt recovery, or send it to a lab |
Fix it on Windows
1. Check Disk Management before anything else
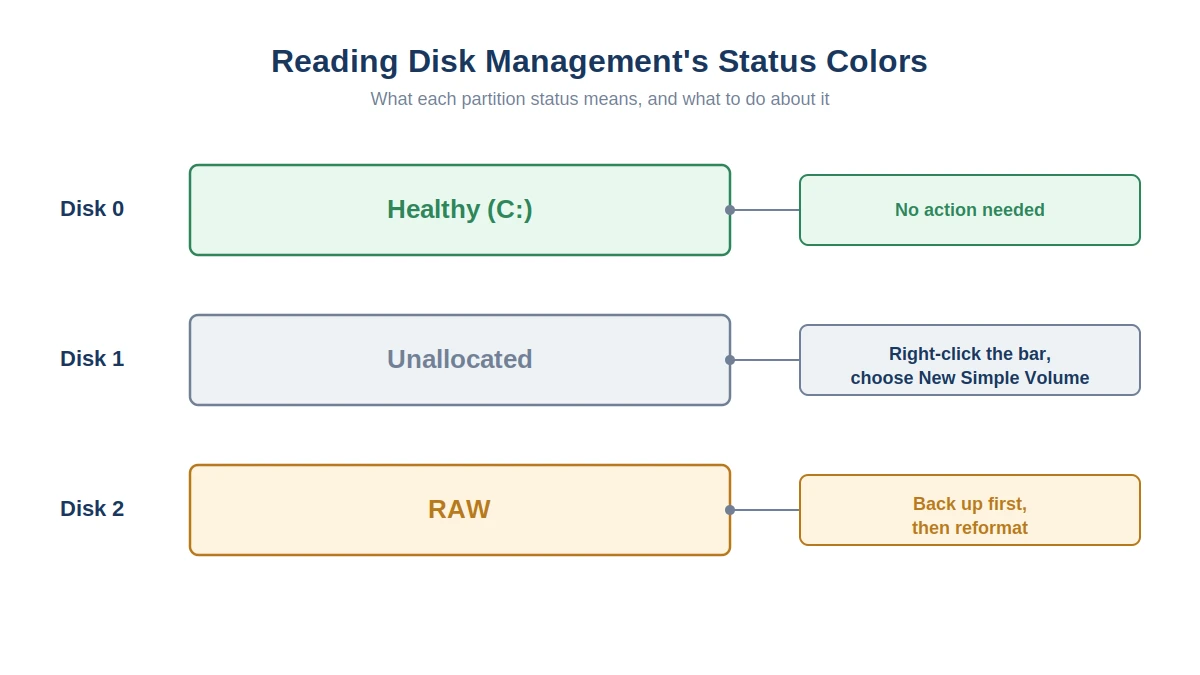
This is the single most useful step, because it tells you which category of problem you’re actually dealing with. Right-click the Start button and open Disk Management (or search for “Create and format hard disk partitions”). Look for your drive in the list at the bottom.
If it’s there but says “Unallocated,” the drive is being detected fine, it just doesn’t have a partition Windows recognizes. Right-click it, choose New Simple Volume, and follow the wizard. If it shows a drive letter conflict or no letter at all, right-click and choose Change Drive Letter and Paths to assign one. Both of these are cosmetic fixes that take thirty seconds and don’t touch your data.
If the drive doesn’t appear in Disk Management at all, the problem is one step earlier, at the connection or driver level. Move on to the next steps.
2. Swap the cable and the port
This sounds too simple to be the answer, but it’s the single most common fix. USB cables fail internally without any visible damage, and not every port on your PC delivers the same thing. USB 2.0 and USB 3.0 ports handle data and power differently, and a marginal cable that works fine on one can fail silently on another. If you’re not sure which type of port you’re using, our breakdown of USB 2.0 vs 3.0 speeds and connectors explains what to look for. Try a cable you know works with another device, and plug directly into a rear motherboard port rather than a front-panel header or a hub for the test.
3. Reinstall the drive in Device Manager
Open Device Manager, expand Disk Drives (and separately, Universal Serial Bus controllers), and look for your drive or anything with a yellow warning triangle. Right-click it and select Uninstall Device, then unplug the drive, wait ten seconds, and plug it back in. Windows will reinstall the driver from scratch. This clears up a surprising number of “drive detected but not readable” situations caused by a corrupted or mismatched driver.
4. Rule out a power problem
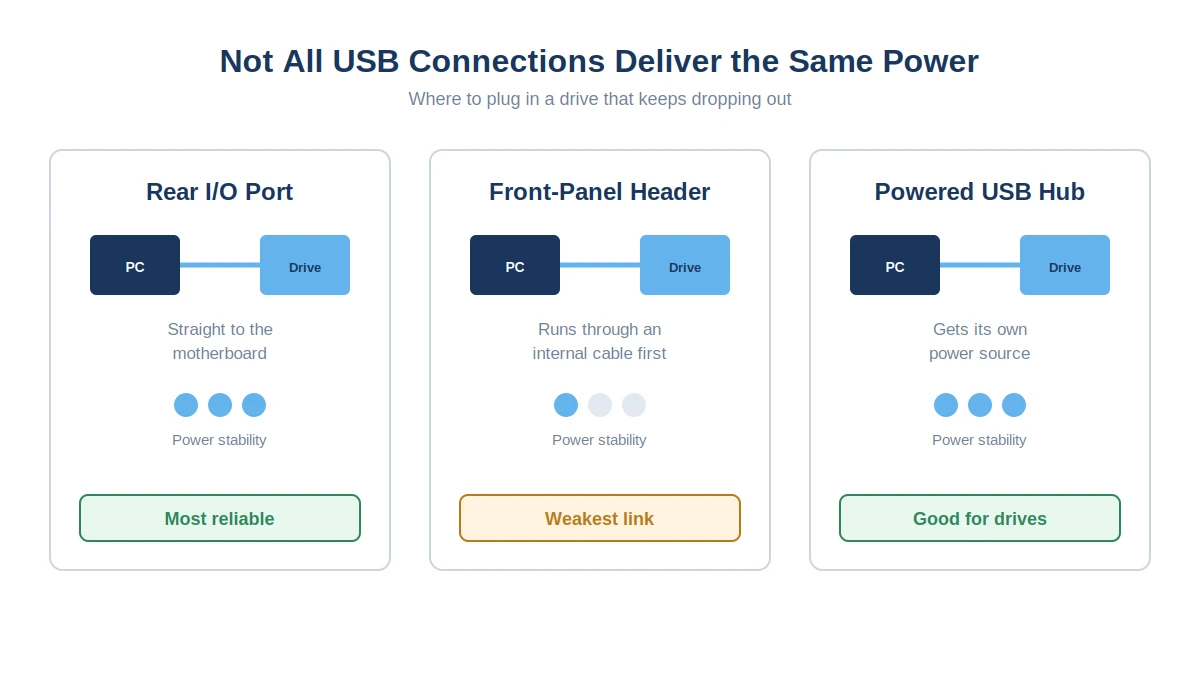
Small bus-powered drives (the kind that don’t need a separate power brick) pull all their power from the USB port itself. Older laptops, docking stations, and some front-panel USB headers simply can’t supply enough current for a 2.5-inch drive, especially if it’s spinning up from idle. If the drive powers on and then disconnects repeatedly, or only shows up intermittently, try a powered USB hub or a rear USB port on a desktop, which tends to have a more direct power path than front-panel connectors.
Fix it on Mac
macOS hides drives more aggressively than Windows does, so the first thing to check is whether the drive is actually being ignored on purpose. Open Finder, go to Finder > Settings > Sidebar, and make sure “External disks” is checked. That alone solves it more often than you’d think.
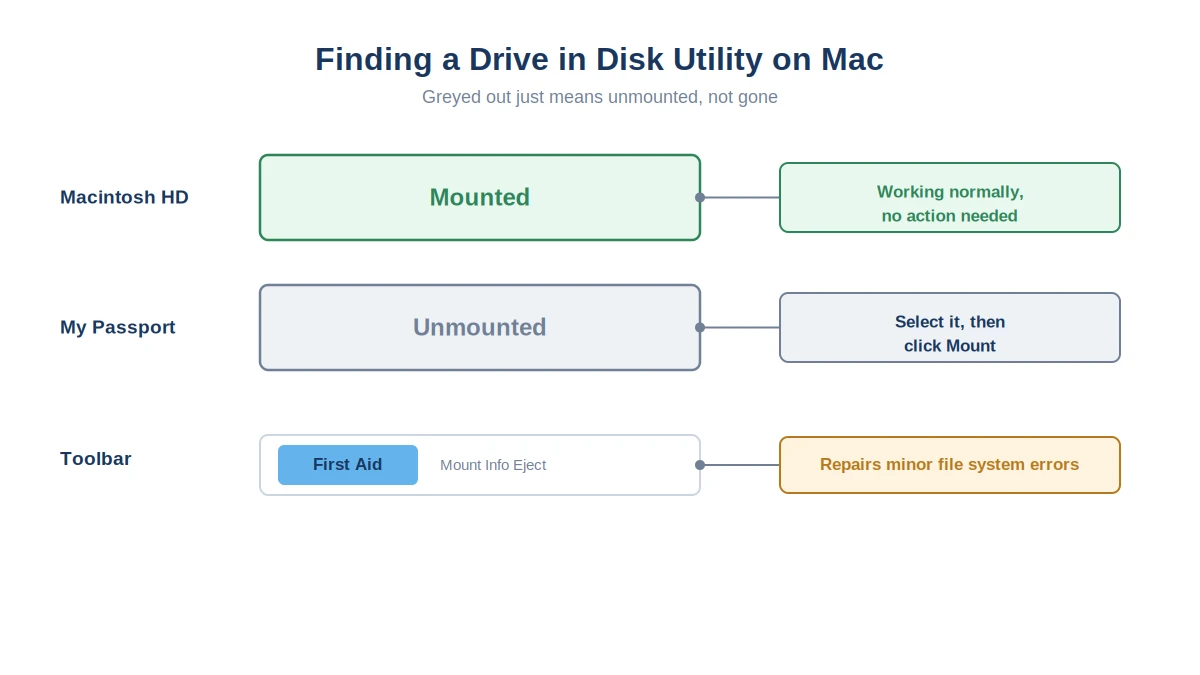
If it’s genuinely not detected, open Disk Utility (Applications > Utilities). If the drive shows up in the sidebar but greyed out, select it and click Mount. If it shows up but First Aid flags errors, run First Aid, it repairs minor file system issues without touching your files. If nothing shows up in Disk Utility at all, open System Information (hold Option and click the Apple menu, then System Information) and check under USB or NVMExpress to see if macOS sees the hardware at a lower level even without mounting it. If it’s not listed there either, you’re looking at a cable, port, or power issue, same as the Windows steps above.
Portable SSDs and branded drives: a few extra checks
Modern portable SSDs (Samsung T7, SanDisk Extreme, Crucial X6/X8, WD My Passport SSD) and USB-C in general add a couple of failure points that older USB-A drives don’t have. Worth ruling out before you assume the drive itself is bad:
- The cable might be charge-only. A lot of USB-C cables that ship with phone chargers carry power but not data, and they look identical to the ones that do. Swap in a cable you know transfers files, not just one that charges something.
- Some older USB-C ports are Thunderbolt-only and won’t negotiate a plain USB connection properly, most commonly on 2016 to 2019 MacBooks. Try a different port if one is available.
- If it’s a known brand and still not cooperating, run the manufacturer’s own utility: Samsung Magician, SanDisk or WD Dashboard, Seagate SeaTools, or Crucial Storage Executive. These read the drive at a lower level than Windows or macOS and can flag a firmware issue, or run a repair pass the built-in OS tools simply can’t touch.
If it’s an internal drive, not an external one
Everything above assumes a drive that plugs in over USB. If it’s an internal hard drive or SSD that vanished after a reboot, the checklist is a bit different, since the drive lives inside the case rather than connecting externally.
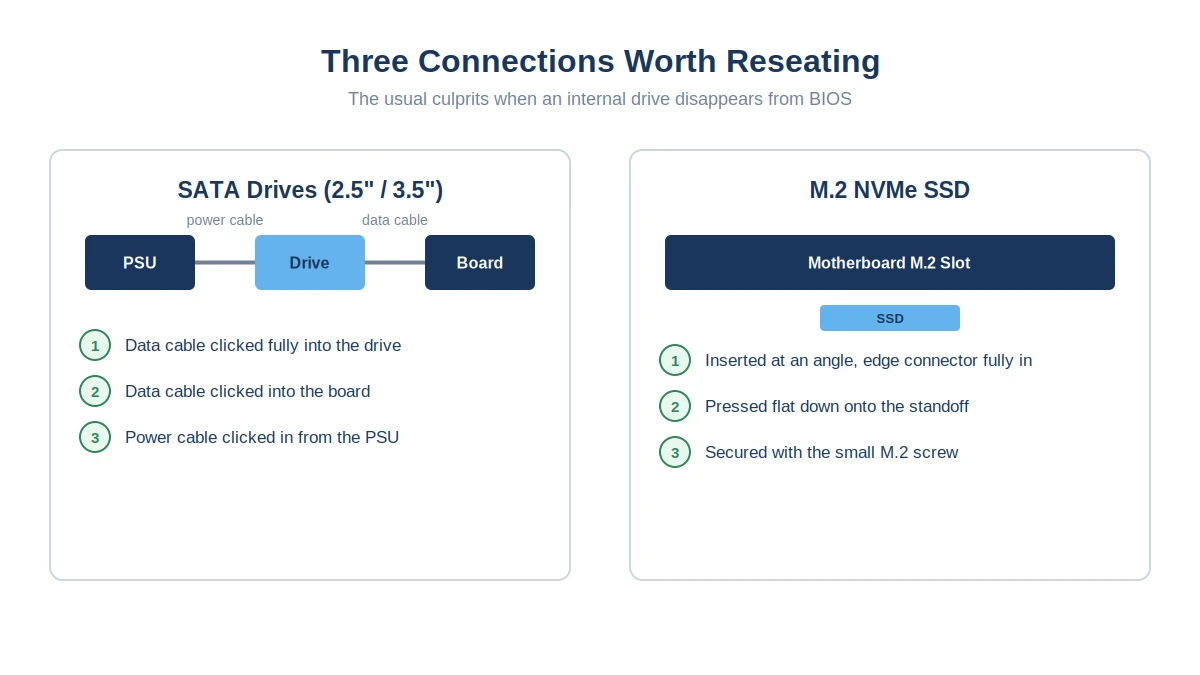
Start in BIOS. Restart, enter BIOS setup, and check the storage or boot device list. If the drive isn’t listed there at all, before you’ve even loaded an operating system, this points to a physical connection problem rather than software: a loose SATA data cable, a loose SATA power cable, or (for M.2 drives) a drive that isn’t fully seated in its slot. Power the system down completely, and confirm the cable seating using our guide on installing a SATA or M.2 SSD, since a drive that isn’t clicked fully into place will often power up but fail to register.
One thing that trips up a lot of people: on many motherboards, populating a specific M.2 slot automatically disables one or more SATA ports, or shares PCIe lanes with them, by design, not because anything is broken. If a SATA drive disappeared from BIOS right after you added an M.2 SSD, check your motherboard manual’s lane-sharing table before assuming a bad connection. Our guide to installing an M.2 NVMe SSD covers this in more detail.
If you’re running several drives off one power supply, it’s also worth confirming your PSU actually has enough SATA power connectors free for everything you’ve got installed. Our guide to PSU SATA power cables and how many drives they can run covers how to check this without guessing.
If the drive does show up in BIOS but not in Windows or macOS once the system boots, treat it like the “shows in Disk Management but not File Explorer” case above: it’s a drive letter, initialization, or file system issue, not a connection problem.
Recover your data before you do anything destructive
This is the step people skip, and it’s the one that actually matters most. If your drive shows up as “RAW,” “Unallocated,” or Windows prompts you to format it before you can use it, resist the urge to just click format. A RAW or unrecognized file system usually means the data is still physically sitting on the drive, Windows just can’t read the map that tells it where each file lives. Formatting rebuilds that map from scratch and can overwrite the very data you’re trying to save.
Before you format, reinitialize, or run any repair tool that writes to the drive, scan it with dedicated Data Recovery Software first. Stellar’s free tool works directly on external drives, internal HDDs and SSDs, USB sticks, and SD cards, including drives that have turned RAW or won’t mount properly, and it recovers up to 2GB at no cost so you can see exactly what’s still recoverable before deciding whether you need to go further. The one rule that actually matters here: stop using the drive for anything else the moment you notice files are missing. Every write to a drive with lost data risks overwriting the very sectors you’re trying to get back, so run the scan before you do anything else with it.
This step is for drives that are still spinning up and responding, just not readable. If the drive is making noise or not spinning at all, keep reading.
When it’s a physical failure
Clicking, grinding, or a repeated spin-up-and-shutdown cycle are mechanical failure signs, not software glitches, and they mean something inside the drive (usually the read/write head or the spindle motor) is physically struggling. Two things not to do here: don’t keep plugging it in and out hoping it’ll catch, and don’t run chkdsk or any disk repair utility against it. Both add more read/write cycles to a drive that’s already failing, and each cycle makes the eventual data loss worse.
SSDs fail differently. There’s no clicking, since there are no moving parts, but a failing SSD will often disappear entirely, show up with the wrong capacity, or throw read errors on specific files while the rest of the drive works fine. The same rule applies: stop writing to it.
If the data matters and the drive is physically failing, a professional data recovery lab is the realistic option; consumer software can’t open a drive and swap parts in a cleanroom. If the data isn’t critical, or you’re just trying to confirm what you’ve lost before deciding whether it’s worth the cost of a lab, that’s still a reasonable time to try a recovery scan first while the drive still responds at all, since some drives with early-stage mechanical issues will still allow one or two successful read passes before they stop entirely.
Prevent this from happening again
A lot of “RAW” and drive-letter problems start the same way: the drive gets unplugged while Windows or macOS is still mid-write. Use Safely Remove Hardware on Windows, or drag the drive to Eject (or hit the eject arrow next to it in Finder) on Mac, before you pull the cable, especially right after copying large files. It takes five seconds, and combined with checking the cable and the drive letter first the next time something goes quiet, it covers almost every version of this problem you’ll run into.
Frequently Asked Questions
Why does my drive show up in Device Manager but not in File Explorer?
Device Manager only confirms that Windows sees the hardware at a low level. Whether it shows up in File Explorer depends on a separate layer, drive letter assignment and a readable file system, both handled in Disk Management. Seeing it in one and not the other is one of the most common and easiest issues to fix, since it usually just needs a drive letter or a quick initialization.
Is it safe to format a drive Windows says is unreadable?
Only after you’ve confirmed you don’t need what’s on it, or after you’ve already recovered what you need. Windows will happily offer to format an unreadable drive as a “fix,” but formatting rebuilds the file system from scratch and treats the old data as free space to be overwritten. If there’s anything on that drive you care about, recover it first.
Can I get files back from a drive that shows as “RAW”?
Usually, yes. A RAW file system means the drive’s directory structure is damaged or unreadable, not that the actual file data is gone. Data recovery software scans past the broken file system and reconstructs files directly from the raw data on the disk, which is why it works even when Windows itself has given up on reading the drive normally.
Why does my external drive work in one USB port but not another?
Ports on the same PC aren’t identical. Some deliver more power than others, some run at USB 2.0 speeds internally even if the connector looks like USB 3.0, and front-panel headers in particular are prone to loose internal wiring. If a drive works in one port and not another, that’s a strong sign the drive itself is fine and the issue is with power delivery or a specific port.
When should I stop troubleshooting myself and call a professional?
As soon as you hear clicking, grinding, or repeated spin-up-and-shutdown cycles, or if the drive gets noticeably hot. At that point, every additional power cycle is a small risk to data that a lab could otherwise recover. If the data isn’t worth a lab’s fee, it’s fine to keep experimenting. If it is, stop touching the drive and get a quote first.

Alex has been building and tweaking custom PCs for over 12 years. From budget builds to full custom water loops, he’s assembled more than 50 systems and helped hundreds of builders troubleshoot their rigs. When he’s not benchmarking the latest hardware, you’ll find him optimizing airflow setups or stress-testing overclocks.