How to Play Mobile Games on PC: Emulators, Requirements and BIOS Setup
Use the game’s own PC version if it has one. Otherwise install Google Play Games on PC or an emulator like BlueStacks, with hardware virtualization turned on in your BIOS.
Last updated: November 2026
Table of Contents
- What your PC needs
- Check for a PC version first
- Google Play Games on PC
- Android emulators (BlueStacks 5)
- BlueStacks and Google’s app on the same PC
- Phone Link: play from your phone on the PC screen
- Turn on virtualization (Intel VT-x or AMD SVM)
- Check whether it’s already on
- Get into the BIOS
- Find the setting and switch it on
- Confirm it in Windows
- Purchases and payments on PC
- If it still runs badly
- Frequently Asked Questions
- Can Windows 11 still run Android apps without an emulator?
- Is BlueStacks free?
- Can I play with a controller in BlueStacks?
- Can I run two games or two accounts at once?
You’ve got a game on your phone and you want it on a proper monitor, with a keyboard and mouse instead of your thumbs. There are four ways to get there. Which one works for you depends on the game and on what’s inside your PC.
Whichever route you pick, check one thing early: a CPU feature called hardware virtualization, which can sit switched off in the BIOS. Google’s app needs it, and BlueStacks runs much faster with it. If an installer already told you virtualization is off, skip to the BIOS steps.
| Your situation | Best route | Go to |
|---|---|---|
| An installer or emulator says virtualization is off | Turn on VT-x or SVM in the BIOS first | Virtualization |
| The game has its own Windows version | Install that version | PC version |
| Your PC has an SSD, 8 GB of RAM and a 4-core CPU | Google Play Games on PC | Google Play Games |
| Your PC falls short of that, or Google’s app shows your game as not playable | An Android emulator such as BlueStacks 5 | Emulators |
| Older PC, and your Android phone came with Link to Windows | Phone Link: the game keeps running on the phone | Phone Link |
What your PC needs
Google’s app and BlueStacks ask for very different hardware. Put your PC next to this table before you download anything. Settings > System > About lists your processor and installed RAM. For the rest, press Ctrl + Shift + Esc to open Task Manager and open the Performance tab: select CPU for the Cores and Logical processors counts, and each Disk entry tells you whether it’s an SSD or a hard drive.
| Requirement | Google Play Games on PC | BlueStacks 5 (minimum) |
|---|---|---|
| Windows | Windows 10 (v2004) or later | Windows 7 and above |
| Processor | 4 physical cores (8 logical recommended) | Intel or AMD processor |
| Memory | 8 GB of RAM | 4 GB of RAM |
| Storage | SSD with 10 GB free | 5 GB free disk space |
| Graphics | Intel UHD Graphics 630 or comparable | Up-to-date graphics drivers |
| Windows account | Admin account | Administrator on the PC |
| Virtualization | Must be turned on | Strongly recommended; 64-bit Android versions need it |
Google’s full list, including the recommended GPU, is on its PC requirements page. On an older PC, check the SSD line first. Google wants the SSD set up as the main drive, so if Windows still boots from a hard drive, fitting an SSD and running Windows from it comes before anything else on Google’s route.
Check for a PC version first
Before you install anything, look the game up on its own website and search for it on Steam and the Epic Games Store. If a Windows version exists, use it. It runs on your PC directly instead of inside an Android layer, and its system requirements tell you up front whether your hardware is enough.
Log in with the same game account you use on your phone. Open the game’s settings on the phone first and check that the account is linked, so your progress has somewhere to come from.
Google Play Games on PC
This is Google’s own app for running Android games on Windows. You get keyboard and mouse controls, PC purchases earn Play Points like they do on your phone, and games with the Syncs across devices label carry your progress between phone and PC. It’s available in more than 130 regions, including the US, UK, Canada and Australia, and it needs a personal Google account.
- Turn on virtualization first (steps below). Many games in the catalog won’t run without it.
- On your Windows PC, go to
google.play/games, click Download and open the downloaded file. Installation takes a few minutes. If your PC misses the minimums, the installer tells you and stops. - If a prompt asks you to turn on Windows Hypervisor Platform, accept it and restart when asked.
- Sign in with the same Google account you use on your phone. Only the Windows user who installed the app can open it, so install it from your own Windows account.
- Search for your game by name. Its details page shows a badge: Optimized (the developer adapted it for Windows), Playable (Google tested it: stable, 30 fps or more, mouse or keyboard support), Untested (it might still run), Unsupported (Google found problems that may stop it running properly) or Not available (not offered on PC, or not for your computer). Untested games only turn up when you search by name, not when you browse the catalog.
In a game, Shift + Tab opens the game options, F11 or Alt + Enter toggles full screen and Alt + F4 exits.
A game without PC controls needs keys mapped by hand. Click Game controls on the left of the game window (in full screen, press Shift + Tab and choose Remap Controls), click Edit, pick Tap or Joystick, press the key you want and drag the control onto the button on screen. The green checkmark closes the editor. Games that already have PC controls don’t offer it.
If a game shows as not playable on your PC, check two known causes. The game may only run on Intel processors in older versions of the app, or your graphics drivers may be out of date. Update the app first: right-click the Google Play Games icon in the taskbar notification area (click the up arrow if you can’t see it) and choose Check for updates. Then update your graphics driver (how, below).
Android emulators (BlueStacks 5)
An emulator runs a full Android system in a window, with the regular Google Play Store inside it. That’s its real advantage over Google’s app: you install from the same Play Store as on your phone, so a game Google’s app marks as Untested or not playable is still worth a try here. The hardware bar is also lower, as the table above shows.
- Download BlueStacks 5 from bluestacks.com, not from a download mirror. The site also offers BlueStacks 16, a beta built on Android 16 that asks for 12 GB of RAM; on a PC with less, take BlueStacks 5.
- Run the installer from a Windows administrator account.
- Open the Play Store inside BlueStacks, sign in with your Google account and install the game.
- Start the game and click the Game controls icon on the Side toolbar. Set up your keys and mouse there before your first real session.
Turn virtualization on here too. The 64-bit Android versions in BlueStacks need it, and with it on, BlueStacks can use more than one CPU core. Without it you’re stuck with a Nougat 32-bit instance, where games can stutter.
BlueStacks and Google’s app on the same PC
Google’s installer may ask you to turn on Windows Hypervisor Platform, and other emulators might not work while it’s on. If BlueStacks stops starting or shows a Hyper-V error after you installed Google’s app, update BlueStacks first: the current BlueStacks 5 runs with Hyper-V on or off. If the error still appears, click Run tool in the message. That starts BlueStacks’ Hyper-V Diagnostic Tool, which switches on the Windows settings that are missing.
If you’ve stopped using Google’s app altogether, you can switch the hypervisor off instead:
- Open Control Panel and go to Programs > Programs and Features.
- Click Turn Windows features on or off.
- Expand Hyper-V > Hyper-V Platform and untick Hyper-V Hypervisor. No Hyper-V entry in the list? Windows 10 Home and Windows 11 Home don’t have it, so untick Windows Hypervisor Platform instead. Do the same if Hyper-V Hypervisor was already unticked.
- Click OK and restart the PC.
Reinstall Google’s app later and it may ask you to turn the hypervisor back on.
Phone Link: play from your phone on the PC screen
Phone Link is already on most Windows 10 and Windows 11 PCs. Its Apps feature shows the apps on your Android phone in a window on the PC over Wi-Fi, so you play on the bigger screen with your keyboard. The game itself keeps running on the phone, which is why this route asks so little of the PC.
Apps only works on select Android phones (mostly Samsung, plus some HONOR, OPPO, ASUS, OnePlus, vivo and Xiaomi models) that run Android 10 or newer and came with Link to Windows pre-installed. iPhone owners need one of the other routes.
The PC needs Windows 10 (October 2022 update or later) or Windows 11 and a graphics card that supports DirectX 11, and phone and PC must be on the same Wi-Fi network. Running several apps side by side needs Android 11 or newer, and Microsoft recommends 8 GB of RAM in the PC for that.
- On the PC, type Phone Link in the search box on the taskbar, open it and choose Android.
- Open Link to Windows on the phone and sign in with the same Microsoft account you use on the PC.
- Back on the PC, tick I have the Link to Windows app ready and select Pair with QR code.
- On the phone, tap Link your phone and PC, then Continue, and scan the QR code on your PC screen. Accept the permissions it asks for.
- Once the phone shows the link is done, open Apps in Phone Link and start the game.
Phone Link suits card, strategy and idle games. For anything where reaction time matters, a PC version or an emulator is the better pick, because every frame has to cross your Wi-Fi first.
Turn on virtualization (Intel VT-x or AMD SVM)
Check whether it’s already on
Plenty of PCs ship with it enabled, and ASUS sets it to Enabled by default on its Intel boards. Check before you touch the BIOS:
- Press
Ctrl + Shift + Escto open Task Manager. On Windows 10, click More details at the bottom if it opens as a short list of apps. - Open the Performance tab and select CPU.
- Find the Virtualization line in the details on the right.
Enabled means you can skip the rest of this section. Disabled on a CPU that supports it means it’s switched off in the BIOS, which the steps below fix. VT-x needs support from both the processor and the BIOS, so if you can’t find the setting anywhere on an Intel PC, look up your CPU on Intel’s ARK site and check the Intel Virtualization fields under Security & Reliability.
Get into the BIOS
Open this page on your phone first, because the PC is going to restart. Then use one of these:
- Key at startup: restart and keep tapping the BIOS key. On ASUS, MSI and Gigabyte desktop boards that’s
Delete(ASUS also takesF2). Other common keys areF2,F10andF12, and the right one usually flashes on screen during startup. - From Windows 11: Settings > System > Recovery, then Restart now next to Advanced startup. On the blue screen choose Troubleshoot > Advanced options > UEFI Firmware Settings > Restart.
- From Windows 10: the same, but start from Settings > Update & Security > Recovery.
If you never catch the key, the Windows route takes you straight into the BIOS on the next boot. No UEFI option on that blue screen? Go back to the key at startup.
Find the setting and switch it on
Look under the Advanced, CPU Configuration or Security tab. On many boards you first have to leave the simple screen for the advanced one. The name depends on your processor:
- Intel: Intel Virtualization Technology or VT-x.
- AMD: SVM Mode or AMD-V. Our SVM Mode guide has the exact paths on ASUS, MSI and Gigabyte boards.
On a desktop board with an Intel CPU, this is where it sits. If the path doesn’t match your BIOS version, use the search key and type Virtualization.
| Board | Intel setting | BIOS search |
|---|---|---|
| ASUS | F7 for Advanced Mode, then Advanced > CPU Configuration > Intel (VMX) Virtualization Technology |
F9 |
| MSI | F7 for Advanced mode, then OC > CPU Features > Intel Virtualization Tech |
Ctrl + F |
| Gigabyte | Switch to Advanced Mode (F2) and search for it; VT-d is a different setting |
Alt + F |
| Other boards, laptops and prebuilts | Advanced, CPU Configuration or Security tab | Maker’s guide (below) |
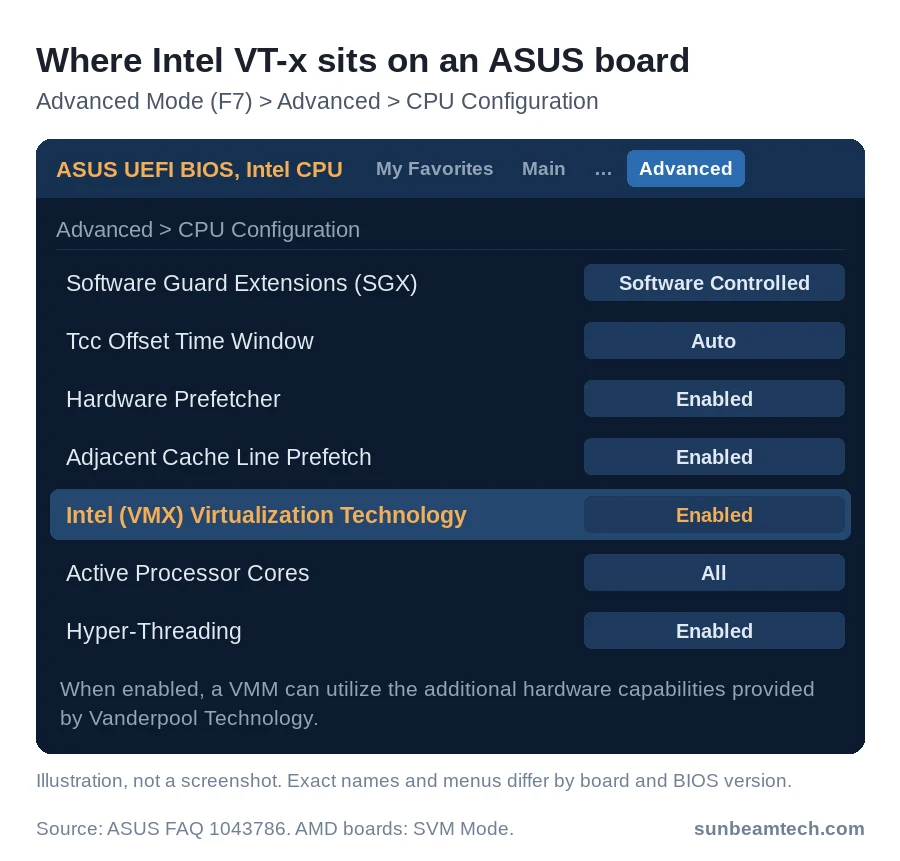
Set it to Enabled, then save and exit. That’s F10 on a lot of boards; confirm the prompt and the PC restarts into Windows. Change nothing else while you’re in there, since a stray setting can stop Windows from starting. If the PC won’t boot after a BIOS change, clear the CMOS to get back to defaults.
Laptops and prebuilts hide the setting in different places. Microsoft’s virtualization guide links the maker’s own steps for Acer, ASUS, Dell, HP and Lenovo. Surface devices ship with it already on.
Confirm it in Windows
Open Task Manager again. The Virtualization line should now say Enabled. Then start the installer or emulator that complained and check the message is gone.
Still told it’s off? If BlueStacks shows a Hyper-V error, update it and use Run tool (see above). If you upgraded this PC from Windows 10 to Windows 11, turn on Virtual Machine Platform as well: click Start, type Windows features, open Turn Windows features on or off, tick Virtual Machine Platform, click OK and restart if asked.
Purchases and payments on PC
Your Google account does most of the work. Sign in with the same account on phone and PC and games that sync across devices pick up where you left off. Purchases on PC, in-app items included, earn Play Points the same way they do on your phone.
Check how you pay before you buy anything on the PC. In the UK you can charge Google Play purchases to a Three, EE, O2 or Vodafone bill, but only through the Play Store app. It isn’t offered on the Play website on a computer, a dual-SIM phone needs the billing SIM in slot 1, and rooted devices are excluded.
In the US, phone-bill payment is off Google’s list. US Cellular stopped being accepted on January 29, 2026, and what’s left is cards, Google Pay balance, Play balance and gift cards, Cash App Pay, PayPal and Venmo.
If your phone bill is how you pay on the phone, add another method to your Google account or buy a Google Play gift card before you sit down to play on the PC.
Services that confirm a payment by text message work differently, because the confirmation goes to your phone number rather than to the device in front of you. UK pay by mobile casino sites are one example. You enter your number, get a one-time code by SMS, and the amount goes on your phone bill or comes off your Pay As You Go credit. The code lands on your phone whichever screen you started on.
If it still runs badly
Start with the graphics driver. An outdated one can make games show as not playable in Google’s app, and BlueStacks needs a current one too. To see which card you have, open Task Manager, select Performance and click GPU; the model is at the top right. Get the current driver from NVIDIA (the NVIDIA app), AMD (its Auto-Detect and Install tool) or Intel (Intel Driver & Support Assistant).
Next, make sure only one emulator is running and that BlueStacks is up to date, so it gets along with the hypervisor setting. In Google’s app, look in the game’s own settings: some games let you lower the graphics to suit your PC.
In BlueStacks, click the gear icon on the Side toolbar, open the Performance tab and give it more CPU cores and memory. Click Save changes and restart BlueStacks when it asks. Don’t hand it all your cores. The same tab has the Performance Modes. Running several instances at once? Switch on Eco mode from its icon on the Side toolbar, or for all instances in the Multi-Instance Manager.
A game inside an emulator still loads your CPU and GPU like any other game. If frame rates drop after a few minutes, check your CPU temperature while it runs, and don’t read 100% GPU usage as a fault on its own. If your PC misses Google’s minimums and BlueStacks still stutters, Phone Link is the fallback, or it’s time to price an upgrade: our gaming PC build costs start at $800.
Frequently Asked Questions
Can Windows 11 still run Android apps without an emulator?
Not on its own anymore. Windows Subsystem for Android and the Amazon Appstore have been unavailable in the Microsoft Store since March 5, 2025. Google Play Games on PC or an emulator is the route now.
Is BlueStacks free?
Yes. Playing games on BlueStacks is free; the ads it shows help keep it that way. To turn off the ads during play, click the gear icon on the BlueStacks home screen, open the Preferences tab, switch off Allow BlueStacks to show Ads during gameplay, click Disable and then Save changes. BlueStacks Prime is an optional monthly membership that removes ads and pop-ups altogether and adds in-game rewards.
Can I play with a controller in BlueStacks?
Yes. BlueStacks 5 has native gamepad support, so you can plug in a controller instead of mapping everything to the keyboard.
Can I run two games or two accounts at once?
Both routes allow it. Google Play Games on PC supports multi-instancing, playing several games at the same time and switching between multiple accounts, and BlueStacks has its Multi-Instance manager.
Want our guides higher in your Google results? Add SunbeamTech as a preferred source.


Alex Rivera writes SunbeamTech’s guides on BIOS settings, motherboard headers, cooling and PC builds. Every guide starts from the manufacturer’s documentation and the questions builders actually search for, and gets checked against AMD, Intel, NVIDIA and board-vendor sources before it goes live. Spotted a mistake? Email [email protected] and it gets fixed.