Fan Splitters and Hubs: Run More Fans Safely
A fan header splitter is a cable that connects two or more PC fans to a single motherboard fan header, sharing that header’s power and control signal across all connected fans.
Last updated: August 2026
Table of Contents
- Quick Answer: What Is a Fan Header Splitter?
- What Is a Fan Header Splitter?
- The Basic Concept
- Splitter vs. Hub: What’s the Difference?
- Understanding Fan Header Pin Types
- 3-Pin Fan Headers (DC Control)
- 4-Pin PWM Fan Headers
- Can You Mix 3-Pin and 4-Pin on a Splitter?
- The Amperage Rule: How Many Fans Can You Safely Run on One Header?
- Why Overloading a Header Is a Real Risk
- Typical Fan Current Draw
- The Safe Math
- How to Find Your Motherboard’s Header Current Rating
- How PWM Signal Works Across a Splitter
- All Fans on a Splitter Share One Speed Signal
- What This Means for Airflow Tuning
- Does Splitting Reduce Fan Speed?
- Splitter vs. Hub: Which Do You Actually Need?
- Decision Flowchart
- When to Absolutely Use a Hub Instead of a Splitter
- How to Install a Fan Header Splitter
- What You’ll Need
- Step-by-Step Installation
- Confirming It Works in BIOS
- Choosing the Right Fan Splitter: What to Look For
- Key Specs to Check Before Buying
- Quick Product Reference
- Frequently Asked Questions
- Can you run two fans off one header?
- Do fan splitters reduce fan speed?
- What does a fan splitter do?
- Can I connect a fan splitter to another fan splitter?
- What’s the difference between a CPU fan header and a system fan header?
- The Short Version
Quick Answer: What Is a Fan Header Splitter?
A fan header splitter plugs into one motherboard fan header and branches into multiple outputs, letting you run two or three fans from a single connection point. All connected fans share both the power budget and the PWM or DC speed-control signal from that one header. According to contributors at Tom’s Hardware Forums, a splitter connects multiple fans in parallel to the signals from a single motherboard header, with all fan power drawn directly from that header without a secondary power source.
Most people think you can plug as many fans as you want into a splitter and call it done. Wrong. Motherboard fan headers have a hard current limit, and exceeding it can permanently damage the MOSFET that drives the header. The good news: the math is simple, and once you know the rules, running a clean multi-fan setup is straightforward. This guide covers everything from pin types and amperage limits to when you need a hub instead of a splitter.
- 🟢 2 standard 120mm fans on one splitter: safe for virtually any motherboard
- 🟢 3 low-draw fans (under 0.75A total): safe on most headers
- 🟡 3 high-static-pressure fans: check your current math first
- 🟡 Daisy-chained splitters: possible, but watch the amperage
- 🔴 4+ fans on one header via splitter: use a powered hub instead
- 🔴 Any fans on CPU_FAN besides the CPU cooler: don’t do it
What Is a Fan Header Splitter?
The Basic Concept
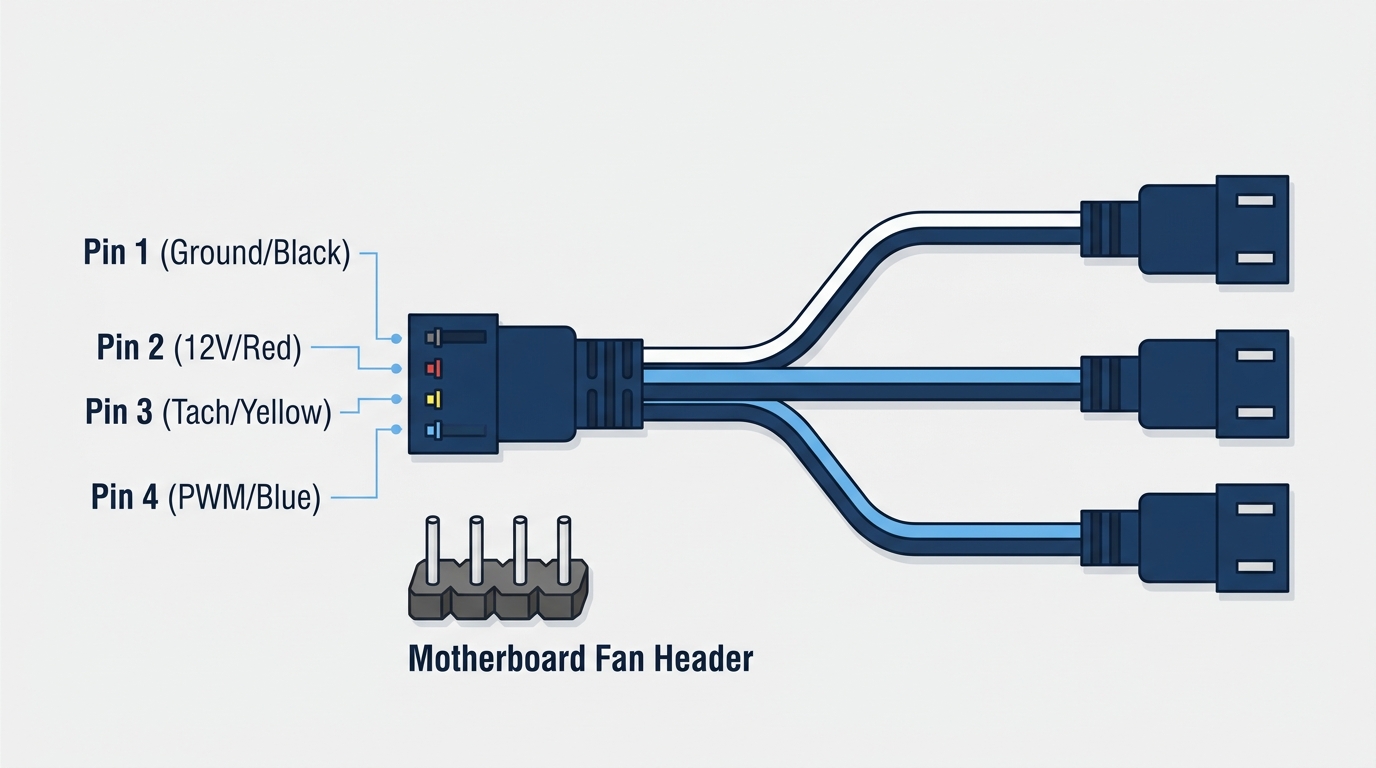
A fan header splitter has one female connector that plugs into the motherboard and two or more male connectors that branch out to individual fans. Power and signal flow from the single header point and split across every connected fan simultaneously. Think of it like a power strip for fans, except every device on that strip shares a single fuse, and that fuse is a small MOSFET on your motherboard PCB.
The signal wire is daisy-chained, not amplified. Speed control, whether DC voltage or PWM, goes to all fans at once. You can’t tell one fan on the splitter to run at 50% while another runs at 80%. They move together as a group. That’s the biggest functional limit to understand before you buy.
Splitter vs. Hub: What’s the Difference?
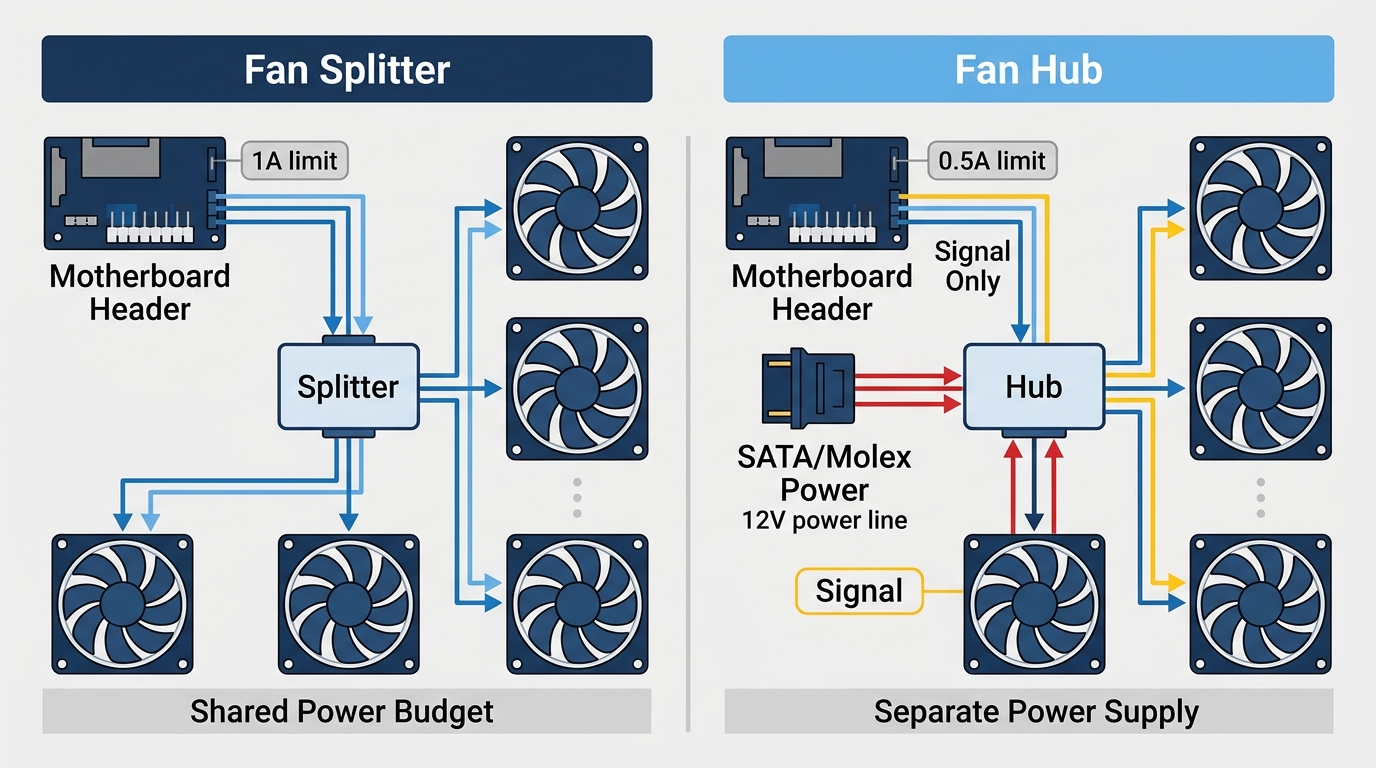
Splitters draw all their power from the motherboard header. Hubs draw power from a SATA or Molex connector and only use the motherboard header for the speed-control signal (or sometimes nothing at all). That distinction determines how many fans you can safely run.
| Feature | Fan Splitter Cable | Fan Hub (SATA/Molex Powered) |
|---|---|---|
| Power Source | Motherboard header | SATA or Molex |
| Header Current Load | High (all fans draw from header) | Minimal (signal only or none) |
| Max Fans Supported | 2-3 safely | 4-10+ |
| PWM Speed Control | Yes (shared signal) | Yes (if PWM hub) |
| Cost | $5-$10 | $10-$30 |
| Best For | 1-2 extra fans | Full fan arrays (4+) |
| Installation | Plug and play | Needs SATA power routing |
For a deeper look at how powered hubs work and which models are worth buying, the PC fan hub and splitter guide covers the full comparison with specific product recommendations.
Understanding Fan Header Pin Types
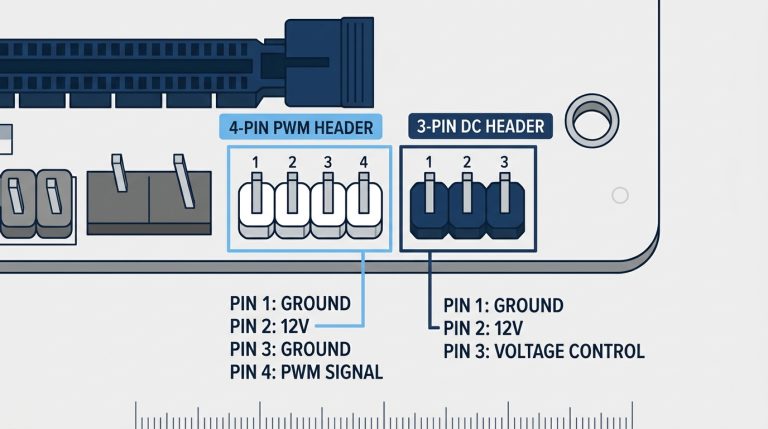
3-Pin Fan Headers (DC Control)
A 3-pin fan header uses three wires. Simple.
- Pin 1: Ground
- Pin 2: +12V power
- Pin 3: Tachometer (RPM signal back to the motherboard)
Speed is controlled by varying the voltage supplied to the fan, typically ranging from around 7V to 12V. Lower voltage means slower spin. The downside is imprecision: at very low voltages (below about 40% of rated voltage), some fans stall entirely. You’ll find 3-pin headers most commonly on older boards, budget AM4 boards, and ITX builds with fewer connectors. Maximum rated current per header is typically 1A (12W), though this varies by manufacturer and model.
4-Pin PWM Fan Headers
The 4-pin PWM fan header adds a fourth wire: the PWM signal. This changes everything about how speed control works.
- Pin 1: Ground
- Pin 2: +12V power (stays constant at 12V)
- Pin 3: Tachometer (RPM signal)
- Pin 4: PWM signal (25 kHz pulse width modulation)
Instead of varying voltage, PWM control varies the duty cycle: how long the fan motor receives power within each 25 kHz cycle. At 50% duty cycle, the motor is effectively switched on for half of each cycle. The 12V stays constant, which means the motor always starts cleanly and won’t stall at low speeds. This is why PWM fans are noticeably quieter at low RPM compared to DC-controlled fans.
Every modern ATX motherboard ships with at least one 4-pin PWM fan header, and most mid-range boards (B650, X870, Z790, B860 and up) have four or more. Current limits on 4-pin headers are the same as 3-pin: most boards rate them at 1A (12W), with some premium Gigabyte boards allowing up to 2A per header. Always check your specific motherboard manual before you assume 2A.
Can You Mix 3-Pin and 4-Pin on a Splitter?
Yes. A 4-pin PWM splitter physically accepts 3-pin fan connectors on its output ports. Pin 4 simply has nothing connected on the fan side. The 3-pin fan will either run at full speed or be DC-controlled by the motherboard, depending on your BIOS settings (look for a “Fan Control Mode” option in Hardware Monitor). Never force a connector backwards. The physical key notch prevents incorrect insertion if you’re paying attention.
The Amperage Rule: How Many Fans Can You Safely Run on One Header?
Why Overloading a Header Is a Real Risk
Every motherboard fan header is driven by a small MOSFET transistor on the PCB. That MOSFET has a thermal limit. Push too much current through it and it runs hot, degrades, and eventually fails. The damage is permanent, and it’s not always obvious at first. Your fans will just keep spinning right until the moment they don’t, and by then your header is dead.
Your BIOS won’t warn you in real time that you’re drawing too much current. There’s no overcurrent protection popup. The header just quietly takes the abuse. This is exactly why knowing the amperage math matters before you buy a splitter.
Typical Fan Current Draw
| Fan Type | Typical Current Draw | Typical Wattage |
|---|---|---|
| 80mm case fan (standard) | 0.10-0.15A | 1.2-1.8W |
| 120mm case fan (standard) | 0.15-0.25A | 1.8-3.0W |
| 140mm case fan (standard) | 0.20-0.30A | 2.4-3.6W |
| 120mm high-static-pressure | 0.25-0.40A | 3.0-4.8W |
| 200mm case fan | 0.30-0.50A | 3.6-6.0W |
| CPU cooler fan (stock) | 0.15-0.35A | 1.8-4.2W |
These are typical ranges. The actual number is printed on the fan label or listed in the manufacturer’s spec sheet. Check it. Don’t guess.
The Safe Math
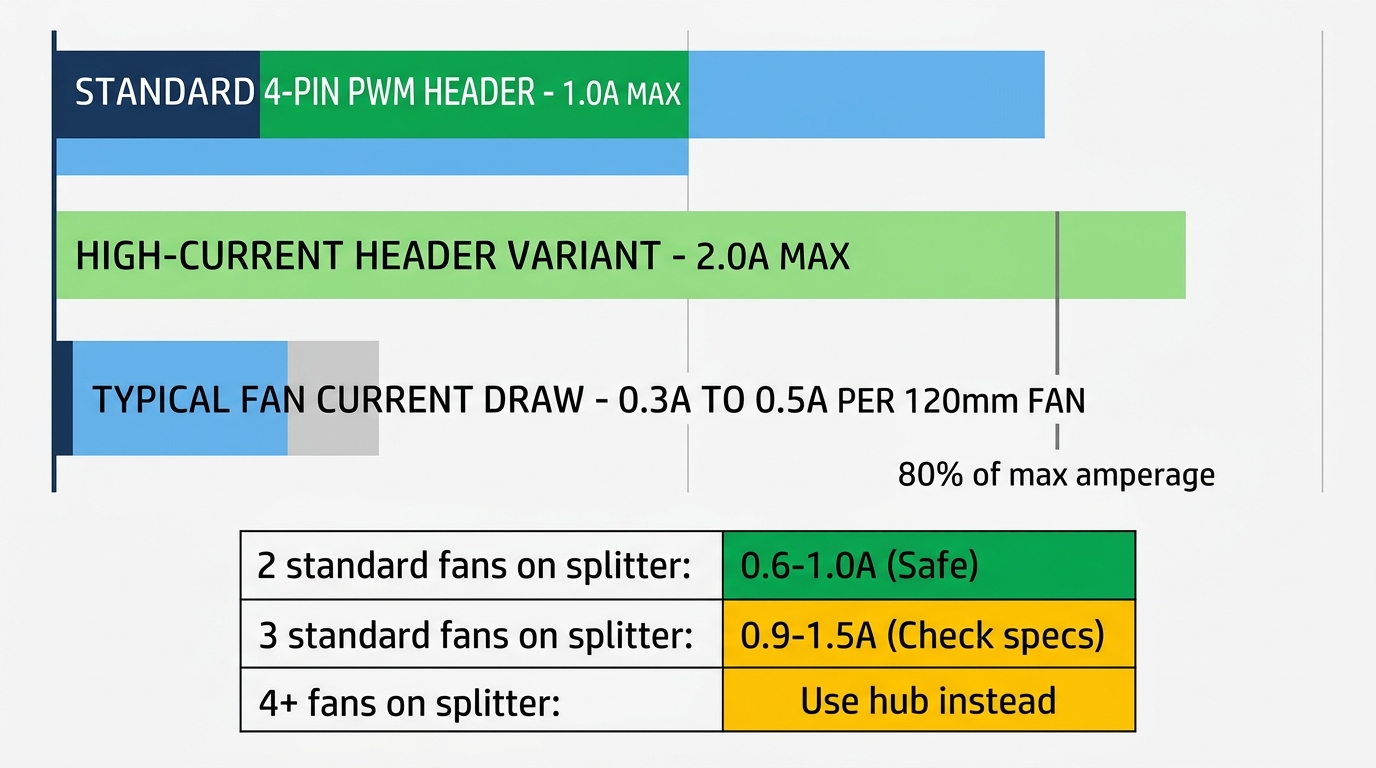
Standard header limit: 1A / 12W. Here’s what that means in practice.
- Safe example: Three standard 120mm fans at 0.20A each = 0.60A total. Fine.
- Over-limit example: Three high-static-pressure 120mm fans at 0.40A each = 1.20A total. Over the limit.
- Safe margin rule: Stay under 0.75A if you can’t confirm your board’s exact header rating.
Enthusiast hardware forums generally recommend not exceeding two fans per splitter connection for average builds. That’s not a random conservative recommendation: it’s based on the 1A limit combined with the variation in fan current draw across different products and temperatures.
A good practical rule: two standard 120mm or 140mm fans on a 1A header puts you at roughly 0.40-0.50A, leaving a comfortable margin. Three fans is possible if they’re low-draw, but you need to do the math first.
How to Find Your Motherboard’s Header Current Rating
Open your motherboard manual (or download the PDF from the manufacturer’s site) and search for “Fan Header Specifications” or “System Fan Connector.” The current rating will be listed in amps or watts.
- ASUS (Z790, X870, B650 boards): typically 1A per header, per widely corroborated enthusiast and ASUS ROG forum reports
- MSI: 1A per header on most consumer boards
- Gigabyte: 2A on some premium X870E and Z890 boards
- ASRock: 1A per header standard
Can’t find it? Assume 1A and budget to 0.75A maximum. Better to be cautious than to fry a header on a $300 motherboard.
How PWM Signal Works Across a Splitter
All Fans on a Splitter Share One Speed Signal
This is the part no shop listing explains. The PWM signal wire is daisy-chained through the splitter. Every fan output receives the exact same duty cycle at the same time. When your motherboard says “spin at 60% duty cycle,” every fan on that splitter goes to 60%. No exceptions, no individual adjustment.
The tachometer (RPM feedback) wire tells a different story: only one fan’s RPM signal makes it back to the motherboard. That’s whichever fan is plugged into the output connector carrying the tach wire, usually the first output on the splitter. Your BIOS will display one RPM reading for that header, not individual readings for each fan.
What This Means for Airflow Tuning
If you want independent speed control over different fan zones, they need to be on different headers. Grouping three identical intake fans on one splitter is a completely reasonable setup. But mixing your front intake fans and rear exhaust fan on a single splitter means they all speed up and slow down together, which isn’t ideal for dialing in airflow.
For a deeper look at intake and exhaust balance, understanding case fan direction and intake vs. exhaust setup before you decide which fans to group on each splitter will save you from reorganizing your cables later.
Also be cautious about mixing different fan models on one splitter. If one fan’s minimum PWM duty cycle is 20% and another’s is 30%, the slower fan may behave unpredictably when the header ramps down. Stick to the same model on each splitter output when possible.
Does Splitting Reduce Fan Speed?
Not meaningfully. The PWM signal itself isn’t weakened by splitting. It’s a digital on/off signal, not an analog voltage, so sharing it across three outputs doesn’t degrade it. Speed reduction can appear if your total current draw is near or above the header’s limit, causing voltage sag at the header pins. That’s not a splitter problem, that’s an overload problem.
Use a quality splitter with 22-24 AWG wire and you won’t see any meaningful speed difference from the split itself. Thin, cheap wire introduces resistance and heat. Not great.
Splitter vs. Hub: Which Do You Actually Need?
Decision Flowchart
Run through this before you order anything:
- 2 fans need one header: use a 1-to-2 splitter cable ($5-$8). Done.
- 3 fans, combined draw under 0.75A: a 1-to-3 splitter works fine.
- 3 fans, combined draw over 0.75A: use a SATA-powered hub.
- 4+ fans from one connection: always use a powered hub, no exceptions.
- Need independent speed zones: use separate headers or a fan controller with multiple channels.
When to Absolutely Use a Hub Instead of a Splitter
- 4 or more fans from one connection: the amperage math doesn’t work with a passive splitter
- High-static-pressure fans (0.30A+ each): two of these push close to the 1A limit already
- Server-style cooling arrays: you want the reliability of SATA power, not a loaded header
- Independent zone control: a hub with multiple PWM channels or a dedicated fan controller is the right tool
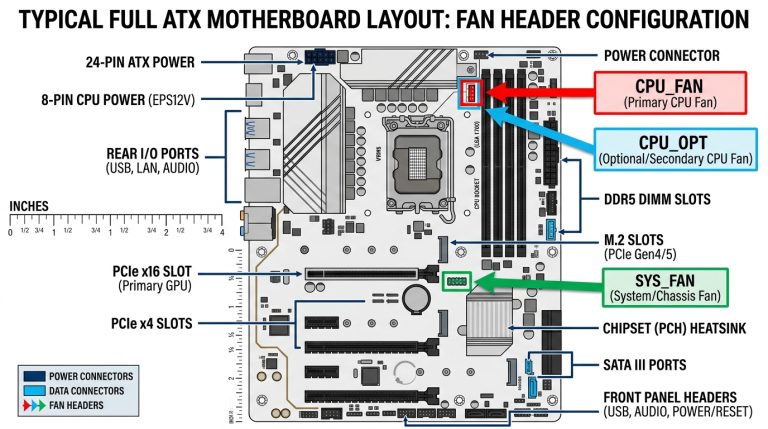
Understanding how your motherboard fan headers are laid out is key to planning your fan setup. The motherboard fan headers guide covering CPU, SYS, CHA, and AUX connectors explains exactly how each header type works and what you can connect to each one.
How to Install a Fan Header Splitter
What You’ll Need
- Fan splitter cable: 1-to-2 or 1-to-3, matching your pin type (4-pin PWM recommended)
- Motherboard manual: to identify header locations and current ratings
- Zip ties or Velcro straps: for cable routing after installation
Step-by-Step Installation
- Power down your PC completely and unplug the power cable from the wall.
- Locate the target fan header on your motherboard. System fan headers are labeled SYS_FAN1, SYS_FAN2, CHA_FAN1, or CHA_FAN2 depending on the manufacturer.
- Plug the single female end of the splitter into the motherboard header. Align the key notch on the connector with the gap in the header pins. It fits one way only.
- Connect each case fan to an output connector on the splitter.
- Route cables behind the motherboard tray or along the case frame and secure with zip ties.
- Reconnect power, boot into BIOS, and navigate to the Hardware Monitor section.
- Confirm the header shows an RPM reading. If it reads zero, check the connection and make sure the fan connected to the tach wire output is properly seated.
- Set your fan curve in the BIOS Fan Xpert, Fan Tuning, or Smart Fan section depending on your board manufacturer.
Confirming It Works in BIOS
In BIOS, look under Hardware Monitor, Q-Fan Control (ASUS), Smart Fan (Gigabyte/MSI), or Fan-Tastic Tuning (ASRock). You’ll see RPM readings per header. One number will appear for the header your splitter is using, representing whichever fan’s tach wire is active on that output. If the reading seems lower than expected, double-check that the fan connected to the tach output is the same model as the others and is spinning freely.
Choosing the Right Fan Splitter: What to Look For
Key Specs to Check Before Buying
- Pin type: 4-pin PWM for any modern build; 3-pin only if your board has exclusively 3-pin headers (rare after 2018)
- Number of outputs: 1-to-2 for simple additions, 1-to-3 for three-fan groups
- Wire gauge: 22-24 AWG is the sweet spot; anything thinner increases resistance and heat generation under load
- Connector quality: sleeved cables and positive-locking clips reduce the chance of vibration-loosening the connector over time
- Rated current: some splitters list a max current; anything rated under 1A is a red flag
Quick Product Reference
| Product | Outputs | Pin Type | Max Rated Current | Approx. Price |
|---|---|---|---|---|
| Arctic Fan Splitter ACCBL00007A | 1-to-4 | 4-pin PWM | ~1A | ~$8 |
| Cable Matters 3-Way PWM | 1-to-3 | 4-pin PWM | ~1A | ~$9 |
| BUZIFU 4-Pack (1-to-2 and 1-to-3) | Mixed | 4-pin PWM | ~1A | ~$9 |
| Generic SATA-Powered PWM Hub | 1-to-10 | 4-pin PWM | SATA-powered | ~$15 |
Note that the Cable Matters 3-Way PWM splitter connects up to 3 fans via a 30cm (12-inch) cable, which is enough reach for most mid-tower builds but can be tight in full towers if the header is low on the board. Verify cable length before ordering. Prices shift often, so check current listings before you buy.
Frequently Asked Questions
Can you run two fans off one header?
Yes. A 1-to-2 fan splitter lets you run two fans from a single motherboard fan header, and it’s the safest splitter configuration for most builds. Two standard 120mm fans drawing around 0.20A each put you at 0.40A total, well within the typical 1A header limit. It’s a configuration widely recommended by hardware forums and case-fan builders for average setups, and it works reliably on every major board brand.
Do fan splitters reduce fan speed?
Not in any meaningful way, as long as you’re within the header’s amperage limit. The PWM signal is a digital on/off waveform, and splitting it doesn’t degrade it. You’ll only notice speed reduction if your combined current draw is causing voltage sag at the header, which is a sign you’re approaching the limit and should move to a powered hub rather than keep running the splitter.
What does a fan splitter do?
A fan splitter takes the single power and signal output from one motherboard fan header and divides it into two or more outputs. All connected fans receive the same speed-control signal and share the header’s power budget. It’s the simplest way to run more fans than your motherboard has headers, provided you stay within current limits.
Can I connect a fan splitter to another fan splitter?
Technically yes, daisy-chaining two 1-to-2 splitters to run four fans from one header is physically possible. But every fan still draws current from the original header, so four fans at even 0.20A each puts you at 0.80A, which is cutting close on a 1A-rated header and leaves no margin for fans that spike higher at startup. For four or more fans, a SATA-powered hub is the cleaner and safer solution.
What’s the difference between a CPU fan header and a system fan header?
The CPU fan header (CPU_FAN) is dedicated to your CPU cooler and is monitored more aggressively by the BIOS. Most boards will throw a POST warning or even refuse to boot if no fan RPM is detected on CPU_FAN, because a missing CPU cooler fan is a critical failure condition. System or chassis fan headers (SYS_FAN, CHA_FAN) are for case fans and are more flexible, with no mandatory RPM check. Never use the CPU_FAN header to run case fans through a splitter. Use your system fan headers for that, and read up on how the CPU fan header works if you’re unsure which connector does which job.
The Short Version
A fan splitter is safe and effective when you use it within the rules. Two standard fans per splitter is the conservative call that works for almost every build. Three fans is fine if the math lands under 0.75A. Go beyond that, or run four or more fans from one point, and you want a SATA-powered hub drawing current from your PSU instead of your motherboard. Before you buy anything, pull up your motherboard manual, find the fan header current rating, and add up your fan draw numbers. Five minutes of math is a lot cheaper than a dead header. If you’re still deciding how many fans your build actually needs before worrying about splitters, the guide on how many case fans you actually need is a good starting point for your cooling plan.

Alex has been building and tweaking custom PCs for over 12 years. From budget builds to full custom water loops, he’s assembled more than 50 systems and helped hundreds of builders troubleshoot their rigs. When he’s not benchmarking the latest hardware, you’ll find him optimizing airflow setups or stress-testing overclocks.