ACPI BIOS Error: What It Means and How to Fix It (Windows and Linux)
An ACPI BIOS error means Windows or Linux found that your BIOS doesn’t fully follow the ACPI specification. On Windows it’s a crash, and the main fix is a newer BIOS.
Last updated: November 2026
Table of Contents
- Windows Blue Screen or Linux Boot Text?
- Windows: Fixing ACPI_BIOS_ERROR (Stop Code 0xA5)
- Undo the last change first
- Load defaults and update the BIOS on your board
- Suspend BitLocker before you flash
- The crash happens when you install Windows
- Read the number: what the 0xA5 parameters mean
- Laptops and prebuilt PCs
- What Not to Do
- Linux: ACPI BIOS Error (bug) at Boot
- Is it your problem?
- Hide it from the boot screen
- Report it to the people who can fix it
- How to Check the Fix Worked
- Frequently Asked Questions
- Is an ACPI BIOS error serious?
- Should ACPI be enabled or disabled?
- How do I fix an ACPI BIOS error in Windows 11?
- What does 0xA5 mean in ACPI_BIOS_ERROR?
- Can clearing CMOS fix an ACPI BIOS error?
- Why does Ubuntu show ACPI BIOS Error at boot?
- Still Crashing on the Newest BIOS? What to Send Support
You press the power button and Windows crashes to a blue or black screen with the stop code ACPI_BIOS_ERROR. Or you boot Linux and a line scrolls past that starts with ACPI BIOS Error (bug): Could not resolve symbol. Same three words, two very different problems.
ACPI is the Advanced Configuration and Power Interface, the standard that lets your operating system configure the board’s devices and manage power. Your BIOS hands its ACPI tables to Windows or Linux at boot. The sleep and soft-off states behind settings like ErP in the BIOS are defined there too. When something in those tables breaks the rules, you get this error.
On Windows it stops the PC, so you need to act. On Linux it’s a logged complaint about your firmware, and if the system boots and works, I wouldn’t lose sleep over it. The flowchart below tells you which case you’re in and what to try first.
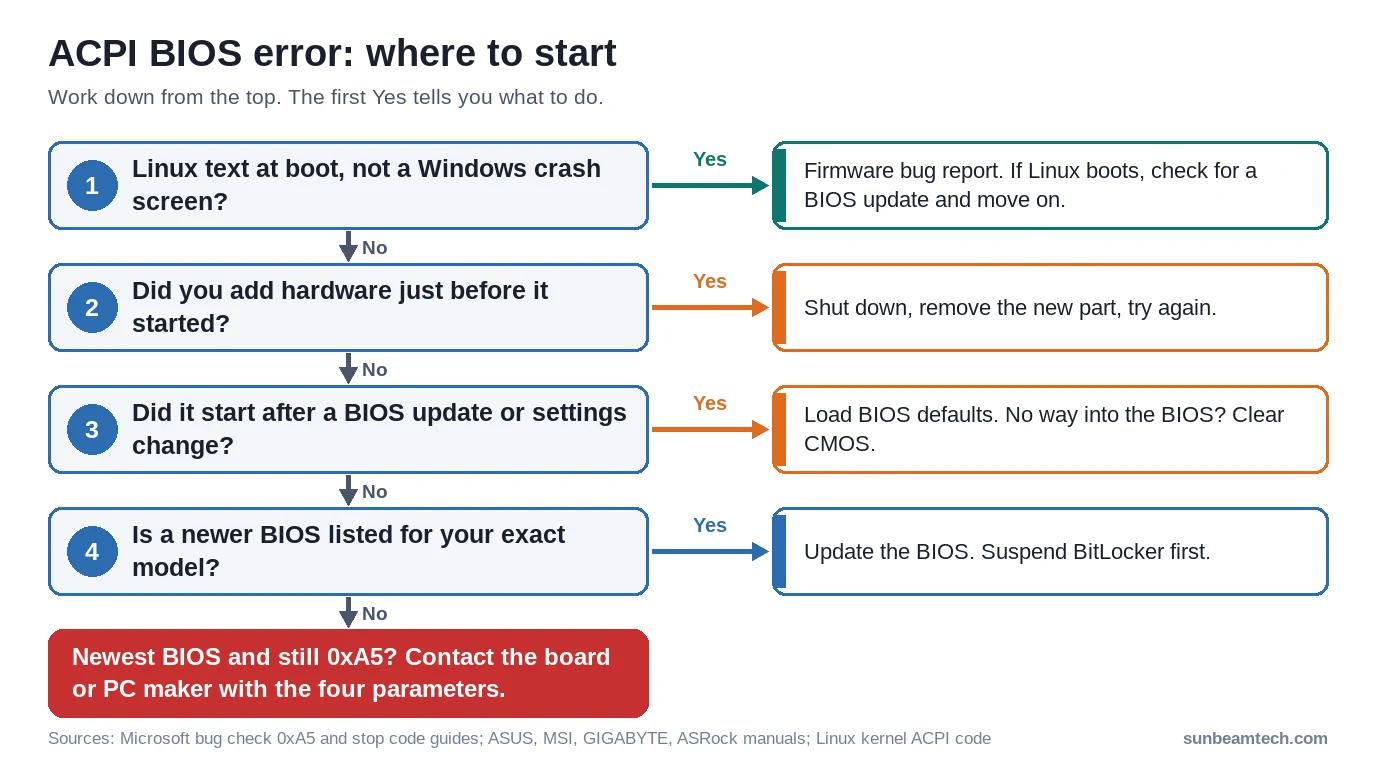
Windows Blue Screen or Linux Boot Text?
Look at where the words show up. Windows puts the stop code at the bottom of the crash screen, which is blue on Windows 10 and older Windows 11 builds and black on Windows 11 24H2 and later. This one reads ACPI_BIOS_ERROR, which is bug check 0xA5. Linux prints its version of the error as a kernel message, so you’ll see it scroll by during boot or find it later in dmesg.
| Windows | Linux | |
|---|---|---|
| What you see | Blue or black crash screen, stop code ACPI_BIOS_ERROR (0xA5) |
A text line starting with ACPI BIOS Error (bug): |
| What it means | The ACPI BIOS isn’t fully compliant with the ACPI specification | The kernel found a bug in the firmware’s ACPI tables |
| Type of event | A crash (bug check) | An error-level log message |
| First move | Undo the last change, then update the BIOS | Check for a BIOS update, hide the line if it bugs you |
Windows: Fixing ACPI_BIOS_ERROR (Stop Code 0xA5)
The bug check reference for 0xA5 doesn’t leave much room. If you’re not debugging, you need a new BIOS from your vendor. Before you flash anything, though, rule out the two cheap suspects: a change you just made and hardware you just added.
Undo the last change first
Did you add a card, a drive or RAM right before the crashes started? Shut down, take it out and boot again before you touch anything else. That’s the first step on Microsoft’s stop code checklist, and it’s the cheapest test you’ve got.
Did it start after a BIOS update or after you changed settings? Load the BIOS defaults. On the four big board brands that’s one key or one menu item, and the table further down shows which. If you can’t even get into the BIOS, clear CMOS instead. The ASUS manual gives exactly that advice for a board that won’t boot after a settings change.
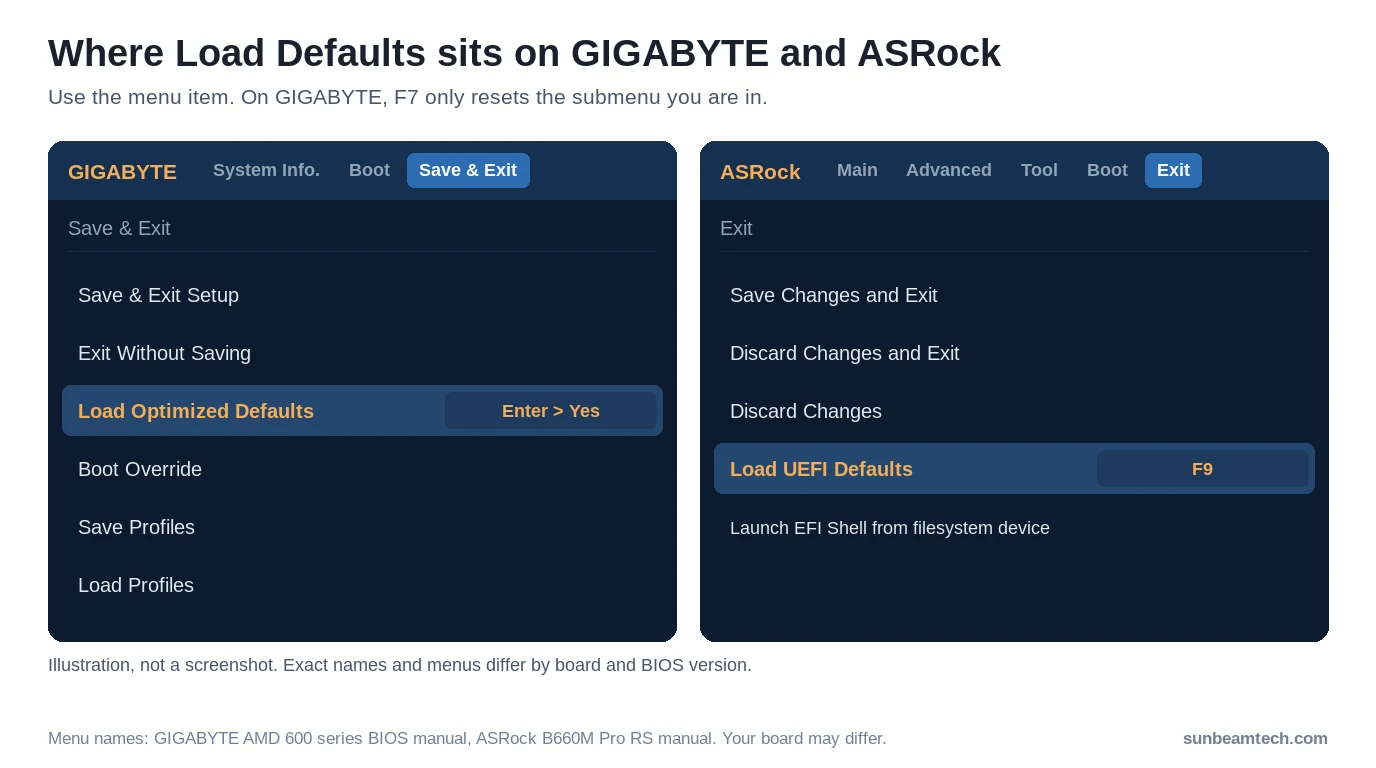
Watch out on recent GIGABYTE boards, where F7 only loads defaults for the submenu you’re in. Use Save & Exit > Load Optimized Defaults to reset everything at once.
Load defaults and update the BIOS on your board
Here’s where each brand puts the two things you need. To get into the BIOS in the first place, press Delete right after you power on; ASUS and ASRock boards also take F2. I took the menu names from one manual per brand (ASUS B550, MSI Intel 500 series, GIGABYTE AMD 600 series, ASRock B660M), so your board and BIOS version may label things a little differently.
| Brand | Load defaults | BIOS update tool | How to open it |
|---|---|---|---|
| ASUS | Exit > Load Optimized Defaults, or F5 | ASUS EZ Flash 3 | Advanced Mode, Tool > ASUS EZ Flash 3 Utility |
| MSI | F6 | M-FLASH | M-FLASH button in the BIOS, or Ctrl + F5 during POST |
| GIGABYTE | Save & Exit > Load Optimized Defaults (F7 only resets the current submenu) | Q-Flash | F8 in the BIOS, or End during POST |
| ASRock | Exit > Load UEFI Defaults, or F9 | Instant Flash | Tool > Instant Flash (F2 or Del enters the UEFI) |
Download the BIOS file for your exact board model from the maker’s support page. MSI’s manual is explicit that the file has to match your motherboard model. Copy it to a USB stick; ASUS EZ Flash 3, for example, wants FAT32 or FAT16 with a single partition.
Start the flash and leave the PC alone until the tool reports it’s done. MSI’s M-FLASH restarts the PC by itself at 100%. The ASUS board in the table leaves the restart to you once EZ Flash 3 finishes. Don’t cut power or hit reset halfway: ASUS warns that doing so can leave the board unable to boot. When it’s done, load the defaults one more time. GIGABYTE’s manual asks for that after every BIOS update, and it costs you nothing on other brands.
Suspend BitLocker before you flash
If your system drive uses BitLocker, suspend it before the update. A BIOS or UEFI firmware upgrade is on Microsoft’s list of recovery triggers. Suspending protection first is how you avoid the recovery key prompt afterwards. Press Start, type BitLocker, open Manage BitLocker and choose Suspend protection for the system drive, or run manage-bde -protectors -disable C: in an admin Command Prompt. Do it right before you restart to flash.
Can’t keep Windows running long enough to do that? Then find the recovery key before you flash. If the PC signs in with a Microsoft account, that’s the recommended place for the key: open aka.ms/myrecoverykey on another device and sign in. Keep a copy somewhere other than this PC either way.
The crash happens when you install Windows
This one shows up in forum threads too: the installer boots from USB, then 0xA5. The fix is the same newer BIOS, but you’ve got no working Windows to download it with. Grab the file on another PC, put it on a USB stick and flash it with the tool from the table. If the board won’t POST at all, check whether it supports BIOS Flashback.
You’ll also read about pressing F7 during setup to switch ACPI off. That trick is real, but it belongs to the old text-mode setup: you press F7 when it asks for storage drivers, and Microsoft only offers it for a BIOS that can’t be made compliant. If your installer never shows that prompt, there’s nothing to press. Update the BIOS instead.
Reinstalling anyway? Decide between UEFI and legacy boot before you start. Our CSM guide covers that choice.
Read the number: what the 0xA5 parameters mean
The crash screen shows the stop code, sometimes with the file that failed, but not the four parameters behind it. The first of those tells you what kind of ACPI problem Windows hit. If Windows boots at least now and then, open Event Viewer and check the Windows system log. The bug check event lists all four parameters in its properties.
Here’s what some of the Parameter 1 values mean, in plain terms:
| Parameter 1 | What ACPI ran into |
|---|---|
0x01 |
It couldn’t find the System Control Interrupt (SCI) in the resources the BIOS handed over. |
0x02 |
It couldn’t process the resource list for the PCI root buses. |
0x03 |
A control method failed while ACPI was building its list of devices. |
0x06 |
It looked for a named object and couldn’t find it. |
0x0D |
A required method or object is missing, such as _HID or _ADR. |
0x11 |
The system couldn’t enter ACPI mode at all. |
0x15 |
Loading an ACPI table failed outright. |
Microsoft files all of them under one verdict: the ACPI BIOS isn’t fully compliant with the spec. That’s why the answer keeps coming back to a BIOS update. Write the four values down. They’re the most useful thing you can hand support.
Laptops and prebuilt PCs
On a laptop or a prebuilt from HP, Dell or Lenovo, your vendor is the PC maker, not the company that made the board inside. Get the BIOS from their support page for your exact model. If the newest version they list still crashes, stop experimenting and open a ticket with them.
What Not to Do
Some popular fix lists for this error include steps that create new problems. Skip these:
- Switching SATA mode from AHCI to IDE. Changing the controller mode on a working install is one of the causes behind a different stop code, INACCESSIBLE_BOOT_DEVICE. If you already changed it, change it back.
- Flashing a BIOS file for a similar board. Match your exact model. Close isn’t good enough.
- Cutting power during a flash. Keep a laptop on its charger and don’t touch the power button until the update tool says it’s finished.
- Disabling ACPI on a PC that already runs Windows. The F7 workaround belongs to text-mode setup. It isn’t a setting to flip on a working machine.
Linux: ACPI BIOS Error (bug) at Boot
Linux prints this when its ACPI code finds something wrong in the tables your firmware provides. The label is deliberate. ACPI BIOS Error (bug): goes out as an error-level kernel message, and the kernel saves it for failures it blames on the firmware, like a name lookup that comes up empty.
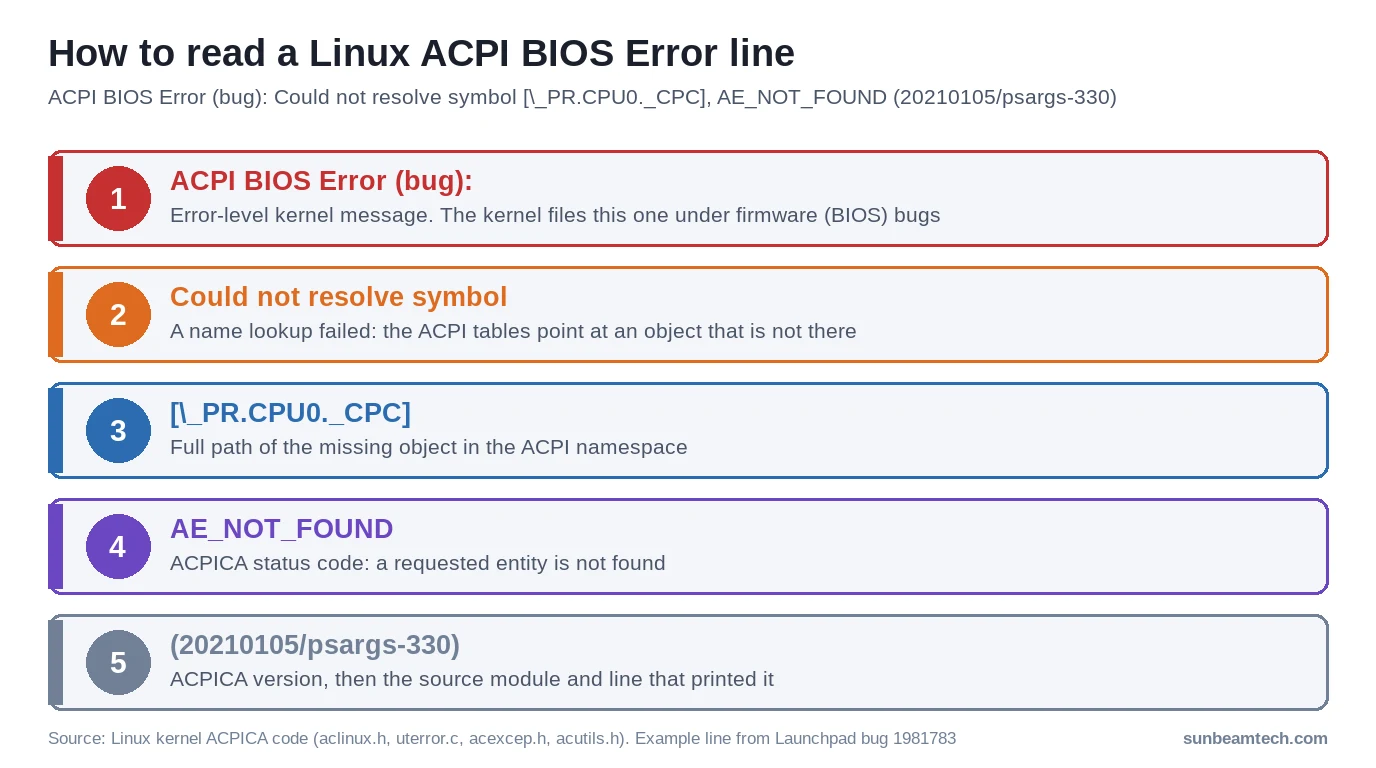
The name lookup version comes in two flavors. Could not resolve symbol means the tables point at an object that isn’t there, which comes with AE_NOT_FOUND. Failure creating named object means the tables try to create something that already exists. Either way, the kernel is pointing at the firmware’s own data.
Is it your problem?
Mostly, no. In a kernel bug report about lines like these, a kernel developer explained that they typically point to a bug in your ACPI tables. So you’re usually looking at a BIOS bug, not a Linux bug.
A recent BIOS doesn’t guarantee they’re gone, either. In one Red Hat case the lines showed up on a fresh install with a recent BIOS. If your system boots, runs and sleeps normally, I’d treat them as noise.
Boot stops right after them? Don’t blame the ACPI lines just because they’re the last thing on screen. Remove quiet from the boot line for one boot (press e at the GRUB menu, as shown below) so you can see what the kernel prints next.
If the screen freezes where the desktop or installer should appear, add nomodeset to that same line as a test. It keeps the kernel’s graphics drivers from loading and sticks with the basic display your firmware set up, so a clean boot points at the graphics driver, not at ACPI.
Hide it from the boot screen
These lines are logged at KERN_ERR, which is level 3. The kernel only prints a message on the console when its level is lower than the console log level. So loglevel=3 keeps them off your boot screen. You can still read them with dmesg.
On Ubuntu, you make it permanent in the GRUB defaults file:
- Open
/etc/default/grubas root in a text editor. - Find the line that starts with
GRUB_CMDLINE_LINUX_DEFAULTand addloglevel=3at the end, inside the quotes and after a space. It has to come afterquiet, because the last setting on the line wins: the upstream kernel treatsquietas log level 4 by default, which still shows these lines. If your distro already hides them withquietalone, you can skip this. - Save, run
sudo update-grubto rebuild the GRUB config, and reboot. That’s Ubuntu’s shortcut forgrub-mkconfig -o /boot/grub/grub.cfg. Other distros with GRUB read the same file, but their rebuild command can differ.
Want to test it once first? Press e at the GRUB menu (if your install hides it, hold Shift or press Esc while it boots), add loglevel=3 to the end of the line that starts with linux, then press Ctrl+X to boot the edited entry.
To bring the messages back up later, run sudo dmesg --level=err,warn. It prints only errors and warnings, so the ACPI lines don’t drown in everything else.
Report it to the people who can fix it
The real fix lives in the BIOS. The kernel’s own documentation tells you to take table bugs the kernel won’t work around to your platform or BIOS vendor. Check their support page for a newer BIOS first, and if there isn’t one, send them the full line.
That same page describes swapping in fixed tables from the initrd. You’d be disassembling, editing and recompiling the tables yourself with the iasl compiler, so it’s a job for firmware tinkerers, and I wouldn’t do it on a machine you depend on.
How to Check the Fix Worked
After a BIOS update, confirm the new version actually took. Press the Windows key, type System and open System Information, which shows your BIOS version and your board’s maker and model. Compare that version with the file you downloaded.
Then use the PC normally for a few days and check the system log in Event Viewer again. No new bug check events means you’re done.
On Linux, run sudo dmesg --level=err,warn after the update and compare it with what you saw before. Fewer ACPI lines means the new tables fixed at least part of it.
Frequently Asked Questions
Is an ACPI BIOS error serious?
On Windows, yes: it’s a stop code that crashes the PC, and the fix Microsoft points to is a newer BIOS. On Linux it’s a logged firmware bug. If the system boots and works, treat it as a report about your BIOS rather than a fault you have to chase.
Should ACPI be enabled or disabled?
Leave it on. ACPI is how the operating system configures your board’s devices and manages power. Microsoft’s ACPI-off workaround is an F7 press in text-mode setup, meant for a BIOS that can’t be made compliant, not a switch for a running system.
How do I fix an ACPI BIOS error in Windows 11?
Remove any hardware you just added, load the BIOS defaults, then update the BIOS from your board or PC maker. If Windows won’t start, prepare the USB stick on another PC and flash from the BIOS’s own update tool.
What does 0xA5 mean in ACPI_BIOS_ERROR?
0xA5 is the bug check number for ACPI_BIOS_ERROR. The first of its four parameters tells you what kind of ACPI problem Windows found, for example 0x11 when the system couldn’t enter ACPI mode. Event Viewer’s system log shows all four.
Can clearing CMOS fix an ACPI BIOS error?
It can if the crash started after a BIOS settings change and you can’t reach the BIOS to load defaults, because clearing CMOS resets those settings. I wouldn’t expect it to fix tables that are buggy in the BIOS itself. That takes an update.
Why does Ubuntu show ACPI BIOS Error at boot?
The kernel prints it when the ACPI tables from your BIOS refer to an object that doesn’t exist (AE_NOT_FOUND) or try to create one that already does. It’s a firmware bug the kernel reports, and loglevel=3 keeps it off the boot screen.
Still Crashing on the Newest BIOS? What to Send Support
At this point the board or PC maker has to fix it, and the 0xA5 reference sends you to your vendor too. Make the ticket easy to act on:
- Your exact board or laptop model, plus the BIOS version from System Information.
- The four bug check parameters from Event Viewer, if Windows ever got far enough to log them.
- What changed right before it started: a BIOS update, a settings change, new hardware or a fresh install.
- That you’ve already loaded defaults and tried the newest BIOS they offer.
If the screen stays black after a flash, work through our no-display checklist. On an MSI board that stops on a debug light, start with what each EZ Debug LED means. And if a board under warranty still won’t get past 0xA5 on the newest BIOS, ask the maker about an RMA.
Want our guides higher in your Google results? Add SunbeamTech as a preferred source.


Alex Rivera writes SunbeamTech’s guides on BIOS settings, motherboard headers, cooling and PC builds. Every guide starts from the manufacturer’s documentation and the questions builders actually search for, and gets checked against AMD, Intel, NVIDIA and board-vendor sources before it goes live. Spotted a mistake? Email [email protected] and it gets fixed.