How Much Thermal Paste to Use on a CPU
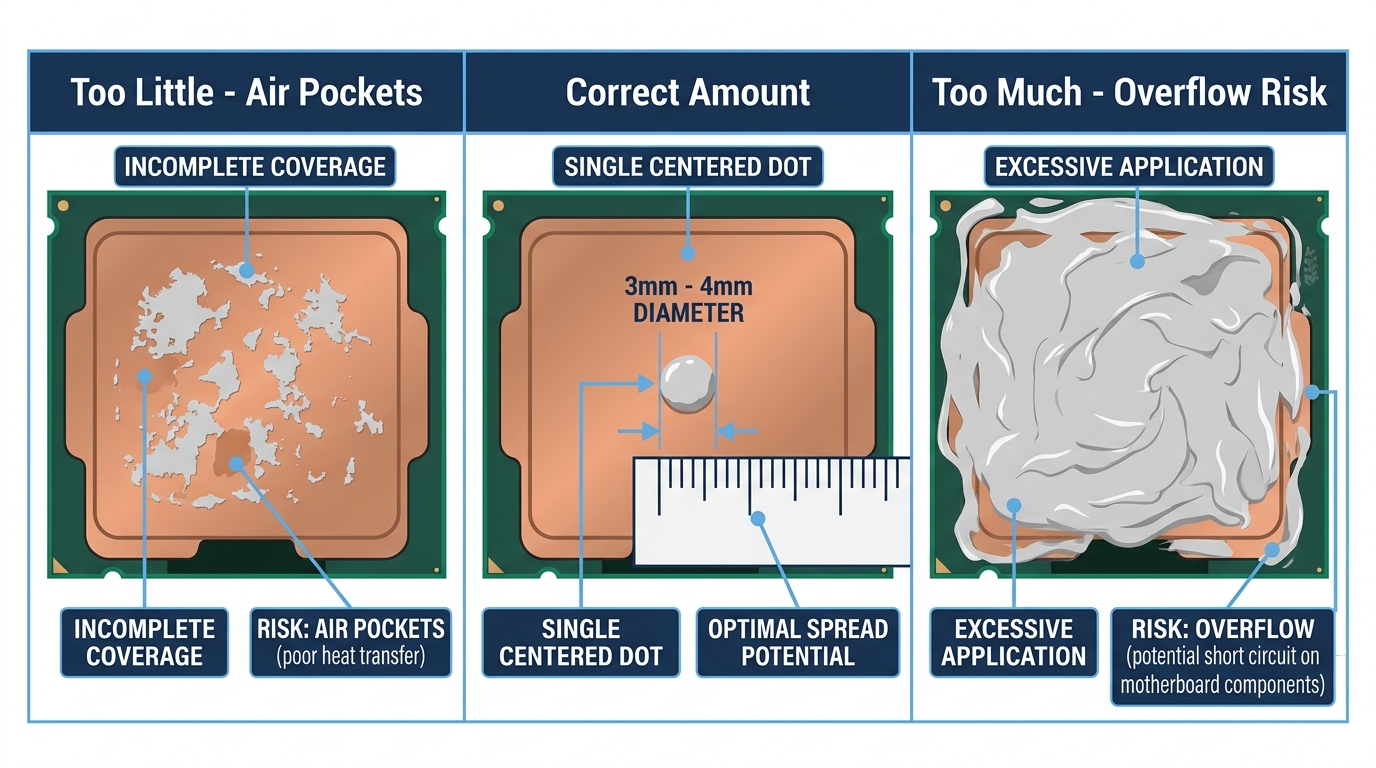
Use a pea-sized dot of thermal paste, about 3–4mm in diameter, centered on your CPU’s integrated heat spreader for optimal thermal transfer.
Last updated: June 2026
Table of Contents
- Quick Answer: How Much Thermal Paste Should You Use on a CPU?
- What Is Thermal Paste and Why Does the Amount Matter?
- What Thermal Paste Actually Does
- Why Quantity Is Critical
- How Much Thermal Paste to Use, The Exact Answer
- How Much Thermal Paste in ml / by Weight
- How Much Thermal Paste by CPU Platform and Socket
- AMD CPUs (AM4 / AM5 Socket)
- Intel CPUs (LGA1700 / LGA1851)
- How Much Thermal Paste on a Laptop CPU
- Application Methods, Which One Is Right for You?
- The Center Dot Method (Recommended for Most Builds)
- The Line / Oval Method
- The Spread / Thin Layer Method
- The X Method and Cross Method
- Signs You’ve Used Too Much or Too Little Thermal Paste
- Signs of Too Little Paste
- Signs of Too Much Paste
- What Good Application Looks Like After Removal
- When to Reapply Thermal Paste
- Thermal Paste Quantity on a GPU, Brief Overview
- FAQ, Thermal Paste Quantity Questions Answered
- How much thermal paste should I use on a CPU?
- How do I know if my CPU has enough thermal paste?
- How much thermal paste should I use on a laptop CPU?
- Can you use too much thermal paste?
- How many applications does a tube of thermal paste provide?
- Key Takeaways
- Final Thoughts
Quick Answer: How Much Thermal Paste Should You Use on a CPU?
A single dot roughly 3–4mm in diameter, centered on the CPU’s IHS (integrated heat spreader), is the correct amount for most desktop CPUs. That’s about the size of a pea or the tip of a pencil eraser. Your cooler’s mounting pressure will spread it from there. For most builds, this means roughly 0.3–0.5ml per application, meaning a standard 4g tube gets you 8–10 applications before it runs out.
72°C. That’s what a poorly pasted CPU running a mid-range cooler can reach at idle, when it should be sitting around 40°C. Thermal paste application is one of those things that looks trivial until it isn’t. Most first-time builders either squeeze out a generous ribbon thinking more is better, or nervously dab a tiny speck and hope for the best. Both cause problems. The amount you use, the method you choose, and the socket you’re working with all affect your CPU temperatures, long-term stability, and whether you’ll hit thermal throttling under sustained load. This guide covers the exact quantity to use, breaks it down by platform including AM4, AM5, LGA1700, LGA1851, and laptop CPUs, and walks through every common application method so you know which one fits your build.
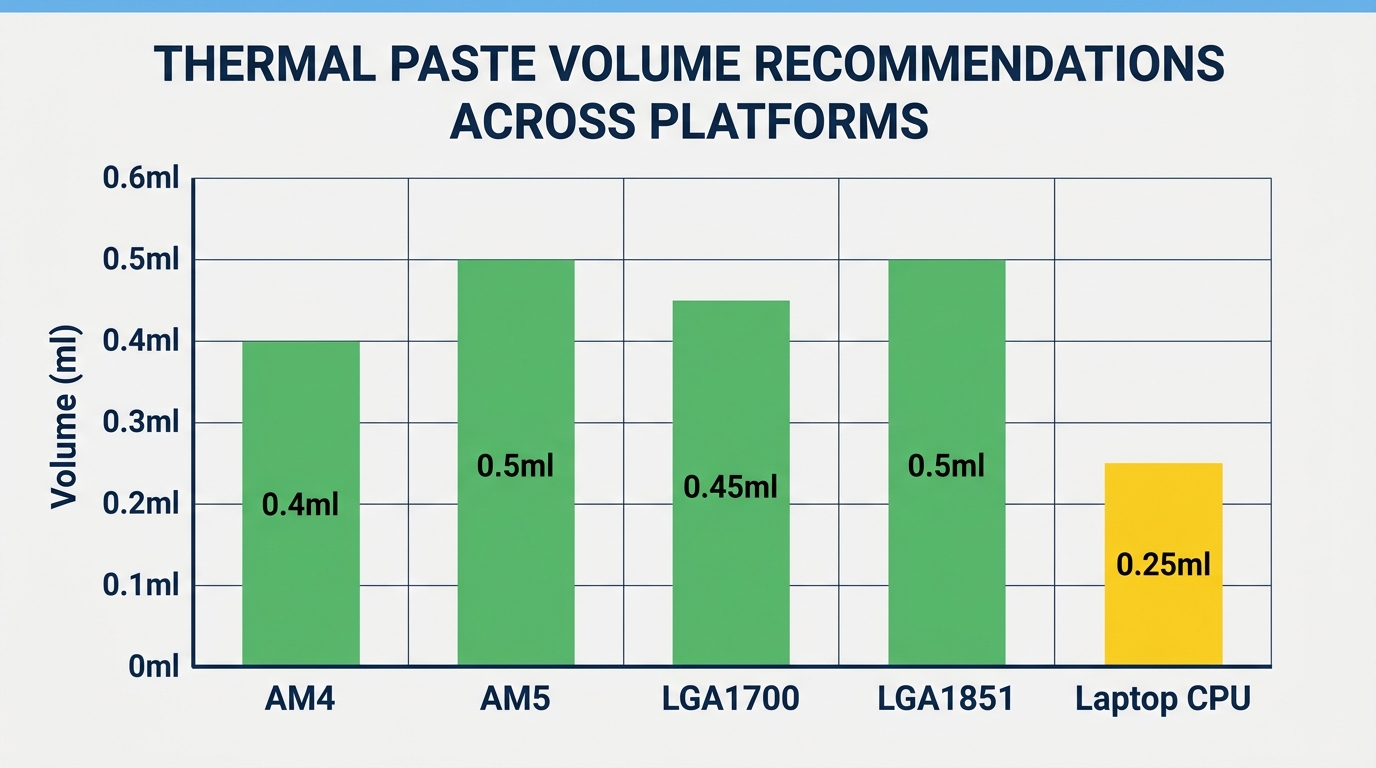
- 🟢 AM4 (Ryzen 5000): Center dot, ~0.4ml
- 🟢 AM5 (Ryzen 7000/9000): Center dot or thin spread, ~0.5ml
- 🟢 LGA1700 / LGA1851 (Intel 12th–15th Gen): Elongated dot or line, ~0.4–0.5ml
- 🟡 Laptop CPU (bare die): Thin spread, ~0.2–0.3ml
- 🔴 Too much (any platform): Paste visible squeezing past IHS edges
- 🔴 Too little (any platform): Bare spots visible on IHS after removal
What Is Thermal Paste and Why Does the Amount Matter?
What Thermal Paste Actually Does
Your CPU’s IHS and the base plate of your cooler look flat. They’re not. Under a microscope, both surfaces have microscopic valleys and ridges that trap air pockets when pressed together. Air conducts heat at around 0.025 W/m·K. That’s terrible. Thermal paste, depending on the compound, conducts heat at 4–14 W/m·K, anywhere from 160 to 560 times better than air. The paste doesn’t do the heavy lifting on its own; it fills the gaps so heat transfers efficiently from the die to the heatsink.
You’ll see this stuff called a lot of things: thermal grease, thermal compound, TIM (thermal interface material), heat paste, CPU paste, thermal gel. All the same thing. The name doesn’t change how much you should use.
Why Quantity Is Critical
Too little paste leaves air pockets. Those pockets act as insulation, creating hot spots that push up your average temps and, under sustained load, can trigger thermal throttling. Your CPU starts slowing itself down to avoid overheating. Not great.
Too much paste creates a different problem. Excess paste squeezes out from under the cooler when you tighten it down. If you’re using a conductive compound like liquid metal, overflow near the socket pins or capacitors is a serious safety concern. Even with non-conductive paste, a thick uneven layer can trap air bubbles in the overflow and actually reduce thermal transfer efficiency compared to a thin, even application.
The Gamers Nexus thermal paste quantity benchmark series tested real-world application variables across common desktop CPUs and found measurable temperature differences of 3–5°C between optimal and excessive applications. That’s not catastrophic, but it’s real, and it compounds with other variables like ambient temp and airflow.
How Much Thermal Paste to Use, The Exact Answer
For the vast majority of desktop CPU builds, you want a center dot of approximately 0.3–0.5ml, or roughly 0.3–0.5g if you’re going by weight. Visually: pea-sized, or about the size of a pencil eraser tip. Most standard syringes like Arctic MX-4, Noctua NT-H1, and Thermal Grizzly Kryonaut contain 1–4g, and at these application sizes, a 4g tube gets you 8–10 applications easily.
How Much Thermal Paste in ml / by Weight
A single desktop application: 0.3–0.5ml, or roughly 0.3–0.5g by weight. Viscosity varies between compounds, so the volume-to-weight ratio isn’t perfectly consistent across products, but the physical dot size on the IHS is your most reliable guide. Here’s how popular tubes stack up:
| Product | Size | Est. Applications |
|---|---|---|
| Arctic MX-4 | 4g | 8–10 |
| Noctua NT-H1 | 3.5g | 7–9 |
| Thermal Grizzly Kryonaut | 1g | 2–3 |
| Cooler Master MasterGel Maker | 1.5g | 3–4 |
| NZXT XTM50 | 3g | 6–8 |
How Much Thermal Paste by CPU Platform and Socket
This is where most guides fall short. The right amount isn’t just “pea-sized”, it depends on the shape and size of the IHS you’re working with. Square and rectangular IHS surfaces distribute paste differently under pressure.
AMD CPUs (AM4 / AM5 Socket)
AM4’s IHS measures approximately 37.5 x 37.5mm. It’s square. A standard pea-sized center dot works perfectly here, cooler pressure spreads it reliably to the corners. AM5 is a different story. The AM5 IHS is larger at roughly 45 x 45mm, and the Ryzen 7000 and 9000 series (Zen 5) pack a more complex die layout underneath. A slightly larger dot, or using the spread method to pre-coat the surface, often gives better edge coverage. AMD Ryzen CPUs have historically run on the warmer side, so paste coverage matters more than you might think on AM4 Zen 2 and Zen 3 chips.
Intel CPUs (LGA1700 / LGA1851)
Intel’s LGA1700 IHS, used by 12th, 13th, and 14th Gen Core processors, is rectangular at approximately 45 x 37.5mm. That non-square shape means a pure center dot may not spread evenly to the longer edges under mounting pressure. A slightly elongated oval dot, or the line method (described below), consistently gives better coverage across the full IHS. Intel’s own guidance recommends a pea or grain of rice size, which holds, but adjusting the shape of that dot for the rectangular IHS gets you better results in practice. LGA1851 (Intel Core Ultra 200 series, including the Core Ultra 9 285K) shares similar dimensions and the same recommendation applies.
How Much Thermal Paste on a Laptop CPU
Laptop CPUs are a different situation entirely. Most mobile processors are soldered bare die, there’s no IHS between the chip and the cooler. That means you’re applying paste directly to the silicon. Use less: approximately 0.2–0.3ml, spread as a thin, even layer across the entire die surface. Don’t rely on pressure to spread it for you here. Use a plastic spreader, old credit card, or the included applicator. Lower-viscosity compounds like NT-H1 work better in this scenario than thick pastes like Kryonaut.
| Platform | CPU Examples | IHS Size | Recommended Method | Approx. Amount |
|---|---|---|---|---|
| AM4 | Ryzen 5000 | 37.5 x 37.5mm | Center dot | ~0.4ml |
| AM5 | Ryzen 7000 / 9000 / 9000X3D | 45 x 45mm | Center dot or thin spread | ~0.5ml |
| LGA1700 | Core i5-14600K, i9-14900K | 45 x 37.5mm | Elongated dot or line | ~0.4–0.5ml |
| LGA1851 | Core Ultra 9 285K, Core Ultra 5 245K | ~45 x 37.5mm | Center dot or thin spread | ~0.4–0.5ml |
| Laptop (bare die) | Various mobile CPUs | Varies | Full thin spread | ~0.2–0.3ml |
- 30°C = 86°F (typical idle CPU temp)
- 40°C = 104°F (normal idle, good cooler)
- 65°C = 149°F (light gaming load)
- 75°C = 167°F (moderate load, acceptable)
- 85°C = 185°F (heavy sustained load, watch closely)
- 90°C = 194°F (approaching thermal limit for most CPUs)
- 100°C = 212°F (throttling territory, reapply paste)
Formula: °F = (°C × 1.8) + 32.
Application Methods, Which One Is Right for You?
The method you choose should match the shape of the IHS you’re working with. One size doesn’t fit all here, and this is the nuance that Intel’s own guide skips over entirely.
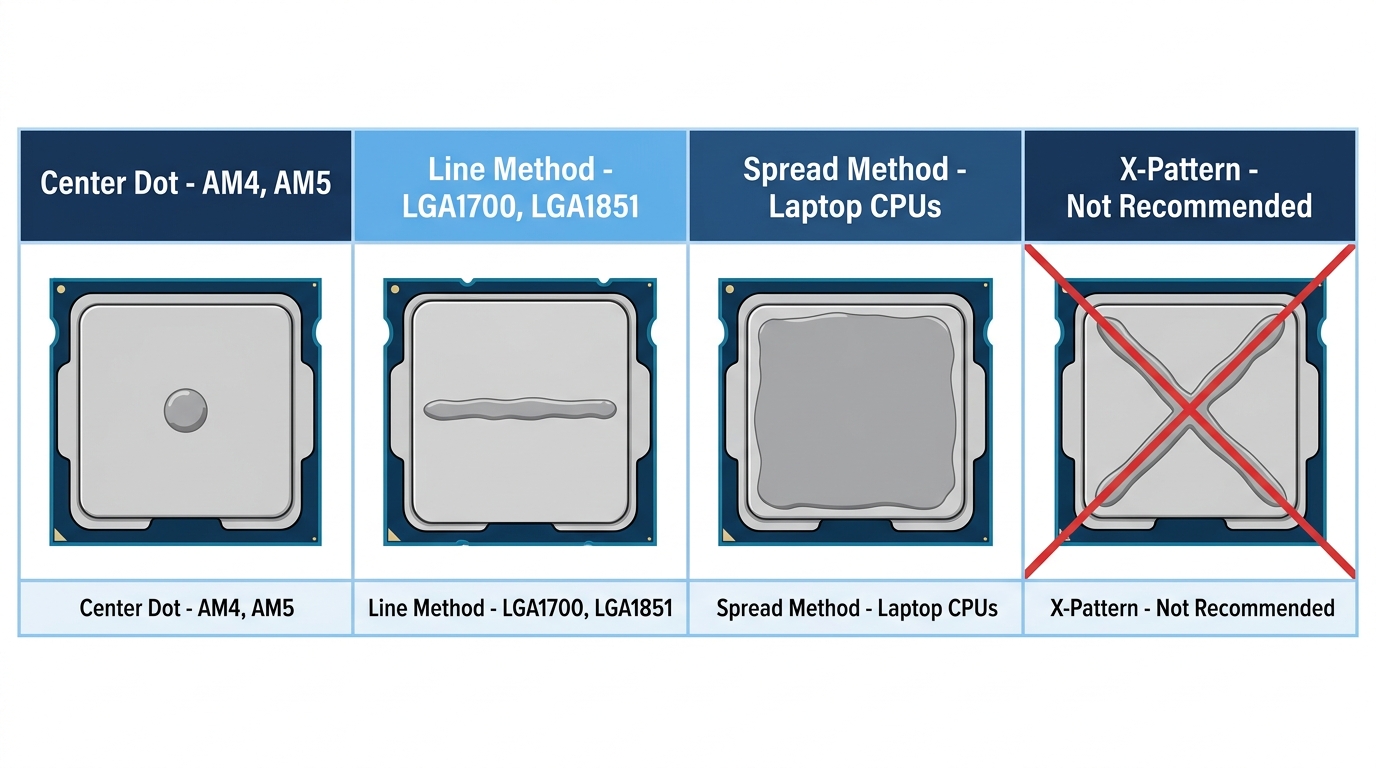
The Center Dot Method (Recommended for Most Builds)
Place a single 3–4mm dot in the center of the IHS and let cooler mounting pressure do the spreading. It’s the most commonly recommended method because it’s simple, consistent, and works well for square IHS platforms like AM4 and AM5. The risk on rectangular IHS platforms is that the dot may not spread fully to the longer edges, potentially leaving thin coverage near the top and bottom of the heatspreader.
The Line / Oval Method
Draw a thin horizontal or vertical line across the center of the IHS rather than a circular dot. This is specifically useful for Intel LGA1700 and LGA1851 chips, where the rectangular IHS shape benefits from that slightly elongated starting point. Orient the line along the longer axis of the rectangle. Don’t make it thick, the total volume should still be roughly 0.4–0.5ml.
The Spread / Thin Layer Method
Manually spread the paste across the entire IHS surface using a plastic card, applicator spatula, or the spreader some tubes include. This gives the most even starting coverage. It’s the right call for laptop bare-die CPUs, delidded CPUs, and large IHS chips where you want full coverage before mounting. The downside: it’s easier to introduce air bubbles if you’re not deliberate. Work from the center outward, slowly.
The X Method and Cross Method
Older technique. You apply paste in an X or cross shape across the IHS. Not recommended for modern CPUs. It uses slightly more paste than needed and Gamers Nexus benchmark testing showed no meaningful temperature advantage over the dot method when cooler mounting pressure is evenly applied. Skip it.
Signs You’ve Used Too Much or Too Little Thermal Paste
Signs of Too Little Paste
Your CPU temps will run 10°C or more above the expected baseline for your cooler and TDP. You may see thermal throttling during sustained workloads, the processor drops clock speeds to cool itself down. Check with HWiNFO64 or Core Temp under a full load. If you pull the cooler and see bare spots or incomplete coverage on the IHS impression, that’s your answer: not enough paste was applied. If you’re seeing your CPU hit 90°C or higher under normal gaming loads, checking your thermal paste should be one of the first steps. A full breakdown of CPU overheating signs and how to fix them is worth reading before you assume the cooler is the problem.
Signs of Too Much Paste
Paste visibly squeezing out from the sides of the cooler base after mounting is the clearest tell. Counterintuitively, temps can actually be higher than optimal with excessive paste because thick uneven overflow traps air. If you’re using a conductive compound and paste reaches the capacitors or socket area, stop immediately and clean everything with isopropyl alcohol before powering on. That’s a short-circuit risk.
What Good Application Looks Like After Removal
When you pull the cooler off a correctly pasted CPU, you should see a thin, even, grey film covering 80–90% of the IHS surface. No thick blobs. No bare patches larger than a few millimeters. A circular or slightly oval coverage pattern with no overflow past the IHS edge. That’s what you’re aiming for.
When to Reapply Thermal Paste
Every single time you remove the cooler. Full stop. Once the thermal interface is broken, you can’t simply reseat the cooler and expect the same coverage. The paste doesn’t re-distribute evenly after separation, air gets in, coverage shifts, and temps suffer.
Under normal operation, thermal paste lasts 2–5 years before it starts degrading. The compound dries out, cracks, and loses conductivity. You’ll notice it as gradually creeping CPU temperatures over months, idle temps that used to be 35°C are now 45°C, and gaming temps keep hitting higher peaks than before. For a full breakdown of timing and degradation signs, the guide on how often you should replace thermal paste covers it in detail.
Specific scenarios that require fresh paste:
- Cooler replacement or upgrade: always reapply
- CPU re-seating or RMA return: clean and reapply
- After delidding: reapply to both the die and IHS
- Annual maintenance (performance builds): worth doing on high-TDP chips
- Any time temps increase more than 5–8°C from your established baseline: investigate paste first
Thermal Paste Quantity on a GPU, Brief Overview
Most GPUs ship with thermal paste pre-applied from the factory. You won’t touch it during a standard build. The scenarios where GPU thermal paste becomes your problem are aftermarket cooler swaps, custom water block installations, or repairing an older GPU that’s running hot after years of use.
GPU dies are typically smaller than CPU IHS surfaces and are bare (no heatspreader). Apply a thin spread directly to the die, roughly 0.2–0.4ml depending on die size. Don’t use a thick dot here; the lack of an IHS to distribute pressure means you need more manual control over coverage. Lower-viscosity compounds work better on GPU bare dies. The same rules on conductive pastes apply: keep it away from capacitors and VRMs surrounding the die. You can reference Arctic’s thermal compound documentation for viscosity specs across their product line if you’re selecting a compound specifically for a GPU repaste.
FAQ, Thermal Paste Quantity Questions Answered
How much thermal paste should I use on a CPU?
A 3–4mm diameter dot centered on the IHS, roughly pea-sized. For AM5 and Intel’s rectangular LGA1700/LGA1851 IHS, a slightly larger center dot or a short horizontal line works better for edge-to-edge coverage. Total volume should stay at 0.3–0.5ml. Don’t eyeball a large blob, the cooler mounting pressure spreads it from there.
How do I know if my CPU has enough thermal paste?
Monitor CPU temps with HWiNFO64 or Core Temp under load. If you’re running 10°C or more above the expected baseline for your cooler and TDP, paste coverage is a likely culprit. You can also pull the cooler and check the IHS impression, complete, thin coverage across 80–90% of the surface means good application. Bare spots mean you used too little. For reference on what normal CPU temps look like, see the guide on what a good CPU temp actually is for your use case.
How much thermal paste should I use on a laptop CPU?
Less than a desktop. Laptop processors are usually bare die with no IHS, so you apply directly to the chip surface. Use approximately 0.2–0.3ml spread as a thin, even layer across the entire die. Use a lower-viscosity compound and a spreader for best results. Thick, high-viscosity pastes are harder to spread evenly on small bare-die surfaces.
Can you use too much thermal paste?
Yes. Excess paste squeezes out from under the cooler, potentially trapping air bubbles that reduce thermal efficiency. More seriously, if you’re using a conductive compound like liquid metal and it reaches nearby capacitors or socket components, it can short-circuit your board. Stick to 0.5ml maximum for desktop CPUs. Contrary to what some Reddit threads claim, more paste doesn’t mean better cooling.
How many applications does a tube of thermal paste provide?
A standard 4g tube provides 8–10 desktop CPU applications at the recommended pea-sized amount. Smaller 1g tubes like the standard Thermal Grizzly Kryonaut syringe yield 2–3 applications. See Tom’s Hardware’s full thermal paste application guide for additional application technique details.
Key Takeaways
- ✅ Most desktop CPUs (AM4, AM5, LGA1700, LGA1851): Use a 3–4mm center dot, approximately 0.4–0.5ml
- ✅ Intel rectangular IHS (LGA1700 / LGA1851): Elongated oval dot or short horizontal line for better edge coverage
- ✅ AM5 (Ryzen 7000/9000): Slightly larger dot or thin manual spread due to the larger 45 x 45mm IHS
- ✅ Laptop CPUs (bare die): Thin spread, 0.2–0.3ml, lower-viscosity compound
- ✅ Reapply every time the cooler is removed, once the seal is broken, the coverage is gone
- ✅ Monitor temps with HWiNFO64 or Core Temp, if gaming temps are above 85°C, investigate paste and cooler seating
- ❌ Don’t manually spread across the full IHS for desktop builds unless you’re using the deliberate spread method for a specific reason
- ❌ Don’t use conductive paste on a bare-die GPU or laptop CPU without being precise, overflow near capacitors is a real risk
Final Thoughts
The honest answer is that most builders overthink this. A pea-sized center dot, mounted with even pressure, gets you 90% of the way to optimal performance on any desktop CPU. Where the detail actually pays off is platform-specific: knowing that Intel’s rectangular IHS benefits from an elongated dot, or that an AM5 build with a Ryzen 9 9950X3D might benefit from a manual spread given the larger IHS. Paste amount is one variable in a system that also includes cooler quality, mounting pressure, airflow, and ambient temperature. Get the amount right, check your temps after the first boot, and you’re done. If temps are climbing over months, that’s your signal to pull the cooler, clean the surfaces with isopropyl alcohol, and start fresh.

Alex has been building and tweaking custom PCs for over 12 years. From budget builds to full custom water loops, he’s assembled more than 50 systems and helped hundreds of builders troubleshoot their rigs. When he’s not benchmarking the latest hardware, you’ll find him optimizing airflow setups or stress-testing overclocks.