How to Change RGB Lights on PC: A Complete Setup Guide
RGB on a PC refers to red, green, and blue LED systems in components like fans, cases, and RAM, controlled through manufacturer software, BIOS, or physical controllers.
Last updated: June 2026
Table of Contents
- Quick Answer: How Do You Change RGB Colors on a PC?
- What Does RGB Mean on a PC? (Quick Primer)
- How to Change RGB Colors on PC, 4 Methods Explained
- Method 1, Using Manufacturer RGB Software (Most Common)
- Method 2, Changing RGB Settings in Your Motherboard BIOS
- Method 3, Using a Physical RGB Controller or Remote
- Method 4, OpenRGB: Control All RGB From One App (Advanced)
- How to Change RGB Fan Color on PC (Step-by-Step)
- How to Set Up RGB Lighting When Building a New PC
- Plan Your RGB Ecosystem Before You Buy
- Component Checklist for a Fully Lit Build
- Cable Planning Before Assembly
- How to Turn Off RGB on PC
- Troubleshooting: Why Won’t My RGB Change Color?
- Problem 1: Software Doesn’t Detect My Device
- Problem 2: RGB Fans Won’t Sync
- Problem 3: RGB Is Stuck on One Color and Won’t Respond
- Problem 4: RGB Worked, Then Stopped After a Windows Update
- Problem 5: Only Some LEDs Are Changing, Not All
- Problem 6: RGB Software Won’t Open or Crashes on Launch
- FAQ, Frequently Asked Questions About PC RGB Lighting
- How do I change RGB fan color on PC without software?
- Can I control RGB on PC with Windows 11 natively?
- Why are my RGB fans a different color than my motherboard RGB?
- Does RGB lighting affect PC performance or temperatures?
- What is the difference between RGB and ARGB?
- Final Thoughts
Quick Answer: How Do You Change RGB Colors on a PC?
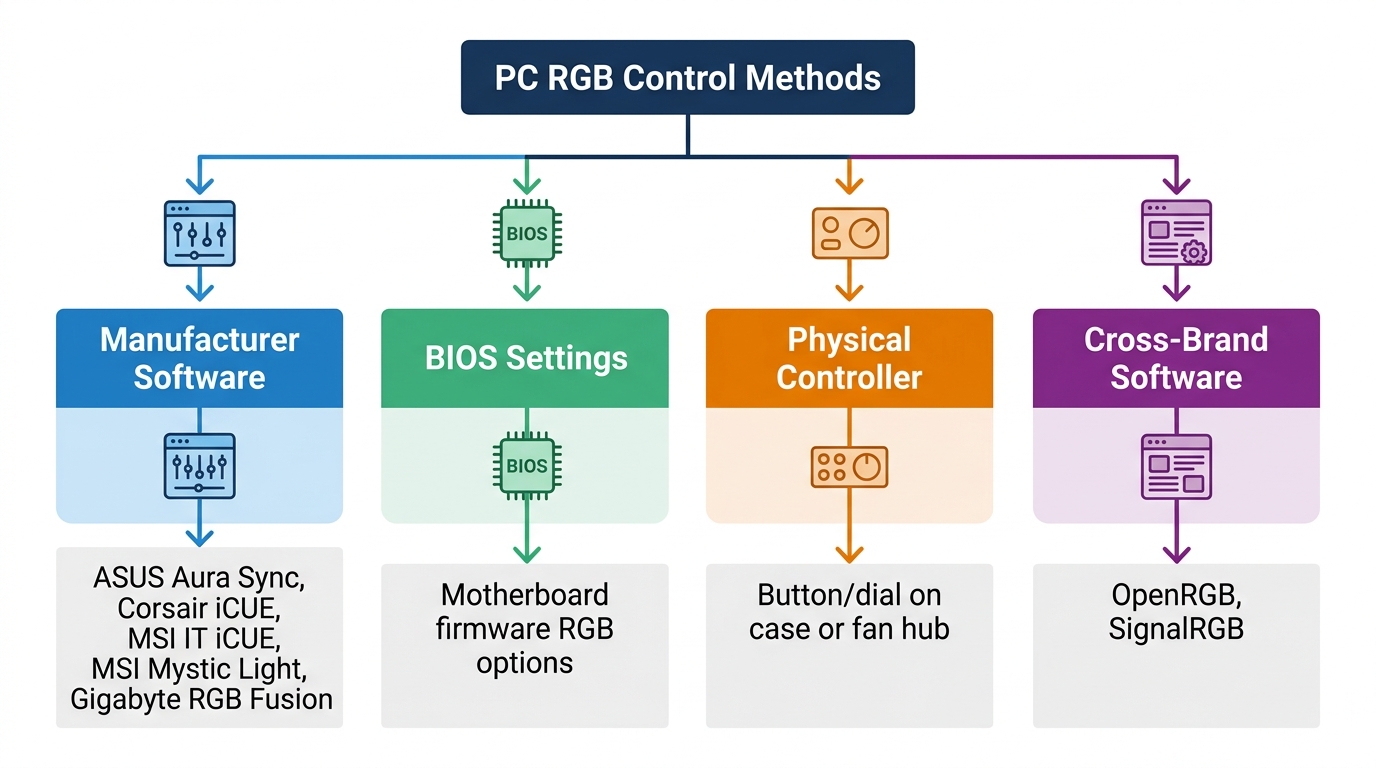
You change RGB colors on a PC through manufacturer software (ASUS Aura Sync, Corsair iCUE, MSI Mystic Light, or similar), your motherboard’s BIOS, a physical controller button, or a cross-brand tool like OpenRGB. The method depends entirely on your hardware. There is no universal Windows RGB control panel. Windows 10 and Windows 11 have zero native RGB settings built in.
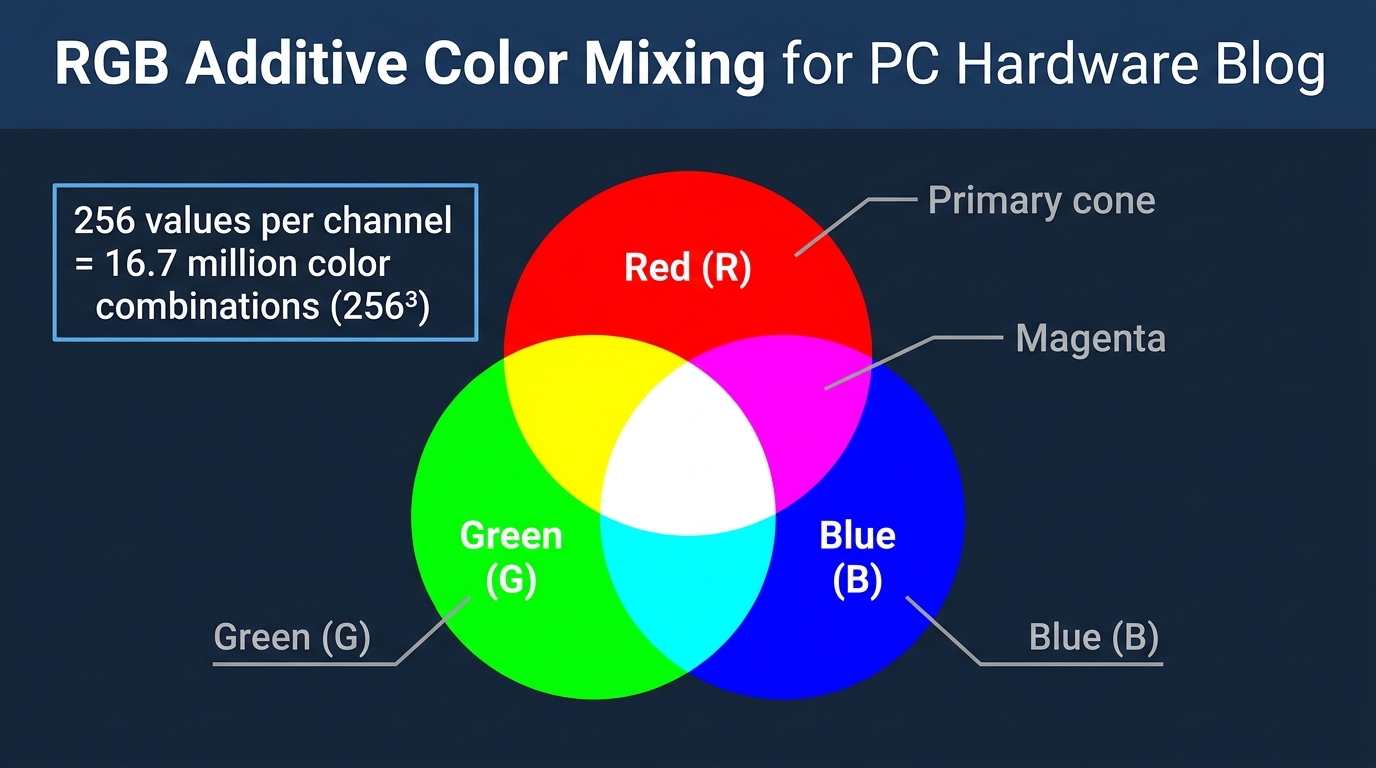
16.7 million color combinations. That’s the theoretical ceiling of what RGB lighting can produce when you’re working with addressable LEDs. But for most people building or upgrading a PC, the first question isn’t “what color should I pick?” It’s “why won’t anything work?” The process isn’t universal, and that’s the root of nearly every RGB frustration you’ll find in a forum thread. The software that controls your Corsair fans won’t touch your ASUS motherboard headers. The BIOS options on a Gigabyte board look nothing like MSI’s. Physical controllers that ship with budget fan kits have no software at all.
This guide covers every method for changing PC RGB lights, every major software ecosystem with step-by-step instructions, how to plan an RGB build from scratch, how to kill RGB entirely, and how to fix the most common failures. By the end, you won’t need a second tab open.
What Does RGB Mean on a PC? (Quick Primer)
RGB stands for red, green, and blue. It’s an additive color model where mixing those three channels at different intensities produces any of 16.7 million colors (256 values per channel, cubed). On a PC, “RGB” describes LED lighting built into cases, fans, RAM, motherboards, GPUs, and peripherals.
Before you download any software or buy any cables, you need to understand one distinction. Not all RGB is the same.
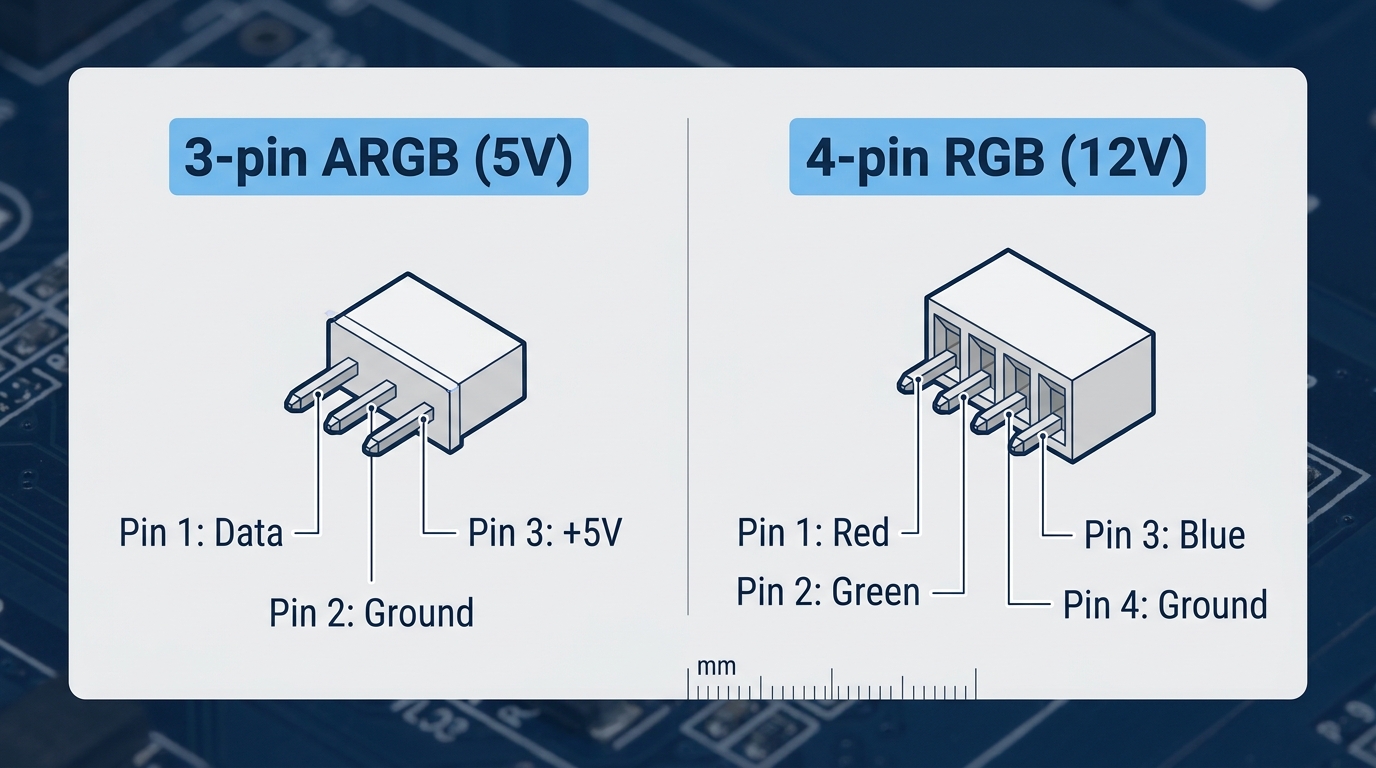
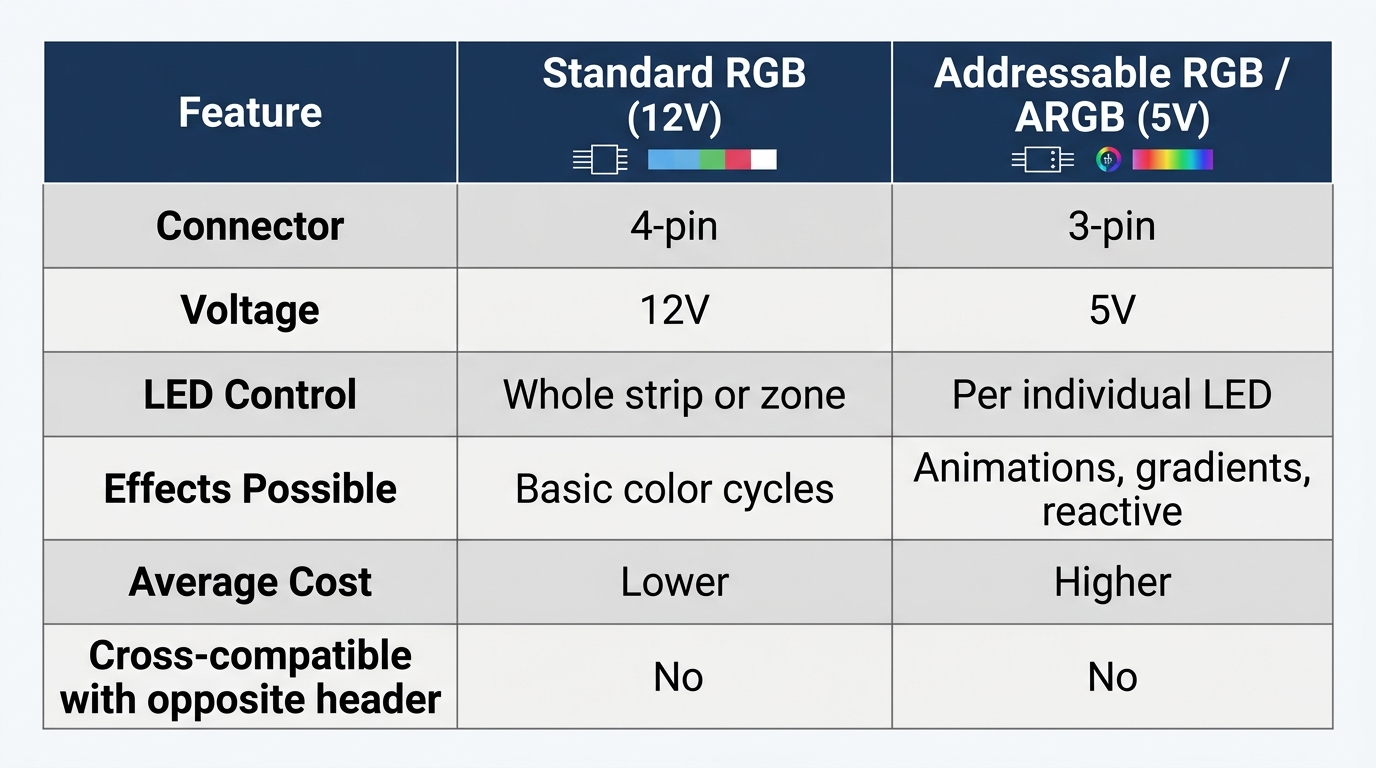
- Standard RGB (12V, 4-pin): Controls all LEDs in a component as one unit. The whole strip or fan changes to a single color at once. Limited animation effects.
- ARGB (Addressable RGB, 5V, 3-pin): Controls each individual LED independently. This is what enables gradients, moving animations, and per-LED color patterns.
Plugging an ARGB component into a standard 12V RGB header (or vice versa) can damage the component. The connectors are different pin counts, but some cheaper fans ship with loose cables that technically fit the wrong header. Don’t guess. Check the spec sheet.
For a full breakdown of connector types, voltages, and compatibility, the ARGB vs RGB differences guide covers every scenario in detail.
| Feature | Standard RGB (12V) | Addressable RGB / ARGB (5V) |
|---|---|---|
| Connector | 4-pin | 3-pin |
| Voltage | 12V | 5V |
| LED Control | Whole strip or zone | Per individual LED |
| Effects Possible | Basic color cycles | Animations, gradients, reactive |
| Average Cost | Lower | Higher |
| Cross-compatible with opposite header | No | No |
How to Change RGB Colors on PC, 4 Methods Explained
There are four real ways to control PC RGB lighting: manufacturer software, BIOS settings, a physical controller, or a cross-brand open-source tool like OpenRGB. The right method depends on what hardware you have and how it’s connected. Identify your components first. Then pick the method below that matches your setup.
Method 1, Using Manufacturer RGB Software (Most Common)
This covers around 80% of builds. If your components come from a major brand with a desktop app, this is your primary method. Each ecosystem is different, so here’s the step-by-step for every major one.
ASUS Aura Sync
Used for ASUS motherboards (ROG, TUF, ASUS Prime), ROG peripherals, and Aura Sync-compatible third-party components.
- Download ASUS Armory Crate from armoury.asus.com. Aura Sync is bundled inside.
- Open Armory Crate and navigate to the Aura Sync tab.
- All detected devices appear in a device list on the left panel.
- Select a device or group. Click Sync to link all devices to one effect.
- Choose a lighting mode (Static, Breathing, Rainbow, Color Cycle, Strobing, etc.).
- Click the color wheel to set a specific color, or use a preset palette.
- Click Apply. Changes take effect immediately.
MSI Mystic Light
Used for MSI motherboards and MSI GPU components.
- Download Mystic Light from msi.com/Landing/mystic-light-rgb-gaming-motherboard.
- Open Mystic Light. The app auto-detects all supported MSI components.
- Select the component you want to change from the top strip (motherboard, GPU, etc.).
- Choose your lighting effect from the right panel.
- Pick a color using the color picker. Adjust speed and brightness sliders as needed.
- Toggle Sync if you want all detected components to match.
- Click Apply.
Corsair iCUE
Used for Corsair fans, RAM (Vengeance RGB, Dominator), keyboards, mice, and cases. This is what you’ll use when controlling pc rgb fans from Corsair’s lineup.
- Download iCUE from corsair.com/icue.
- Open iCUE. All connected Corsair devices appear as cards on the home screen.
- Click on a device card.
- Select Lighting Effects from the left menu.
- Click the + button to add a new lighting layer.
- Choose an effect type (Static Color, Rainbow Wave, Color Pulse, etc.).
- Configure color(s) and timing. Multiple layers stack.
- ICUE saves automatically. Enable iCUE Link to sync across all connected devices.
Razer Synapse
Used for Razer peripherals and any Chroma-enabled device (including some third-party products with Chroma integration).
- Download Razer Synapse from razer.com/synapse and install.
- Open Synapse and click on a connected device.
- Go to the Chroma tab.
- Select an effect preset or use Chroma Studio for custom per-LED effects.
- Apply and save your profile.
Gigabyte RGB Fusion 2.0
Used for Gigabyte and AORUS motherboards and components.
- Download RGB Fusion 2.0 from the Gigabyte support page for your specific motherboard model.
- Open the app. Your motherboard zones (headers, onboard LED areas) appear as selectable regions.
- Click a zone to edit it individually.
- Choose an effect from the mode list and pick your color.
- Click Apply to save.
ASRock Polychrome Sync
Used for ASRock motherboards (Phantom Gaming, Steel Legend, Taichi).
- Download Polychrome Sync from the ASRock support page for your specific board.
- Open the app. Zones appear for each RGB/ARGB header and onboard LED region.
- Select a zone, pick your effect and color.
- Enable Sync at the top to unify all zones.
Method 2, Changing RGB Settings in Your Motherboard BIOS
BIOS RGB control is the most underused method, and it’s the most reliable one for persistent settings. Changes made in the BIOS survive OS reinstalls, software crashes, and Windows updates. It’s also your only option when the OS isn’t yet installed, or when your RGB software refuses to load.
The trade-off: BIOS RGB control is usually limited to static colors and a small set of basic effects. No complex animations.
How to access BIOS RGB settings:
- Restart your PC. As soon as the screen goes dark, start pressing the BIOS key repeatedly.
- ASUS: DEL
- MSI: DEL
- Gigabyte: DEL or F2
- ASRock: F2 or DEL
- Once inside, switch to Advanced Mode if your BIOS opens in Easy Mode (usually F7 toggle).
- Navigate to the RGB/LED section. Location varies by brand:
- ASUS: Advanced tab > Onboard Devices Configuration > Aura LED
- MSI: Settings > Advanced > Mystic Light
- Gigabyte: Peripherals > RGB Fusion
- ASRock: Advanced > ACPI Configuration > RGB LED
- Select a color or effect. Most BIOS versions offer Static color, Breathing, and Off.
- Press F10 to save and exit.
This is also the most reliable way to turn off RGB entirely. Setting LED control to “Disabled” or “Off” in BIOS kills the lights at the hardware level. No software override, no startup delay. Gone.
Method 3, Using a Physical RGB Controller or Remote
Budget RGB components often skip software entirely. If your fans or LED strips came with a small box and a button (or a handheld remote), that’s your controller. No app needed. Not always a bad thing.
Physical controllers come in a few forms:
- Built-in case button: Common on mid-tower cases like the NZXT H510 and some Phanteks models. A dedicated button on the front panel cycles through preset lighting modes.
- Remote controller: Ships with many budget fan kits and PC LED strip packages. Buttons cycle colors, effects, and brightness. The “M” button typically cycles through modes; speed buttons adjust effect timing.
- Fan hub with mode buttons: A hub that powers multiple fans and has a physical button on the unit itself or a cable button routed to the front panel.
To change the color: press the mode button once per preset. Most cycle through: static red, green, blue, white, cyan, purple, yellow, rainbow, breathing, strobe, then off.
To turn off RGB with a physical controller: hold the mode button for 3 to 5 seconds on most models. Some require cycling all the way to an “Off” mode. If nothing works, the last resort is unplugging the SATA or Molex power cable from the controller hub entirely. That kills the lights without affecting fan speed if the PWM/DC cable is separate.
PC LED strip installs (interior case lighting) almost always fall into this category. Budget strips connect to a standalone controller powered by SATA, not a motherboard header.
Method 4, OpenRGB: Control All RGB From One App (Advanced)
OpenRGB is open-source software that detects and controls RGB hardware from virtually any brand, from one interface. Windows, Linux, and macOS are all supported. It’s compatible with hundreds of devices across motherboards, RAM, fans, and peripherals, with the device list growing through ongoing community contributions. It’s the solution for mixed-brand builds where running three manufacturer apps simultaneously creates conflicts.
Download it from openrgb.org.
Step-by-step setup:
- Download and run the OpenRGB installer for your operating system.
- When prompted, install the low-level hardware access driver. On Windows, OpenRGB uses a driver to communicate with your motherboard’s SMBus and detect onboard RGB components. Skip it and you’ll see far fewer devices.
- Launch OpenRGB. Wait 5 to 10 seconds. Detected devices populate the left-side device list automatically.
- Click a device in the list. The right panel shows its color zones.
- Select a zone (or all zones with the top dropdown), then use the color picker to set your color.
- Choose a mode from the mode dropdown: Static, Rainbow Wave, Breathing, Flicker, Color Cycle, and others depending on device capability.
- Click Save Profile under the Profiles menu to store your configuration.
- To auto-load on startup: go to Settings > enable Start at Login and Load Profile on Start.
Limitations worth knowing. Some newer Corsair devices need iCUE running as a “bridge” for OpenRGB to detect them. A few Razer products still require Synapse for full LED access. For Corsair and Razer peripherals specifically, check the OpenRGB device compatibility database before committing to it as your only tool.
On GPU RGB: OpenRGB supports most RTX 30 and RTX 40 series NVIDIA GPU lighting directly, as well as AMD RX 6000 and RX 7000 series GPU RGB. You don’t need GeForce Experience or AMD Software running to control GPU LEDs through OpenRGB.
How to Change RGB Fan Color on PC (Step-by-Step)
RGB fans are the most common RGB component in a build, and they’re also the most misunderstood. The fan has two separate cables in most cases: one for speed control (PWM or DC) and one for lighting (ARGB or RGB). Speed and lighting are independent functions.
Step 1: Identify your fan’s connector type.
Look at the lighting cable coming off the fan:
- 3-pin connector, labeled 5V/D/G: ARGB. Individual LED control.
- 4-pin connector, labeled 12V/R/G/B: Standard RGB. Whole fan as one color.
- No second cable at all: No RGB. The fan only controls airflow. Some fans with translucent blades look lit but aren’t.
Step 2: Check where the RGB cable connects.
- Directly to a motherboard ARGB/RGB header: Most modern mid-range and high-end boards include one to three ARGB headers. If your fan connects here, manufacturer software is your control method.
- To a case-included RGB hub: The hub connects to the motherboard via USB header. Some cases (Phanteks, NZXT) include their own controller.
- To a fan-specific hub: Corsair fans using the Lighting Node Core or Lighting Node Pro connect fan RGB through USB. Control is entirely through iCUE.
For understanding how headers work on your specific board, the RGB header on motherboard guide covers pinouts, header types, and connection diagrams in full.
Step 3: Control based on connection type.
Once you know where it’s connected, the control method follows automatically. Motherboard header = manufacturer software. Case hub with USB = case app or physical button. Corsair Lighting Node = iCUE. Follow the steps in Method 1 for software control, or Method 3 for physical controllers.
Windows 11 note: There is no native Windows 11 RGB fan control. Zero. Windows doesn’t see RGB hardware as a system component. Every fan color change requires third-party software, regardless of your OS version. This applies equally to Windows 10.
| Fan Connection | Control Method | Software Needed |
|---|---|---|
| 3-pin ARGB to motherboard | Manufacturer software | Aura / Mystic Light / Fusion / Polychrome |
| 4-pin RGB to motherboard | Manufacturer software (limited modes) | Same as above |
| Corsair Lighting Node Core / Pro | iCUE only | Corsair iCUE |
| Case hub (NZXT, Phanteks) | Case app or physical button | NZXT CAM / Phanteks app |
| Manual controller or remote | Physical button | None |
| No RGB cable | N/A, no lighting hardware | N/A |
How to Set Up RGB Lighting When Building a New PC
Most guides skip the planning phase entirely. That’s why people end up with three incompatible RGB ecosystems, not enough headers, and fans that don’t sync with anything. Getting this right before you buy saves real money and frustration.
Plan Your RGB Ecosystem Before You Buy
The cleanest approach: stick to one brand for as many RGB components as possible. An all-Corsair build runs entirely through iCUE. An all-ASUS build runs through Armory Crate. Mixing brands means multiple apps, and multiple apps means potential conflicts.
If mixing is unavoidable (it usually is), OpenRGB becomes your unifying layer.
Check your motherboard’s header count before buying fans. Most mid-range boards ($150 and up) include one to two ARGB headers and one standard RGB header. If you’re running six ARGB fans, you need a hub. Either use one built into your case, or buy a standalone ARGB hub. If you need guidance on optimal fan counts for different build sizes, the case fan count guide covers exactly how many fans typical builds actually need.
Component Checklist for a Fully Lit Build
- RGB PC case: Options like the Lian Li Lancool 216 ($100), NZXT H7 Flow RGB ($150), and Corsair 4000D RGB Airflow ($115) include tempered glass panels and built-in RGB fans. Price range: $80 to $180.
- RGB fans for PC: Lian Li UNI FAN SL120 ($25/fan, daisy-chain design), Corsair LL120 ($30/fan, dual-ring ARGB), be quiet! Light Wings ($30/fan, high airflow with ARGB). Price range: $20 to $50 per fan.
- RGB RAM: Corsair Vengeance RGB DDR5, G.Skill Trident Z5 RGB, Kingston Fury Beast RGB. All controlled through their respective apps or via XMP lighting profiles.
- Motherboard with ARGB headers: Any mid-range board at $150 or above from ASUS, MSI, Gigabyte, or ASRock will include ARGB headers. Confirm the header count in the spec sheet before buying.
- PC LED strip (optional): ASUS ROG Addressable LED Strip ($25) and Phanteks NEON Digital RGB Strip ($30) mount inside the case for accent lighting. Both connect to motherboard ARGB headers.
Cable Planning Before Assembly
RGB cables are short. Fan ARGB cables average 20 to 30cm. Plan your routing before the fans go in. Decide where your ARGB hub will mount (usually behind the motherboard tray or on the case floor), then route cables to it before installing the GPU or cable covers. This is one area where pre-planning pays off significantly. Good cable management keeps the interior clean once the tempered glass panel goes on.
If you need a fan controller for speed management alongside RGB, a dedicated PWM fan controller handles speed independent of the RGB lighting setup.
How to Turn Off RGB on PC
Some people build a full RGB rig, use it for a week, and decide they want it dark. Valid. Here are all four ways to kill the lights.
- 🟢 Software “Off” mode: Easiest, reversible
- 🟢 BIOS disable: Most reliable, survives reinstalls
- 🟡 Physical button/remote: Works for non-software components
- 🔴 Disconnect RGB cable: Permanent until reconnected, no software needed
Method 1, Turn off in software. Every major RGB app includes an “Off” mode or allows you to set a static color of pure black (hex #000000). In Aura Sync, select “Off” from the effect dropdown. In iCUE, add a “Static Color” lighting effect and set the color to black. In Mystic Light, select “Off” from the mode list. In RGB Fusion 2.0, select “Off” per zone. This is instant and reversible.
Method 2, Disable in BIOS. The most reliable option. Follow the BIOS navigation steps in Method 2 above and set the LED control to “Disabled.” This kills RGB at boot before any OS or software loads. No startup program will re-enable it. This survives fresh OS installs.
Method 3, Physical button or remote. For components on a physical controller: cycle the mode button until the lights go off, or hold it for 3 to 5 seconds. For remotes with a power button, press that. This works for all budget RGB hardware that doesn’t use software.
Method 4, Disconnect the RGB cable. The nuclear option. The ARGB or RGB cable is separate from the PWM fan speed cable. Unplugging the ARGB cable from the header (or hub) kills the LEDs without affecting fan operation at all. No speed loss. Just dark. Budget RGB components with permanently-on LEDs that can’t be controlled any other way require this method.
Troubleshooting: Why Won’t My RGB Change Color?
These are the six most common failures, each with a direct fix. Not complicated. Just often missed.
Problem 1: Software Doesn’t Detect My Device
First, check the physical connection. For motherboard RGB, confirm the ARGB or RGB cable is seated fully in the correct header. For Corsair fans using a Lighting Node, confirm the Node’s USB cable is connected to an internal USB 2.0 header on the motherboard. Then try running the software as Administrator (right-click the icon > Run as Administrator). If still not detected, check for conflicting RGB apps. Two apps trying to control the same hardware simultaneously will cause both to fail. Disable or uninstall the one you’re not using.
Problem 2: RGB Fans Won’t Sync
This almost always comes down to mixed header types. ARGB and standard RGB devices cannot share the same hub or sync through the same software channel. Confirm every fan in your sync group connects to the same type of header (all ARGB to ARGB, all RGB to RGB). Also confirm the hub has its USB header cable connected to the motherboard. Without that USB connection, the software can’t see the hub at all.
Problem 3: RGB Is Stuck on One Color and Won’t Respond
The component is likely connected to a non-addressable controller that has a fixed mode selected. Confirm the connector type matches what the software expects. If it’s an ARGB fan plugged into a standard 4-pin RGB header, only static color is possible regardless of software settings. Try resetting BIOS to default settings, which often returns LED headers to a factory state that software can then override.
Problem 4: RGB Worked, Then Stopped After a Windows Update
Windows updates frequently disable startup programs. The RGB software is still installed but no longer launches at boot. Open Task Manager (Ctrl + Shift + Esc), click the Startup Apps tab, find your RGB software (Armory Crate, iCUE, Mystic Light, etc.), and set it to “Enabled.” Then restart. The software will launch on next boot and restore your saved profile automatically.
Problem 5: Only Some LEDs Are Changing, Not All
You likely have a mix of ARGB and standard RGB devices detected in the same software. They’ll appear as separate devices or zones. Address each one individually in the app rather than applying settings globally. Some zones may also be on separate headers and require separate zone configuration.
Problem 6: RGB Software Won’t Open or Crashes on Launch
Conflict between two manufacturer apps is the most common cause. ASUS Aura and MSI Mystic Light don’t coexist well. Neither do Corsair iCUE and Razer Synapse on certain hardware combinations. Uninstall all manufacturer RGB software, restart, then install only one. If you have genuinely mixed-brand hardware that requires multiple apps, use OpenRGB as a replacement for all of them instead of stacking apps.
FAQ, Frequently Asked Questions About PC RGB Lighting
How do I change RGB fan color on PC without software?
Use a physical RGB controller or remote if one was included with your fan kit. Pressing the mode button cycles through preset colors, effects, and an off state. If your fans connect to a case hub with a physical front-panel button, that button does the same. Fans wired directly to a motherboard ARGB header with no physical controller require software. There’s no workaround for header-connected fans without an app.
Can I control RGB on PC with Windows 11 natively?
No. Windows 11 has no built-in RGB control panel. There’s no RGB option under Settings, Personalization, or Device Manager. All RGB management on Windows 10 and 11 requires manufacturer software (Aura Sync, iCUE, Mystic Light, etc.) or a third-party tool like OpenRGB. This isn’t a missing feature that will be added. It’s simply outside Windows’ scope as an OS.
Why are my RGB fans a different color than my motherboard RGB?
They’re likely running under different software ecosystems with no sync link between them. A Corsair fan controlled by iCUE and an ASUS motherboard controlled by Aura Sync don’t communicate by default. To sync them, you need either a platform that supports both (rare, as ecosystems are intentionally closed) or OpenRGB, which controls both from one interface and allows you to set matching profiles across all detected devices.
Does RGB lighting affect PC performance or temperatures?
No measurable impact. A fully lit system with RGB fans, RAM, and motherboard LEDs typically draws 0.5W to 3W total from the LEDs themselves. That’s negligible. GPU and CPU temperatures aren’t affected by LED current draw. The fans attached to RGB hardware affect thermals based on their airflow, not their lighting. The LEDs are a separate electrical circuit from the fan motor.
What is the difference between RGB and ARGB?
Standard RGB uses a 4-pin 12V connector and controls all LEDs in a component as a single unified color. The whole fan or strip changes to one color at a time. ARGB (Addressable RGB) uses a 3-pin 5V connector with a data line that addresses each individual LED independently, enabling gradients, animations, and per-LED color mapping. The two standards are not backward compatible. Plugging an ARGB component into a 12V RGB header can damage it permanently.
Final Thoughts
The four methods, manufacturer software, BIOS settings, physical controllers, and OpenRGB, cover every RGB hardware scenario you’ll encounter in a real build. Most confusion comes from not identifying the hardware type first. Check your connector (3-pin ARGB or 4-pin RGB), find where it connects (motherboard header, case hub, or standalone controller), and the right control method becomes obvious. If you’re mixing brands, skip the software stack and go straight to OpenRGB. If you just want the lights off, the BIOS disable method is the cleanest and most permanent route. Start with your hardware, pick the matching method, and you’ll have it sorted in under ten minutes.

Alex has been building and tweaking custom PCs for over 12 years. From budget builds to full custom water loops, he’s assembled more than 50 systems and helped hundreds of builders troubleshoot their rigs. When he’s not benchmarking the latest hardware, you’ll find him optimizing airflow setups or stress-testing overclocks.