PC Fan Hub and Splitter Guide: How to Power More Case Fans
A PC fan hub is a powered distribution board that connects to one motherboard fan header and a SATA power cable, allowing you to run 4–10+ case fans from a single header safely.
Last updated: May 2026
Table of Contents
- What Is a PC Fan Hub?
- Fan Hub Definition and Core Function
- How a Fan Hub Differs From Your Motherboard Headers
- Fan Hub vs. Fan Splitter: Which Do You Need?
- What Is a Fan Splitter Cable?
- PWM Fan Splitter vs. DC Fan Splitter
- Fan Hub vs. Fan Splitter: Head-to-Head Comparison
- Types of PC Fan Hubs Explained
- Basic PWM Fan Hub (Non-RGB)
- RGB Fan Hub
- ARGB PWM Fan Hub (Most Popular Right Now)
- Smart Fan Hubs and Controllers
- Integrated Case Fan Hubs
- Top Fan Hub Brands: What to Know Before Buying
- Corsair Fan Hub
- NZXT Fan Hub
- Lian Li Fan Hub
- Arctic Case Fan Hub
- ASUS TUF and EZDIY-FAB Budget Options
- Fan Hub Specs You Must Check Before Buying
- Power Input Type
- Per-Channel Amperage and Total Wattage
- PWM vs. DC Control
- Port Count and Expandability
- RGB Ecosystem Compatibility
- How to Install a Fan Hub in Your PC
- What You’ll Need
- Step 1: Choose a Mounting Location
- Step 2: Connect the PWM Control Cable
- Step 3: Connect SATA Power
- Step 4: Connect Fans to the Hub
- Step 5: Connect ARGB Cables (If Applicable)
- Step 6: BIOS Configuration
- Common Fan Hub Problems and How to Fix Them
- Fans Not Spinning or Running at Full Speed
- RGB Not Syncing
- BIOS Only Shows One Fan’s RPM
- Hub Running Hot or SATA Rail Concerns
- Do You Actually Need a Fan Hub?
- FAQ: PC Fan Hubs and Splitters
- Can I plug a 3-pin fan into a 4-pin PWM fan hub?
- How many fans can a fan hub support?
- Will a fan splitter damage my motherboard?
- Do I need special software to use a fan hub?
- What’s the difference between a Corsair fan hub and a generic fan hub?
- Wrapping Up
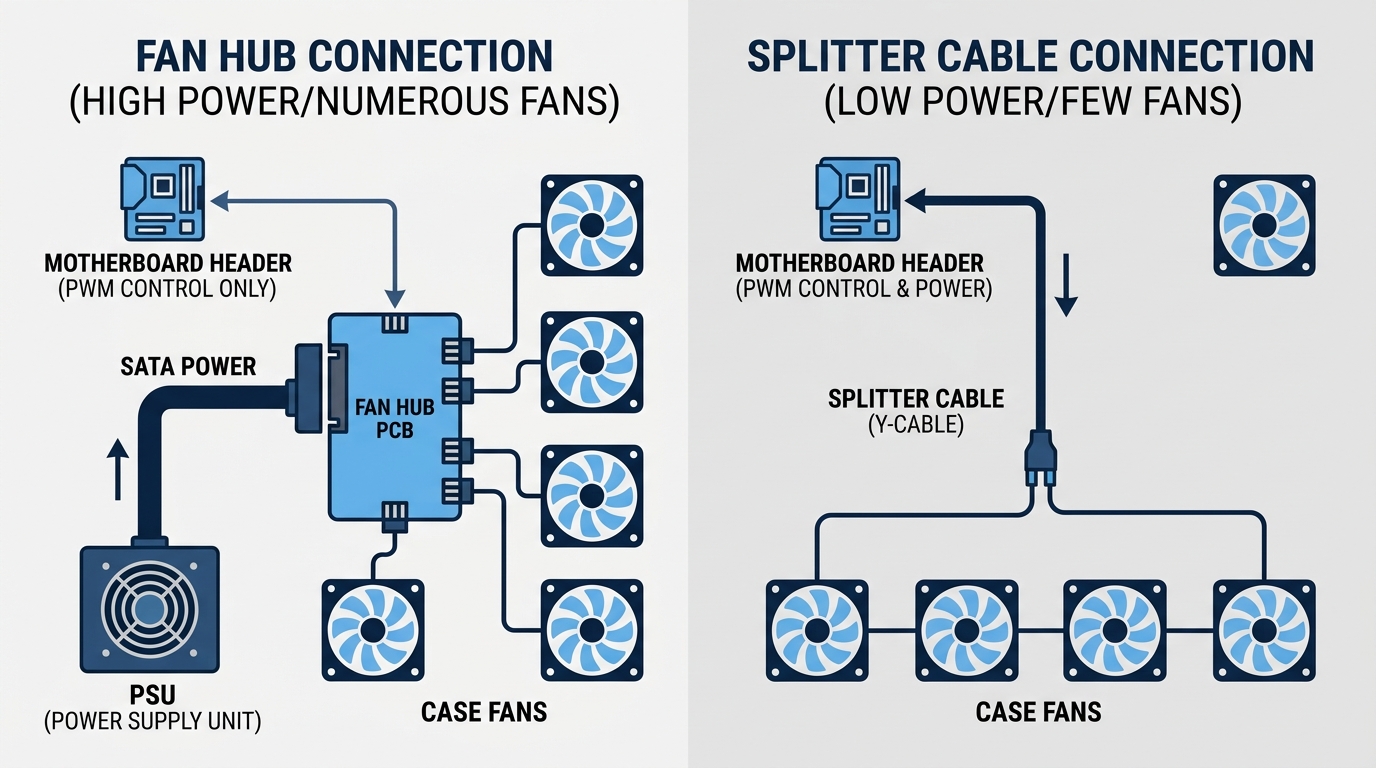
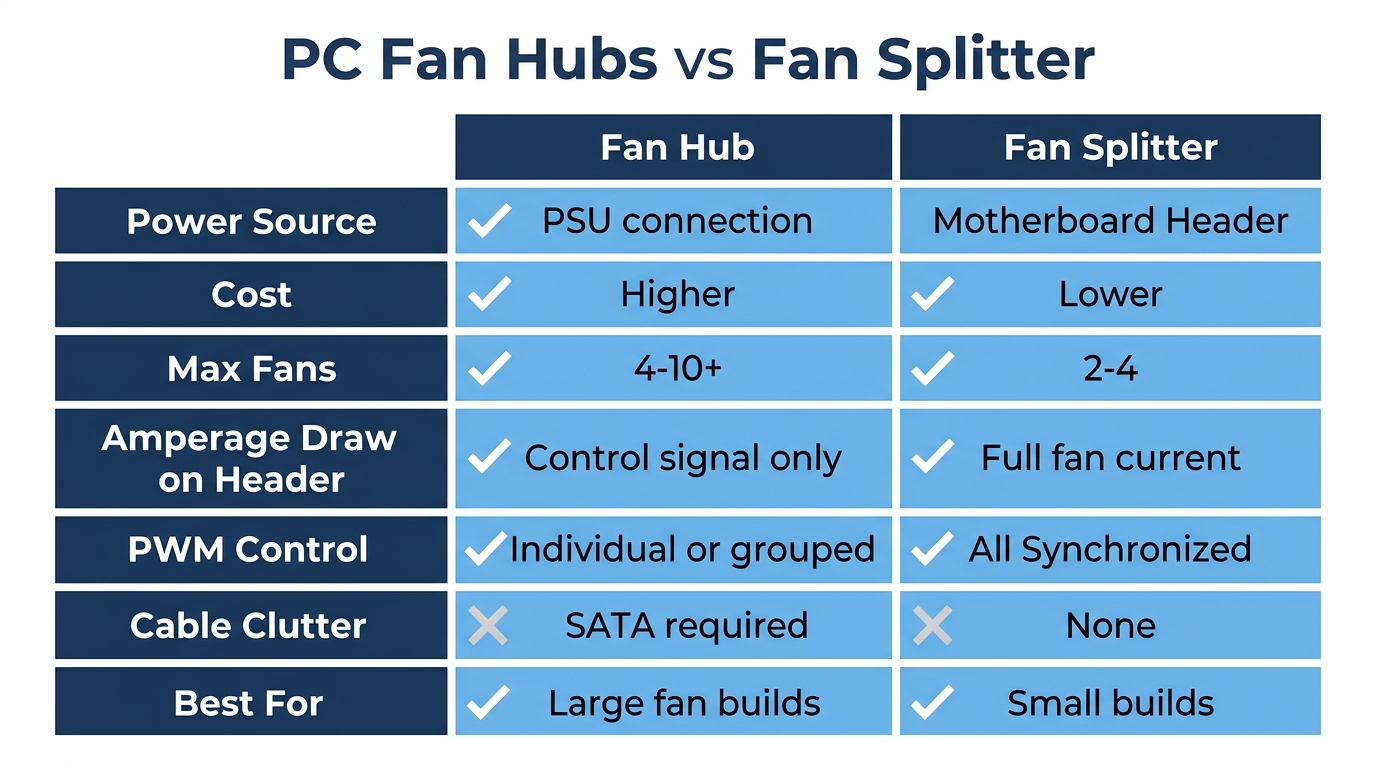
Fan hubs and fan splitters solve the same problem in very different ways. A fan hub draws power directly from your PSU, so your motherboard header never gets overloaded. A fan splitter is just a passive Y-cable that copies one header signal to two, three, or four fans while they all share that header’s limited amperage. Knowing which one you need will save you money, prevent motherboard damage, and keep your cable runs clean.
What Is a PC Fan Hub?
Fan Hub Definition and Core Function
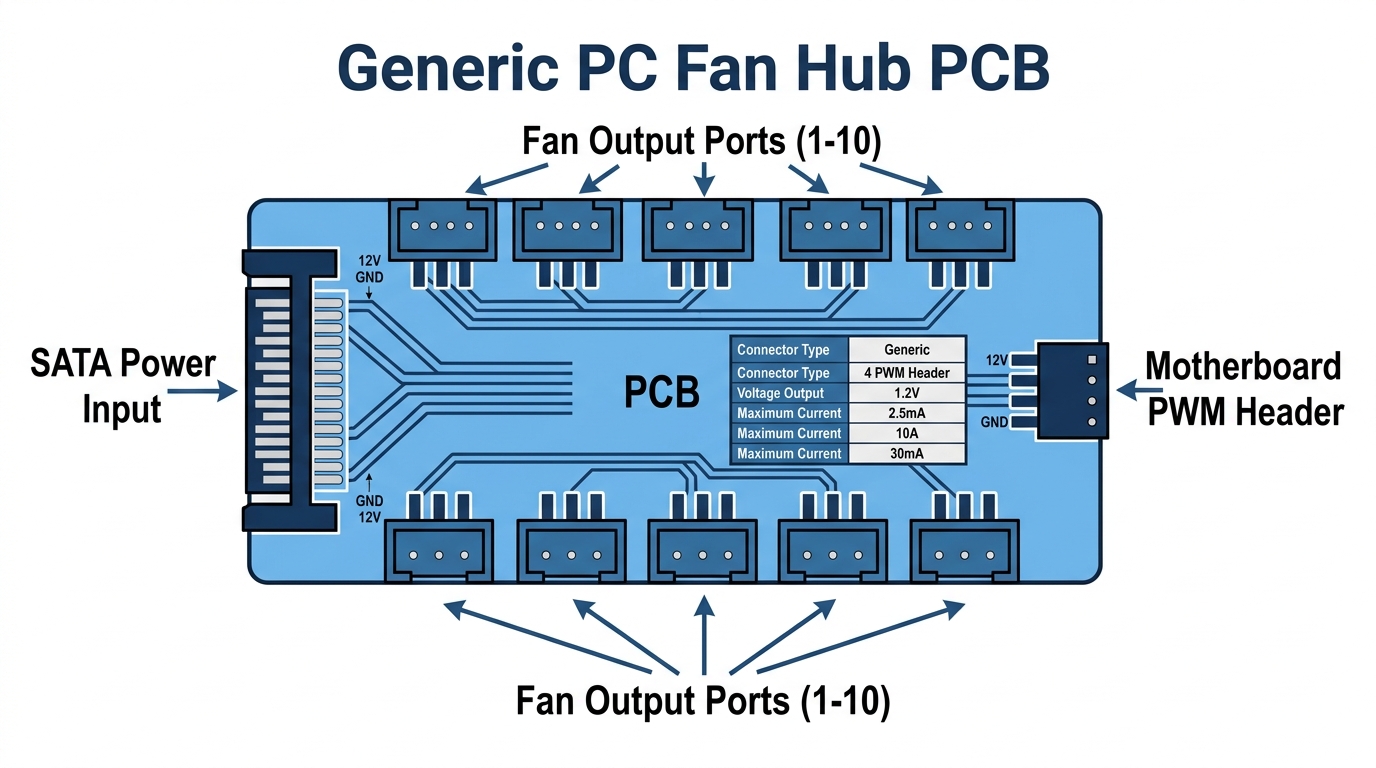
A PC fan hub centralizes your fan connections onto one small PCB. You plug it into a SATA power connector from your PSU, run a single 4-pin PWM cable from the hub to a motherboard header, and then plug all your case fans into the hub’s output ports. The hub distributes power from the PSU to each fan, while the motherboard header only carries the control signal. No heavy current runs through your motherboard at all.
Most PC fan hubs support between 4 and 10 fans depending on the model. Budget hubs like the Arctic Case Fan Hub support 10 PWM ports from a single SATA connection. Higher-end hubs from Corsair or NZXT add per-channel monitoring and software integration on top of that.
How a Fan Hub Differs From Your Motherboard Headers
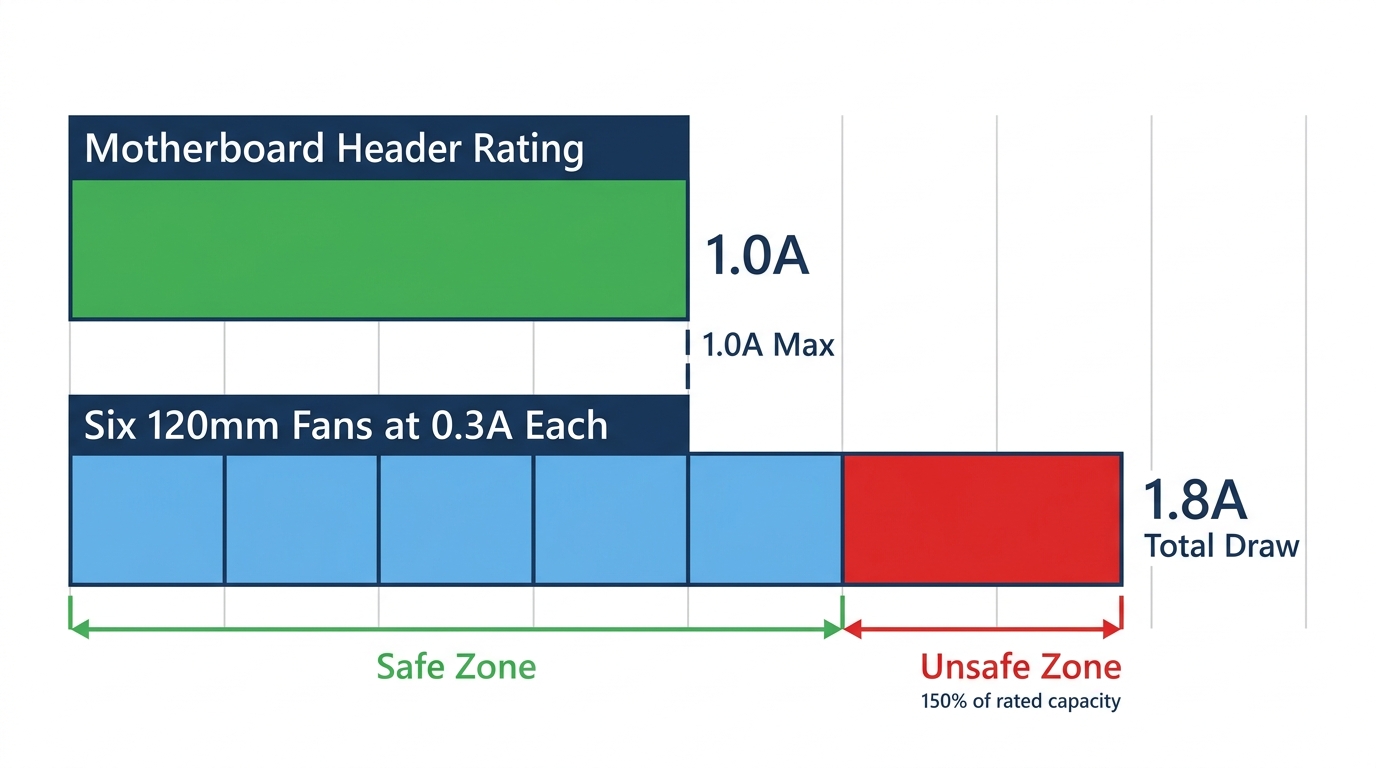
Standard motherboards ship with 3 to 6 fan headers. Each one is rated for roughly 1A at 12V, which works out to about 12W maximum. That sounds like plenty until you start adding fans.
Here’s the math that trips people up: six 120mm fans drawing 0.3A each pulls 1.8A total. If you daisy-chain them all to one header with a splitter, you’re pulling 180% of that header’s rated capacity. That’s not a good situation for your board.
A powered fan hub sidesteps this completely. According to contributors on the Tom’s Hardware Forums, a fan hub draws power for all connected fans directly from the PSU through a single connector and receives PWM control signals from one motherboard fan port. The tradeoff: all fans controlled by a basic hub run at the same speed, since they all receive the same PWM duty cycle signal. Worth knowing before you buy.
Fan Hub vs. Fan Splitter: Which Do You Need?
What Is a Fan Splitter Cable?
A fan splitter cable is a passive, unpowered Y-cable. No SATA connection. No PCB. Just wire splitting one header into two, three, or four outputs. You can find them as 3-pin fan splitters, 4-pin fan splitters, and PWM fan splitter variants at nearly any PC parts shop for $5–$15.
The key limitation: every fan on a splitter still draws current from the motherboard header. Add too many fans and you exceed the 1A rating. For low-fan builds where your total fan draw stays under that limit, a fan splitter cable is the right call. Fast. Cheap. Zero cable clutter from a SATA run.
PWM Fan Splitter vs. DC Fan Splitter
A PWM (4-pin) fan splitter passes the full PWM duty cycle signal to all connected fans simultaneously. Every fan ramps up and down in sync based on your BIOS fan curve. Clean, precise, quiet when your temps are low.
A DC (3-pin) fan splitter controls speed through voltage scaling instead. Less precise. Some fans won’t spin down as smoothly at low voltages.
There’s one gotcha that catches new builders: plugging 3-pin fans into a 4-pin PWM splitter. The fans will run, but they’ll run at full speed constantly because 3-pin fans can’t read PWM signals. Not dangerous. Just loud. Check your fan specs before buying a pwm fan splitter if you’re mixing connector types.
Fan Hub vs. Fan Splitter: Head-to-Head Comparison
| Feature | Fan Hub (Powered) | Fan Splitter (Unpowered) |
|---|---|---|
| External Power | Yes (SATA or Molex) | No |
| Max Fans Supported | 4–10+ | 2–4 |
| Amperage Limit Risk | None (PSU powered) | Yes (shares header limit) |
| Individual Fan Control | Some models (smart hubs) | No, all fans in sync |
| PWM Signal Support | Yes (PWM fan hub) | Yes (PWM splitter only) |
| RGB/ARGB Support | Some models | No |
| Cost Range | $10–$50+ | $5–$15 |
| Best For | 4+ fan builds | 1–3 fan additions |
Types of PC Fan Hubs Explained
Basic PWM Fan Hub (Non-RGB)
The simplest option. A 4-pin PWM input takes the control signal from your motherboard, SATA power feeds the fans directly from the PSU, and 4–10 output ports distribute both to each connected fan. All fans mirror a single PWM signal. They rise and fall together.
The Arctic Case Fan Hub is a solid example here. Ten PWM output ports, SATA powered, compact PCB with adhesive pad mounting. According to Arctic’s official product page, it supports both PWM and non-PWM fans, keeps cable management clean, and typically runs around $10–$12. No RGB. No software. Just works.
Price range for basic PWM fan hubs: $10–$20. Good enough for most builds.
RGB Fan Hub
An RGB fan hub adds 12V 4-pin RGB headers for lighting sync alongside the standard fan control. Connect the hub’s RGB input to your motherboard’s 12V RGB header and the lighting syncs with whatever software your board uses.
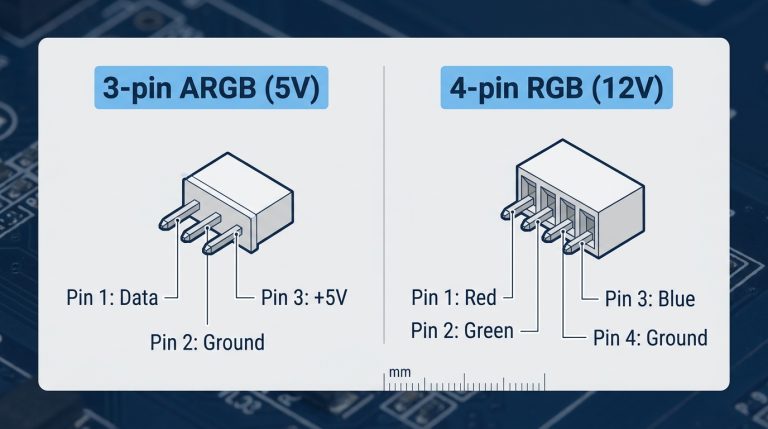
Important: these hubs use 12V RGB, not 5V ARGB. The connectors look similar but they are not interchangeable. Plugging a 12V RGB hub into a 5V ARGB header can damage your components instantly. Double-check your motherboard’s header type before you buy. If you’re not sure what RGB headers your motherboard has, confirm it before ordering.
A typical RGB fan hub supports 6 fans and 6 RGB channels. Price range: $15–$25.
ARGB PWM Fan Hub (Most Popular Right Now)
This is the type most mid-range to high-end builds use today. You get 5V 3-pin ARGB ports and 4-pin PWM ports for each fan, plus a single ARGB input that connects to your motherboard’s 5V header. The hub handles per-fan lighting sync while the PWM signal controls speed.
The EZDIY-FAB 8-port ARGB PWM hub is a popular budget pick at $22.99. It supports 8 PWM outputs, 8 ARGB outputs, and up to 200 LEDs total. It also includes a 12V/5V toggle switch for dual lighting system compatibility, which makes it compatible with Asus Aura Sync, MSI Mystic Light, Gigabyte RGB Fusion, and ASRock Polychrome. One caveat: only “Fan 1” reports RPM back to the system, which is normal behavior for this hub type.
If you’re uncertain whether your fans use RGB or ARGB, the difference between ARGB and RGB comes down to the connector pin count and voltage. ARGB is 3-pin at 5V. RGB is 4-pin at 12V. Getting this wrong is an expensive mistake.
Smart Fan Hubs and Controllers
Smart hubs include an onboard controller, usually connected via a USB 2.0 header, and provide individual channel control through software. Think Corsair Commander CORE, NZXT Smart Device v2, or the enthusiast-tier Aquacomputer Octo.
The big advantage competitors often skip mentioning: smart hubs eliminate your dependency on BIOS fan curve software. You control everything through the hub’s dedicated app, which means per-fan speed curves, individual RPM monitoring, and temperature-linked profiles that respond to sensors across your entire system, not just one CPU header reading.
Price range: $40–$120+. Overkill for casual builds. Essential for custom loop and high-airflow workstation setups.
Integrated Case Fan Hubs
Several cases from Lian Li, Fractal Design, and NZXT ship with a fan hub pre-installed. The Lian Li ARGB/PWM hub used in the O11 Dynamic and similar cases supports up to 8 fans and uses a proprietary daisy-chain system on UNI FAN series builds. You get full control through L-Connect 3 software.
If your case includes one of these built-in, use it. No extra cost, no extra mounting hardware. Already routed.
Top Fan Hub Brands: What to Know Before Buying
Corsair Fan Hub
Corsair offers two main options: the iCUE Commander CORE (USB-connected, supports up to 6 fans at 10W per channel) and the older Corsair RGB Fan Hub (SATA + USB, designed for LL and HD series fans). Both are tightly locked into the iCUE ecosystem.
That’s a feature if you’re already running Corsair fans, keyboards, and coolers. It’s a frustration if you’re not. Some Corsair hub models have no standalone RGB mode without iCUE running in the background, which adds to startup overhead. The Commander CORE maxes out at 60W total across 6 channels, which is solid headroom for most builds.
Best fit: full Corsair builds. Mixed-brand builds will find better value elsewhere.
NZXT Fan Hub
The NZXT Smart Device v2 provides 3 fan channels at up to 10W each, plus 2 RGB channels and USB 2.0 header connectivity. It uses CAM software for control and monitoring. If you’re building in an NZXT H-series case, the Smart Device v2 is usually already installed.
Standalone price runs $30–$50. Good option if you’re in the NZXT ecosystem. Like Corsair, the software dependency is real. CAM is functional but heavier than most people want running at boot.
Lian Li Fan Hub
Lian Li’s ARGB controller supports up to 8 fans via combined ARGB and PWM connections. The UNI FAN series uses a daisy-chain design where fans link to each other rather than running individual cables back to the hub, which keeps your case interior dramatically cleaner.
L-Connect 3 software handles RGB control. Required for full functionality. The hub is typically bundled with Lian Li fans rather than sold separately, which means you’re buying into an ecosystem rather than a standalone product.
Arctic Case Fan Hub
The Arctic Case Fan Hub supports 10 fan ports, SATA powered, with both PWM and non-PWM fan compatibility. Maximum 30W total (6W per channel for the 5-port variant). No RGB. No software. No individual RPM monitoring per port.
For around $10–$12, it’s the best value non-RGB hub available. If you’re running a clean all-black build or just need reliable fan distribution without any lighting, it’s hard to beat.
ASUS TUF and EZDIY-FAB Budget Options
The ASUS TUF Gaming ARGB PWM Fan Hub packs impressive specs for a branded product. According to ASUS’s official spec sheet, it supports 6 ports with a 2A safety current per port and a total 9A capacity across all 6 ports. That’s significantly more headroom than most competitors at this price tier.
EZDIY-FAB’s 8-port ARGB PWM hub at $22.99 is the go-to budget recommendation for ARGB builds. Eight PWM outputs, eight ARGB outputs, 200 LED support, 12V/5V toggle. Strong value. No meaningful build quality complaints at this price.
Fan Hub Specs You Must Check Before Buying
Power Input Type
Most hubs use SATA power. The 12V rail on a SATA connector can handle up to 54W (4.5A at 12V), which is more than enough for 8–10 standard case fans. Molex power connectors show up on older or budget hubs and work fine but are less common in modern PSUs with modular cabling.
USB header-powered smart hubs are limited to about 2.5W from the USB header itself. They use a separate fan power input alongside it. Don’t confuse the USB header connection (which carries data and control signals) with the actual fan power source.
Per-Channel Amperage and Total Wattage
| Hub Tier | Per Channel | Total Capacity | Notes |
|---|---|---|---|
| Budget splitter (unpowered) | Shared 1A | ~12W total | Risk of overloading header |
| Standard powered hub | 0.5A–1A | 20W–40W | Most common type |
| ASUS TUF ARGB Hub | 2A per port | 9A / ~108W | Exceptionally high headroom |
| Corsair Commander CORE | ~1A (10W) per channel | 60W total | Individually monitored |
| Aquacomputer Octo | Up to 3A per channel | Varies | Enthusiast/custom loop use |
PWM vs. DC Control
PWM (4-pin) control uses a duty cycle signal: the fan motor receives full voltage but switches on and off rapidly to regulate speed. Range is typically 20–100% duty cycle. Precise. Quiet at low speeds. Better for noise-sensitive builds.
DC control scales voltage between approximately 7V and 12V to change speed. Less precise. Some fans won’t spin reliably below 7V, which means you lose part of the low-speed range. Confirm what control mode your motherboard header outputs before assuming PWM compatibility.
Port Count and Expandability
Four ports is the practical minimum for a mid-tower build. Most mid-tower cases ship with 3 fans included and assume you’ll add one or two more. A 4-port hub fills up fast.
Full-tower and high-airflow builds planning 6+ fans should start with an 8–10 port hub. Much easier than buying a second hub later. Check whether the hub supports daisy-chaining if you’re looking at Lian Li UNI FAN products specifically.
RGB Ecosystem Compatibility
Confirm the hub matches your motherboard’s RGB standard before ordering. ASUS Aura Sync, MSI Mystic Light, Gigabyte RGB Fusion, and ASRock Polychrome all use 5V 3-pin ARGB headers as of current-gen boards. Corsair and NZXT run proprietary headers on their own hubs.
“Universal” hubs with a 12V/5V toggle switch give you flexibility if you’re mixing platforms or upgrading boards later. Not great for pure single-ecosystem builds where the toggle adds unnecessary complexity.
How to Install a Fan Hub in Your PC
What You’ll Need
- Fan hub (confirm model and port count)
- Available SATA power connector from your PSU
- Motherboard with at least one 4-pin SYS_FAN or CHA_FAN header free
- Zip ties or Velcro strips for cable management
- Phillips head screwdriver (if hub includes a mounting bracket)
Step 1: Choose a Mounting Location
Most budget hubs ship with adhesive Velcro backing. The best spots are behind the motherboard tray, inside a free drive bay, or behind the front panel where cable routing is already messy anyway. Pick a location where the SATA cable reaches comfortably without strain.
Keep the hub’s PWM control cable short enough to reach a motherboard fan header without running it across the GPU or CPU cooler area. Tidy routing matters more than people realize once the side panel goes on.
Step 2: Connect the PWM Control Cable
Run the single 4-pin PWM cable from the hub’s input to any available SYS_FAN or CHA_FAN header on your motherboard. This cable carries only the speed control signal. No fan power flows through your motherboard from this connection.
If your hub has a 3-pin input and you’re using a 4-pin header, the hub will fall back to DC mode. Speed control still works, but you lose PWM precision. For understanding the difference between your motherboard’s fan headers, the distinction between CPU OPT and CPU FAN headers is worth knowing, since those are reserved for your CPU cooler and shouldn’t be used for case fans.
Step 3: Connect SATA Power
Plug the hub’s SATA power input into an available SATA power cable from your PSU. If you’re daisy-chaining off a cable that’s already powering SSDs or optical drives, calculate the total load on that cable run. Keep the sum under 54W per SATA cable to stay safe.
One firm warning: avoid cheap SATA-to-Molex adapter cables under any meaningful load. Some generic adapters use undersized wire gauges that can overheat. Not worth the risk.
Step 4: Connect Fans to the Hub
Plug each case fan into the hub’s output ports. If you’re running 4-pin PWM fans into a PWM hub, speed control works as expected. Three-pin fans in a 4-pin hub will run at 100% RPM unless the hub supports DC mode fallback. Check your specific hub’s documentation for confirmation.
Step 5: Connect ARGB Cables (If Applicable)
For ARGB fan hubs, connect each fan’s 3-pin ARGB cable to the hub’s ARGB output ports, then connect the hub’s ARGB input to your motherboard’s 5V 3-pin ARGB header. If your hub has a 12V/5V toggle switch, verify it’s set to match your motherboard’s header voltage before powering on. Wrong voltage on an RGB header causes immediate, irreversible damage.
Step 6: BIOS Configuration
Boot into BIOS and navigate to the Fan or Hardware Monitor section. Find the header you connected the hub to and confirm it’s set to PWM mode (if your hub uses 4-pin input). Then set your fan curve.
Starting points that work well for most builds:
- Idle (CPU below 40°C): 30–40% duty cycle
- Mid-load (60–70°C): 60–75% duty cycle
- Heavy load (70–80°C): 80–90% duty cycle
- Thermal limit (80°C+): 100%
Save and reboot. Listen for abnormal fan behavior on first POST. If any fan isn’t spinning, power down and check the connection at that specific port.
Common Fan Hub Problems and How to Fix Them
Fans Not Spinning or Running at Full Speed
The most common cause: 3-pin fans connected to a PWM-only hub with no DC fallback mode. Those fans receive no speed control signal they can interpret, so they spin at 100%. The fix is either switching to 4-pin PWM fans or finding a hub that supports DC mode on all ports.
If no fans are spinning at all after a fresh install, check whether the PWM control cable is actually seated in a motherboard header. Without that signal connection, some hubs default to zero speed. Verify the header is a SYS_FAN or CHA_FAN port, not a CPU_FAN port being used by your cooler already.
RGB Not Syncing
Voltage mismatch is the first thing to check. A 12V RGB hub plugged into a 5V ARGB header will fry the header instantly. No second chances. If you’re not getting any RGB response, verify the voltage label on both the hub input and the motherboard header before assuming software is the issue.
Software conflicts are the second most common cause. Corsair iCUE and Asus Aura Sync do not play nicely when both are trying to control RGB simultaneously. Disable RGB control in one application or use only one at a time. Running two competing RGB management apps is a guaranteed path to flickering, mismatched colors, or total RGB shutdown.
BIOS Only Shows One Fan’s RPM
Not a defect. Expected behavior. Most standard fan hubs (including the EZDIY-FAB ARGB hub) only route the RPM signal from Fan Port 1 back to the motherboard. Every other fan runs at the correct speed but doesn’t report individually to BIOS.
Smart hubs (Corsair Commander, NZXT Smart Device v2) bypass this by reporting all channel speeds through their USB header connection and proprietary software. If per-fan RPM monitoring matters to you, factor that into your hub selection from the start.
Hub Running Hot or SATA Rail Concerns
Calculate your actual load before worrying. The formula: (number of fans) x (per-fan amperage) x 12V = total watts. Eight fans drawing 0.3A each equals 28.8W. That’s well within SATA rail limits. Most builds don’t come close to stressing a SATA power cable unless you’re running 10 high-draw 140mm fans simultaneously.
If the hub itself feels warm to the touch, verify the SATA connection is fully seated and the hub’s PCB isn’t pressed against another component that’s restricting airflow around it.
Do You Actually Need a Fan Hub?
Short answer: count your headers, then count your fans.
If you’re running a mid-tower with a decent modern motherboard and 4–5 fans, there’s a good chance a PWM fan splitter on one or two headers handles everything without spending $20+ on a hub. A mid-range board from ASUS, MSI, or Gigabyte typically ships with 4–5 fan headers. If your fans fit within those headers without exceeding 1A per header, you don’t need a hub.
The decision is clearer when you land in these situations:
- 1–3 fans, headers available: No hub needed. Plug directly into motherboard.
- 2–4 fans, only 1–2 headers free: Fan splitter works. Keep total draw under 1A per header.
- 4+ fans OR needing RGB/ARGB sync: Fan hub is the right call.
- 6+ fans OR you want individual fan control: Smart hub or controller.
ITX builds are the one case where a hub is almost always necessary. Most mini-ITX boards ship with only 2–3 fan headers, and small cases often fit 4–6 fans once you’re optimizing airflow. For anyone figuring out how many case fans your build actually needs, that decision directly affects whether a hub makes sense.
FAQ: PC Fan Hubs and Splitters
Can I plug a 3-pin fan into a 4-pin PWM fan hub?
Yes, physically it fits. The 3-pin connector aligns with the first three pins on a 4-pin port. However, PWM speed control won’t work because 3-pin fans use voltage-based control, not PWM duty cycle signals. The fan will run at 100% RPM constantly on a PWM-only hub. If your hub supports DC mode on its output ports, you can get speed control that way. Otherwise, either replace the fans with 4-pin models or accept full-speed operation.
How many fans can a fan hub support?
It depends entirely on the hub model. Budget hubs like the Arctic Case Fan Hub support 10 ports. Mid-range ARGB hubs typically handle 6–8 ports. Smart hubs and enthusiast controllers scale up to 12 or more individual channels. Port count matters less than wattage capacity: confirm the hub’s total rated wattage covers your fan load before assuming a high port count translates to unlimited fan connections.
Will a fan splitter damage my motherboard?
It can, if you exceed the header’s 1A (12W) amperage rating. Most 120mm fans draw 0.15A–0.35A. Most 140mm fans draw 0.2A–0.45A. Three 120mm fans at 0.3A each totals 0.9A, which is within limits. Add a fourth fan at 0.3A and you’re at 1.2A, past the rated maximum. Use a powered fan hub any time you’re unsure about total draw. The cost of a $12 hub is far less than the cost of a motherboard RMA.
Do I need special software to use a fan hub?
Basic powered hubs require no software whatsoever. Speed is controlled entirely through your BIOS fan curve settings. ARGB hubs use your motherboard’s RGB software (Aura Sync, Mystic Light, RGB Fusion) for lighting, which you likely already have installed. Smart hubs from Corsair and NZXT do require their proprietary apps (iCUE and CAM respectively) for full functionality, including per-channel speed control and RPM monitoring. Factor in that software overhead if you prefer a lean background process footprint.
What’s the difference between a Corsair fan hub and a generic fan hub?
Corsair hubs integrate with iCUE for unified fan speed, RGB, and temperature monitoring across Corsair devices. The Commander CORE handles up to 6 fans with individual channel monitoring at 10W each. Generic hubs are plug-and-play with BIOS control, brand-agnostic, and usually cheaper. The Corsair ecosystem delivers genuine value if you’re already running Corsair fans and peripherals. In a mixed-brand build, a generic ARGB PWM hub at $20–$25 will do everything you need without locking you into one software platform.
Wrapping Up
The fan hub vs. splitter decision comes down to how many fans you’re running and whether you’re already near your motherboard header limits. For most builds with 4 or more fans, a powered SATA fan hub is the cleaner, safer solution. Budget builds without RGB can grab the Arctic hub for $12 and call it done. ARGB builds get the most flexibility from a mid-range hub like the EZDIY-FAB or ASUS TUF ARGB options. Full ecosystem builds from Corsair or Lian Li are better served by their brand-specific controllers. Pick your tier, check the per-channel wattage specs, confirm your RGB voltage standard, and the rest is just cable management.

Alex has been building and tweaking custom PCs for over 12 years. From budget builds to full custom water loops, he’s assembled more than 50 systems and helped hundreds of builders troubleshoot their rigs. When he’s not benchmarking the latest hardware, you’ll find him optimizing airflow setups or stress-testing overclocks.