PC Cable Management Guide: Clean Builds and Hidden Wiring
PC cable management is the practice of routing, securing, and concealing internal and external PC cables to improve airflow, aesthetics, and component accessibility.
Last updated: May 2026
Table of Contents
- Why PC Cable Management Actually Matters (It’s Not Just Aesthetic)
- Airflow and Thermal Impact
- Build Maintenance and Upgrades
- Resale Value and Presentation
- What You Need: The Best PC Cable Management Kits and Tools
- Essential Tools (Budget Tier, Under $15)
- Intermediate Tools ($15–$50)
- Enthusiast Tools ($50+)
- Step-by-Step PC Cable Management Guide
- Step 1, Start With a Modular or Semi-Modular PSU
- Step 2, Plan Routes Before You Install Components
- Step 3, The 24-Pin ATX Cable
- Step 4, CPU EPS / ATX12V Cable
- Step 5, GPU PCIe Power Cables
- Step 6, SATA, Fan Headers, and Front Panel Cables
- Cable Management by Case Type and Form Factor
- ATX Mid-Tower (Most Common)
- Micro-ATX and Mini-ITX (Small Form Factor Challenges)
- Open-Air and Test Bench Builds
- Cable Management PC Desk, Hiding External Cables
- Under-Desk Cable Trays and Raceways
- PC Cable Management Box and Power Strip Hiding
- Monitor, Peripheral, and Desk Cable Tips
- Advanced Cable Management Techniques
- Cable Sleeving, Full DIY Guide
- Custom Cable Extensions vs. Full Custom Cables
- Using RGB and Lighting to Complement Managed Cables
- PC Cable Management DIY Ideas on a Budget
- DIY Cable Spine from PVC Pipe
- Binder Clips as Free Cable Holders
- Pegboard Cable Organization Wall
- Frequently Asked Questions About PC Cable Management
- How do you do proper cable management for a PC?
- Do you actually need cable management in a PC?
- Can you pay someone to do PC cable management?
- What is a PSU shroud and why does it help cable management?
- What’s the difference between velcro ties and zip ties for PC cable management?
- Wrapping Up
The difference between a build that looks thrown together and one that looks engineered comes down to cable management. Done right, it cuts temperatures, shaves time off future upgrades, and makes a glass-panel case worth showing off. Done wrong, you’ve got a rats nest behind the tray that haunts every maintenance session. This guide covers everything: internal build management, desk routing, DIY solutions, and the kits worth spending money on.

Why PC Cable Management Actually Matters (It’s Not Just Aesthetic)
Most guides treat cable management like a cosmetic exercise. It isn’t. Poor cable routing has measurable consequences for your thermals, your time, and your wallet.
Airflow and Thermal Impact
Loose cables sitting in front of intake fans can raise case temperatures by 3°C to 8°C depending on case size and fan configuration. In a cluttered mid-tower, front panel intake airflow can be restricted by up to 15 to 20% when cables bunch up in the intake path. That’s not trivial.
Consider a 240mm front-mounted AIO radiator. Block its intake with a loose 24-pin ATX cable and you’re actively strangling the static pressure efficiency that makes the cooler worth buying. The radiator is doing less work because your cable is in the way.
There’s a useful thermal principle to keep in mind here: based on the Arrhenius equation, every 10°C increase in operating temperature can reduce component lifespan by roughly 50% over time. That’s not a reason to panic, but it is a reason to take airflow seriously. Keeping tabs on your normal GPU temperature ranges after a build is a good way to confirm your routing didn’t create a problem.
Build Maintenance and Upgrades
Re-cabling an unmanaged build takes 45 to 90 minutes before you can even touch the component you’re swapping. A pre-managed build? 10 to 20 minutes, tops. The zip ties or velcro you put in now pay dividends every time you open the case.
Clean builds are also easier to dust. Compressed air has a clear path through the case instead of bouncing off a wall of cables. And properly routed cables don’t get accidentally yanked during a GPU swap. Worth the effort up front.
Resale Value and Presentation
A well-managed build photographs better. On eBay or Facebook Marketplace, a clean build communicates that the previous owner knew what they were doing, which anecdotally commands 10 to 20% higher asking prices on secondhand listings. Streamers and content creators showing their setup on camera have even more reason to care. Nobody clicks on a setup tour to see cable chaos.
What You Need: The Best PC Cable Management Kits and Tools
Essential Tools (Budget Tier, Under $15)
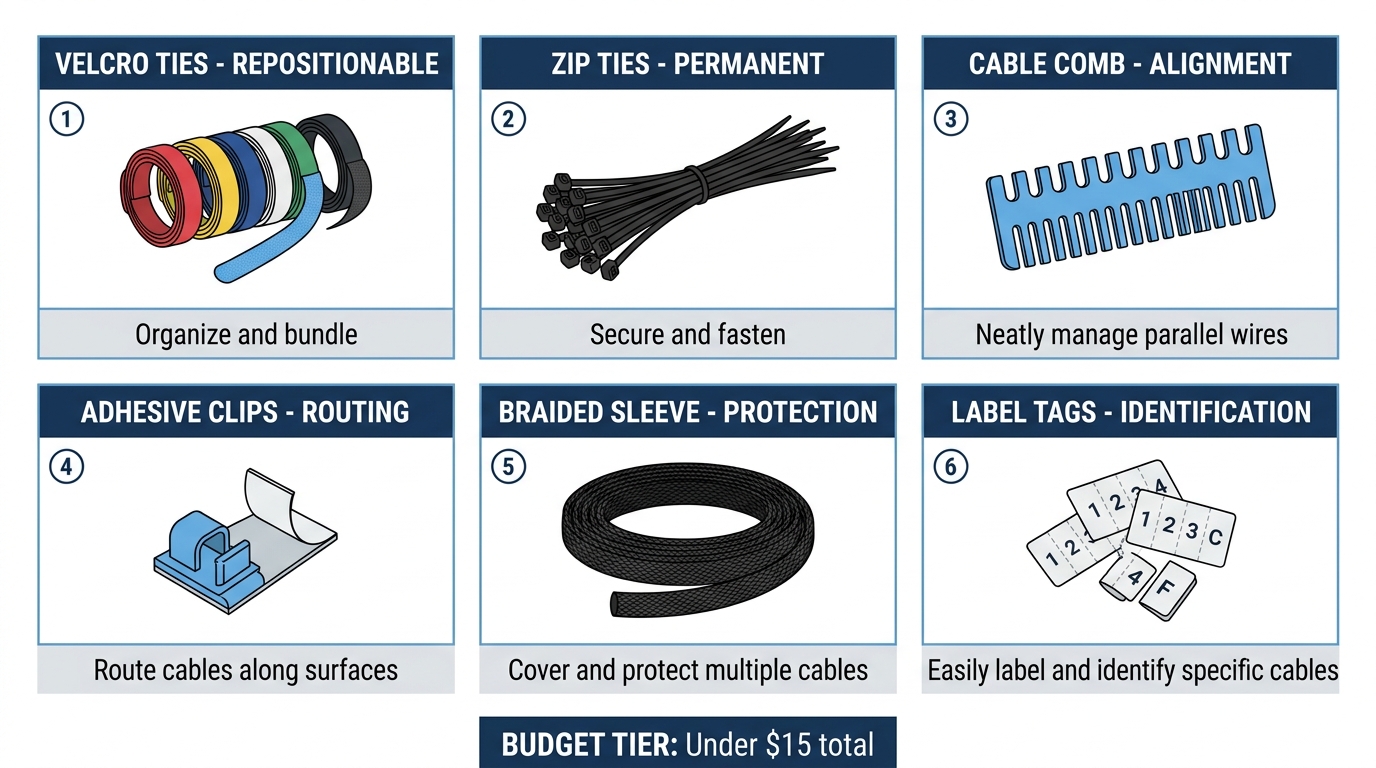
You don’t need to spend much to make a significant difference. Velcro reusable cable ties are the single best tool for inside-the-case management. They’re non-destructive, repositionable, and won’t pinch cables if you apply them wrong. Nylon zip ties (3-inch size) work for tight permanent bundles, but leave a small loop rather than cinching them to the cable’s outer sheath. Adhesive cable clips are useful for routing along PSU shroud edges and case walls.
| Kit / Item | Price Range | Best For | Includes |
|---|---|---|---|
| ZIIYAN 163-Piece Kit | ~$12–$16 | Budget builds, desks | Sleeves, clips, velcro straps, zip ties |
| Velcro One-Wrap (brand name) | ~$8–$12 | Internal case tidying | Reusable velcro straps only |
| CableMod ModFlex Cables | ~$40–$80 | Enthusiast/aesthetic builds | Pre-sleeved modular cables |
| Corsair Premium Sleeved Cables | ~$50–$90 | Corsair PSU owners | Full set of sleeved modular cables |
Intermediate Tools ($15–$50)
Cable combs are a game-changer for 24-pin ATX, EPS 8-pin, and PCIe 8-pin cables. They keep parallel wires perfectly spaced and give a factory-finished look. Braided sleeving is worth measuring before you buy: take the cable run length and add 15% for slack and termination. Adhesive cable raceways are the go-to for desk and wall routing. A 1/2-inch channel handles 1 to 3 cables; go 1-inch for 4 to 6 cables.
Enthusiast Tools ($50+)
Custom sleeved cables from CableMod or MDPC-X are the cleanest option for a showcase build. You choose your colors, lengths, and connector types. Aftermarket PSU shrouds (metal or acrylic) are available for cases that lack them. Cable labels and heat-shrink label tags add a server-rack level of organization that makes tracing individual runs trivial during troubleshooting.
Step-by-Step PC Cable Management Guide
Step 1, Start With a Modular or Semi-Modular PSU
A modular PSU lets you connect only the cables you actually need. That eliminates 30 to 50% of the cable bulk you’d be fighting with a non-modular unit. Connect only what’s required: 24-pin ATX, EPS 4+4-pin CPU power, PCIe cables for the GPU, and SATA or Molex for drives. Nothing else goes in.
If you’re stuck with a non-modular PSU, bundle unused cables with velcro and tuck them into the drive cage. Not pretty. But manageable.
Step 2, Plan Routes Before You Install Components
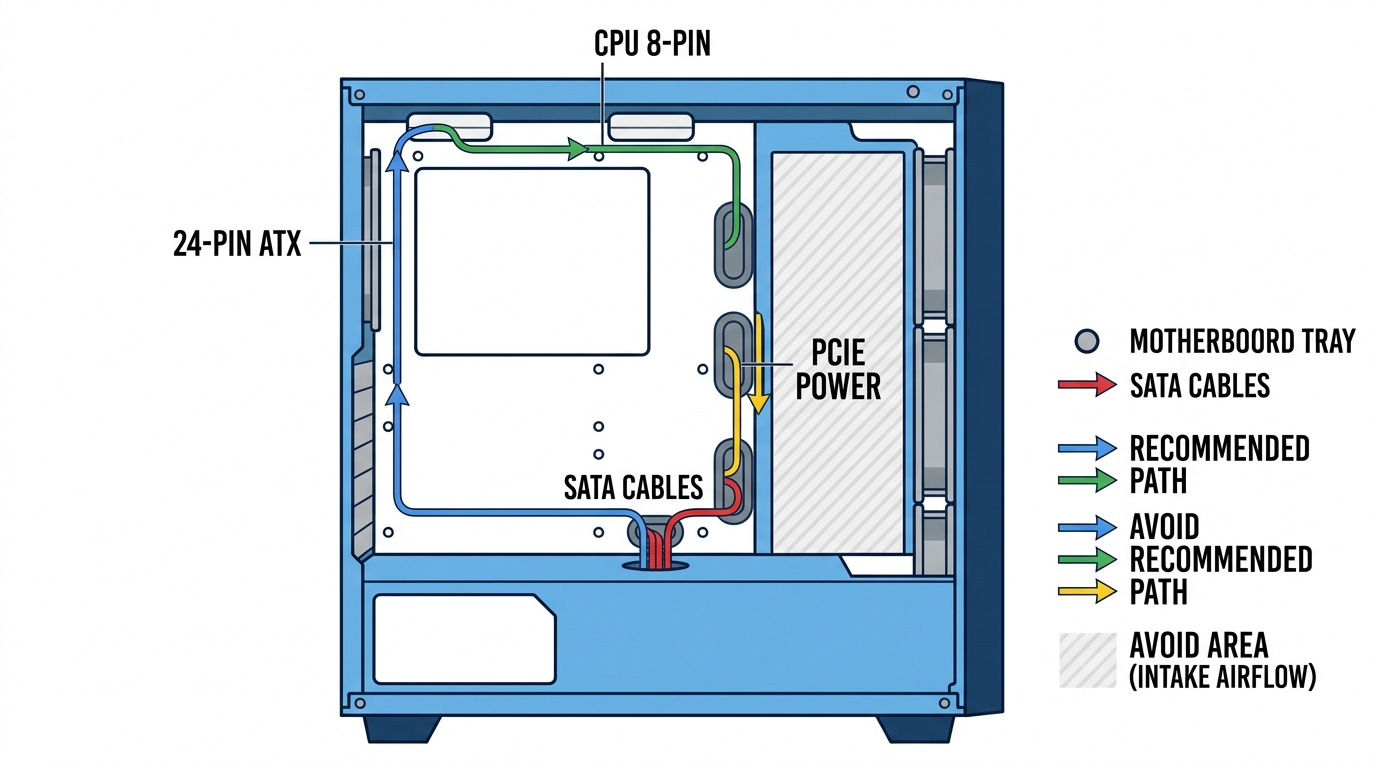
The number one beginner mistake is installing every component, then trying to manage cables around them. Don’t do it. Run cables behind the motherboard tray first, then connect to components. Map your paths: PSU routes up through the bottom-right grommet, travels behind the tray, and emerges at the correct header location. Plan it on paper if you have to. You’ll thank yourself later.
Step 3, The 24-Pin ATX Cable
This is the trickiest cable in any build. It’s thick, stiff, and has to travel a meaningful distance from the PSU to the motherboard’s right side. Route it behind the tray, emerge from the grommet closest to the motherboard connector, and use cable combs to fan it out neatly. Cases from Fractal Design and Lian Li often include a dedicated 24-pin channel alongside the tray. Use it if your case has one.
Step 4, CPU EPS / ATX12V Cable
Route the EPS cable through the top-left grommet on most ATX cases and run it along the top of the case behind the shroud. On ITX builds, this cable causes the most headaches. It’s long, the routing space is tight, and the connector sits in a difficult corner. On platforms that support it, an EPS 4-pin connector saves space over the full 8-pin. Check your motherboard manual before assuming you need both.
Step 5, GPU PCIe Power Cables
Many RTX 4000 series GPUs at the RTX 4070 tier and above, and most RTX 5000 series cards, use the 12VHPWR or 12V-2×6 16-pin connector; the RTX 4060 and some partner RTX 4070 designs use a standard 8-pin instead. Route this cable carefully. Nvidia specifies a minimum 35mm bend radius for the 12VHPWR connector, a sharp kink near the connector head has been directly linked to melting incidents. Don’t cut corners here. For dual 8-pin configurations on older GPUs, cable combs keep the parallel runs clean and prevent the cables from fanning out across the GPU area.
Full technical guidance on the 12VHPWR connector is covered in Nvidia’s official 16-pin connector guidance.
Step 6, SATA, Fan Headers, and Front Panel Cables
Use right-angle SATA data connectors to keep data cables lying flat against the drive. For fans, a PWM hub consolidates 4 to 6 fan headers into a single cable run back to the motherboard. That alone removes a significant amount of individual cable clutter. If you’re building out a system with multiple case fans, understanding how many case fans you need helps you plan the hub and routing before buying anything.
Front panel connectors (USB 3.0 header, HD audio, power button cluster) should be bundled together with velcro and routed behind the tray as a single group. They’re low-pressure cables that don’t carry high current, so bundling them tightly is fine.
Cable Management by Case Type and Form Factor
ATX Mid-Tower (Most Common)
Mid-towers give you the most routing real estate. Quality cases for cable management include the Fractal Design Define 7, Lian Li Lancool 216, and be quiet! Pure Base 500DX. All three offer 25 to 35mm of behind-tray space, which is enough to route even stiff modular cables comfortably. Anything under 20mm behind the tray is going to be a fight. Check that spec before buying a case if cable management is a priority. The PSU shroud is equally important: it visually separates the cable zone from the motherboard area, and cases without one always look more cluttered.
If you’re building around an all-black theme, the black PC stealth setup guide covers case and component choices that make cable routing even cleaner visually.
Micro-ATX and Mini-ITX (Small Form Factor Challenges)
SFF builds have roughly 40 to 60% less cable routing real estate than a standard mid-tower. Every cable decision matters more. Priority order: hide the 24-pin first, manage everything else around it. Standard PSU cables run 500 to 600mm, which is wildly excessive for a Mini-ITX case. Short-run custom cables (CableMod offers 300mm GPU cables specifically for ITX builds) make a meaningful difference. Don’t assume your mid-tower cables will work cleanly in a small case. They won’t.
Open-Air and Test Bench Builds
There’s no hiding anything here. The focus shifts entirely to presentation. Cable combs on every connector, color-coordinated sleeving, and consistent cable direction matter more than grommet routing. Think of it like a show car with an exposed engine bay. Everything visible has to look intentional.
Cable Management PC Desk, Hiding External Cables
Under-Desk Cable Trays and Raceways
J-channel raceways are the workhorse of desk cable management. Available in 3-foot and 6-foot lengths, they mount to desk edges or walls and hide cable runs completely. Under-desk cable trays from Monoprice or VIVO mount with screws or adhesive strips and hold your power strip plus bundled peripheral cables in a single tray below the desk surface. Before buying, measure your total bundled cable diameter. Most standard trays hold up to 2 to 3 inches of bundled cable. Overestimate rather than underestimate.
PC Cable Management Box and Power Strip Hiding
A cable management box conceals the power strip and excess cable slack in one move. Look for internal dimensions of at least 12″ L x 5″ W x 4″ H to fit most surge protectors. Critically: confirm the box has ventilation slots. A fully enclosed box around an active power strip is a fire hazard. Ventilation isn’t optional.
Monitor, Peripheral, and Desk Cable Tips
A cable spine or mesh sleeve groups your monitor, USB hub, and audio cables into a single run instead of five separate ones draped across the desk. Adhesive cable clips along the underside of the desk edge every 6 to 8 inches keep that bundle running in a straight line. If you’re willing to go wireless for your mouse and keyboard, you eliminate 2 to 4 visible cables instantly. That’s the highest-impact single upgrade for desk aesthetics with zero technical effort required.
Advanced Cable Management Techniques
Cable Sleeving, Full DIY Guide
Sleeving your own cables takes time but produces results no pre-made kit can match exactly. You’ll need PET braided sleeve (sized by wire count: 3mm for 1 to 2 wires, 6mm for 3 to 4 wires, 10mm for 5+ wires), heat shrink tubing, cable combs, and a heat gun or lighter.
The process: de-pin the connector using proper de-pinning tools (not a screwdriver), slide the sleeve over the wire, trim the heat shrink, apply heat to secure the ends, and re-pin the connector. A full cable set takes a beginner 4 to 8 hours. Experienced builders get it down to 2 to 3 hours. Never sleeve a non-detachable cable without de-pinning tools. You’ll damage the wire or the connector housing, or both.
Custom Cable Extensions vs. Full Custom Cables
Extensions are the most accessible entry point. They plug in between the PSU and the component, add sleeving aesthetics, and cost $20 to $50 for a set. Full custom cables replace the factory cables entirely and look cleaner at the connector end. They cost more and take longer to source, but the result is noticeably better. Here’s the comparison:
| Option | Cost | Difficulty | Result Quality | Best For |
|---|---|---|---|---|
| Factory Cables + Management | $0–$15 (ties/clips) | Easy | Good | Budget builds |
| Sleeved Extensions | $20–$50 | Easy | Very Good | Mid-range builds |
| Full Custom Cables | $60–$150 | Hard (DIY) / Easy (buy) | Excellent | Enthusiast/showcase builds |
Using RGB and Lighting to Complement Managed Cables
Addressable RGB lighting only looks good in a clean build. In a messy one, it just illuminates the chaos. Hide LED strips behind the GPU bracket or along the PSU shroud edge for indirect ambient glow rather than direct LED exposure. For cable color theory: white and black cables work with a monochrome build theme; colored sleeving pairs with a matching RGB scheme. Pick one direction and commit. Mixed color cables with mixed RGB lighting reads as accidental, not artistic.
PC Cable Management DIY Ideas on a Budget
DIY Cable Spine from PVC Pipe
Cut a 1-inch diameter PVC pipe to your desk height and you have a cable spine for $3 to $5. Sand the cut edges smooth, then use PVC pipe clips or standard zip ties to bundle the cable run to the spine. It’s not glamorous. But it works, and it costs almost nothing.
Binder Clips as Free Cable Holders
Clamp a binder clip to the desk edge and route a cable through the metal loop. It holds the cable off the floor and costs exactly zero dollars if you already have binder clips in a drawer. Works surprisingly well for USB cables, headphone cables, and phone chargers. Zero cost. Totally functional.
Pegboard Cable Organization Wall
A 2×4-foot pegboard mounted behind the desk creates an infinitely configurable organization surface. Add hooks, bins, and cable loops to build a zero-clutter desk environment. A full pegboard setup runs $20 to $40 compared to $100 or more for commercial cable management systems that do the same job. The pegboard approach also scales: you add a hook or a bin as your needs change, rather than replacing the entire system.
Frequently Asked Questions About PC Cable Management
How do you do proper cable management for a PC?
Start with a modular PSU so you’re only working with cables you actually need. Plan your routing before installing components, not after. Run cables behind the motherboard tray and through grommets toward their destination connectors. Prioritize the 24-pin ATX and EPS CPU cables first, then GPU power, then SATA data cables and fan headers last. Velcro ties at regular intervals along the cable runs keep everything tight against the tray.
Do you actually need cable management in a PC?
No, a PC will function without it. But cluttered cable runs can restrict airflow and raise temperatures by 3 to 8°C in a packed mid-tower, which has real consequences for component longevity. Cases with glass side panels make poor cable management especially obvious visually. From a maintenance standpoint, managed builds save significant time during upgrades and cleaning. It’s not mandatory, but the cost in time is low and the benefits are real.
Can you pay someone to do PC cable management?
Yes. Most local PC repair shops offer cable management as a service. Expect to pay $30 to $75 for an internal tidy-up using factory cables, or $100 to $200+ if you want full custom sleeved cable installation. Reddit’s r/buildapc community and local Facebook groups often connect you with enthusiast builders who offer informal cable management services for less. Always ask to see examples of their previous work before handing over your hardware.
What is a PSU shroud and why does it help cable management?
A PSU shroud is a cover, usually made of metal, plastic, or acrylic, that sits at the bottom of the case and conceals the power supply and the cable clutter surrounding it. Most modern mid-towers and full towers include one as a standard feature. The shroud creates a clean visual separation between the motherboard area above and the cable and storage zone below, which dramatically improves the appearance of the build even before you route a single cable.
What’s the difference between velcro ties and zip ties for PC cable management?
Velcro ties are reusable and repositionable. They don’t damage cables and can be adjusted later when you swap components. Zip ties are stronger and more permanent, but over-tightening them can crimp or damage cable insulation over time. For inside the PC, velcro is the right call. Zip ties make more sense for permanent external runs like under-desk cable management where you’re unlikely to be adjusting anything frequently. If you need to remove a zip tie cleanly without cutting the cable, push a thin needle into the locking mechanism head to release it.
Wrapping Up
Good PC cable management comes down to three things: the right tools (velcro ties, cable combs, a modular PSU), the right technique (plan before you install, route behind the tray, use grommets), and the habit of doing it consistently on every build. It gets faster every time. Your first managed build might take an extra two hours. Your fifth will feel natural. Start with the 24-pin and EPS cables, get those clean, and everything else follows. The before and after difference is always worth it.

Alex has been building and tweaking custom PCs for over 12 years. From budget builds to full custom water loops, he’s assembled more than 50 systems and helped hundreds of builders troubleshoot their rigs. When he’s not benchmarking the latest hardware, you’ll find him optimizing airflow setups or stress-testing overclocks.


