CSM BIOS Setting Explained: When to Enable or Disable
CSM (Compatibility Support Module) is a UEFI firmware component that emulates Legacy BIOS so older operating systems and MBR-formatted drives can boot on modern motherboards.
Last updated: May 2026
Table of Contents
- What Is CSM in BIOS? (Full Definition)
- CSM Full Form and Origin
- What CSM Actually Does in Your BIOS
- CSM vs. UEFI, Key Differences Explained
- Comparison Table, CSM (Legacy) vs. Pure UEFI
- Should You Enable or Disable CSM?
- Disable CSM If…
- Keep CSM Enabled If…
- How to Disable (or Enable) CSM in BIOS, By Motherboard Brand
- How to Disable CSM in MSI BIOS (Click BIOS 5)
- How to Disable CSM in ASUS BIOS
- How to Disable CSM in ASRock BIOS
- How to Disable CSM in Gigabyte / AORUS BIOS
- Other Manufacturers (Dell, Lenovo, HP)
- “Disabling CSM Boots to BIOS”, Troubleshooting and Fixes
- Why Disabling CSM Can Cause Boot Loops or a BIOS Freeze
- Step-by-Step Fix, Convert MBR to GPT Without Reinstalling
- Can’t Find CSM in BIOS? Here’s Why
- CSM and Windows 11, What You Need to Know
- Windows 11’s Hard Requirements That Conflict with CSM
- Windows 11 CSM Checklist
- Performance Impact of Disabling CSM, Real-World Data
- Resizable BAR / Smart Access Memory Requires CSM Disabled
- Boot Time Differences (CSM On vs. Off)
- CSM Settings Glossary, Understanding Every Related BIOS Option
- FAQ, CSM BIOS Common Questions
- Should I disable CSM in BIOS?
- What happens if I disable CSM in BIOS?
- Does disabling CSM affect performance?
- What is “Launch CSM” in BIOS, especially on ASUS boards?
- Can I switch from CSM to UEFI without reinstalling Windows?
- The Short Version
Most people think CSM is some obscure toggle that only matters for ancient hardware. They’re wrong. It directly affects whether you can install Windows 11, enable Secure Boot, use Resizable BAR, and how fast your PC actually boots. The wrong setting here causes black screens, boot loops, and a lot of frustrated forum posts.
Here’s the short answer: if you’re on a modern build running Windows 10 or 11 on an NVMe or SATA SSD, CSM should be disabled. Full stop. Keep reading to understand exactly why, and what to do if disabling it breaks your boot.
- 🟢 Disable CSM, Windows 10/11 fresh install, GPT drive, NVMe SSD, Resizable BAR, Secure Boot, modern GPU (post-2012)
- 🟡 Check first, Upgrading existing Windows install: verify GPT before disabling (run
diskpart → list disk) - 🔴 Keep CSM Enabled, Legacy OS (Windows 7), MBR-partitioned boot drive you can’t convert, pre-2012 GPU without UEFI GOP
What Is CSM in BIOS? (Full Definition)
CSM Full Form and Origin
CSM stands for Compatibility Support Module. It’s part of the UEFI firmware specification, defined by the UEFI Forum since UEFI 2.0 around 2006. It shipped on virtually every consumer motherboard from roughly 2011 onward, sitting inside the firmware as a software layer that could impersonate an old-school BIOS.
It was always a transitional technology. Never meant to be permanent. The idea was to give the industry time to move from MBR/Legacy BIOS to the GPT/UEFI ecosystem without breaking everything overnight. That transition is done. Most new platforms from 2022 onward are phasing CSM out entirely.
What CSM Actually Does in Your BIOS
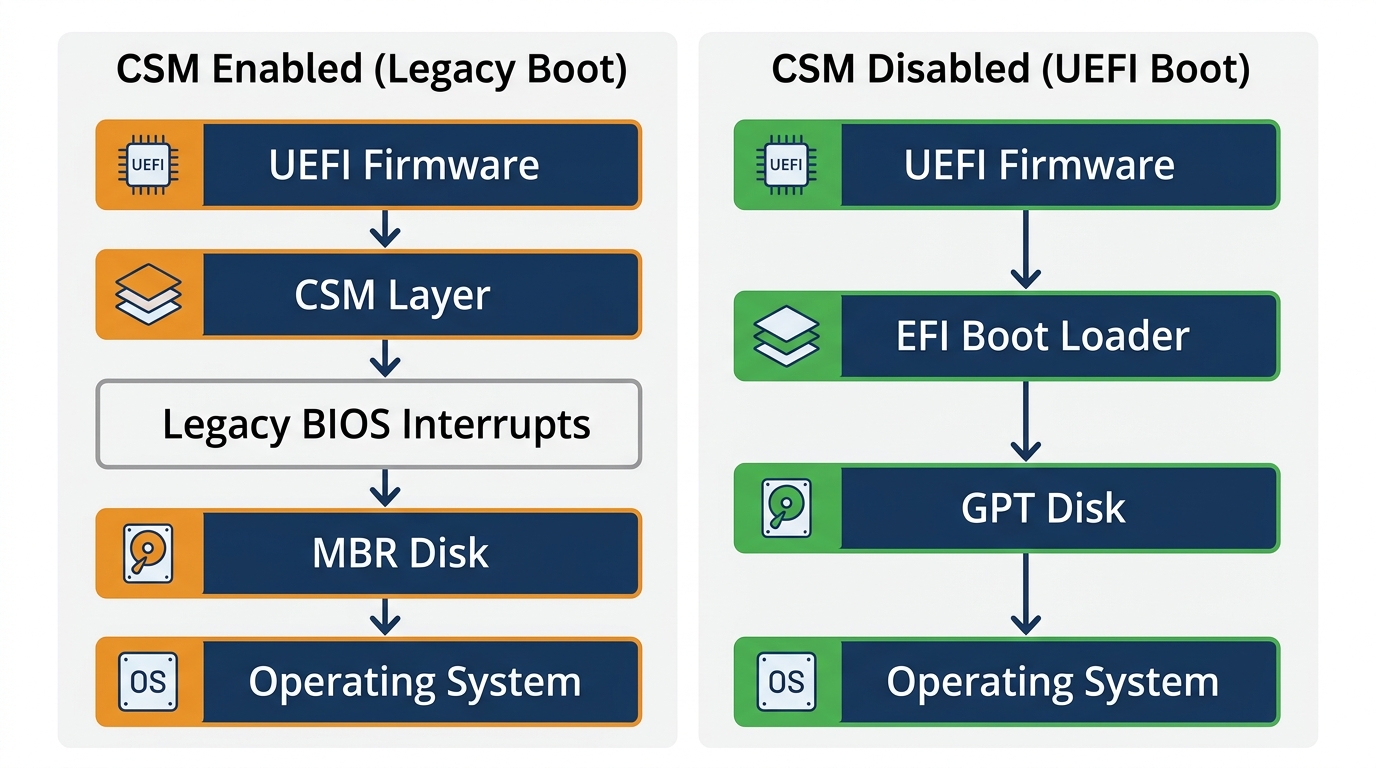
Without CSM, your motherboard’s UEFI firmware only recognizes EFI boot loaders on GPT-formatted disks. That’s the modern standard. With CSM enabled, the firmware emulates the legacy BIOS interrupt calls (INT 10h for video, INT 13h for disk access) that older operating systems and hardware rely on.
Specifically, CSM lets the board:
- Read MBR (Master Boot Record) partition tables on boot drives
- Load legacy Option ROMs from older GPUs, RAID cards, and network adapters
- Present itself as a “Classic BIOS” to an operating system that doesn’t understand UEFI
- Boot from devices that only have legacy boot loaders (old USB sticks, optical drives)
When CSM is off, none of that works. Your GPU needs a UEFI GOP (Graphics Output Protocol) driver. Your boot drive needs a GPT partition layout with an EFI System Partition. Your OS needs to be installed in UEFI mode. That’s actually a good thing, it’s all faster, more secure, and more capable.
CSM vs. UEFI, Key Differences Explained
People throw around “UEFI” and “Legacy BIOS” interchangeably with CSM, and it creates confusion. Here’s the actual picture: all modern motherboards use UEFI firmware. CSM is a module inside that UEFI firmware that makes it act like Legacy BIOS. So the real choice is between running in pure UEFI mode (CSM off) or UEFI-with-legacy-emulation mode (CSM on).
Comparison Table, CSM (Legacy) vs. Pure UEFI
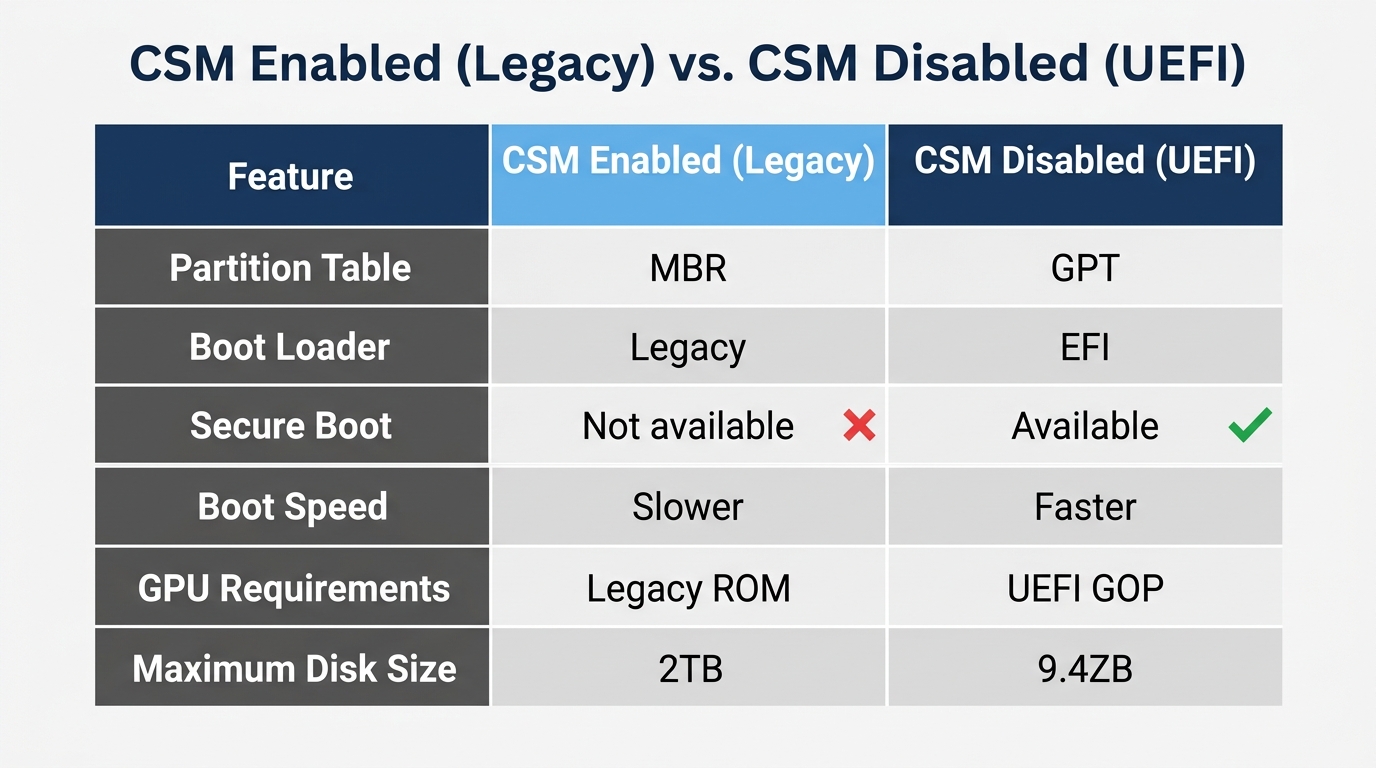
| Feature | CSM / Legacy Mode | Pure UEFI Mode |
|---|---|---|
| Boot disk format | MBR (max 2.19TB bootable) | GPT (no practical limit) |
| Secure Boot | ❌ Not available | ✅ Fully supported |
| Boot time (NVMe) | 15–30 seconds POST | 3–8 seconds POST |
| TPM 2.0 support | Limited / unreliable | ✅ Full support |
| Windows 11 compatible | ❌ No | ✅ Yes |
| Resizable BAR / SAM | ❌ Incompatible | ✅ Supported |
| Driver initialization | Legacy Option ROMs | UEFI GOP drivers |
| 64-bit OS required | No | Recommended |
That Resizable BAR row deserves emphasis. ReBAR (AMD’s version is called Smart Access Memory) gives your CPU unrestricted access to all VRAM instead of a 256MB window. The performance gain is real: anywhere from 3–15% FPS improvement depending on the game, with titles like Cyberpunk 2077 and Forza Horizon 5 sitting at the higher end. It requires CSM disabled, full stop. Not a small thing to leave on the table.
Secure Boot is a hard requirement for Windows 11, and it simply can’t coexist with CSM enabled. Microsoft enforced this at launch in October 2021 and hasn’t budged.
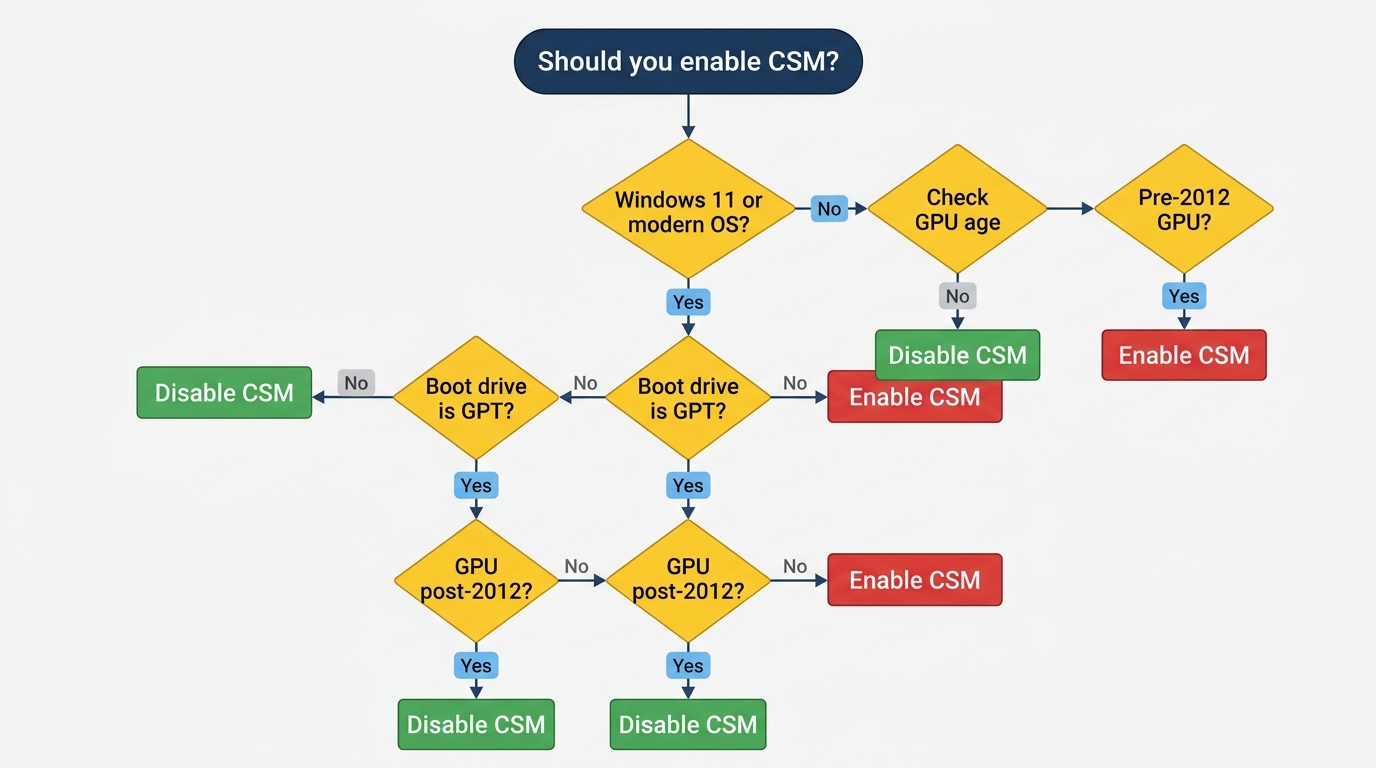
Should You Enable or Disable CSM?
Disable CSM If…
- You’re running Windows 10 or 11 on a modern system
- Your boot drive is formatted as GPT (the default for any Windows install from 2012 onward on UEFI systems)
- You want to upgrade to Windows 11 (CSM must be off; Secure Boot and TPM 2.0 are hard requirements)
- You’re booting from an NVMe SSD, NVMe is natively UEFI and delivers no benefit with CSM on
- You want Resizable BAR / Smart Access Memory for GPU performance gains
- Your GPU was made after roughly 2012 (it has a UEFI GOP driver built in)
- You’re on Intel 12th gen (Alder Lake) or newer, or AMD Ryzen 5000 or newer
Keep CSM Enabled If…
- You’re running a legacy operating system, Windows 7 32-bit, older Linux distributions without EFI support
- Your boot drive is MBR-partitioned and you can’t or won’t convert it right now
- You’re using a pre-2012 GPU that has no UEFI GOP driver (no video output without CSM)
- You have older PCIe add-in cards (some legacy RAID or NIC cards) that only have Legacy Option ROMs
- You have a dual-boot setup where one operating system was installed in Legacy mode
If none of those legacy scenarios apply to you, disable it. There’s no upside to running CSM on a modern build.
How to Disable (or Enable) CSM in BIOS, By Motherboard Brand
⚠️ Before you disable CSM: Confirm your Windows installation is on a GPT disk. Open Command Prompt as admin, run diskpart, then list disk. If there’s an asterisk (*) in the “GPT” column next to your boot drive, you’re good. No asterisk means MBR, convert it first (see the Troubleshooting section below). Also confirm your GPU supports UEFI GOP. Any GPU from 2012 onward should be fine. Back up your data before making changes.
How to Disable CSM in MSI BIOS (Click BIOS 5)
MSI labels the CSM control differently depending on the board revision and BIOS version, which trips people up. Two paths exist depending on your board:
- Press Delete at the POST screen to enter MSI Click BIOS 5
- Press F7 to switch to Advanced Mode
- Go to Settings → Advanced → Windows OS Configuration
- Set “Windows 10 WHQL Support” to Enabled, this automatically configures UEFI mode and disables CSM on most MSI boards
- Alternatively, go to Settings → Boot → Boot Mode Select
- Change from “LEGACY+UEFI” to “UEFI”
- CSM Support will now show as Disabled in the menu
- Press F10 to save and exit
If you can’t locate the CSM option, the MSI forum notes that BIOS structure can shift between versions, the “Windows 10 WHQL Support” toggle is the most reliable path on newer MSI boards where the standalone CSM toggle may be hidden.
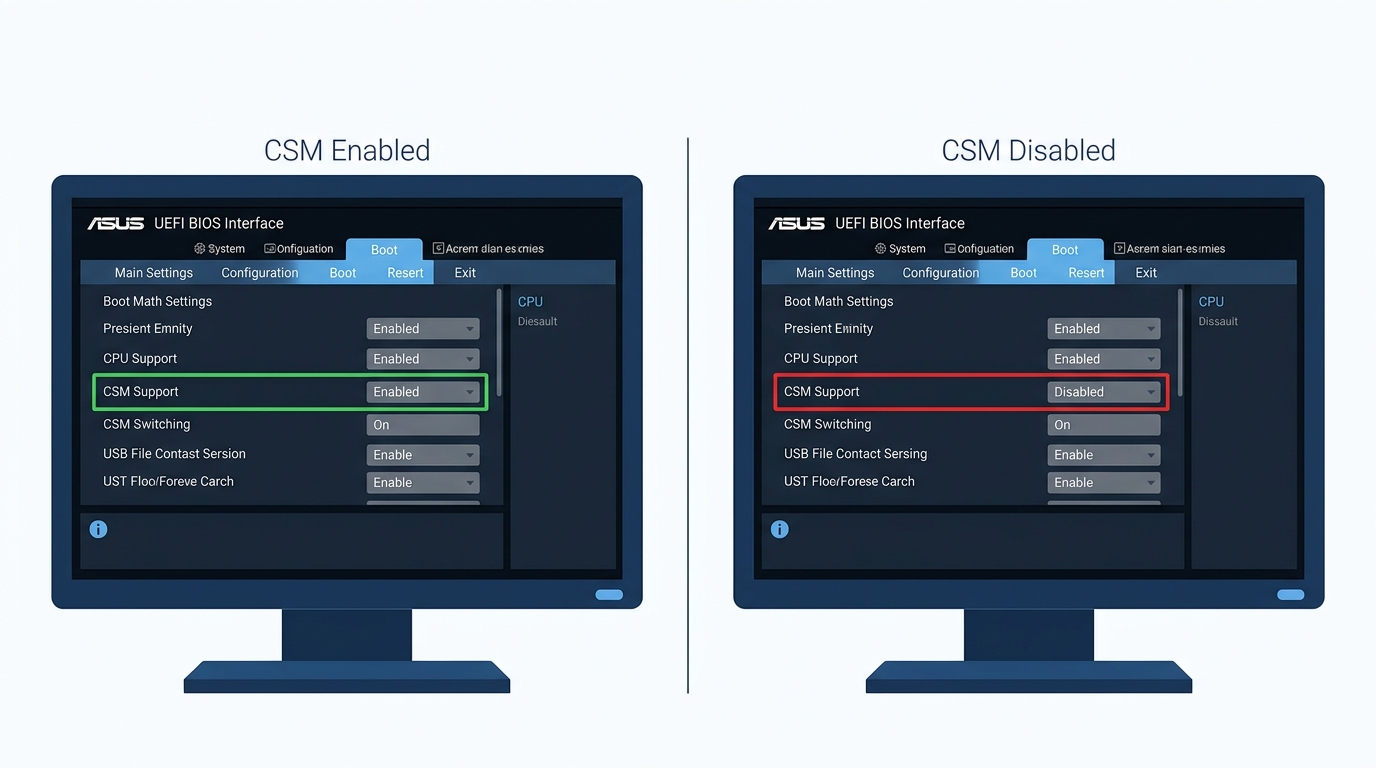
How to Disable CSM in ASUS BIOS
ASUS calls the toggle “Launch CSM”, which is where the confusion starts. It’s not hidden, it’s just named differently.
- Press Delete or F2 at POST
- Press F7 to enter Advanced Mode (if you land in EZ Mode)
- Navigate to the Boot tab
- Find “CSM (Compatibility Support Module)” section
- Set “Launch CSM” to Disabled
- Sub-options like “Boot Device Control,” “Boot from Storage Devices,” and “Boot from PCIe/PCI Expansion Devices” will gray out automatically
- Press F10 to save
On some ASUS ROG and TUF boards, Secure Boot configuration may need to happen first before the CSM toggle appears. If you see no CSM option at all, check whether Secure Boot is already enabled, some boards hide the CSM setting when Secure Boot is active because the two are mutually exclusive. The board may also already be in pure UEFI mode by factory default on newer models.
How to Disable CSM in ASRock BIOS
- Press F2 or Delete at boot
- Navigate to the Boot tab
- Find “CSM” or “Launch CSM”
- Set it to Disabled
- Go to Security → Secure Boot and set it to Enabled if you’re targeting Windows 11
- Press F10 to save
ASRock boards have a known issue where disabling CSM on a system with a Legacy/MBR Windows installation causes the board to freeze at POST. The screen just hangs. It’s not bricked, re-enabling CSM in BIOS will restore boot. The fix is converting your drive to GPT using Microsoft’s mbr2gpt.exe tool before disabling CSM (detailed in the Troubleshooting section).
How to Disable CSM in Gigabyte / AORUS BIOS
- Press Delete at POST to enter the Gigabyte BIOS
- Press F2 to switch to Classic/Advanced mode if you’re in Easy Mode
- Navigate to the BIOS tab in the top menu bar
- Find “CSM Support” and set it to Disabled
- Navigate to the Security tab and enable Secure Boot if needed
- Press F10 to save
On older boards like the AX370 Gaming 5, the location is BIOS Features → CSM Support. On newer Gigabyte Z690 and B650 boards, CSM may be hidden entirely when Secure Boot is active, this is by design, not a bug. If you’re on an AM5 platform and want to know how your chipset handles these settings, the differences between X870 vs X870E motherboard chipsets explain what BIOS-level features vary between them.
Other Manufacturers (Dell, Lenovo, HP)
OEM BIOS interfaces don’t use the term “CSM” directly. They abstract it behind simpler labels:
- Dell: BIOS → Boot Sequence → Boot List Option → Change from “Legacy” to “UEFI”
- Lenovo: BIOS → Startup → UEFI/Legacy Boot → set to “UEFI Only”
- HP: BIOS → System Configuration → Boot Options → Legacy Support → Disabled
Same function, different labels. Dell and Lenovo are particularly inconsistent between product lines and BIOS versions, so if these paths don’t match exactly, search your specific model name plus “disable Legacy Boot.”
“Disabling CSM Boots to BIOS”, Troubleshooting and Fixes
Why Disabling CSM Can Cause Boot Loops or a BIOS Freeze
This is the most common thing that goes wrong. You disable CSM, save, reboot, and either the system loops back to the BIOS screen, or it freezes entirely at POST. Nothing seems to work.
The root cause is almost always the same: Windows was installed in Legacy/MBR mode. When you disable CSM, the firmware stops recognizing MBR boot records. It scans for a valid UEFI boot entry, finds nothing, and drops you back to BIOS. Your OS isn’t gone, it just can’t be seen by the firmware in pure UEFI mode.
A secondary cause: a GPU without a UEFI GOP driver. If your graphics card predates 2012 or is an older workstation card, disabling CSM means no video output at all during POST. The fix there is to use the integrated graphics output (if your CPU has one) to get into the BIOS and re-enable CSM.
Step-by-Step Fix, Convert MBR to GPT Without Reinstalling
Disabling CSM requires the system drive to use GPT partitioning. The transition from MBR to GPT can be handled without reinstalling Windows using Microsoft’s mbr2gpt tool. Here’s how:
Method 1: mbr2gpt.exe (Microsoft’s official tool, Windows 10 build 1703 and later)
- Open Command Prompt as Administrator
- Run
mbr2gpt /validate /disk:0first, this checks if conversion is possible - If validation passes, run
mbr2gpt /convert /disk:0 - Reboot, go into BIOS, disable CSM, enable Secure Boot
- Windows should boot normally in UEFI mode
Success rate on clean installs is high but not guaranteed. On systems with non-standard partition layouts (recovery partitions in unusual places, third-party disk tools, etc.), it can fail. If it fails, don’t force it.
Method 2: Clean Install (most reliable for Windows 11)
- Back up your data
- Create a Windows 11 bootable USB using the Microsoft Media Creation Tool
- Disable CSM in BIOS first
- Boot the USB, make sure to boot it as a UEFI USB device (it will appear twice in the boot menu on CSM-enabled systems: once as “Legacy USB” and once as “UEFI USB”)
- During setup, delete all existing partitions on the target drive
- Let Windows create the partition layout automatically, it will create a GPT layout with an EFI System Partition
Clean install. No drama. Worth the extra hour.
Can’t Find CSM in BIOS? Here’s Why
If you’re hunting through your BIOS and CSM is just… not there, one of these is the reason:
- Your platform has dropped CSM entirely. AMD AM5 (Ryzen 7000 series) and Intel 13th/14th gen boards increasingly ship with CSM removed from the firmware. It’s gone, not hidden. You’re already in pure UEFI mode by default.
- Secure Boot is currently enabled. Many boards hide the CSM option when Secure Boot is active because enabling CSM would conflict with it. Disable Secure Boot first, and the CSM toggle will reappear.
- Your board shipped post-2022 with CSM disabled by default. Some newer boards don’t expose the toggle at all, they’re pure UEFI out of the box. That’s fine.
- OEM BIOS uses different terminology. Dell, Lenovo, and HP systems use “Legacy Boot” or “UEFI/Legacy Boot” instead. See the OEM section above.
Not finding it doesn’t mean something is broken. It might just mean you’re already set up correctly.
CSM and Windows 11, What You Need to Know
Windows 11’s Hard Requirements That Conflict with CSM
Windows 11 and CSM don’t coexist. Period. Microsoft’s official hardware requirements enforce three things that require CSM to be off:
- Secure Boot: Mandatory for Windows 11. Only works in pure UEFI mode (CSM off).
- TPM 2.0: Required. Firmware TPM (fTPM) is unreliable with CSM on, some boards show the TPM as “not found” or report version 1.2 instead of 2.0 while CSM is active. Disabling CSM resolves this.
- Pure UEFI boot path (UEFI Class 3, or Class 2 with CSM disabled): Windows 11 requires the system to boot in pure UEFI mode. Class 1 devices and Class 2 devices running with CSM enabled don’t qualify, even though UEFI firmware is technically present. The installer checks this via msinfo32, it must show “BIOS Mode: UEFI” not “BIOS Mode: Legacy.”
Microsoft has been clear on this since the Windows 11 launch in October 2021. The upgrade path requires CSM off. There’s no workaround that doesn’t involve registry hacks that Microsoft can revoke via update.
Windows 11 CSM Checklist
| Requirement | Status Needed | How to Verify |
|---|---|---|
| CSM | ❌ Must be OFF | BIOS Boot tab |
| Secure Boot | ✅ Required: ON | BIOS Security tab or msinfo32 |
| TPM 2.0 | ✅ Required: Active | BIOS → enable fTPM / tpm.msc |
| Windows on GPT disk | ✅ Required | diskpart → list disk (asterisk in GPT column) |
| UEFI Boot mode | ✅ Required | msinfo32 → BIOS Mode = UEFI |
Run through all five before attempting the Windows 11 upgrade. Miss one and the installer will block you. While you’re in the BIOS making these changes, other settings matter too, for example, ErP in BIOS is another setting worth understanding since it affects how your system handles power states after shutdown, and Network Stack in BIOS controls a separate boot-time feature relevant to PXE network booting and remote OS deployment.
Performance Impact of Disabling CSM, Real-World Data
Resizable BAR / Smart Access Memory Requires CSM Disabled
Resizable BAR (ReBAR) is the feature that lets the CPU access the full GPU VRAM pool instead of being limited to a 256MB window. It’s part of the PCIe specification and has been available since PCIe 3.0, but it requires the UEFI boot path to function, which means CSM must be off.
The performance gains are concrete. Across supported GPU and CPU combinations (NVIDIA RTX 30/40 series, AMD RX 6000/7000 series paired with compatible Intel or AMD platforms), ReBAR delivers:
- 3–15% FPS uplift in supported titles, with most games seeing 3–5% on average and some seeing no measurable benefit
- Highest gains in titles like Cyberpunk 2077, Forza Horizon 5, and Battlefield 2042, where engines stream large texture and geometry sets
- Particularly impactful at higher resolutions where VRAM bandwidth is the bottleneck
Not great, leaving that on the table for the sake of keeping CSM on unnecessarily.
Boot Time Differences (CSM On vs. Off)
The difference in POST times is noticeable in daily use:
| Configuration | Typical POST Time |
|---|---|
| CSM On, HDD boot drive | 20–35 seconds |
| CSM On, SATA SSD boot drive | 15–25 seconds |
| CSM Off, SATA SSD boot drive | 6–12 seconds |
| CSM Off, NVMe SSD boot drive | 3–8 seconds |
| CSM Off, NVMe + Fast Boot enabled (Z790/X670) | Under 5 seconds |
These are real-world averages and vary by connected hardware, RAM amount, and BIOS version. The gap between CSM-on and CSM-off on the same NVMe drive can be 10–20 seconds. Every day. That adds up.
CSM Settings Glossary, Understanding Every Related BIOS Option
BIOS menus are full of CSM-adjacent options with names that don’t explain themselves. Here’s what they actually mean:
| BIOS Term | What It Actually Means |
|---|---|
| Launch CSM | Master on/off toggle for the Compatibility Support Module (ASUS terminology) |
| Boot Device Control | Restricts bootable devices to UEFI-only, Legacy-only, or both |
| Boot from Storage Devices (CSM) | Controls whether storage controllers use UEFI drivers or legacy INT 13h calls |
| Boot from PCIe/PCI Devices | Controls whether PCIe cards (GPUs, NICs) use UEFI GOP or legacy Option ROMs |
| UEFI/Legacy Boot | Lenovo’s equivalent of the CSM toggle |
| Boot Mode: UEFI / Legacy / Auto | MSI and Dell terminology for CSM configuration |
| CSM/UEFI Mode | Gigabyte’s combined setting for boot mode selection |
| Windows 10 WHQL Support | MSI shortcut that enables UEFI mode, configures Secure Boot, and disables CSM simultaneously |
| Legacy Support | HP’s label for the CSM toggle in their BIOS |
Understanding these labels means you can navigate any BIOS, even if the manufacturer decided to get creative with naming. The same principles apply regardless of what it’s called on your board. If you want to go deeper on AMD-specific BIOS settings, the guide on DOCP and EXPO for AMD RAM covers another important toggle that’s easy to miss on Ryzen builds.
FAQ, CSM BIOS Common Questions
Should I disable CSM in BIOS?
Yes, on most modern builds you should disable CSM. If you’re running Windows 10 or 11 on a GPT-formatted drive with a GPU from 2012 or later, disabling CSM unlocks Secure Boot, gives TPM 2.0 reliable operation, enables Resizable BAR, and cuts your boot time significantly. Only keep it enabled if you’re running a legacy OS, using an MBR-partitioned drive you haven’t converted, or relying on a pre-2012 GPU that lacks a UEFI GOP driver.
What happens if I disable CSM in BIOS?
If your system is configured correctly (UEFI boot mode with a GPT drive), disabling CSM enables Secure Boot, gives TPM 2.0 full functionality, unlocks Resizable BAR support, and reduces boot times by 10–25 seconds. If Windows is installed on an MBR disk, disabling CSM will cause a boot failure, the system will loop back to the BIOS. The fix is converting your disk to GPT using mbr2gpt.exe before disabling CSM, or doing a clean Windows install in UEFI mode.
Does disabling CSM affect performance?
Disabling CSM can improve performance in two ways: it enables Resizable BAR (which delivers up to 15% GPU FPS improvement in supported games), and it cuts POST and boot times by 10–25 seconds compared to Legacy boot mode. It does not negatively affect CPU, RAM, or storage benchmark performance. Your frame rates in games won’t drop. They may go up if ReBAR was previously blocked.
What is “Launch CSM” in BIOS, especially on ASUS boards?
“Launch CSM” is ASUS’s name for the master CSM toggle, located in the Boot tab of their UEFI BIOS. Setting it to “Disabled” puts the system in pure UEFI mode. Sub-options beneath it control granular legacy compatibility for specific hardware categories: “Boot Device Control” covers what types of boot devices are recognized, “Boot from Storage Devices” handles whether storage controllers use legacy or UEFI drivers, and “Boot from PCIe/PCI Expansion Devices” governs whether GPU and add-in cards use legacy Option ROMs or UEFI GOP. All three gray out when Launch CSM is disabled.
Can I switch from CSM to UEFI without reinstalling Windows?
Yes, using Microsoft’s mbr2gpt.exe tool included in Windows 10 (build 1703 and later) and Windows 11, you can convert your boot drive from MBR to GPT without losing data. Run mbr2gpt /validate /disk:0 first to check compatibility, if it passes, run mbr2gpt /convert /disk:0. Then go into BIOS, disable CSM, and enable Secure Boot. Success isn’t guaranteed on all setups, particularly systems with non-standard partition layouts. A clean install remains the most reliable method if validation fails.
The Short Version
CSM is a legacy compatibility layer inside your UEFI firmware. It exists for one reason: to let older hardware and operating systems that don’t understand UEFI still boot on modern motherboards. On any build running Windows 10 or 11 on a modern GPU and SSD, disabling it is the right move, you get Secure Boot, reliable TPM 2.0, Resizable BAR, and faster boot times with zero downside. The only reason to leave it on is genuine legacy hardware or an unconverted MBR drive. Convert the drive, then turn CSM off.
| Scenario | CSM Setting |
|---|---|
| New Windows 11 build | 🟢 Disabled |
| New Windows 10 build (GPT drive) | 🟢 Disabled |
| Upgrading existing install to Windows 11 | 🟡 Disable after GPT conversion |
| Enabling Resizable BAR / AMD SAM | 🟢 Disabled (required) |
| Secure Boot required | 🟢 Disabled (required) |
| Legacy OS (Windows 7, old Linux) | 🔴 Enabled |
| Old GPU without UEFI GOP (pre-2012) | 🔴 Enabled |
| MBR boot drive (unconverted) | 🔴 Enabled until converted |

Alex has been building and tweaking custom PCs for over 12 years. From budget builds to full custom water loops, he’s assembled more than 50 systems and helped hundreds of builders troubleshoot their rigs. When he’s not benchmarking the latest hardware, you’ll find him optimizing airflow setups or stress-testing overclocks.


