How to Apply Thermal Paste the Right Way
Thermal paste is a thermally conductive compound applied between a CPU’s integrated heat spreader and a cooler’s cold plate to eliminate air gaps that impede heat transfer.
Last updated: June 2026
Table of Contents
- Quick Answer: How Do You Apply Thermal Paste?
- What Is Thermal Paste and Why Does It Actually Matter?
- The Science Behind Heat Transfer (Simplified)
- When Do You Need to Apply Thermal Paste?
- What You’ll Need Before You Start
- Tools and Materials Checklist
- How to Prepare the CPU Surface
- How Much Thermal Paste to Apply
- The 5 Thermal Paste Application Methods Compared
- Method 1: Center Dot (Pea Method)
- Method 2: Thin Spread (Manual or Stencil)
- Method 3: X Pattern
- Method 4: Two Vertical Lines
- Method 5: Stencil Application
- Step-by-Step: How to Apply Thermal Paste to a CPU
- Platform-Specific Thermal Paste Tips
- AMD AM5 (Ryzen 7000 / 9000 Series)
- Intel LGA1700 / LGA1851 (12th–15th Gen / Arrow Lake)
- Laptops
- GPUs
- The Biggest Thermal Paste Mistakes (And How to Avoid Them)
- When to Replace Thermal Paste
- Signs Your Thermal Paste Has Degraded
- Replacement Schedule by Paste Type
- Frequently Asked Questions
- Can I apply thermal paste myself?
- What is a common mistake when applying thermal paste?
- How often should you reapply thermal paste?
- Does thermal paste brand really matter?
- Is pre-applied thermal paste on stock coolers good enough?
- The Bottom Line
Quick Answer: How Do You Apply Thermal Paste?
Clean both the CPU IHS and cooler cold plate with 90%+ isopropyl alcohol, let them dry fully, then place a pea-sized dot (roughly 0.3–0.5mL) in the center of the CPU. Mount the cooler straight down without sliding, and tighten the mounting screws diagonally in an X pattern. The cooler’s clamping pressure spreads the paste across the surface automatically. That’s the whole process for most builds.
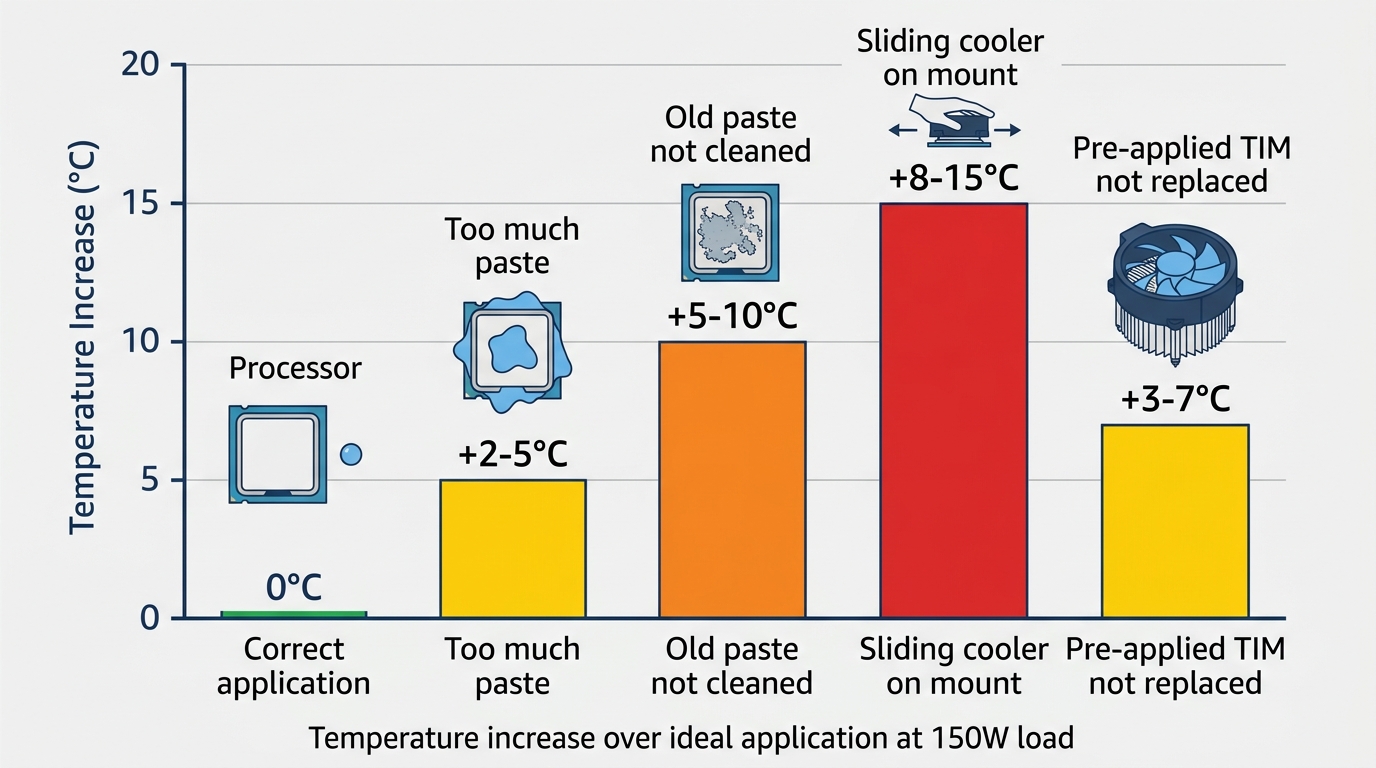
A bad application can raise idle temps by up to 10°C and load temps by 15°C or more. That gap is larger than the difference between a budget paste and a premium one. Getting the method right matters more than which paste you buy. This guide covers every application method, common mistakes with actual temperature penalties, and platform-specific tips for AM5, Intel LGA1851, and more.
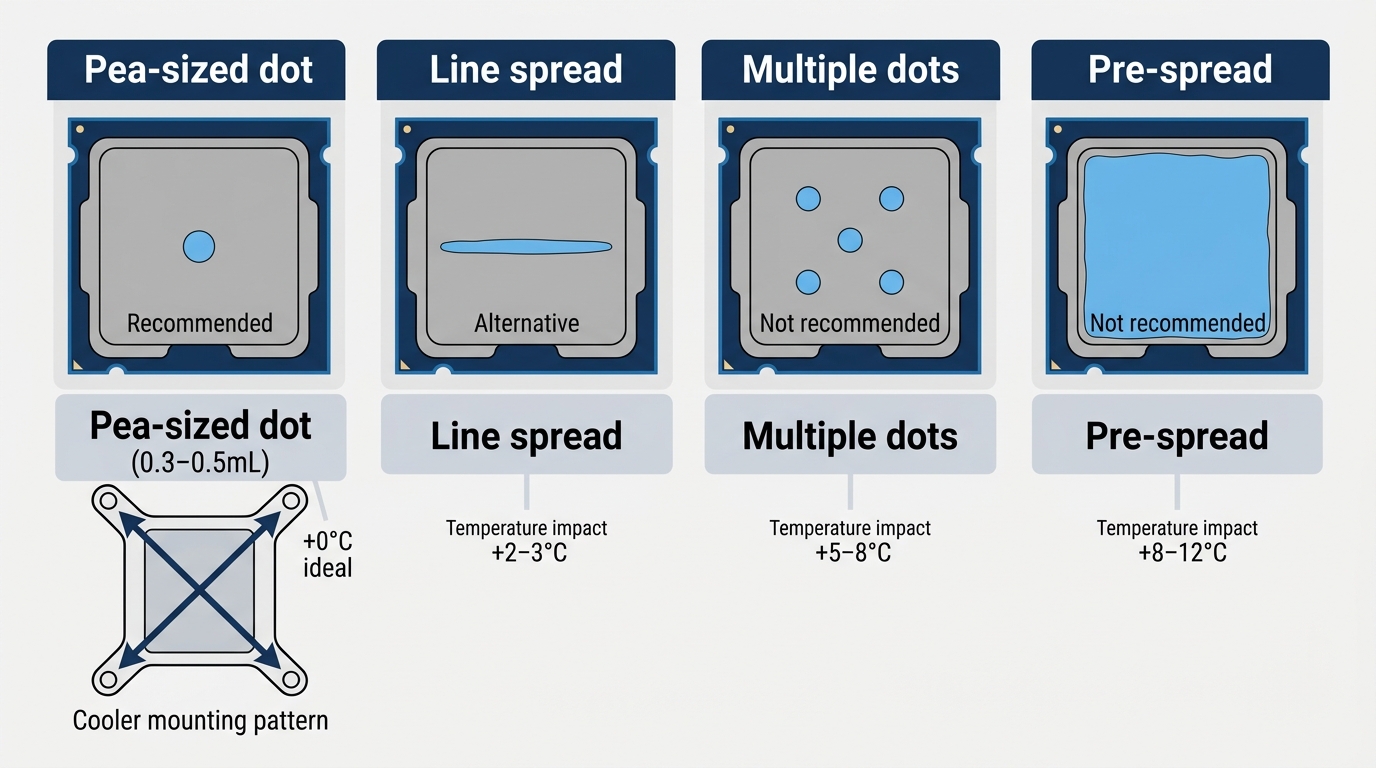
- 🟢 Correct amount: pea-sized dot, center of IHS (0.3–0.5mL)
- 🟢 Surface prep: 90–99% IPA, lint-free wipe, 30–60 sec dry time
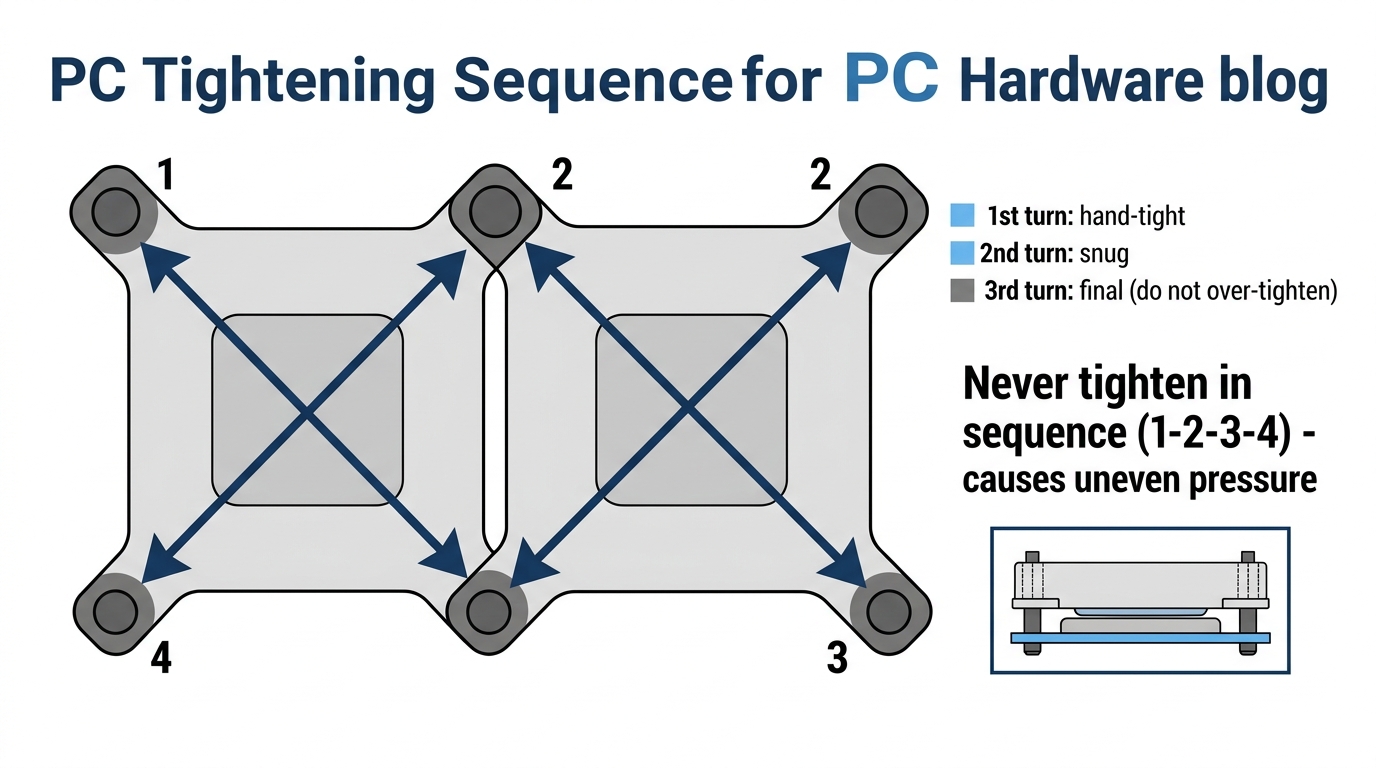
- 🟢 Mounting: straight down, no sliding, tighten screws diagonally
- 🟡 Too much paste: messy but not damaging; adds ~2–5°C over ideal
- 🟡 Pre-applied TIM on stock coolers: adequate but 3–7°C warmer than aftermarket paste
- 🔴 Old paste left on surface: adds 5–10°C; always clean before reapplication
- 🔴 Sliding the cooler on mount: creates air pockets; ruins spread pattern

What Is Thermal Paste and Why Does It Actually Matter?
The Science Behind Heat Transfer (Simplified)
Both a CPU’s integrated heat spreader (IHS) and a cooler’s cold plate look perfectly flat. They’re not. At the microscopic level, both surfaces have peaks and valleys that trap air when they’re pressed together. Air has a thermal conductivity of roughly 0.025 W/m·K. A quality thermal paste reaches 4–14 W/m·K depending on the formula. That’s a 160x to 560x difference in how efficiently heat moves across the interface.
In practical terms, air gaps at the CPU-cooler interface create a thermal resistance of around 0.5–1.0°C per watt. Fill those gaps with good paste and that drops to roughly 0.05–0.1°C/W. On a CPU running 150W sustained load, that’s a potential 60–135°C difference in theory. Real-world delta is smaller because the gaps aren’t total, but the point stands: air is a terrible conductor, and paste fixes that.
When Do You Need to Apply Thermal Paste?
You need fresh thermal paste any time a cooler is removed or installed. Specific situations include:
- Installing an aftermarket cooler: always apply fresh paste; don’t trust the pre-applied TIM on aftermarket coolers that have been stored or shipped
- Replacing a stock cooler: remove the factory TIM completely and apply fresh paste
- Re-seating a cooler: even a brief removal counts; the spread pattern is disrupted and air is reintroduced
- Paste has degraded: typically every 3–5 years depending on paste chemistry (more on this later)
Stock Intel and AMD coolers ship with pre-applied TIM, which is fine for running within rated TDP. Aftermarket paste on a stock cooler still saves around 3–5°C at load, which is worth it if you’re pushing the chip. GPU repasting is a separate project outside the scope of this guide, but uses the same surface prep and application principles.
What You’ll Need Before You Start
Tools and Materials Checklist
- Thermal paste: your chosen compound (zinc oxide, silver, carbon, or liquid metal for advanced users)
- Isopropyl alcohol: 90% concentration minimum; lower percentages leave water residue on the IHS
- Lint-free cloth or coffee filters: not paper towels, which shed fibers that contaminate the surface
- Nitrile gloves: optional but smart; finger oils on the IHS degrade thermal contact
- Plastic spreader or applicator card: needed only if you’re using the thin spread method
- Good lighting: you want to see what you’re doing clearly
How to Prepare the CPU Surface
This step gets skipped too often. Residue from old paste, especially hardened, cracked TIM, acts as an insulator, not a conductor. Don’t skip cleaning even if the surface looks clear.
- Apply a small amount of IPA to a lint-free cloth or coffee filter. Not directly onto the CPU.
- Wipe the IHS in one direction, not circular. Circular wiping redistributes contamination.
- Let it dry fully. 30–60 seconds. IPA evaporates fast but not instantly.
- Do the same on the cooler cold plate.
- Don’t touch either surface after cleaning.
If old paste is dry and powdery, it may take two or three passes to fully remove. Stubborn residue responds well to letting the IPA soak for a few seconds before wiping. You can read more about paste degradation and when replacement becomes necessary in our guide on how often you should replace thermal paste.
How Much Thermal Paste to Apply
Less is more. This is the rule that beginners consistently get backwards. Adding more paste doesn’t improve conductivity once the gap is filled. It just creates overflow risk and can trap air bubbles if the layer is too thick.
Platform-appropriate amounts:
- Standard desktop IHS (AM4, AM5, Intel LGA1700/1851): pea-sized dot, roughly 0.3–0.5mL
- Large/HEDT IHS (Threadripper, Intel LGA2066): small X pattern or thin spread; single dot won’t reach corners
- Laptop CPUs (exposed die, no IHS): grain-of-rice dot; the die is small and pressure distribution is different
Too much paste and you’ll get squeeze-out around the edges. Not a safety issue since standard thermal paste isn’t electrically conductive, but it’s messy and harder to clean. Too little and you get incomplete coverage, hot spots, and temps running 5–10°C higher under sustained load. Split the difference with a conservative pea-sized amount and let mounting pressure do the work.
The 5 Thermal Paste Application Methods Compared
Cooler mounting pressure is what actually spreads the paste. Your job before mounting is to set up the right starting point so pressure distributes paste evenly across the IHS. Different IHS shapes benefit from different starting patterns. You can find that resource at gamersnexus.net.
Method 1: Center Dot (Pea Method)
The most used method. One pea-sized dot dead center of the IHS. Mounting pressure spreads it outward in a roughly circular pattern. Works well for most square and near-square desktop CPUs (AMD AM4, AM5, Intel LGA1700, LGA1851). Corners may be thin on rectangular IHS designs, but the corners run cooler than the center anyway. Beginner-friendly. Low overflow risk. This is the recommended starting method for anyone new to PC building.
Method 2: Thin Spread (Manual or Stencil)
Use a plastic spreader card to create a thin, even layer across the full IHS before mounting. Most consistent coverage across the entire surface. Best method for large or rectangular IHS designs. The downside: it’s easy to apply too thick a layer, which actually increases thermal resistance rather than reducing it. Takes more care than the dot method. In controlled comparisons on large-IHS CPUs, a properly executed thin spread runs 1–3°C cooler than the center dot.
Method 3: X Pattern
Draw an X across the IHS from corner to corner. Better corner coverage than the center dot. More paste used overall, and thickness is uneven between the lines and the gaps. Good for Intel’s rectangular Alder Lake, Raptor Lake, and Arrow Lake IHS designs. Not required, but a reasonable middle ground if you want more coverage without a spreader.
Method 4: Two Vertical Lines
Two parallel lines running the length of the IHS. Suited to elongated IHS designs from older platforms. Still leaves corners thin. This is largely a legacy method. Not wrong, but not optimal for any modern socket geometry. Stick with dot or X on current-gen hardware.
Method 5: Stencil Application
The most precise approach. Corsair’s XTM70 kit, for example, includes triangular stencils that create a controlled coverage pattern before mounting. The result is a thin, even layer with minimal overflow and complete IHS coverage. Best suited to enthusiast builds, custom loop setups, and high-TDP CPUs where every degree matters. Slightly more setup time. Excellent results.
| Method | Best For | Coverage Quality | Skill Level | Overflow Risk | Est. Temp Delta vs. Dot |
|---|---|---|---|---|---|
| Center Dot | Most desktop CPUs | Good | Beginner | Low | Baseline |
| Thin Spread | Large / rectangular IHS | Excellent | Intermediate | Medium | -1 to -3°C |
| X Pattern | Intel LGA1700 / LGA1851 | Good to Very Good | Beginner | Medium | 0 to -2°C |
| Two Vertical Lines | Elongated IHS (legacy) | Fair | Beginner | Low | 0 to +2°C |
| Stencil | Enthusiast / High-TDP builds | Excellent | Intermediate | Low | -2 to -4°C |
Temperature deltas shown are based on community benchmark data and Corsair’s own visual coverage comparisons using their XTM series paste. Results vary by cooler quality, ambient temperature, and paste brand. The methodology caveat: these are typical ranges, not guarantees.
Step-by-Step: How to Apply Thermal Paste to a CPU
These steps use the center dot method. It’s the right starting point for most builders and most platforms. Follow these in order and don’t skip surface prep.
- Power down and ground yourself: shut down the PC completely, unplug the power cable. Touch a metal part of the case or use an anti-static wrist strap before handling components.
- Remove the old cooler: twist it slightly to break the paste seal, then lift straight up. Never pry sideways. Pulling a stuck cooler without breaking the seal can lift the CPU out of an LGA socket.
- Clean both surfaces: CPU IHS and cooler cold plate, both cleaned with 90%+ IPA on a lint-free cloth. Wipe in one direction. Let both dry for 30–60 seconds before proceeding.
- Apply paste to the CPU IHS center: place a pea-sized dot (0.3–0.5mL) directly in the center of the IHS. Don’t spread it.
- Mount the cooler immediately: don’t let the paste sit exposed for more than 15–20 minutes. It begins to oxidize on the surface and thermal performance drops.
- Apply even downward pressure: set the cooler straight down, aligned with its mounting holes. Do not slide it around. Sliding disrupts the spread and introduces air.
- Tighten mounting hardware in an X pattern: alternate diagonally across the screws or bolts in 3–4 passes until hand-tight. Never crank one side down fully before the opposite side. Uneven pressure tilts the cold plate and creates hot spots.
- Boot and verify temperatures: check with HWMonitor or HWiNFO64. Idle temps should sit 10–20°C above ambient for most cooler/CPU combinations. Load temps depend heavily on TDP (see platform section below).
- 40°C = 104°F (typical idle, well-cooled system)
- 50°C = 122°F (idle, warmer ambient or modest cooler)
- 65°C = 149°F (light gaming / sustained light load)
- 75°C = 167°F (normal gaming load)
- 85°C = 185°F (heavy all-core load, acceptable for most CPUs)
- 90°C = 194°F (approaching thermal limit for most consumer CPUs)
- 100°C = 212°F (thermal throttle territory; investigate immediately)
Formula: °F = (°C × 1.8) + 32.
Platform-Specific Thermal Paste Tips
AMD AM5 (Ryzen 7000 / 9000 Series)
The AM5 IHS is larger than AM4 was, making a center dot slightly less ideal for full surface coverage. An X pattern or thin spread does a better job reaching all corners on high-TDP parts. The Ryzen 9 9950X has a 170W TDP, so prioritize paste with thermal conductivity at or above 8 W/m·K. The 9900X sits at 120W TDP and is less demanding on paste selection.
The Ryzen 9 9800X3D is a special case. The 3D V-Cache stack creates a raised structure under the IHS, making surface contact uneven if a spreader is used. Center dot only on this CPU. Don’t use a stencil or manual spread. Expected temps with good paste and a quality 280mm or 360mm AIO: idle around 40–50°C, gaming load around 70–85°C.
AM5 uses LGA on the socket side (pins on the motherboard, not the CPU), so overflow onto the CPU itself isn’t a pin-damage risk. Still keep overflow minimal. It’s messy and difficult to fully clean from socket surroundings.
Intel LGA1700 / LGA1851 (12th–15th Gen / Arrow Lake)
Intel’s rectangular IHS is noticeably wider than it is tall. A center dot leaves the long-edge corners thin after spread. X pattern or thin spread is the better call here, especially on the i9 tier.
The Core i9-14900K and i9-13900K can hit 253W PL2 under sustained all-core loads. At those power levels, paste quality matters more and standard pastes approach their limits faster. High-conductivity pastes (8 W/m·K or higher) are worth the extra cost on these chips.
Arrow Lake (Core Ultra 200 series, including the Core Ultra 9 285K) runs at significantly lower TDP targets and doesn’t produce the same thermal extremes as Raptor Lake i9 parts. Standard application methods apply; aim for under 65°C sustained all-core with a 240mm or larger AIO. Target under 75°C under short peak bursts.
Laptops
Most laptop CPUs don’t have an IHS. The die is exposed, which means a grain-of-rice dot only. The die area is small and paste spreads quickly under minimal pressure. Too much and it squeezes onto the motherboard. Clean the copper heat pipe contact surface carefully; old paste bakes onto copper and takes more IPA passes to remove fully. This is a more involved process than desktop repasting, and the cleanup standard is higher.
GPUs
Modern GPUs use a combination of thermal pads on VRMs and VRAM, plus paste on the GPU die itself. Replacing GPU thermal paste is a repasting project that involves disassembling the GPU shroud. Same surface prep applies: IPA cleaning on the die and heatsink contact point, center dot or thin spread on the GPU die. Do not apply paste where thermal pads belong. Thermal pads and thermal paste are not interchangeable.
The Biggest Thermal Paste Mistakes (And How to Avoid Them)
- Using too much paste: the excess can’t improve conductivity and may trap air bubbles in a thick layer. Adds roughly 2–5°C compared to the correct amount. Messy to clean.
- Spreading paste with your finger: skin oils contaminate the interface and degrade thermal transfer. Use a plastic spreader if you’re spreading at all.
- Not cleaning old paste off first: dried, hardened TIM acts as an insulator. Leaving it in place and applying fresh paste on top can add 5–10°C over a clean application.
- Sliding the cooler during mounting: this disrupts the spread pattern and introduces air pockets. Always set straight down.
- Uneven screw tightening: tightening one corner fully before the others tilts the cold plate. One side of the CPU runs hot, the other runs cold. Always tighten diagonally in multiple passes.
- Using IPA below 90%: the extra water content doesn’t fully evaporate, leaving residue on the IHS that degrades contact. 90–99% IPA only.
- Letting paste sit before mounting: paste begins oxidizing within 15–20 minutes of air exposure. Apply and mount immediately.
- Re-using old paste after cooler removal: once a cooler comes off, the spread pattern is ruined. Always apply a fresh dot. Every time. No exceptions.
Not every mistake has the same penalty. Leaving old paste on the surface is the worst offender at 5–10°C. Uneven tightening is second. Using too much paste is more common but less damaging. Prioritize surface prep and even mounting pressure above everything else.
When to Replace Thermal Paste
Signs Your Thermal Paste Has Degraded
Paste doesn’t fail overnight. It dries out gradually over years of heating and cooling cycles. Signs it’s time to replace:
- Temps have risen 5–10°C from your baseline: if you recorded temps at build time and they’ve crept up significantly, paste degradation is a likely cause
- Paste appears dry, cracked, or powdery: visible when the cooler is removed; healthy paste is still viscous
- Thermal throttling under familiar loads: if your CPU is suddenly throttling during tasks it handled fine before, paste degradation combined with higher ambient temps is a common culprit
- More than 3–5 years since last application: varies by paste chemistry, but this is a reasonable general schedule
For a full breakdown of what normal and abnormal CPU temperature ranges look like before and after repasting, our guide on what constitutes a good CPU temperature covers the numbers by use case.
Replacement Schedule by Paste Type
| Paste Type | Examples | Typical Lifespan | Notes |
|---|---|---|---|
| Silicone-based | Stock pre-applied TIM, budget compounds | 2–4 years | Dries out fastest; adequate for stock cooling scenarios |
| Metal oxide / ceramic | Noctua NT-H1, Thermal Grizzly Kryonaut | 3–5 years | Most common enthusiast choice; good balance of performance and longevity |
| Carbon-based | Arctic MX-6, Thermal Grizzly Kryonaut Extreme | 4–6 years | Higher conductivity ceiling; longer initial curing period before peak performance |
| Liquid metal | Thermal Grizzly Conductonaut | 5–7 years | Electrically conductive; can damage non-nickel-plated surfaces; advanced users only |
Thermal Grizzly Kryonaut is one of the most tested pastes in the enthusiast space. If you want a deeper look at how it performs in practice, our Thermal Grizzly Kryonaut review covers real-world temperatures and application characteristics. Liquid metal sits in its own category. Excellent performance and longevity, but electrically conductive, which means a spill onto a motherboard or GPU PCB is a real risk. It also reacts with bare aluminum. Leave it alone unless you know exactly what you’re working with and have nickel-plated surfaces confirmed.
You can also find a detailed replacement interval breakdown by paste chemistry and use case in our guide on how often to replace thermal paste.
Frequently Asked Questions
Can I apply thermal paste myself?
Yes, without any special skills or tools. The center dot method requires nothing more than the paste itself, some IPA, and a lint-free cloth. Standard thermal paste isn’t electrically conductive, so minor overflow onto the IHS surround won’t damage anything. It’s one of the most forgiving steps in a PC build, and the stakes of doing it wrong are a few extra degrees at load, not a dead CPU.
What is a common mistake when applying thermal paste?
The two most common mistakes are using too much paste and skipping the cleaning step before reapplication. Too much paste adds roughly 2–5°C without any benefit. But leaving old, dried TIM on the surface and applying fresh paste on top is worse, adding 5–10°C because the degraded layer acts as an insulator between the new paste and the IHS.
How often should you reapply thermal paste?
Every 3–5 years under typical desktop use, depending on paste type. Any time a cooler is removed for any reason, fresh paste is required regardless of how recently it was last applied. Systems under constant heavy load, like home servers or always-on workstations, may benefit from checking paste condition annually after the 3-year mark.
Does thermal paste brand really matter?
Within a range, yes. The difference between a quality budget paste and a premium one is typically 2–5°C. But the difference between applying any paste correctly versus incorrectly is 5–15°C. Surface prep and even mounting pressure matter far more than brand. Buy a reputable paste (Noctua NT-H1, Thermal Grizzly Kryonaut, Arctic MX-6 are all solid), apply it right, and you’ll get better results than someone using a premium paste sloppily.
Is pre-applied thermal paste on stock coolers good enough?
Adequate for running within the CPU’s rated TDP at stock settings. Not optimal. Aftermarket paste on a stock cooler consistently saves 3–7°C at load in real-world comparisons. If you’re overclocking, running a high-TDP chip, or just want the headroom, remove the pre-applied TIM and apply fresh paste. If you’re upgrading to an aftermarket cooler, always strip the cooler’s pre-applied TIM too and start clean regardless of what the instructions say.
The Bottom Line
Three things determine whether your CPU runs cool: surface prep, correct paste amount, and even cooler mounting pressure. Get those right and the specific application method is secondary. A correctly applied center dot will outperform a badly applied stencil job every time.
Clean both surfaces with 90%+ IPA. Apply a pea-sized amount to the center of the IHS. Mount the cooler straight down, tighten diagonally, verify temps with HWMonitor or HWiNFO64 after boot. That’s it. If you’re on a high-TDP platform like the Ryzen 9 9950X, Core i9-14900K, or Core Ultra 9 285K, bump up to a high-conductivity paste and confirm your cooler is rated for the wattage. Everything else is optimization around those fundamentals. Check your temps, write them down at build time, and revisit in 3–5 years to decide if a repaste makes sense.

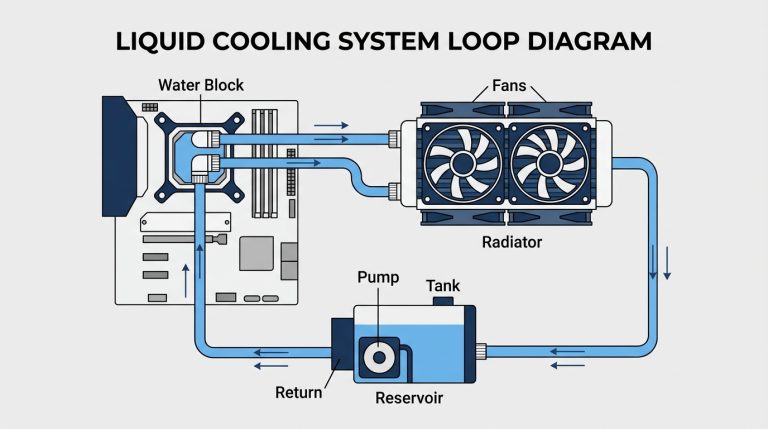
Alex has been building and tweaking custom PCs for over 12 years. From budget builds to full custom water loops, he’s assembled more than 50 systems and helped hundreds of builders troubleshoot their rigs. When he’s not benchmarking the latest hardware, you’ll find him optimizing airflow setups or stress-testing overclocks.