How Many Case Fans Do You Need? The Complete Guide
Most mid-tower PC builds need 2–3 case fans at minimum, typically two intake fans at the front and one exhaust fan at the rear, with the exact number scaling based on case size, total system TDP, and cooling method.
Last updated: May 2026
Table of Contents
- The Minimum Number of Case Fans Every PC Needs
- The Absolute Baseline: 2 Fans
- The Recommended Starting Point: 3 Fans
- Positive, Neutral, and Negative Pressure: Quick Definitions
- How Many Case Fans Do You Need by Case Size?
- Small Form Factor Cases (Mini-ITX / SFF)
- Micro-ATX Mid-Tower Cases
- Standard Mid-Tower Cases (ATX)
- Full-Tower Cases (E-ATX / XL-ATX)
- How Many Case Fans Do You Need for Gaming PCs?
- Budget Gaming Build (Under $600)
- Mid-Range Gaming Build ($600–$1,200)
- High-End Gaming Build ($1,200–$2,000+)
- Enthusiast and Workstation Builds (Threadripper, HEDT, Dual GPU)
- Air Cooling vs. Liquid Cooling: Does It Change Your Fan Count?
- Builds with Air CPU Coolers
- Builds with AIO Liquid Coolers (240mm / 280mm / 360mm)
- Custom Water Cooling Loops
- The Fan Math Framework: Calculate Your Exact Fan Need
- Fan Performance Tiers: Getting More From Fewer Fans
- Budget Fans (Under $10 per fan)
- Mid-Tier Fans ($10–$25 per fan)
- Premium Fans ($25–$50+ per fan)
- Top Fans, Bottom Fans, and Side Fans: Do You Actually Need Them?
- Top Fans
- Bottom Fans (Intake)
- Side Panel Fans
- Common Case Fan Mistakes to Avoid
- Frequently Asked Questions About PC Case Fans
- Is 2 case fans enough?
- Is it okay to have 6 intake fans and 1 exhaust?
- How many fans should be in a case?
- How many case fans do I need for a gaming PC?
- Do more case fans always mean lower temperatures?
- Final Thoughts
72°C on your CPU under load with two case fans. 89°C with zero airflow strategy and a beefy GPU stuffed in a poorly ventilated case. That 17-degree gap is the difference between a stable, long-lasting system and one that thermal throttles mid-session and degrades over time. Asking “how many case fans do I need?” is one of the smartest questions you can ask before finalizing a build, because fans are the cheapest thermal insurance you can buy.
The honest answer is: it depends. But that’s not useful on its own. So here’s what this guide actually gives you: specific fan counts by case size, build tier, and cooling method, a simple fan math framework to calculate your own number, and a clear breakdown of when more fans stop helping. Whether you’re figuring out how many PC case fans you need for a budget office box or a $2,000 gaming rig, you’ll have a concrete answer by the end.

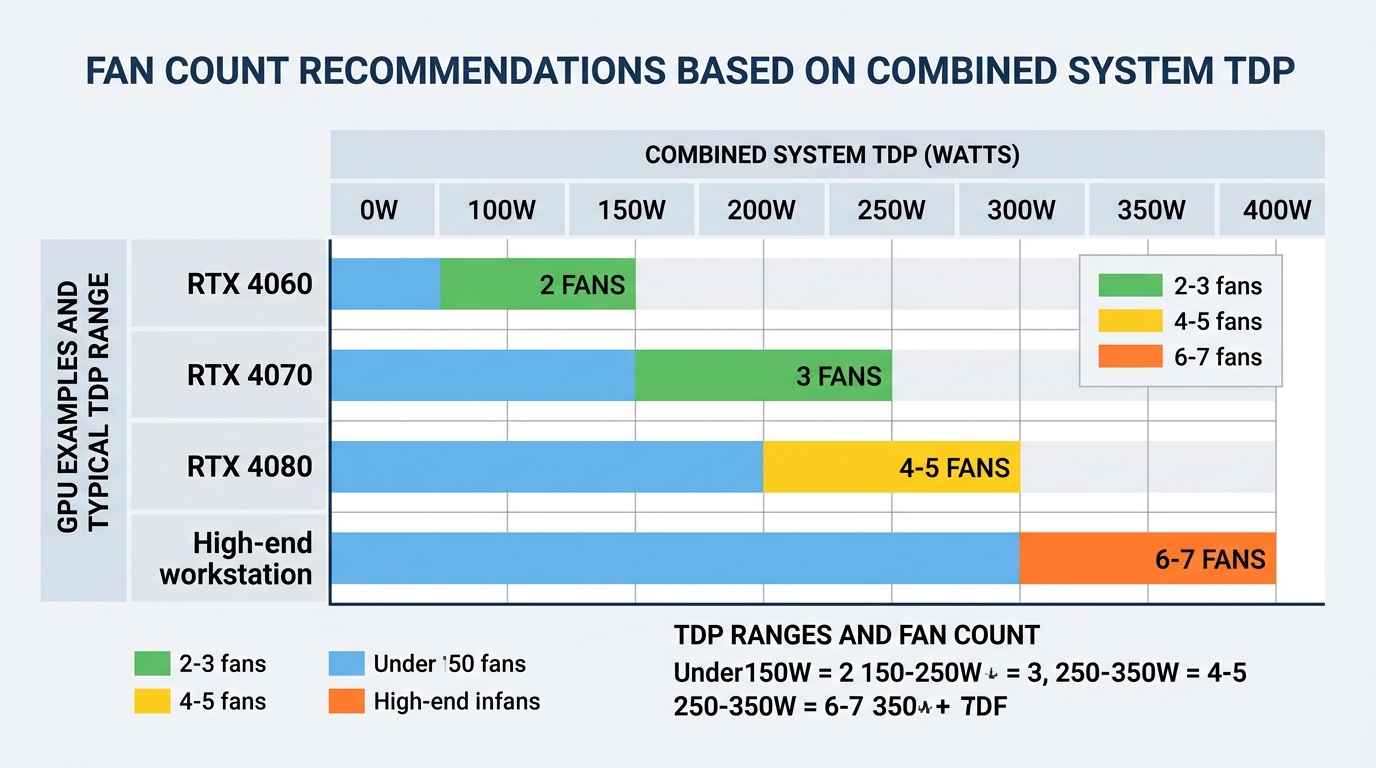
- 🟢 2 fans (1 in, 1 out): Office PC, budget build, combined TDP under 150W
- 🟢 3 fans (2 in, 1 out): Entry to mid-range gaming, RTX 4060 class, ideal starting point
- 🟢 4–5 fans (3 in, 2 out): High-end gaming ATX builds, RTX 4070–4080 class
- 🟡 6–7 fans: Enthusiast builds, full towers, high-TDP workstations
- 🔴 All exhaust, no intake: Negative pressure, pulls dust through unfiltered gaps, not recommended
- 🔴 All intake, no exhaust: Hot air has no structured exit path, avoid this too
The Minimum Number of Case Fans Every PC Needs
The Absolute Baseline: 2 Fans
One intake fan at the front, one exhaust fan at the rear. That’s the minimum functional airflow loop for any PC. This configuration works for budget office builds, light browsing machines, and systems running low-TDP CPUs (65W or under) with no discrete GPU. It’s not glamorous, but it moves air in a defined direction and prevents heat stratification inside the case.
What happens with just one fan? Dead zones. Hot air pockets that have nowhere to go, building up around your RAM, VRMs, and storage. A single intake fan with no exhaust creates positive pressure but no exit path. A single exhaust fan with no intake creates negative pressure and pulls air (plus dust) through every unfiltered gap in your case. Neither is good. Two fans, one of each, is the real floor.
The Recommended Starting Point: 3 Fans
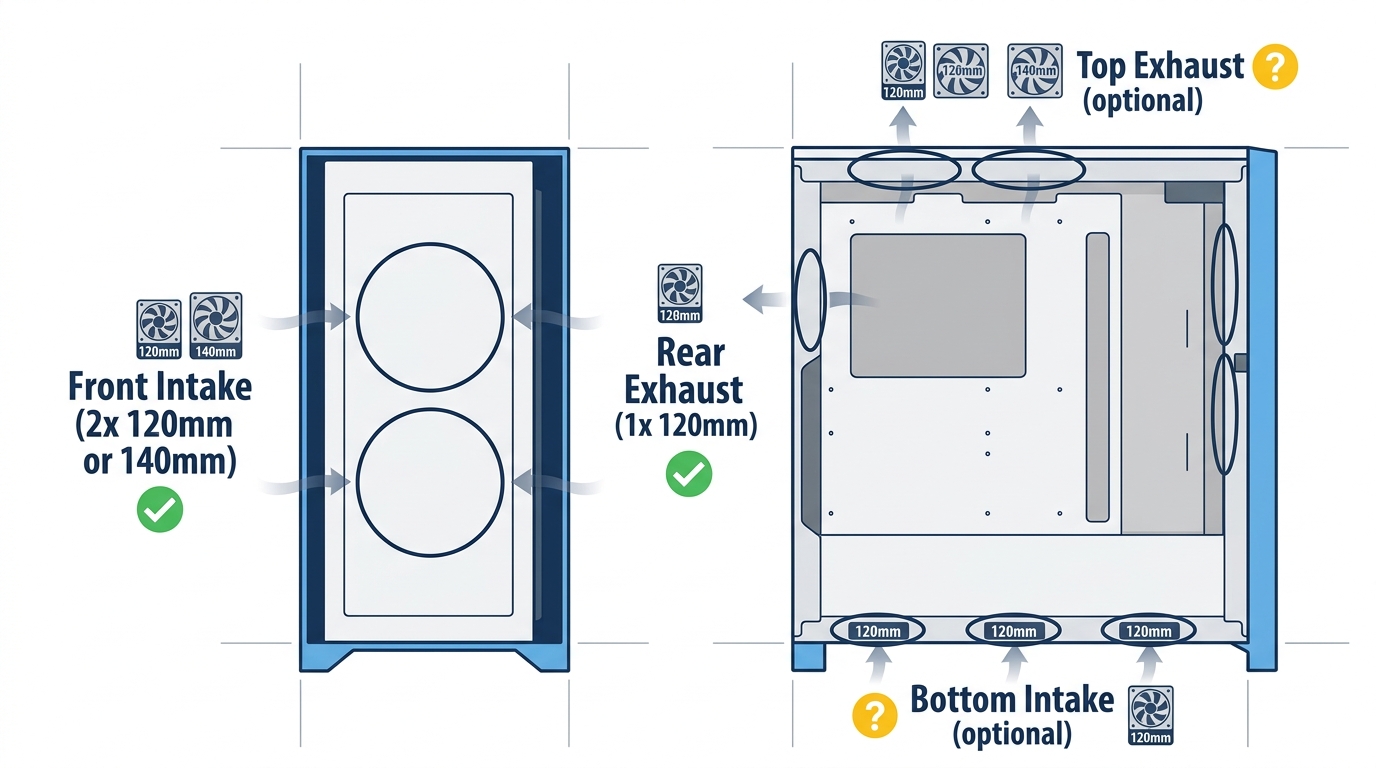
Two intake fans at the front plus one exhaust fan at the rear. This is the configuration most PC builders land on for mainstream gaming builds, and it’s the right call. Two front intakes outpace one rear exhaust, which creates positive pressure inside the case. Positive pressure means filtered air comes in faster than it leaks out through unfiltered gaps, so dust takes the path of least resistance through your filters rather than through seams and PCIe slot gaps.
This setup handles mid-range gaming builds comfortably. Systems running an RTX 4060 (115W TDP) or an RX 7600 (165W TDP) with a mainstream CPU stay well within safe thermal ranges with three properly placed fans.
Positive, Neutral, and Negative Pressure: Quick Definitions
| Pressure Type | Intake Fans | Exhaust Fans | Dust Risk | Recommended? |
|---|---|---|---|---|
| Positive | More | Fewer | Low (filtered entry) | ✅ Yes |
| Neutral | Equal | Equal | Medium | ✅ Acceptable |
| Negative | Fewer | More | High (unfiltered gaps) | ❌ Not Recommended |
One common question: is it okay to have six intake fans and one exhaust? Technically yes, and positive pressure is maintained. But the returns drop off sharply beyond a 3:1 intake-to-exhaust ratio, and a single exhaust fan can become a bottleneck for hot air evacuation. A 3:2 or 4:2 ratio is more balanced and equally effective in practice.
How Many Case Fans Do You Need by Case Size?
Small Form Factor Cases (Mini-ITX / SFF)
SFF cases like the Cooler Master NR200 or NZXT H1 typically offer only 1–2 fan mounting slots total. You don’t have the luxury of stacking fans here. The recommended configuration is one intake plus one exhaust, or one high-quality intake with passive exhaust through vented side or rear panels.
In SFF builds, fan quality matters far more than fan count. A high-static-pressure fan like the Noctua NF-A12x25 (rated at 2.34 mmH₂O) moves significantly more air through tight heatsink fins than a budget fan at the same RPM. SFF cases run hotter by design because there’s less internal volume for heat to dissipate. Buy the best fan you can afford rather than trying to cram in more of them.
Micro-ATX Mid-Tower Cases
Most Micro-ATX cases offer 3–5 fan mounting positions. The recommended setup is two intake fans at the front and one exhaust fan at the rear, for a total of three fans. That covers CPUs up to 125W TDP and GPUs up to roughly 200W, think RTX 4070 or RX 7700 XT class hardware.
Adding a top exhaust fan to a Micro-ATX build is genuinely worthwhile. In my experience building in cases like this, a top exhaust fan noticeably reduces CPU cooler ambient temps because hot air that would otherwise linger near the top of the case gets actively pulled out. It’s worth the extra slot if your case has it, just make sure you know which fan header to plug it into so the motherboard can actually control its curve.
Standard Mid-Tower Cases (ATX)
This is where most builds live. ATX mid-towers typically offer 4–7 fan mounting positions across the front, rear, and top panels. The recommended configuration is three intake fans at the front and one to two exhaust fans at the rear and top, for a total of four to five fans.
Is four fans enough for a gaming PC in a standard ATX case? Yes, for 90%+ of mid-range and high-end gaming builds. A well-configured 4-fan setup (3 front intake, 1 rear exhaust) outperforms a poorly arranged 6-fan setup every time. Placement and direction matter more than raw count.
Full-Tower Cases (E-ATX / XL-ATX)
Full-tower cases support anywhere from 7 to 12+ fan mounting positions. You don’t need to fill every slot, but high-TDP builds benefit from the extra flexibility. The recommended range is five to seven fans total, typically three to four intakes and two to three exhausts. This is appropriate for high-TDP workstations, dual-GPU setups, and custom water cooling configurations with multiple radiators. Seven fans in a full tower? Excellent. Not overkill at all for the hardware that typically lives in those cases.
How Many Case Fans Do You Need for Gaming PCs?
Budget Gaming Build (Under $600)
Typical components at this tier: a Core i3 or Ryzen 5 paired with something in the GTX 1660 Super or RX 6600 range, with GPU TDP at or below 135W. Two to three fans is all you need here. Two fans (1 intake, 1 exhaust) is genuinely sufficient. Three fans gives you positive pressure and a bit of headroom. Don’t overcomplicate it. Spend the extra $20 on better fans, not more mediocre ones.
Mid-Range Gaming Build ($600–$1,200)
At this tier you’re typically running a Core i5 or Ryzen 7 alongside an RTX 4060 Ti or RX 7700 XT (160–245W GPU TDP range). Three to four fans is the right target. Two to three front intakes and one to two exhausts keeps temperatures in check. Adding a top exhaust fan at this tier meaningfully reduces CPU temps, tested configurations show a 3–7°C reduction compared to rear-only exhaust with equivalent hardware. Worth the slot and the $15–20 it costs to fill it.
High-End Gaming Build ($1,200–$2,000+)
RTX 4080 or RX 7900 XTX territory, with GPU TDP ranging from 250W to 355W. Your CPU is probably a Core i7 or i9, or a Ryzen 7 or 9, all of which generate substantial heat under sustained load. Four to six fans is the recommended range here. Three front intakes, one rear exhaust, and one to two top exhausts is a proven configuration. You can also pair an AIO cooler with two to three dedicated case fans for an extremely clean thermal result. At this tier, fan quality becomes as important as fan count. Check the safe GPU temperature ranges your card is targeting, if you’re consistently hitting 85°C+ under load, your case airflow is the first thing to audit.
Enthusiast and Workstation Builds (Threadripper, HEDT, Dual GPU)
A Core i9-14900K pulls 253W at PL2. Threadripper PRO configurations go well beyond that. At this level, six to nine fans is not excessive, it’s appropriate. Custom water cooling loops with multiple radiators add fan requirements on top of dedicated case fans. Rad fans count toward your total, but you may still need additional fans for case airflow between the radiator positions. If you’re building at this tier, you already know your case’s mounting map. Fill the important slots first: front intake, rear exhaust, top exhaust. Then assess temps before adding more.
| Build Tier | Typical GPU TDP | Minimum Fans | Recommended Fans | Notes |
|---|---|---|---|---|
| Budget (under $600) | ≤135W | 2 | 2–3 | 2 fans fully sufficient |
| Mid-Range ($600–$1,200) | 160–245W | 3 | 3–4 | Top exhaust fan helps |
| High-End ($1,200–$2,000+) | 200–355W | 4 | 4–6 | Fan quality becomes critical |
| Enthusiast / Workstation | 300W+ | 5 | 6–9 | Custom loop likely |
Air Cooling vs. Liquid Cooling: Does It Change Your Fan Count?
Builds with Air CPU Coolers
Tower air coolers come with one or two fans already attached. Those aren’t case fans, they cool the heatsink directly and don’t move air across the rest of your case. With an air-cooled CPU, your front intake fans are doing double duty: feeding fresh air to the heatsink AND cooling the rest of the internal components. Don’t skimp here. Two to three front intake fans remains the recommendation regardless of how many fans your tower cooler includes. Signs your CPU is running too hot despite a beefy tower cooler are usually a case airflow problem, not a cooler problem. If you’re seeing sustained high temps, the common causes of CPU overheating almost always include inadequate case airflow as a primary culprit.
Builds with AIO Liquid Coolers (240mm / 280mm / 360mm)
This is where fan counting gets interesting. AIO radiator fans mount to the case and move air through the case, so they absolutely count toward your total fan number. A 360mm AIO has three 120mm fans. Mount that radiator at the top as exhaust and your exhaust side is fully handled. All you need to add is two to three front intake fans.
That puts a typical AIO build at five total fans: three radiator fans (top exhaust) plus two front intakes. That’s an excellent configuration. If you’re considering liquid cooling, our complete PC water cooling guide for beginners covers how to plan your radiator placement and fan orientation before you buy anything.
Custom Water Cooling Loops
Custom loops multiply fan requirements fast. A 240mm front radiator plus a 360mm top radiator means five radiator fans before you’ve added a single dedicated case fan. The intake vs. exhaust orientation of each radiator matters too, a front radiator configured as intake pulls fresh air in through the rad, while a top radiator configured as exhaust pulls hot case air out and through the rad. Most custom loop builders opt for front rad intake and top rad exhaust for a clean front-to-rear airflow path. For a deeper look at GPU-side liquid cooling options, the AIO vs. custom loop GPU cooling guide covers the tradeoffs in detail.
The Fan Math Framework: Calculate Your Exact Fan Need
No competitor gives you this. Here’s a simple 3-variable approach to figure out your fan target before you buy anything.
- Variable A: How many fan mounting slots does your case actually have? Check the spec sheet, not the marketing copy.
- Variable B: What’s your total system TDP? Add your CPU’s rated TDP to your GPU’s rated TDP in watts.
- Variable C: Are you using an AIO? Subtract your radiator fan count from the total fans needed, they’re already doing work.
Apply this decision matrix to Variable B:
- Total TDP under 200W: 2–3 fans minimum
- Total TDP 200–400W: 3–5 fans minimum
- Total TDP 400–600W: 5–7 fans minimum
- Total TDP above 600W: 7+ fans or custom loop required
Worked example: Core i7-13700K (rated at 125W TDP) paired with an RTX 4080 (320W TDP) = 445W total system TDP. That puts you in the 5–7 fan range. Running that in a standard ATX mid-tower with a 360mm AIO (3 rad fans at the top)? Subtract 3 for the rad fans. You need 2–4 additional case fans, most of them front intakes. Three front intakes plus the 360mm AIO rad at the top gets you to exactly 6 total fans. Solid setup for that hardware.
Fan Performance Tiers: Getting More From Fewer Fans

More fans isn’t always the answer. Not great, actually, if the fans themselves are underperforming. Fan quality has a direct relationship with how many you need.
Budget Fans (Under $10 per fan)
Typical specs land around 50–60 CFM airflow, 1.0–1.5 mmH₂O static pressure, and 28–35 dB noise levels. They work. They move air. But their lower individual airflow means you need more of them to hit the same thermal result as fewer, better fans. Fine for basic builds where budget is the priority.
Mid-Tier Fans ($10–$25 per fan)
This is the sweet spot for most builds. Expect 60–75 CFM, 1.8–2.3 mmH₂O static pressure, and 22–28 dB, noticeably quieter and meaningfully more capable than budget options. Three mid-tier fans will outperform five budget fans in most standard configurations. Better static pressure means better airflow through heatsink fins and restrictive front mesh panels.
Premium Fans ($25–$50+ per fan)
The Noctua NF-A14, for example, is rated at 82.5 CFM, 2.08 mmH₂O static pressure, and 24.6 dB, impressive balance of airflow and acoustics. The be quiet! Silent Wings 4 Pro is similarly capable. At this tier, a two-fan build can outperform a four-fan build using budget fans. Buy fewer, better fans before stacking more mediocre ones. The math consistently favors quality over quantity once you’re past the three-fan baseline.
| Tier | Price per Fan | Avg CFM | Static Pressure (mmH₂O) | Noise (dB) | Best For |
|---|---|---|---|---|---|
| Budget | Under $10 | 50–60 | 1.0–1.5 | 28–35 | Basic builds, quantity focus |
| Mid-Range | $10–$25 | 60–75 | 1.8–2.3 | 22–28 | Most gaming builds |
| Premium | $25–$50+ | 75–90 | 2.0–2.8 | 18–25 | High-end / noise-sensitive |
Top Fans, Bottom Fans, and Side Fans: Do You Actually Need Them?
Top Fans
Hot air rises. That’s basic physics. A top exhaust fan works with convection rather than against it, actively pulling the hottest air in your case (which naturally accumulates near the top) directly out of the chassis. Tested configurations consistently show a 3–8°C reduction in CPU area temps when a top exhaust fan is added to a rear-exhaust-only setup. If your case has top fan mounts, use one. High ROI for a low cost.
Bottom Fans (Intake)
Less common, and for good reason. Bottom intake fans require a mesh bottom panel, at least 25mm of clearance from your desk surface, and a case layout where the GPU would benefit from cooler air from below. Useful in specific scenarios, dense GPU-heavy builds where the front panel is restrictive and GPU junction temps are running high. Optional. Not a first move.
Side Panel Fans
Rare now. Tempered glass panels dominate the market, and glass doesn’t have fan mounts. Side panel fans were useful in older cases to dump cold air directly onto a GPU, but that use case is mostly solved by open mesh front panels and strong front intakes today. If your case has a mesh side panel with fan mounts and your GPU is running hot, it’s worth considering. Otherwise, skip it.
Common Case Fan Mistakes to Avoid
- ❌ All exhaust, no intake: Negative pressure drags air through every unfiltered seam and gap in your case. Dust infiltrates components that have no filter protection. Avoid this entirely.
- ❌ All intake, no exhaust: Air comes in but has no structured path out. Hot air pools near your CPU and GPU and lingers. Positive pressure alone isn’t enough, you need an exit strategy.
- ❌ Mixing 120mm and 140mm fans without planning: Mismatched CFM outputs create airflow dead zones. If you’re mixing sizes, make sure your higher-CFM fans are on intake and the lower-CFM fans are supplemental.
- ❌ Skipping dust filter maintenance: Dust accumulation on heatsinks reduces cooling efficiency by 10–20% over six months without cleaning. That’s a significant thermal penalty for not spending five minutes with a can of compressed air.
- ❌ Mounting AIO radiator fans to recirculate internal air: Your AIO rad should either pull fresh air in from outside the case or push hot internal air out through the top or rear. Recirculating already-warm case air through the rad defeats the point entirely.
- ❌ Buying more fans before checking temperatures: Run your build, stress test it, check temps. Then decide if more fans are actually needed. Don’t add fans speculatively.
Frequently Asked Questions About PC Case Fans
Is 2 case fans enough?
Yes, for the right build. Budget PCs, office machines, and any system with a combined CPU and GPU TDP under 200W run fine with one intake and one exhaust fan. For dedicated gaming builds with a discrete GPU, three fans is the recommended minimum. Two fans in a gaming build isn’t a disaster, it’s just leaving thermal headroom on the table for very little cost savings.
Is it okay to have 6 intake fans and 1 exhaust?
Technically yes, and strong positive pressure is maintained. But diminishing returns kick in hard beyond a 3:1 intake-to-exhaust ratio. The bigger concern is that a single exhaust fan becomes a bottleneck, six fans worth of air coming in has one small exit. A 4:2 or 3:2 ratio achieves the same dust-management benefit of positive pressure while giving hot air a more balanced exit path. It’s the smarter configuration.
How many fans should be in a case?
For a standard ATX mid-tower gaming build, 3–5 fans is the optimal range. Three fans (2 intake, 1 exhaust) is the functional minimum for gaming. Five fans (3 intake, 2 exhaust) is the peak efficiency point for most mid-to-high-end systems. Beyond seven fans in a standard ATX case, the incremental temperature gains per additional fan drop to less than 1°C in most configurations. Fill the critical slots first, then stop and measure before adding more.
How many case fans do I need for a gaming PC?
For a mid-range gaming build running an RTX 4060 or RTX 4070 class GPU: 3–4 fans. For a high-end build with an RTX 4080 or RTX 4090: 4–6 fans. If you’re using an AIO cooler, count the radiator fans in your total, a 360mm AIO paired with 2 front intakes already gives you 5 fans. That’s a strong setup for virtually any gaming build. The question of how many PC case fans you need ultimately comes down to your specific hardware’s heat output, not a universal number.
Do more case fans always mean lower temperatures?
No. Fan placement, airflow direction, and individual fan quality all matter more than raw count beyond a certain baseline. Adding a sixth fan to a well-configured five-fan build with good front-to-rear airflow may reduce temps by under 1°C. The first three fans deliver the bulk of the thermal benefit. Each additional fan beyond that returns progressively less. Prioritize getting the front-to-rear airflow path right before filling every available slot.
Final Thoughts
There’s no magic number that works for every build, but there are clear best practices. Start with three fans for any gaming PC. Use the Fan Math Framework (CPU TDP + GPU TDP) to validate that number for your specific hardware. Prioritize quality over quantity, three good fans beat five cheap ones in most real-world configurations. Add a top exhaust fan if your case supports it. And if you’re running an AIO, count those radiator fans toward your total before buying anything extra.
If your temps are already good, stop adding fans. If your CPU is running above the safe temperature range under load, check your airflow direction before you buy more fans, often a misconfigured fan is doing more harm than an absent one. Build smart, measure your temps, and adjust from there.

Alex has been building and tweaking custom PCs for over 12 years. From budget builds to full custom water loops, he’s assembled more than 50 systems and helped hundreds of builders troubleshoot their rigs. When he’s not benchmarking the latest hardware, you’ll find him optimizing airflow setups or stress-testing overclocks.


