PC Water Cooling for Beginners: Everything You Need to Know
A liquid cooled computer is a PC that uses circulating liquid to transfer heat away from components like the CPU and GPU more efficiently than air cooling alone.
Last updated: May 2026
Table of Contents
- What Is a Liquid Cooled Computer?
- How Liquid Cooling Actually Works (The Physics, Simply Explained)
- Air Cooling vs. Liquid Cooling: The Core Difference
- Types of Liquid Cooling Systems, Which One Is Right for You?
- AIO (All-In-One) Liquid Coolers
- Custom / Open-Loop Liquid Cooling
- Comparison Table: AIO vs. Custom Loop
- Key Components of a Liquid Cooled Computer System
- Water Blocks
- Pumps and Reservoirs
- Radiators
- Tubing, Fittings, and Coolant
- How to Choose the Right Liquid Cooling Setup for Your Build
- Matching Cooling to Your CPU’s TDP
- Liquid Cooled Gaming Computer, Do You Actually Need It?
- Case Compatibility, The Step Most Beginners Skip
- Multi-GPU Liquid Cooling, 4 GPU and 7 GPU Configurations
- 4 GPU Liquid Cooled Computer Builds
- 7 GPU Liquid Cooled Computer Builds
- Extreme Cooling, Liquid Nitrogen Cooled Computers
- What Is Liquid Nitrogen PC Cooling?
- How Much Does a Liquid Cooled Computer Cost?
- Cost Breakdown by System Type
- Pre-Built vs. DIY Liquid Cooled Computer
- Is Liquid Cooling Hard to Maintain?
- AIO Maintenance (Almost Zero)
- Custom Loop Maintenance Schedule
- Common Problems and How to Avoid Them
- Pros and Cons of Liquid Cooling, The Honest Verdict
- Advantages
- Disadvantages
- FAQ, Liquid Cooled Computer Questions Answered
- Is a liquid cooled computer better than air cooled?
- Is it hard to maintain a liquid-cooled PC?
- Can water cooling damage my PC?
- What is the best liquid cooled computer for gaming?
- How long does a liquid cooled computer last?
- The Short Version
Most people think water cooling is just for overclockers and enthusiasts who want their rigs to look pretty. They’re wrong. A well-chosen liquid cooling setup delivers measurably lower temperatures, quieter operation, and real headroom for sustained performance, whether you’re running a mid-range gaming build or a beefy workstation pushing four GPUs under load. The question isn’t whether liquid cooling works. It’s whether it’s the right call for your specific build.
- 🟢 AIO (All-in-One): Beginner-friendly, low maintenance, $60–$250, CPU only
- 🟢 Custom Loop (CPU only): More performance, $300–$500, moderate complexity
- 🟡 Custom Loop (CPU + GPU): Best performance, $600–$1,500+, requires planning and skill
- 🟡 Multi-GPU Loop (4+ GPUs): Specialized builds, $1,500–$3,500 cooling cost alone
- 🔴 Liquid Nitrogen: World record overclocking only, not for daily use, ever
What Is a Liquid Cooled Computer?
How Liquid Cooling Actually Works (The Physics, Simply Explained)
Heat wants to move from hot things to cooler things. That’s it. The question is just how fast and how efficiently you move it. Air coolers rely on convection, fans push air over metal fins, and the hot air gets expelled from the case. Liquid cooling uses conduction first: a metal water block sits directly on the CPU or GPU die, and liquid flows through it, absorbing heat on contact.
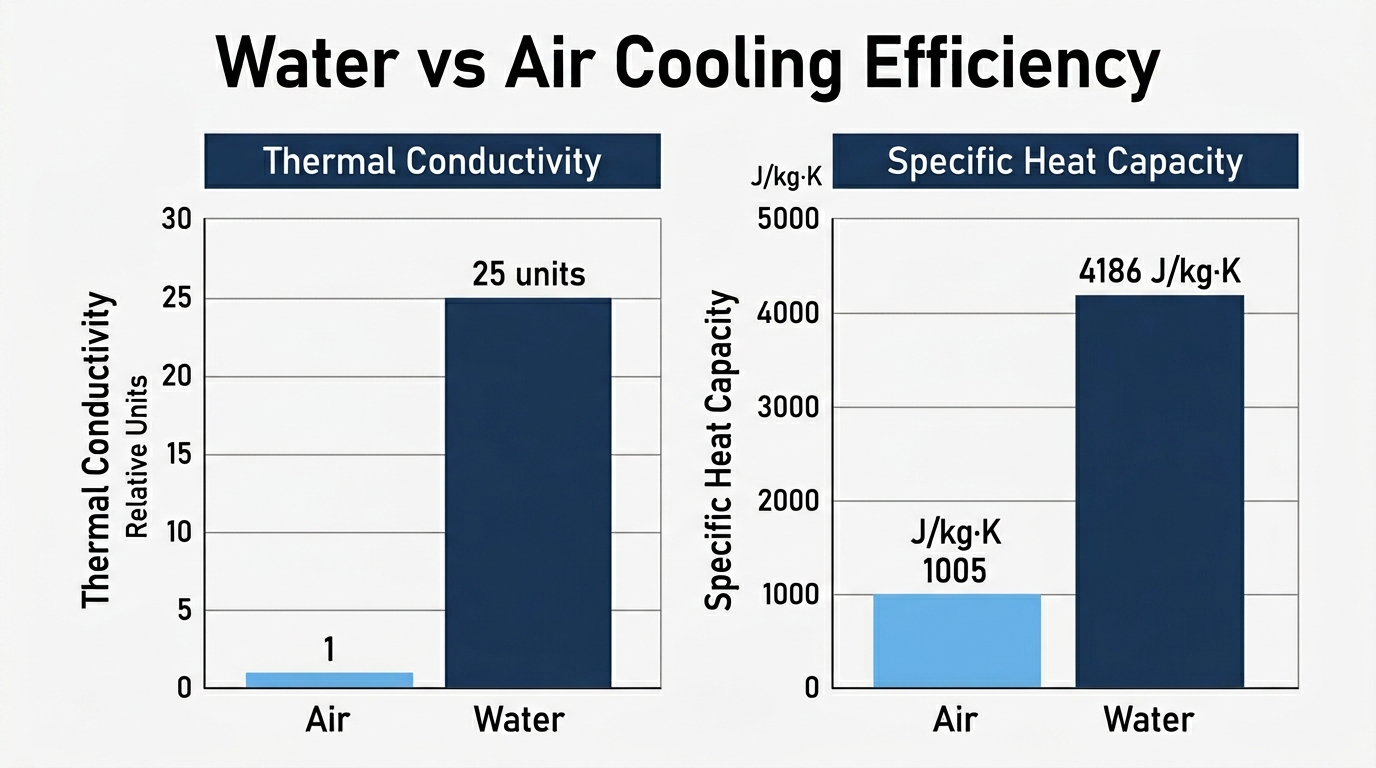
Water wins this contest easily. Liquid has roughly 25 times greater thermal conductivity than air. Water’s specific heat capacity is 4,186 J/kg·K, compared to air’s 1,005 J/kg·K, meaning water absorbs about four times more heat energy per unit of mass before its temperature rises. That’s why engines, nuclear reactors, and high-end gaming PCs all use liquid cooling when heat loads get serious.
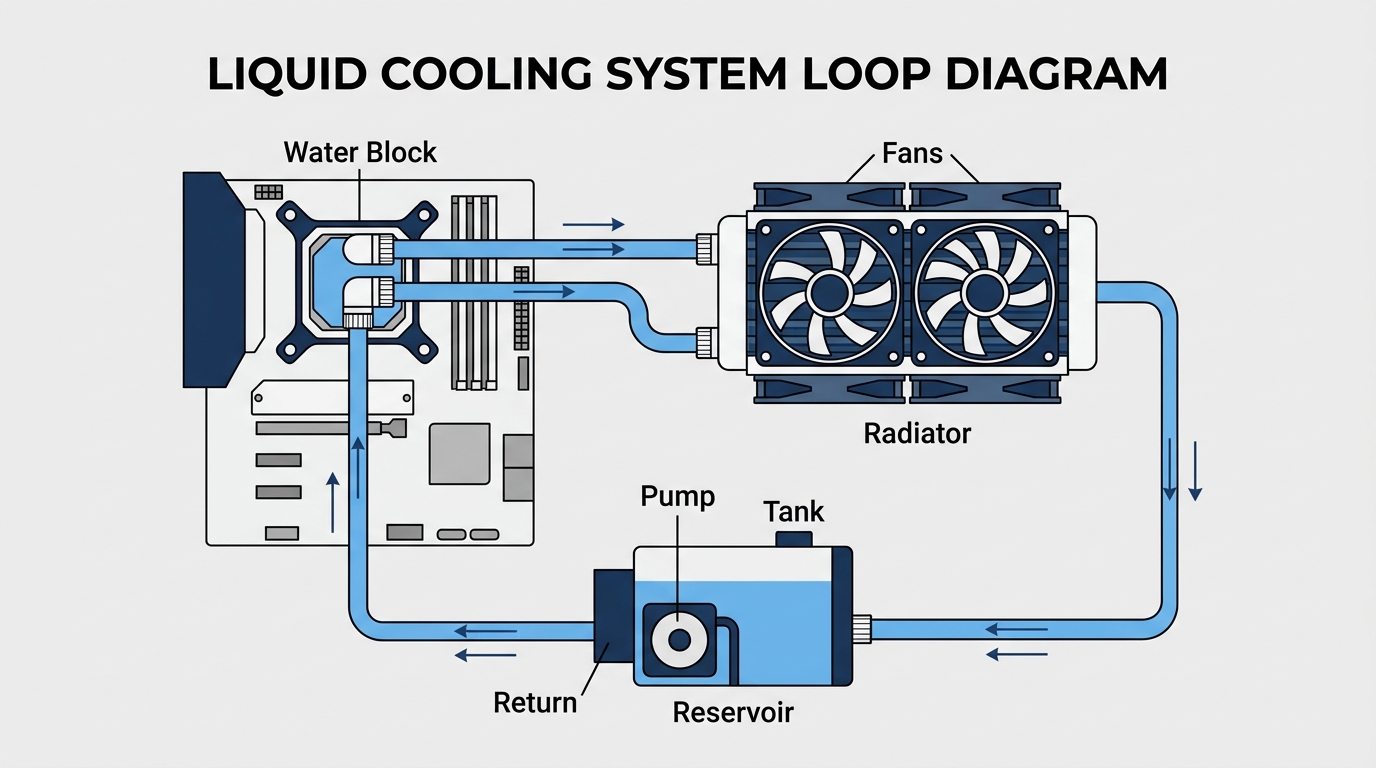
The basic loop goes like this: liquid absorbs heat at the CPU or GPU block, flows through tubing to a radiator (usually mounted to the case exterior), gets cooled by fans at the radiator, then cycles back through a reservoir and pump to repeat the process. Simple in concept. Effective in practice.
Air Cooling vs. Liquid Cooling: The Core Difference
Air coolers push hot air around inside your case. Liquid coolers relocate heat. That’s the key distinction. With air cooling, your heatsink dumps hot air into the case interior, and case fans then have to move all of that out. With liquid cooling, the radiator sits at a vent location and exhausts heat directly out of the case without heating the internal air first.
The numbers back this up. Based on Corsair’s published Hydro X benchmarks, a system running an NVIDIA RTX 3080 FE and AMD Ryzen 7 3700X hit 72°C GPU and 75°C CPU during Far Cry 5 gameplay with air cooling. The same system on a custom liquid loop dropped to 51°C GPU and 63°C CPU. That’s a 21°C GPU improvement and a 12°C CPU improvement. Noise levels dropped from 46 dBA to 40 dBA. Six decibels is audibly significant. Noticeably quieter.
Types of Liquid Cooling Systems, Which One Is Right for You?
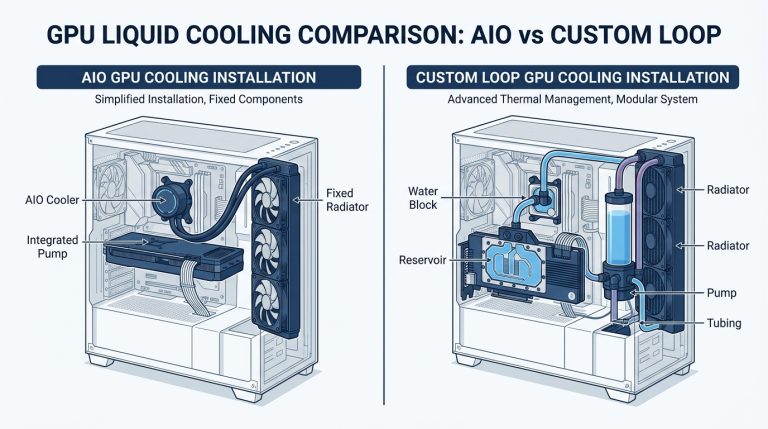
AIO (All-In-One) Liquid Coolers
An AIO is a closed, pre-filled liquid cooling loop in a single unit. The pump, water block, tubing, and radiator come assembled and ready to install. No mixing coolant, no planning loop routes, no bleeding air for hours. You mount the radiator, attach the block to your CPU, plug in the pump and fans, and you’re done. One to two hours, tops.
AIOs are the right call for most liquid cooled desktop computer builds. Here’s how radiator size maps to CPU thermal load:
- 120mm / 140mm: Entry-level. Single fan. Handles CPUs up to ~65W TDP like the Ryzen 5 7600 or Core i5-13400F. Fine for budget builds.
- 240mm / 280mm: The mainstream sweet spot. Two fans, handles up to ~125W TDP. Good for Ryzen 7 7700X, Core i7-13700K builds.
- 360mm / 420mm: High-performance tier. Three or more fans. Handles 170W+ TDP monsters like the Ryzen 9 7950X or Core i9-14900K.
Price range runs $60 to $250. The NZXT Kraken series (240mm around $90–$120, 360mm around $150) and Corsair iCUE H150i are popular picks. Arctic Liquid Freezer III consistently ranks at the top of thermal benchmarks for value. One thing to check before buying: your liquid cooled computer case needs clearance for the radiator at a top, front, or rear mounting location. Check your case specs first. Don’t assume.
Custom / Open-Loop Liquid Cooling
A custom loop is user-assembled from individual components: water blocks, a pump, a reservoir, radiators, tubing, fittings, and coolant. More parts. More decisions. More performance. And a significantly better-looking build when done right.
The biggest differentiator from an AIO: a custom loop can cool your CPU and GPU in the same circuit. That’s the whole point for a custom liquid cooled gaming computer. Your RTX 4090 or RX 7900 XTX runs hot under load, a full-cover GPU block handles heat that no AIO ever touches. For GPU-specific block recommendations and a deeper comparison of options for graphics cards, see our GPU liquid cooling guide.
Tubing options: soft tubing is flexible and beginner-friendly (common sizing: 3/8″ ID x 1/2″ OD). Hard line tubing (PETG is easiest to bend, acrylic is the most visual, copper is premium) takes more skill but looks exceptional inside a tempered glass case.
Entry cost for a basic custom loop: $300–$600. Full CPU and GPU coverage: $800–$2,000 or more. Worth it if you’re running a high-TDP system or plan to overclock.
Comparison Table: AIO vs. Custom Loop
| Feature | AIO Cooler | Custom Loop |
|---|---|---|
| Install Difficulty | Easy (1–2 hrs) | Hard (4–10+ hrs) |
| Cost (entry) | $60–$120 | $300–$600+ |
| Maintenance | Minimal | Flush every 12 months |
| GPU Cooling | No (CPU only) | Yes |
| Performance | Good | Excellent |
| Leak Risk | Very Low | Low–Moderate |
| Aesthetics | Moderate | Exceptional |
| Lifespan | 3–5 years | 5–10+ years (with refills) |
Key Components of a Liquid Cooled Computer System
Water Blocks
The water block is the part that sits on your component and pulls heat into the liquid. CPU blocks use a copper base plate for maximum thermal conductivity, usually with a nickel-plated finish to resist corrosion. GPU full-cover blocks are model-specific, a block made for an RTX 4090 Founders Edition won’t fit a 4090 from ASUS ROG. Check compatibility before buying. Seriously. Monoblock designs combine CPU block and VRM cooling in one unit, which is great for motherboards with exposed VRM heat loads. A useful feature on X670E and Z790 builds running overclocked configurations.
Pumps and Reservoirs
The pump keeps liquid moving. Look for 300–600 L/h flow rate for a single-loop liquid cooled computer system, that’s enough pressure and volume to keep temperatures stable through a full radiator circuit. Combo pump/reservoir units (called pump-res combos) simplify installation and reduce the number of fittings you need. Pump noise runs 15–25 dBA at low speed settings. Quiet enough that you won’t notice it over your fans.
Radiators
Radiators come in aluminum (cheaper) or copper (better conductivity). Here’s the thing about material matching: never combine aluminum radiators with copper water blocks in the same loop. Galvanic corrosion will slowly eat your components from the inside. Copper and brass throughout, or aluminum and aluminum. No mixing.
Thickness matters too. A 30mm slim radiator gives you standard performance. A 45–60mm thick radiator holds more fin surface area and handles higher heat loads. A useful rule of thumb: plan for 120mm of radiator surface per 100W of heat load. An overclocked Ryzen 9 7950X pulling 170W needs at minimum 240mm of radiator. More is always safer.
Tubing, Fittings, and Coolant
For soft tubing, the most common sizing is 3/8″ inner diameter by 1/2″ outer diameter. It’s flexible, easy to route, and forgiving for first-time builders. Hard tubing in PETG is the most beginner-accessible of the rigid options, it bends cleanly with a heat gun at around 150°C and holds its shape. Acrylic looks stunning but cracks more easily under stress. Copper hardline is the premium option. Beautiful. Also expensive and difficult to work with.
For coolant: premixed options are the easiest starting point. If you mix concentrate with distilled water, use a 1:10 ratio. Distilled water alone works with a biocide added. Never use tap water, the mineral content causes deposits. Opaque and UV-reactive coolants look great but can clog fittings and blocks over time. Clear coolant with a dye is the lower-maintenance option for daily-use systems.
How to Choose the Right Liquid Cooling Setup for Your Build
Matching Cooling to Your CPU’s TDP
This is the most direct way to pick your cooler tier. Match heat output to radiator surface, and you won’t go wrong.
| CPU TDP Range | Example CPUs | Recommended Cooling |
|---|---|---|
| Up to 65W | Core i5-13400F, Ryzen 5 7600 | 120–240mm AIO |
| 65W–125W | Core i7-13700K, Ryzen 7 7700X | 240–280mm AIO or entry loop |
| 125W–170W | Core i9-13900K, Ryzen 9 7900X | 360mm AIO or custom loop |
| 170W+ | Core i9-14900KS, Ryzen 9 7950X | 360–420mm AIO or custom |
| Extreme / OC | Delidded / heavily overclocked | Custom loop required |
For understanding what CPU temperatures are actually safe under these different cooler configurations, there are specific idle and load thresholds worth knowing before you commit to a cooling solution.
Liquid Cooled Gaming Computer, Do You Actually Need It?
Honest answer: it depends on your TDP and your noise tolerance. If you’re already seeing throttling or instability, our CPU overheating signs and fixes guide covers diagnostics before committing to a cooling solution. Gaming at stock settings on a Core i5 or Ryzen 5? A quality 240mm AIO at $70–$90 is more than adequate, and arguably better value than a premium air tower. Running a liquid cooled gaming computer with an RTX 4090 and a Core i9-14900KS at all-core boost? A custom loop starts to make real financial and thermal sense, you’re managing 450W from the GPU alone, plus 250W+ from the CPU under load.
Noise reduction alone is a valid reason to go liquid. Six decibels is a meaningful difference in a quiet room. If you work in silence and game without headphones, an AIO will make your rig noticeably quieter than a comparable air setup. Worth considering even on mid-range builds.
Case Compatibility, The Step Most Beginners Skip
Your liquid cooled computer case determines what radiator sizes you can actually use. Top-mount radiators are the most common configuration and give the cleanest hot air exhaust path. Front-mount radiators often support larger sizes (360mm or 420mm) and give the best performance. Rear-mount positions fit a single 120mm radiator only, enough for a very light AIO, nothing more.
For a 360mm top radiator, you need roughly 165mm of interior clearance between the top panel and your motherboard. Mid-tower ATX and full-tower ATX cases handle most liquid cooling configurations. Smaller form factors (mATX, ITX) get complicated fast, check manufacturer clearance specs before committing.
Multi-GPU Liquid Cooling, 4 GPU and 7 GPU Configurations
4 GPU Liquid Cooled Computer Builds
Four-GPU builds aren’t gaming rigs. They’re workstations for AI and machine learning training, deep learning inference, and (historically) cryptocurrency mining. The thermal math is brutal. Each RTX 4090 produces 450W TDP. Four of them together means 1,800W of heat load that needs to go somewhere.
A 4 GPU liquid cooled computer requires serious loop planning. At minimum: a 480mm radiator plus a 360mm radiator in a dedicated GPU loop, with full-cover water blocks on every card. Many builders run two separate loops, one for the CPU and one for all four GPUs, to keep flow rates manageable and temperatures stable. The cooling hardware alone on a four-GPU build costs $1,500–$3,500. The cases for these builds are typically full-tower or open-air frames, since you need radiator mounting space for that much surface area.
Pump selection matters more here too. A single pump-res combo rated for 400–600 L/h is marginal for a four-GPU loop. Consider a dual-pump configuration for redundancy and flow reliability.
7 GPU Liquid Cooled Computer Builds
Seven-GPU liquid cooled configurations are primarily a legacy mining rig concept, but they still appear in AI inference farms and professional render nodes where parallel GPU compute is needed at scale. Single-loop cooling at this scale isn’t viable. You need multiple independent loops, typically two or three, each handling two to three GPUs with dedicated radiators.
Open-air frames dominate here because enclosed liquid cooled computer towers simply don’t have the radiator mounting space for this much heat load. These aren’t builds you assemble casually. They require custom loop planning, dedicated power infrastructure, and serious thermal management knowledge. For completeness: they exist, they work, and they’re entirely practical in the right professional context. Just not your first build.
Extreme Cooling, Liquid Nitrogen Cooled Computers

What Is Liquid Nitrogen PC Cooling?
Liquid nitrogen (LN2) cools at -196°C (-321°F). Nothing available to consumers gets close to that. It’s used exclusively for world record overclocking benchmarks, not daily driving, not even extended sessions. You pour LN2 into a custom copper or brass pot mounted directly to the CPU or GPU die, and it evaporates continuously, pulling massive amounts of heat as it changes phase from liquid to gas.
Notable benchmarks have been set using LN2 on AMD’s Ryzen 7 7800X3D, pushing clock speeds well past 6.0GHz, territory completely inaccessible with conventional cooling. The risks are significant: condensation can form on the PCB and cause shorts, thermal shock from the extreme temperature differential can crack the CPU die, and you’re burning through LN2 fast, it requires continuous pouring throughout the session.
LN2 itself costs $0.15–$0.50 per liter, but you need proper dewars for storage, insulation for the pot and surrounding components, and appropriate safety gear. The technique is fascinating. Practical for daily use? Not remotely. It captures the “liquid nitrogen cooled computer” question well though, and the answer is: this is benchmarking theater, not a real-world cooling strategy.
For context on what this looks like in research settings: according to a University of Tokyo research team, covered by Tom’s Hardware, a two-phase cooling technique that exploits water’s liquid-to-gas phase change can dissipate approximately seven times more heat than standard single-phase liquid cooling. LN2 extreme overclocking is essentially a brute-force application of the same phase-change physics, just far more extreme and far less controlled.
How Much Does a Liquid Cooled Computer Cost?
Cost Breakdown by System Type
| System Type | Cooling Cost | Total Build Estimate |
|---|---|---|
| Pre-built AIO liquid cooled desktop | Included | $800–$2,500+ |
| DIY AIO liquid cooled gaming computer | $60–$250 | $700–$3,000+ |
| Custom loop (CPU only) | $300–$500 | $1,200–$4,000+ |
| Custom loop (CPU + GPU) | $600–$1,500 | $2,000–$6,000+ |
| Pre-built custom liquid cooled PC | Included | $2,500–$8,000+ |
| 4 GPU liquid cooled workstation | $1,500–$3,500 | $10,000–$30,000+ |
Pre-Built vs. DIY Liquid Cooled Computer
Pre-built liquid cooled systems from AVADirect, iBUYPOWER, and Corsair ONE offer a convenience premium and loop warranty coverage. You’re paying 15–30% more for the assembly and service guarantee. Reasonable if you want a turnkey system and don’t want to learn the process.
DIY gives you better value per dollar, full control over component selection, and the ability to upgrade individual loop components over time rather than replacing the whole unit. It also means you understand every part of your system, which matters when something eventually needs attention. For most builders who are willing to spend a few hours researching and assembling, DIY is the better long-term investment.
Is Liquid Cooling Hard to Maintain?
AIO Maintenance (Almost Zero)
AIOs are sealed units. There’s nothing to top off, no coolant to flush, no fittings to check. Install it and run it. After about three years, listen for changes in pump noise, a grinding or rattling sound indicates bearing wear, and replacement is coming. Most AIOs have a practical lifespan of four to six years before pump failure becomes likely.
Some higher-end AIOs (the Corsair iCUE Elite Capellix series, for example) include a refill port. Nice feature. Not universal. For most AIO users, maintenance means replacing the unit when the pump dies. That’s it.
Custom Loop Maintenance Schedule
Custom loops need more attention. Not a lot, but some.
- Every 6–12 months: Top off coolant level, visually inspect tubing for discoloration or cloudiness. Thirty minutes, maximum.
- Every 12–24 months: Full flush and coolant replacement. Drain the loop, flush with distilled water, refill with fresh coolant.
- Annually: Remove water blocks and re-apply thermal paste to the CPU and GPU dies. A quality thermal compound like Thermal Grizzly Kryonaut is a common choice here and performs exceptionally well for this use case.
Flushing process in brief: close the drain valve, disconnect the reservoir fill port, run distilled water through the loop, drain, repeat until the water runs clear, then refill with fresh coolant and bleed air bubbles by tilting the case. UV-reactive or clear coolant makes contamination easy to spot visually. Opaque coolants hide problems until they’re worse. Plan accordingly.
Common Problems and How to Avoid Them
Algae growth is the most common issue in poorly maintained loops. Use premixed coolant with biocide inhibitors or add biocide separately to distilled water. Galvanic corrosion happens when you mix copper and aluminum components, the two metals react in liquid and corrode each other. Don’t mix them. Ever. Air bubbles after filling are normal and dissipate within 24–48 hours as long as you tilt and rotate the case to help them move to the reservoir. Not a problem. And leaks? Always leak test for 24 hours with the system powered off before you turn the PC on. Paper towels under every fitting tell you immediately if anything is dripping. Skip this step and you risk liquid reaching your GPU or motherboard before you catch it. Don’t skip it.
Pros and Cons of Liquid Cooling, The Honest Verdict
Advantages
- Lower operating temperatures: up to 21°C GPU improvement and 12°C CPU improvement in real-world gaming tests
- Quieter operation: 4–6 dBA lower than comparable air cooling, audibly noticeable
- Superior overclocking headroom, more thermal margin means more sustained boost clocks
- Custom loops look exceptional, especially in tempered glass cases with hard line tubing and colored coolant
- Relocating heat away from the CPU zone improves airflow for RAM, M.2 SSDs, and VRMs
- Understanding safe GPU temperature ranges becomes less stressful when your GPU is running 20°C cooler than air cooling would allow
Disadvantages
- Higher upfront cost versus air cooling, a Noctua NH-D15 at ~$100 competes with a 240mm AIO thermally, and costs less
- Custom loops require planning, time, and skill. Expect to spend a full day on your first build.
- Leak risk is real, even if low. Low probability, high consequence. Always leak test.
- AIO pump failure eventually ends the unit’s life, air coolers don’t have that failure mode
- Overkill for low-to-mid TDP builds on stock settings
Not necessary for every build. But for high-TDP gaming and workstation rigs, the performance and noise benefits are real and measurable.
FAQ, Liquid Cooled Computer Questions Answered
Is a liquid cooled computer better than air cooled?
For high-TDP CPUs (125W+) and GPUs, yes. A liquid cooled computer delivers 10–21°C lower temperatures and 4–6 dBA less noise than comparable air setups. For budget builds under $700, though, a quality air cooler like the Noctua NH-D15 (~$100) often delivers comparable cooling to a 240mm AIO at lower cost and zero pump failure risk. The answer depends on your TDP, budget, and how much you care about noise.
Is it hard to maintain a liquid-cooled PC?
For an AIO, maintenance is nearly nonexistent, the unit is sealed and runs for three to five years with no user action required. For a custom loop, it’s moderate effort: top off coolant every six to twelve months, flush and replace coolant every one to two years, and re-paste CPU and GPU thermal interfaces annually. None of these tasks are technically difficult. They just require a scheduled habit.
Can water cooling damage my PC?
Leak risk exists, but it’s very low with quality components and correct installation. Modern AIOs have a failure rate under 1% in the first three years. Custom loops carry slightly higher risk, concentrated at the fittings and any connections you assembled yourself. Always perform a 24-hour power-off leak test before booting the system. Do that, and your risk exposure drops dramatically.
What is the best liquid cooled computer for gaming?
For a pre-built: AVADirect and Origin PC both offer reputable custom liquid cooled gaming computers with tested loop builds and warranty coverage. For DIY: a 360mm AIO handles high-TDP gaming CPUs cleanly, while pairing a CPU AIO with a GPU water block in a custom loop gives the best thermal performance per dollar for high-end gaming rigs running RTX 4080 or 4090 class hardware.
How long does a liquid cooled computer last?
AIOs average four to six years before pump failure becomes the limiting factor. Custom loops with proper maintenance last seven to ten years or more, the water blocks, tubing, and fittings are nearly indefinite if maintained, and the pump is the only component that typically needs replacement over the long run. Custom loops are the better long-term investment if you’re willing to maintain them.
The Short Version
Here’s how to match your situation to the right cooling solution. Casual gamer on a mid-range CPU: a 240mm AIO is plenty, costs $70–$100, and installs in under two hours. Enthusiast gamer with a 125W+ CPU and a beefy GPU: step up to a 360mm AIO or an entry-level custom loop. Content creator or overclocker running sustained all-core loads: a full custom loop covering CPU and GPU is where the real thermal and noise gains materialize. Multi-GPU workstation: multiple custom loops are the only viable path, full stop.
A liquid cooled computer isn’t magic, and it isn’t necessary for every build. But for the right system, it’s one of the most impactful upgrades you can make, both in measurable temperatures and in day-to-day noise levels. Pick the tier that matches your heat load, plan your case compatibility before buying, and leak test before you power on. Do those three things and you’ll have a system that runs cool, quiet, and clean for years.

Alex has been building and tweaking custom PCs for over 12 years. From budget builds to full custom water loops, he’s assembled more than 50 systems and helped hundreds of builders troubleshoot their rigs. When he’s not benchmarking the latest hardware, you’ll find him optimizing airflow setups or stress-testing overclocks.