Want to connect your Chromebook to the TV but having a hard time? Read through this article for the simple know-how.
Chromebook is a tablet or a laptop that runs on the Linux-based Chrome operating system. It was developed to rely on Google Chrome for web-based tasks. In 2017 and 2018, it was able to run Android and Linux apps, respectively. However, macOS and Windows OS don’t work on Chromebooks.
Chromebook is based on the ‘Internet first’ principle, so you can trust that the operating system is very fast. All the applications you want can be installed from the Google PlayStore. But if you’re a Microsoft Office user, you’ll have to use Office 365 instead.
Regarding storage, Chromebook usually has a limited capacity. Nevertheless, buyers receive 100GB of free online storage. You can also use other storage services on your Chromebook, such as Dropbox, if you need more.
Chromebook is protected against viruses by default and doesn’t require a separate virus software or application. Google protects files stored online, so viruses and other threats have little to no effect on the operating system and Chromebook itself.
Lastly, Chromebook is energy-efficient since it doesn’t need a heavy processor, video card, hard drive, and SSD. The operating system is light and requires little of the Chromebook itself, including the battery. A Chromebook can typically last you a whole working day, so it’s perfect for when you’re on the go.
Now that you’ve been introduced to what a Chromebook is and its features, let’s move on to how to connect it to a TV. Connecting a Chromebook to a TV is easy. Just follow the instructions we’ve listed below.
Contents
How to Connect Chromebook to a TV With a Wire
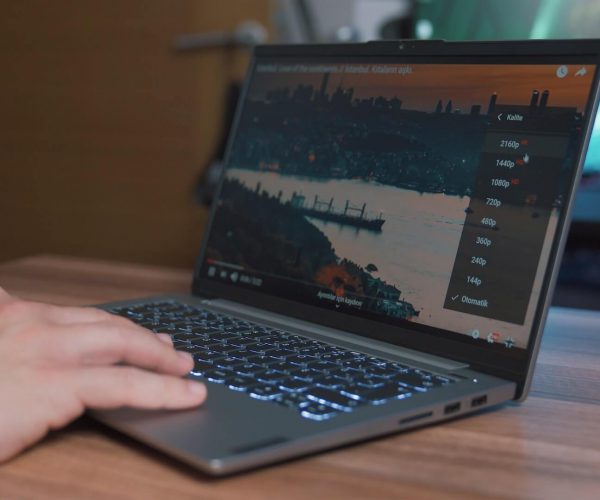
Before starting, make sure your Chromebook has an HDMI port. Check the available ports on your Chromebook or get the appropriate adaptor, such as USB-C to HDMI, USB-A to HDMI, or mini-HDMI to HDMI. Make sure that the TV you’re connecting your Chromebook to has an “IN” HDMI port.
Another thing, check that the “Mirror Internal Display” is ticked in your Chromebook settings so that your computer screen will be properly mirrored on your TV.
Here are the steps to connect your Chromebook to a TV using an HDMI cable:
- Insert one end of the HDMI cable into your Chromebook. If you’re using an adaptor, plug the HDMI cable into the adaptor first. Then, insert the adaptor into one of the USB-C ports on the side of your Chromebook.
- Plug the opposite end of the HDMI cable into your TV. Several televisions have multiple ports at the back, while others’ ports are found below the screen or on the side of the screen.
- Turn on or boot your Chromebook. A pop-up may appear confirming your Chromebook is connected.
- After turning on your Chromebook, see to it that you’ve changed your TV input to the right channel. For many TVs, the appropriate channel is labeled as “HDMI 3” or “HDMI 4,” but it’s still important to check if this is the right one in your case.
- After choosing the correct HDMI input, your Chromebook’s desktop background should now appear on the TV screen. The television will become an extension of your Chromebook.
- To ensure that everything in your Chromebook’s desktop is displayed on your TV screen, you’ll need to turn on the “Mirror Internal Imaging” feature. Select the clock in the bottom-right corner of the screen, then click on the Settings gear.
- From the Settings, navigate to the Device section, and click on Displays. Scroll down to the Arrangement section and check the Mirror Internal Display box. This will turn the white box into a blue checkmark.
- All the items on your Chromebook should now be mirrored on your television. When you open applications, play games, or surf the web, all of these will be seen on your TV. You can also open videos from YouTube and Netflix so that you can watch them with a larger screen.
Furthermore, you can also adjust the screen to better suit your needs, making items on the screen larger or smaller depending on your preference. You can do this via the display size. Through the Orientation setting, you can rotate the items or the screen itself as well. In order to move apps or windows from one screen to another, simply hit Search + Alt + M.
When you finally have everything settled on your TV screen, then you can sit back and enjoy!
Now that we’ve discussed the steps for connecting your Chromebook to a TV using a wire, specifically an HDMI cable, let’s move on to connecting your Chromebook to a TV wirelessly.
How to Connect Chromebook to a TV Wirelessly
Chromebooks have a built-in feature that supports Chromecast. Before you connect, make sure you have either a Google TV, a Fire TV, or an Android TV. Chromecast is only compatible with those devices.
Follow the instructions below to establish a wireless connection between your Chromebook and television:
- Select the clock on the Chromebook shelf, then click on Cast.
- Choose your Chromecast device.
- Choose your desktop in the pop-up window, then click on Share.
- To stop connecting your Chromebook to the television, select the clock again, then click Stop in the prompted window that opens at the top of the system tray menu.
You can also connect your Chromebook to your Chromecast-supported device or television using another way. Just follow these steps:
- Open the Chrome browser in your Chromebook and click on the three-dot menu at the upper-right corner.
- From the list, select the Cast option.
- After selecting the Cast option, a small pop-up window with the available Chromecast devices will open. Click on your TV to connect your Chromebook to it.
- You can also choose the Sources dropdown menu if you want to Cast Tab, Cast Desktop, or Cast File before choosing the television to share on.
- The next time you use Chromecast, click on the three-dot menu on the upper-right corner of the screen. When the window pops up, click on Cast Now, then right-click on the Chromecast logo at the top. Select the Always Show Icon. The Chromecast icon will stay at the top of the screen for easier access.
How to Connect Chromebook to FireTV
FireTV also supports Chromecast, but connecting it to your Chromebook is not as simple as Google TV or Android TV.
- To start mirroring, open the Fire TV Settings on the home page.
- In the Settings, choose Display and Sounds.
- Click Enable Display Mirroring. This will open a waiting page to start screen mirroring from available devices. Don’t leave or close the page to avoid beginning the procedure again.
- On your Chromebook, click on the three-dot menu and choose Cast. Choose the TV you’d like to connect.
- Afterward, you’ll see your Chromebook screen on your FireTV. The only difference between Android TV and Fire TV is that you cannot do a screen mirror on the Fire TV without first enabling the display mirroring option.
Conclusion
A Chromebook runs on Linux-based ChromeOS and can be connected to a television using a wire, specifically an HDMI. It can be connected wirelessly also.
For a wired connection, make sure to check the available ports on your Chromebook and get a suitable adaptor for it, such as USB-C to HDMI, mini-HDMI to HDMI, etc. For a wireless connection, check if Chromecast supports the device you want to connect your Chromebook to. Examples are Android TV, Google TV, and FireTV.